
Grow Eggplants Faster? Absolutely! Imagine biting into a perfectly ripe, homegrown eggplant weeks ahead of schedule. Sounds like a dream, right? Well, it doesn’t have to be! For centuries, gardeners have sought ways to coax the most out of their crops, and eggplants, with their glossy skin and delicious flavor, are no exception.
Eggplants, originating from Southeast Asia, have a rich history, gracing tables and gardens for over 1500 years. But let’s be honest, sometimes they can be a bit… slow. We’ve all been there, patiently waiting for those beautiful purple fruits to appear, only to be met with frustration. That’s where these DIY tricks come in.
In this article, I’m going to share some of my favorite, tried-and-true methods to help you grow eggplants faster and enjoy a bountiful harvest. Whether you’re a seasoned gardener or just starting out, these simple hacks will give your eggplants the boost they need to thrive. Get ready to unlock the secrets to earlier, bigger, and more delicious eggplants!
Grow Eggplants Faster: My Secret DIY Hack!
Hey fellow gardeners! I’m so excited to share my tried-and-true method for getting those gorgeous, glossy eggplants to mature faster. I’ve been tweaking this process for years, and I’ve finally landed on a system that consistently yields earlier and more abundant harvests. Get ready to impress your neighbors with your eggplant prowess!
Understanding Eggplant Growth
Before we dive into the DIY magic, let’s quickly touch on what eggplants need to thrive. They’re heat-loving plants, so warmth is key. They also need plenty of sunlight, well-drained soil, and consistent watering. Understanding these basics will help you appreciate why my hack works so well.
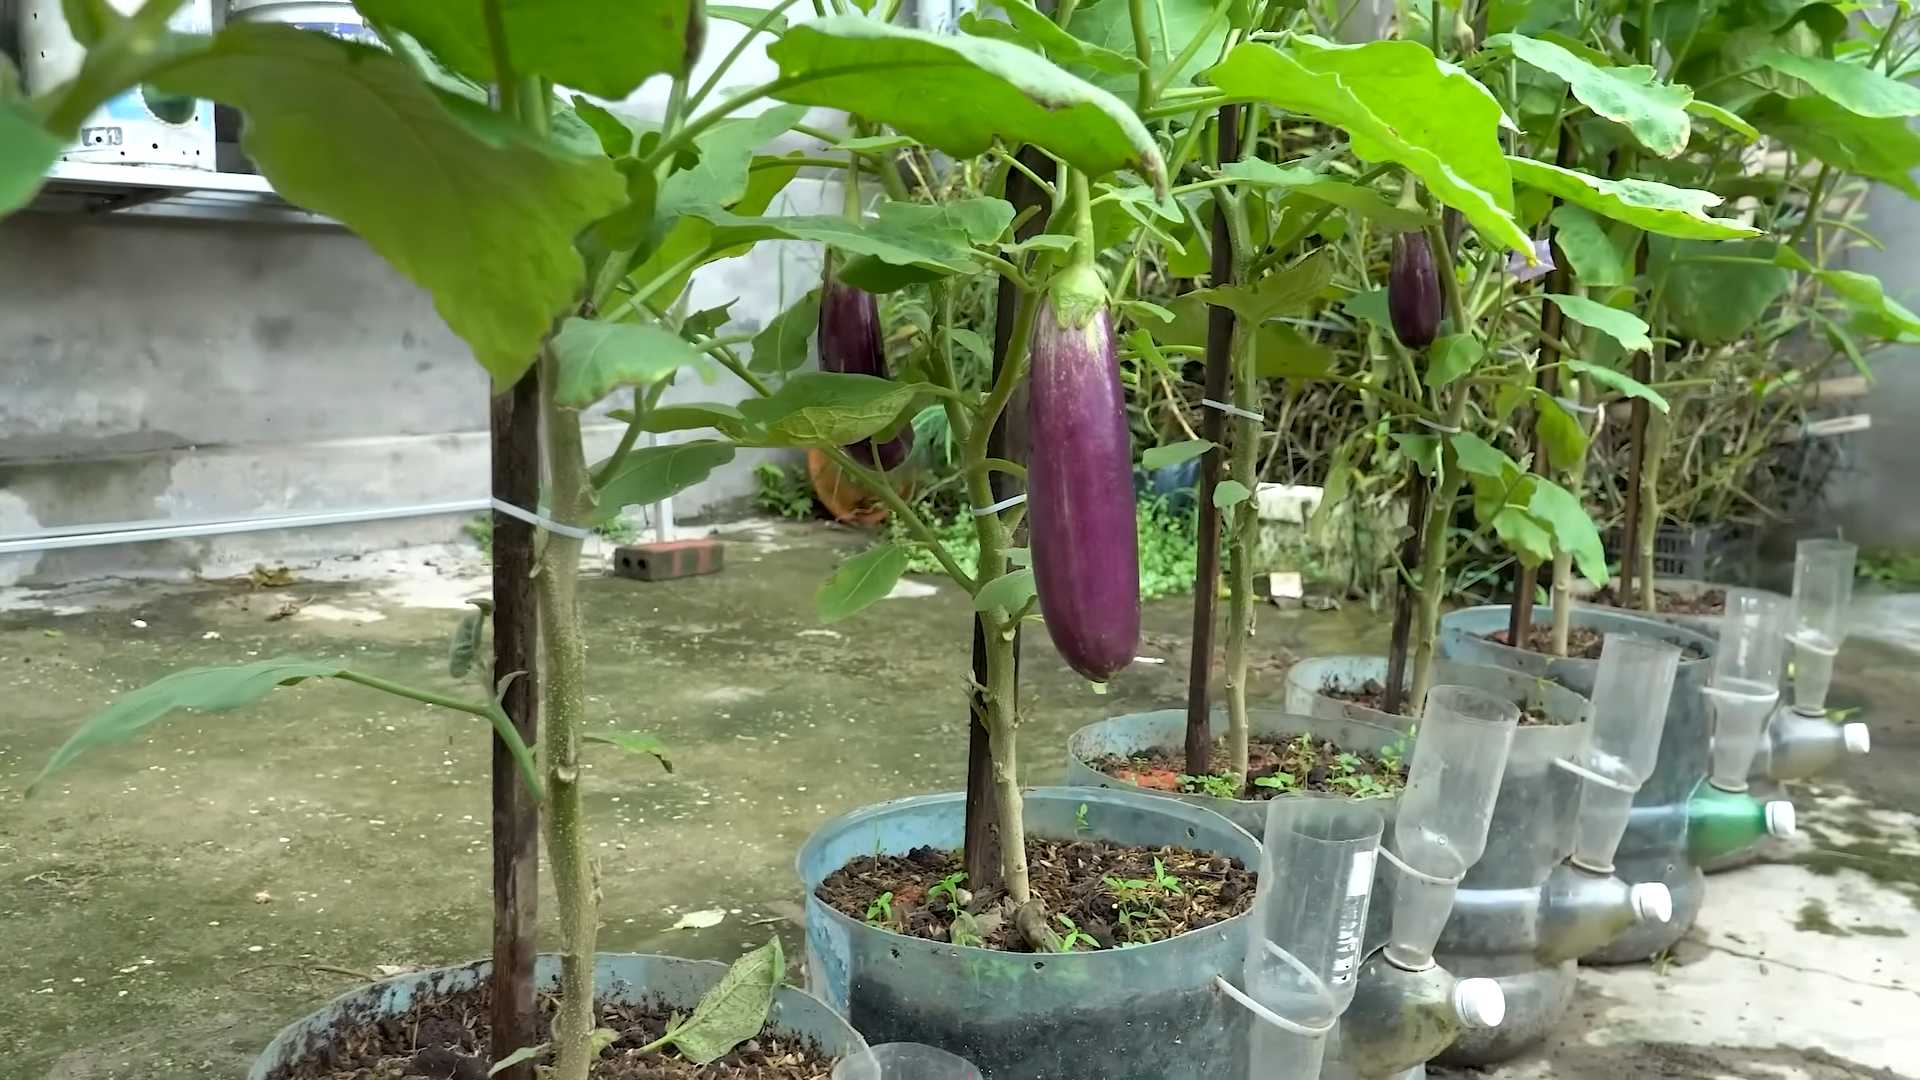
The DIY Hack: My Eggplant Acceleration System
This system focuses on three main areas: pre-sprouting, creating a mini-greenhouse effect, and strategic pruning. Each step plays a crucial role in speeding up the eggplant’s growth cycle.
* Pre-Sprouting Seeds: Giving your seeds a head start indoors.
* Mini-Greenhouse Magic: Creating a warm and humid environment for young plants.
* Strategic Pruning: Directing the plant’s energy towards fruit production.
* Soil Enrichment: Providing the necessary nutrients for rapid growth.
* Consistent Watering and Feeding: Maintaining optimal moisture and nutrient levels.
Phase 1: Pre-Sprouting for a Head Start
This is where the magic begins! Pre-sprouting gives your eggplant seeds a significant advantage, allowing them to germinate faster and establish themselves quickly once planted.
1. Gather Your Supplies: You’ll need eggplant seeds (obviously!), a small container (like a yogurt cup or seed tray), paper towels, and a spray bottle filled with water.
2. Moisten the Paper Towels: Lightly dampen two paper towels with the spray bottle. They should be moist but not soaking wet.
3. Place Seeds on Paper Towel: Lay one paper towel flat in your container. Sprinkle your eggplant seeds evenly across the towel, leaving a little space between each seed.
4. Cover with Second Paper Towel: Gently place the second moist paper towel on top of the seeds, creating a sandwich.
5. Seal and Store: Cover the container with a lid or plastic wrap to create a humid environment. Place the container in a warm location, ideally around 75-85°F (24-29°C). A heat mat works wonders, but a warm spot on top of your refrigerator can also do the trick.
6. Monitor and Moisten: Check the paper towels daily to ensure they remain moist. If they start to dry out, lightly spray them with water.
7. Wait for Sprouts: Within a few days (usually 3-7), you should see tiny white sprouts emerging from the seeds. Once the sprouts are about ¼ inch long, they’re ready to be planted.
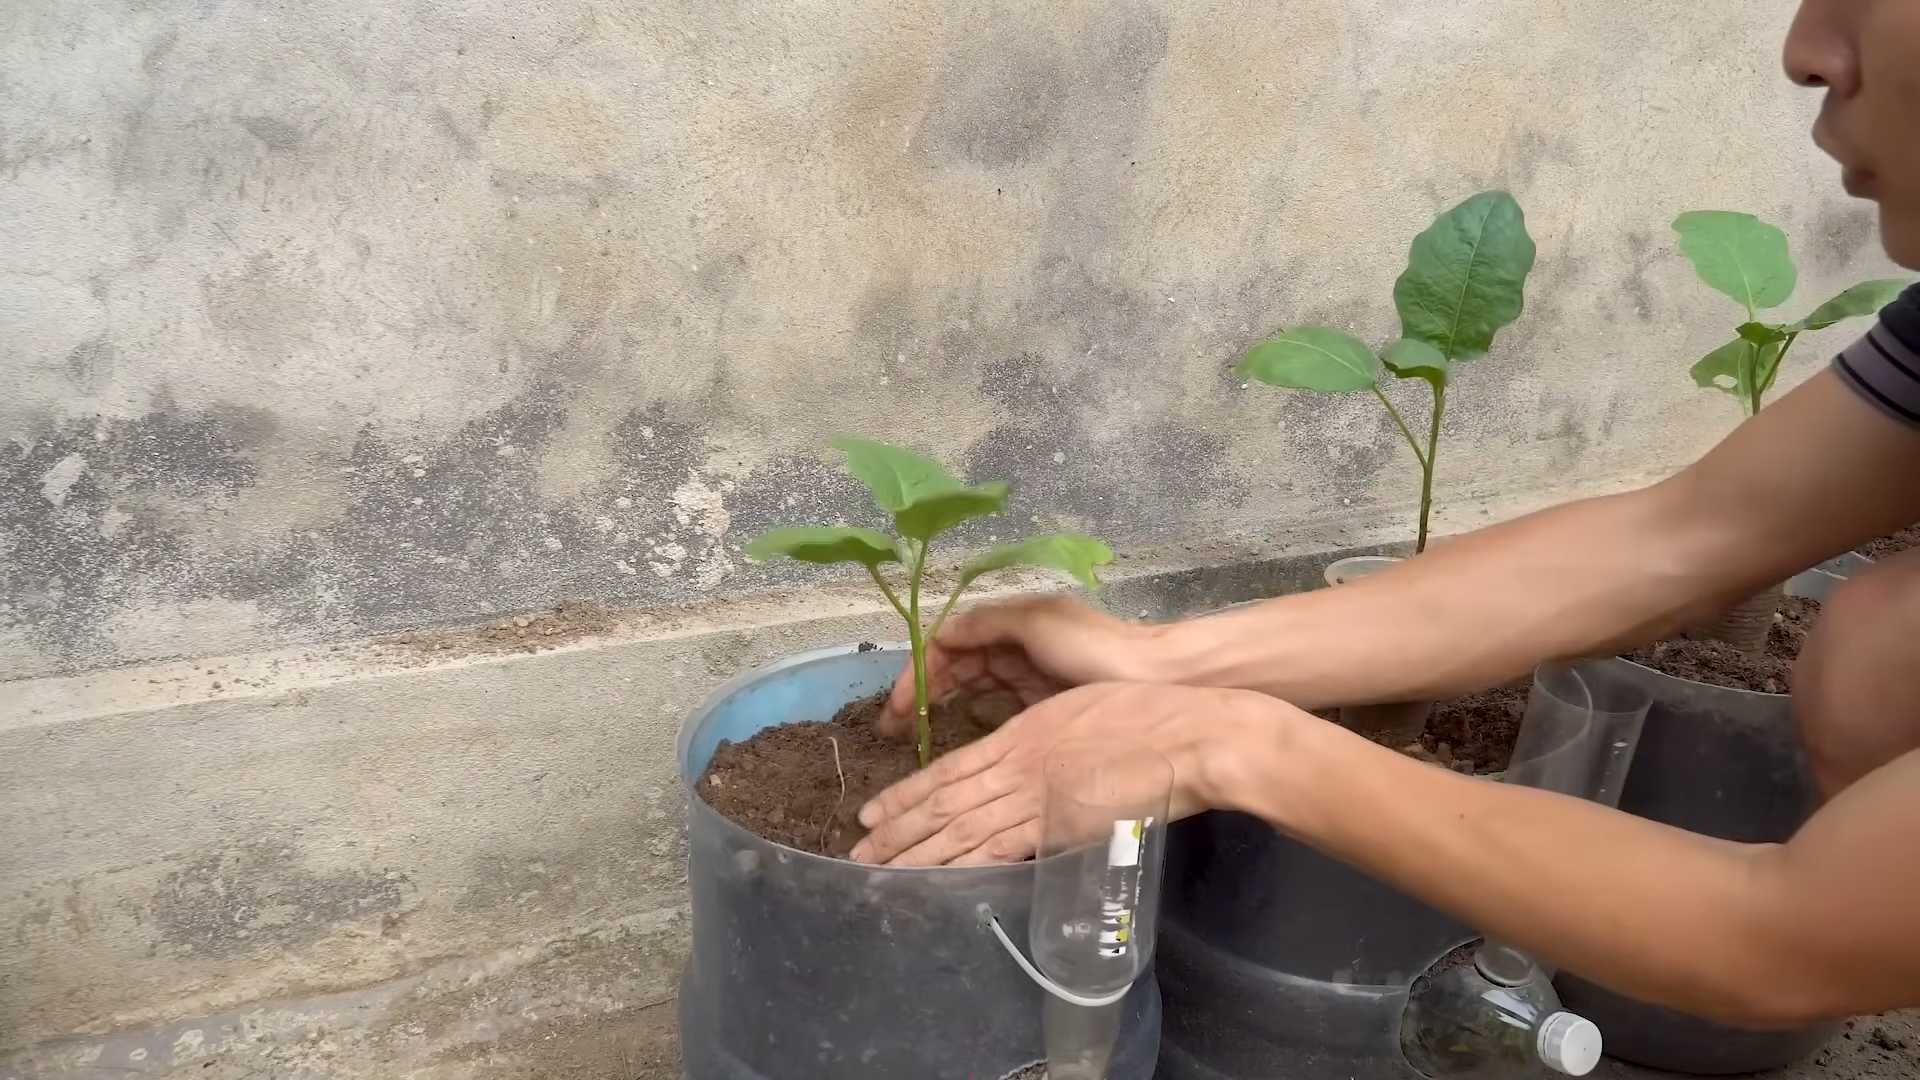
Phase 2: Creating a Mini-Greenhouse for Young Plants
Eggplants love warmth, and this mini-greenhouse technique provides the perfect environment for them to thrive in their early stages.
1. Prepare Your Seedling Pots: Fill small pots (about 3-4 inches in diameter) with a high-quality seed-starting mix. I like to use a mix that’s light and airy, allowing for good drainage.
2. Carefully Plant the Sprouts: Using tweezers or your fingers, gently transfer the sprouted seeds to the seedling pots. Make a small hole in the soil, place the sprout in the hole (sprout facing down), and gently cover it with soil. Be very careful not to damage the delicate sprouts.
3. Water Gently: Water the seedlings gently to avoid disturbing them. Use a spray bottle or a watering can with a rose attachment.
4. Create the Mini-Greenhouse: There are a few ways to do this. You can use clear plastic cups placed over each pot, a plastic bag covering the entire tray, or even a repurposed clear plastic container. The goal is to trap heat and humidity around the seedlings.
5. Provide Light: Place the mini-greenhouse in a sunny location or under grow lights. Eggplants need at least 6-8 hours of sunlight per day.
6. Ventilate Regularly: To prevent fungal diseases, it’s important to ventilate the mini-greenhouse daily. Simply remove the cover for a few hours each day to allow fresh air to circulate.
7. Harden Off: Before transplanting your seedlings outdoors, you’ll need to “harden them off.” This means gradually exposing them to outdoor conditions over a period of 7-10 days. Start by placing them in a sheltered location for a few hours each day, gradually increasing the amount of time they spend outdoors.
Phase 3: Strategic Pruning for Maximum Fruit Production
Pruning might seem counterintuitive, but it’s a game-changer for eggplant production. By removing unnecessary foliage, you’re directing the plant’s energy towards fruit development.
1. Wait Until Established: Don’t start pruning until your eggplant plants are well-established and have reached a height of about 12-18 inches.
2. Remove Suckers: Suckers are small shoots that grow from the base of the plant or from the joints between the main stem and the branches. Remove these suckers as they appear, as they will only divert energy from fruit production.
3. Remove Lower Leaves: As the plant grows, remove the lower leaves that are touching the ground or are yellowing. These leaves are more susceptible to disease and can hinder airflow.
4. Pinch Back Growing Tips: Once the plant has set a few fruits, you can pinch back the growing tips of the branches. This will encourage the plant to focus its energy on ripening the existing fruits rather than producing new growth.
5. Monitor and Adjust: Keep an eye on your eggplant plants and adjust your pruning as needed. The goal is to create an open and airy plant that receives plenty of sunlight and has good airflow.
Phase 4: Soil Enrichment for a Nutrient Boost
Eggplants are heavy feeders, meaning they require a lot of nutrients to produce abundant fruit. Amending your soil with organic matter and providing regular feedings will give your plants the boost they need.
1. Amend the Soil: Before planting, amend your soil with plenty of compost, well-rotted manure, or other organic matter. This will improve drainage, aeration, and nutrient content.
2. Choose the Right Fertilizer: Use a fertilizer that’s specifically formulated for vegetables or fruiting plants. Look for a fertilizer with a balanced NPK ratio (nitrogen, phosphorus, and potassium).
3. Fertilize Regularly: Follow the instructions on your fertilizer label for application rates and frequency. I like to fertilize my eggplants every 2-3 weeks during the growing season.
4. Consider Side-Dressing: Side-dressing is a technique where you apply fertilizer along the sides of the plant, rather than directly on top of the soil. This allows the nutrients to be absorbed more slowly and evenly.
5. Monitor Soil pH: Eggplants prefer a slightly acidic soil pH of around 6.0-6.8. Test your soil pH regularly and adjust as needed.
Phase 5: Consistent Watering and Feeding for Optimal Growth
Consistent watering and feeding are essential for healthy eggplant growth and fruit production.
1. Water Deeply and Regularly: Water your eggplants deeply and regularly, especially during hot, dry weather. Aim to keep the soil consistently moist but not waterlogged.
2. Water in the Morning: Water your eggplants in the morning to allow the foliage to dry before nightfall. This will help prevent fungal diseases.
3. Use a Soaker Hose or Drip Irrigation: Soaker hoses and drip irrigation systems are great for delivering water directly to the roots of the plants, minimizing water waste and reducing the risk of foliar diseases.
4. Mulch Around the Plants: Mulching around your eggplant plants will help retain moisture in the soil, suppress weeds, and regulate soil temperature.
5. Monitor for Pests and Diseases: Keep an eye out for common eggplant pests and diseases, such as aphids, flea beetles, and fungal infections. Take action promptly to prevent problems from escalating.
Extra Tips for Supercharged Eggplant Growth
* Choose the Right Variety: Some eggplant varieties are naturally faster-maturing than others. Do some research and choose varieties that are well-suited to your climate and growing conditions.
* Provide Support: As your eggplant plants grow, they may need support to prevent the branches from breaking under the weight of the fruit. Use stakes, cages, or trellises to provide support.
* Hand-Pollinate: If you’re growing eggplants indoors or in a greenhouse, you may need to hand-pollinate the flowers to ensure fruit set. Use a small paintbrush to transfer pollen from one flower to another.
* Harvest Regularly: Harvest your eggplants regularly
Conclusion
So, there you have it! This simple yet effective DIY trick to grow eggplants faster is a game-changer for any gardener, whether you’re a seasoned pro or just starting out. We’ve walked you through the process, highlighting the science behind why it works and providing practical tips to ensure your success.
But why is this method a must-try? Because it addresses the core needs of young eggplant plants: warmth, protection, and a nutrient boost. By creating a mini-greenhouse environment, you’re giving your seedlings a head start, shielding them from harsh weather and pests, and accelerating their growth. This translates to earlier harvests, more abundant yields, and ultimately, more delicious eggplants on your table.
Beyond the basic method, there’s plenty of room for experimentation and personalization. Consider these variations to tailor the technique to your specific needs and environment:
* Material Variations: While plastic bottles are readily available and effective, you can also use other clear or translucent materials like repurposed plastic containers or even glass cloches (exercise caution with glass, especially in direct sunlight). The key is to allow sunlight to penetrate while providing insulation.
* Soil Amendments: Enhance the nutrient boost by incorporating other organic amendments into the soil around your seedlings. Compost, well-rotted manure, or even a sprinkle of bone meal can provide additional nutrients to fuel growth.
* Pest Control: While the bottle provides some protection, consider adding extra layers of defense against pests. A sprinkle of diatomaceous earth around the base of the plant can deter slugs and snails, while netting can protect against flying insects.
* Watering Techniques: Be mindful of watering. Overwatering can lead to fungal diseases, especially in the enclosed environment. Water at the base of the plant, avoiding wetting the foliage, and ensure the soil is well-draining. Consider using a soaker hose or drip irrigation system for more efficient watering.
* Climate Considerations: In extremely hot climates, be sure to vent the bottles during the hottest part of the day to prevent overheating. You can simply remove the cap or cut small holes in the sides of the bottle to allow for airflow. In cooler climates, you may want to leave the bottles on for longer periods to maximize the warming effect.
This DIY trick isn’t just about growing eggplants faster; it’s about empowering you to take control of your garden and achieve remarkable results. It’s about understanding the needs of your plants and providing them with the optimal conditions to thrive. It’s about connecting with nature and experiencing the satisfaction of harvesting your own homegrown produce.
We wholeheartedly encourage you to try this method and witness the difference it can make in your eggplant garden. Don’t be afraid to experiment, adapt, and personalize the technique to suit your specific needs and environment.
And most importantly, we want to hear about your experience! Share your photos, tips, and success stories in the comments below. Let’s create a community of gardeners who are passionate about growing eggplants faster and more efficiently. Your insights can help others learn and improve their gardening practices. So, get out there, get your hands dirty, and start growing! We can’t wait to see your amazing eggplant harvests. Remember, even small changes can lead to big results in the garden. Happy gardening!
Frequently Asked Questions (FAQ)
What type of plastic bottle is best to use for this DIY trick?
The best type of plastic bottle to use is a clear, transparent bottle that allows sunlight to penetrate easily. Avoid using colored or opaque bottles, as they will block sunlight and hinder plant growth. A standard 2-liter soda bottle or a larger water bottle works well. Ensure the bottle is clean and free of any residue before using it. You can also use other clear plastic containers, but bottles are generally easier to work with and provide good protection.
How long should I leave the plastic bottle on the eggplant seedling?
The duration you leave the bottle on depends on your climate and the weather conditions. Generally, you should leave it on for the first few weeks after transplanting, until the seedling has established itself and the weather has warmed up. In cooler climates, you may need to leave it on for a longer period, while in warmer climates, you may need to remove it sooner to prevent overheating. Monitor the plant closely and remove the bottle when it starts to outgrow it or when the weather is consistently warm. A good indicator is when the plant’s leaves start touching the sides of the bottle.
Will the plastic bottle overheat the plant on sunny days?
Yes, overheating can be a concern, especially in hot climates. To prevent this, you can vent the bottle by removing the cap or cutting small holes in the sides to allow for airflow. You can also shade the bottle during the hottest part of the day using shade cloth or other materials. Monitor the plant closely for signs of heat stress, such as wilting or scorched leaves. If you notice these signs, remove the bottle immediately.
How often should I water the eggplant seedling while it’s covered with the bottle?
Watering frequency depends on the soil type, climate, and weather conditions. Generally, you should water the seedling when the top inch of soil feels dry to the touch. Avoid overwatering, as this can lead to fungal diseases. Water at the base of the plant, avoiding wetting the foliage. You may need to water more frequently in hot, dry weather and less frequently in cool, wet weather. Check the soil moisture regularly to ensure the plant is getting enough water.
Can I use this trick for other plants besides eggplants?
Yes, this trick can be used for other plants that benefit from warmth and protection, such as tomatoes, peppers, and cucumbers. The principle is the same: creating a mini-greenhouse environment to accelerate growth and protect against pests and harsh weather. However, you may need to adjust the size of the bottle or container depending on the size of the plant.
What if I don’t have plastic bottles? Are there any alternatives?
Yes, there are several alternatives to plastic bottles. You can use other clear or translucent plastic containers, such as repurposed food containers or yogurt cups. You can also use glass cloches, but exercise caution as glass can heat up quickly in direct sunlight. Another option is to create a mini-greenhouse using plastic sheeting or row covers. The key is to provide a barrier that allows sunlight to penetrate while providing insulation and protection.
How does this trick help to grow eggplants faster?
This trick helps to grow eggplants faster by creating a warmer microclimate around the plant. Eggplants thrive in warm temperatures, and the plastic bottle acts as a mini-greenhouse, trapping heat and protecting the plant from cold winds and frost. This allows the plant to grow more quickly and establish itself sooner. Additionally, the bottle provides some protection against pests, which can also hinder growth.
What kind of soil is best for eggplants?
Eggplants prefer well-draining, fertile soil that is rich in organic matter. A slightly acidic to neutral pH (6.0-7.0) is ideal. Amend the soil with compost, well-rotted manure, or other organic materials to improve drainage and fertility. Avoid heavy clay soils, as they can become waterlogged and hinder root growth.
How do I know when my eggplants are ready to harvest?
Eggplants are typically ready to harvest when they are firm, glossy, and have reached their mature size and color. The skin should be smooth and unblemished. Gently press the skin with your thumb; if it leaves a slight indentation, the eggplant is ripe. If the skin is hard and resistant to pressure, it is likely overripe. Use a sharp knife or pruning shears to cut the eggplant from the plant, leaving a short stem attached.
What are some common problems that can affect eggplants, and how can I prevent them?
Some common problems that can affect eggplants include pests such as aphids, flea beetles, and spider mites, as well as diseases such as blossom-end rot and fungal infections. To prevent these problems, practice good gardening hygiene, such as removing weeds and debris from around the plants. Use organic pest control methods, such as insecticidal soap or neem oil, to control pests. Ensure the soil is well-draining to prevent fungal infections. Provide adequate calcium to prevent blossom-end rot. Rotate crops regularly to prevent soilborne diseases.

Leave a Comment