
Grow Celery Hanging Garden: Imagine stepping onto your balcony or into your kitchen and plucking fresh, crisp celery right from a hanging garden! Sounds like a dream, right? Well, it doesn’t have to be! This DIY guide will unlock the secrets to creating your very own vertical celery oasis, even if you have limited space.
For centuries, humans have cultivated celery, not just for its refreshing crunch, but also for its medicinal properties. From ancient Egypt, where it was used in wreaths and celebrations, to its modern-day culinary prominence, celery has a rich and fascinating history. But who says you need a sprawling farm to enjoy this versatile vegetable?
In today’s world, where space is a premium and access to fresh produce isn’t always guaranteed, learning how to grow celery hanging garden is more relevant than ever. This DIY project is perfect for apartment dwellers, urban gardeners, or anyone looking to add a touch of green to their lives. Plus, it’s a fantastic way to reduce your carbon footprint and enjoy the satisfaction of growing your own food. I’m excited to share these simple, step-by-step instructions that will have you harvesting your own celery in no time!
DIY Hängegarten für Staudensellerie: Dein eigenes Gemüsebeet von der Decke
Hallo liebe Gartenfreunde! Habt ihr schon mal darüber nachgedacht, euren eigenen Staudensellerie anzubauen, aber keinen Platz im Garten? Oder wollt ihr einfach mal etwas Neues ausprobieren? Dann habe ich genau das Richtige für euch: einen hängenden Staudensellerie-Garten! Das ist nicht nur platzsparend, sondern auch ein echter Hingucker. Und das Beste daran: Es ist super einfach und macht richtig Spaß!
Was du brauchst:
* Staudensellerie-Stiele mit Wurzelansatz: Am besten kaufst du im Supermarkt Bio-Sellerie, da dieser oft noch Wurzeln hat. Achte darauf, dass die Stiele fest und knackig sind.
* Plastikflaschen (PET): Am besten 1,5-Liter-Flaschen. Je nachdem, wie viele Selleriepflanzen du haben möchtest, brauchst du entsprechend viele Flaschen.
* Schere oder Cuttermesser: Zum Zuschneiden der Flaschen.
* Bohrmaschine oder Nagel und Hammer: Um Löcher für die Aufhängung zu bohren.
* Kordel, Draht oder stabile Schnur: Zum Aufhängen der Flaschen.
* Blumenerde: Am besten eine hochwertige, nährstoffreiche Erde.
* Wasser: Zum Gießen, natürlich!
* Optional: Tongranulat oder Kies für die Drainage.
* Optional: Dünger für Gemüse (flüssig oder Langzeitdünger).
Schritt-für-Schritt-Anleitung:
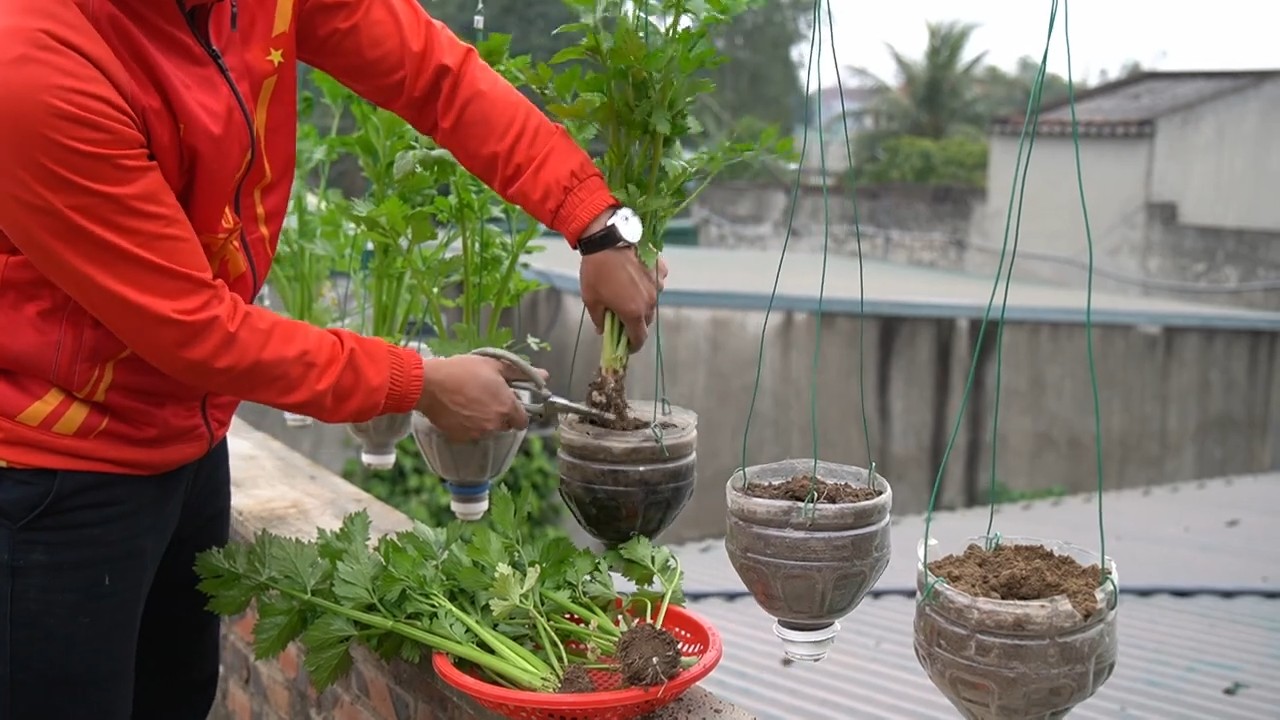
1. Vorbereitung der Sellerie-Stiele
1. Sellerie essen (oder anderweitig verwenden): Das Wichtigste zuerst: Den Sellerie essen! Oder für andere Rezepte verwenden. Wir brauchen nur den unteren Teil mit dem Wurzelansatz.
2. Stiele vorbereiten: Schneide die Stiele etwa 5-7 cm oberhalb des Wurzelansatzes ab. Achte darauf, die Wurzeln nicht zu beschädigen.
3. In Wasser stellen: Stelle die Sellerie-Stiele in ein Glas mit Wasser, sodass der Wurzelansatz bedeckt ist. Wechsle das Wasser täglich. Nach ein paar Tagen sollten sich neue Wurzeln bilden. Das ist ein gutes Zeichen!
2. Vorbereitung der Plastikflaschen
1. Flaschen reinigen: Spüle die Plastikflaschen gründlich mit warmem Wasser und Spülmittel aus. Entferne alle Etiketten.
2. Flaschen zuschneiden: Schneide die Flaschen etwa 1/3 von oben ab. Der untere Teil wird unser Pflanzgefäß.
3. Drainagelöcher bohren: Bohre oder steche mit einem Nagel und Hammer mehrere kleine Löcher in den Boden der Flasche. Das ist wichtig, damit überschüssiges Wasser ablaufen kann und die Wurzeln nicht faulen.
4. Aufhängungslöcher bohren: Bohre oder steche zwei Löcher gegenüberliegend am oberen Rand der Flasche. Diese Löcher dienen zur Befestigung der Aufhängung.
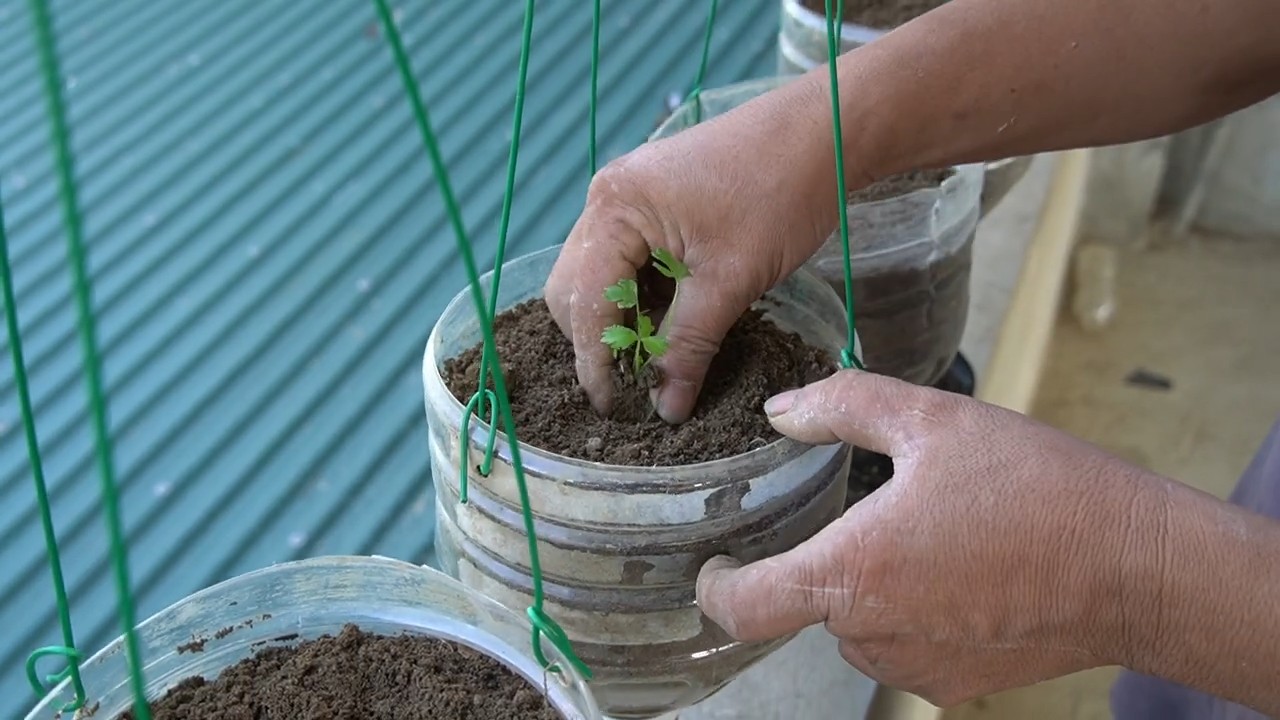
3. Bepflanzung der Flaschen
1. Drainage einfüllen (optional): Fülle eine Schicht Tongranulat oder Kies (ca. 2-3 cm) in den Boden der Flasche. Das sorgt für eine gute Drainage und verhindert Staunässe.
2. Erde einfüllen: Fülle die Flasche mit Blumenerde. Lasse etwa 2-3 cm Platz bis zum Rand.
3. Sellerie einpflanzen: Setze den Sellerie-Stiel vorsichtig in die Erde. Achte darauf, dass die Wurzeln gut bedeckt sind.
4. Angießen: Gieße die Sellerie-Pflanze vorsichtig an. Die Erde sollte gut durchfeuchtet sein, aber nicht nass.
4. Aufhängen des Hängegartens
1. Aufhängung befestigen: Fädle die Kordel, den Draht oder die Schnur durch die Aufhängungslöcher. Achte darauf, dass die Aufhängung stabil ist und das Gewicht der bepflanzten Flasche tragen kann.
2. Hängegarten aufhängen: Suche dir einen geeigneten Platz zum Aufhängen deines Hängegartens. Der Platz sollte hell sein, aber nicht in der prallen Sonne liegen. Ein halbschattiger Platz ist ideal. Du kannst den Hängegarten an einem Haken an der Decke, an einem Balkongeländer oder an einem stabilen Ast aufhängen.
5. Pflege des Hängegartens
1. Gießen: Gieße den Sellerie regelmäßig. Die Erde sollte immer leicht feucht sein, aber nicht nass. An heißen Tagen musst du möglicherweise täglich gießen.
2. Düngen (optional): Dünge den Sellerie alle paar Wochen mit einem flüssigen Gemüsedünger oder verwende Langzeitdünger. Das sorgt für ein gesundes Wachstum und eine reiche Ernte.
3. Schädlinge kontrollieren: Kontrolliere den Sellerie regelmäßig auf Schädlinge wie Blattläuse oder Schnecken. Bei Bedarf kannst du biologische Schädlingsbekämpfungsmittel einsetzen.
4. Ernten: Du kannst die äußeren Stiele des Selleries ernten, sobald sie groß genug sind. Schneide sie einfach mit einem Messer ab. Der Sellerie wird weiterwachsen und neue Stiele bilden.
Zusätzliche Tipps und Tricks:
* Verschiedene Sorten: Du kannst verschiedene Selleriesorten in deinem Hängegarten anbauen. Es gibt grüne, gelbe und sogar rote Sorten.
* Kombination mit anderen Kräutern: Du kannst den Sellerie auch mit anderen Kräutern wie Petersilie, Schnittlauch oder Basilikum kombinieren. Das sieht nicht nur schön aus, sondern sorgt auch für eine aromatische Vielfalt.
* Upcycling: Verwende alte T-Shirts oder Stoffreste, um die Flaschen zu dekorieren. Das macht deinen Hängegarten noch individueller.
* Vertikaler Garten: Wenn du mehrere Flaschen untereinander aufhängst, kannst du einen vertikalen Garten gestalten. Das spart noch mehr Platz und sieht besonders beeindruckend aus.
* Standort: Achte darauf, dass der Standort windgeschützt ist, da starke Winde die Pflanzen beschädigen können.
* Überwinterung: In kälteren Regionen solltest du den Hängegarten im Winter an einen frostfreien Ort bringen.
Warum Staudensellerie selbst anbauen?
* Frischer geht’s nicht: Selbst angebauter Staudensellerie schmeckt einfach besser als gekaufter. Er ist aromatischer und knackiger.
* Bio-Qualität: Du weißt genau, was in deinem Sellerie steckt. Du kannst auf Pestizide und chemische Düngemittel verzichten.
* Nachhaltigkeit: Du sparst Verpackungsmüll und reduzierst den Transportweg.
* Entspannung: Gärtnern ist eine tolle Möglichkeit, um zu entspannen und Stress abzubauen.
* Lerneffekt: Du lernst etwas über Pflanzen und den Anbau von Gemüse.
Ich hoffe, diese Anleitung hat dir gefallen und du bist motiviert, deinen eigenen Hängegarten für Staudensellerie anzulegen. Es ist wirklich einfach und macht Spaß! Und das Ergebnis ist nicht nur lecker, sondern auch ein echter Hingucker. Viel Erfolg beim Gärtnern!
Conclusion
So, there you have it! Transforming a humble celery stalk into a thriving hanging garden is not just a fun project; it’s a testament to the magic of resourcefulness and the sheer resilience of nature. We’ve walked you through the simple steps, highlighting the ease and accessibility of this DIY trick. But why should you actually try it?
First and foremost, it’s incredibly rewarding. Witnessing new growth emerge from something you would normally discard is a deeply satisfying experience. It’s a tangible connection to the natural world, right in your own home. Secondly, it’s a fantastic way to reduce food waste. Instead of tossing those celery ends, you’re giving them a second life, contributing to a more sustainable lifestyle. And thirdly, it’s a conversation starter! Imagine the delight and curiosity of your guests when they see your unique, verdant hanging celery garden.
But the beauty of this project lies in its adaptability. Feel free to experiment with different types of containers. Instead of a plastic bottle, try using a repurposed glass jar or even a woven basket lined with plastic. Consider adding other herbs or small plants to your hanging garden alongside the celery. Mint, parsley, or even small succulents would make excellent companions, creating a diverse and visually appealing display. You could also experiment with different growing mediums. While we recommended water, you could also try using a well-draining potting mix for a more traditional approach. Just be sure to keep the soil consistently moist.
Don’t be afraid to get creative with the presentation. Paint your containers, add decorative stones, or even string fairy lights around your hanging garden for a touch of whimsy. The possibilities are endless!
This **grow celery hanging garden** project is more than just a fun activity; it’s an opportunity to learn, connect with nature, and add a touch of green to your living space. It’s a simple, sustainable, and surprisingly beautiful way to bring the outdoors in.
We wholeheartedly encourage you to give this DIY trick a try. It’s easy, affordable, and incredibly rewarding. And most importantly, we want to hear about your experiences! Share your photos and stories with us in the comments below. Let us know what worked for you, what challenges you faced, and any creative variations you came up with. Together, we can inspire others to embrace the joy of growing their own food and creating beautiful, sustainable spaces. So, grab a celery stalk, gather your supplies, and get ready to embark on a green adventure! We can’t wait to see what you create!
Frequently Asked Questions
What kind of celery works best for this project?
Any type of celery you buy from the grocery store will work for regrowing. Look for celery stalks that have a healthy base with the roots still attached. The fresher the celery, the better the chances of successful regrowth. Organic celery is a great option, but conventional celery will work just as well. The key is to choose a stalk that looks vibrant and hasn’t started to wilt or brown.
How long does it take for the celery to start regrowing?
You should start to see new growth within a few days to a week. The speed of regrowth depends on factors like temperature, sunlight, and the overall health of the celery base. Keep the water fresh and the celery in a bright location, and you should see noticeable progress within a week. Be patient, as some celery stalks may take a little longer to show signs of life.
How much sunlight does the celery need?
Celery thrives in bright, indirect sunlight. Avoid placing your hanging garden in direct sunlight, especially during the hottest part of the day, as this can scorch the leaves. A spot near a window that receives morning sun or filtered sunlight throughout the day is ideal. If you don’t have access to a sunny window, you can supplement with a grow light.
How often should I change the water?
It’s important to change the water every one to two days to prevent bacteria growth and ensure the celery has access to fresh nutrients. Stagnant water can lead to rot and hinder growth. When you change the water, gently rinse the celery base to remove any debris or buildup.
Can I eventually plant the celery in soil?
Yes, absolutely! Once the celery has developed a good root system and new growth, you can transplant it into a pot filled with well-draining potting mix. Choose a pot that is large enough to accommodate the growing roots. Water the celery regularly and provide it with plenty of sunlight. You can also plant it directly in your garden if the weather is suitable.
What kind of soil is best for planting celery?
Celery prefers rich, well-draining soil with a slightly acidic pH (around 6.0 to 6.8). Amend your garden soil with compost or other organic matter to improve drainage and fertility. You can also use a high-quality potting mix specifically formulated for vegetables.
How do I harvest the celery once it’s grown?
You can harvest the celery stalks as needed once they reach a desirable size. Simply cut the outer stalks near the base of the plant, leaving the inner stalks to continue growing. This allows you to harvest celery gradually over time.
Can I grow celery from seed instead of regrowing it from a stalk?
Yes, you can definitely grow celery from seed. However, it’s a more time-consuming process than regrowing it from a stalk. Celery seeds are small and require a long germination period. You’ll need to start the seeds indoors several weeks before the last frost. Regrowing from a stalk is a quicker and easier way to get started.
What if my celery starts to rot?
If you notice any signs of rot, such as brown or mushy spots, remove the affected areas immediately. Make sure you are changing the water frequently and that the celery is not sitting in stagnant water. If the rot persists, it may be necessary to discard the celery and start with a fresh stalk.
Can I use fertilizer to help the celery grow?
While not essential, you can use a diluted liquid fertilizer to provide the celery with extra nutrients. Choose a fertilizer that is specifically formulated for vegetables and follow the instructions on the label. Be careful not to over-fertilize, as this can damage the plant. A balanced fertilizer applied sparingly every few weeks can help promote healthy growth.
Is this method only for celery, or can I use it for other vegetables?
This regrowing method works best for celery, but you can also try it with other vegetables like lettuce, romaine lettuce, bok choy, and green onions. The success rate may vary depending on the vegetable, but it’s worth experimenting to see what you can regrow from kitchen scraps.
My celery is growing, but the stalks are thin and weak. What can I do?
Thin and weak stalks can be a sign of insufficient sunlight or nutrients. Make sure your celery is getting enough bright, indirect sunlight. You can also try adding a diluted liquid fertilizer to the water to provide it with extra nutrients. Ensure that the water is being changed regularly to prevent nutrient depletion.
Can I grow celery indoors year-round using this method?
Yes, you can grow celery indoors year-round using this method, provided you provide it with adequate light and care. Supplement with a grow light if necessary, especially during the winter months when natural sunlight is limited. Maintain a consistent watering schedule and fertilize as needed to ensure healthy growth.

Leave a Comment