
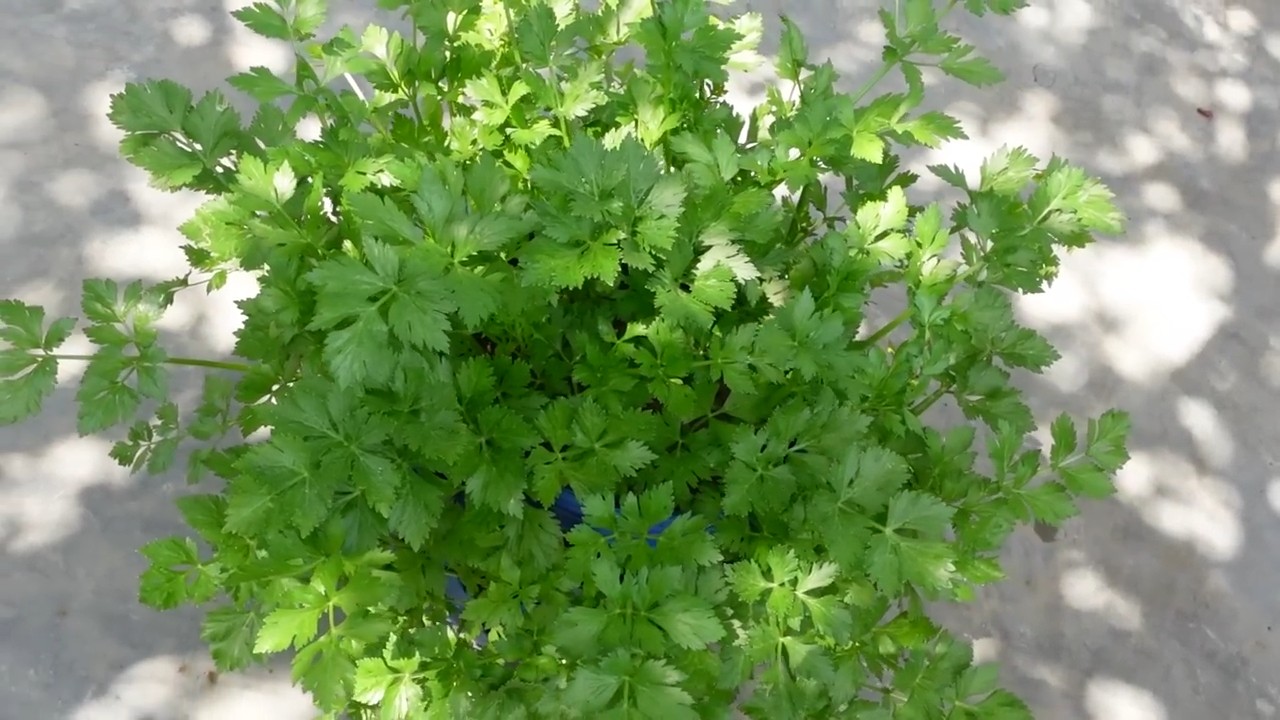
Grow Celery at Home – and ditch those limp, flavorless stalks from the grocery store! Have you ever dreamed of snipping fresh, crisp celery straight from your backyard for your salads, soups, or even just a healthy snack? Well, dream no more! This DIY guide will unlock the secrets to cultivating your own thriving celery patch, even if you think you have a black thumb.
Celery, with its satisfying crunch and subtle flavor, has a rich history. Originating in the Mediterranean, it was initially valued for its medicinal properties before becoming a culinary staple. Ancient Greeks and Romans used it to crown victors in athletic games, symbolizing triumph and celebration. Now, you can celebrate your own small victory by learning how to grow celery at home!
But why bother with the effort? Because store-bought celery often lacks the vibrant taste and crispness of homegrown varieties. Plus, growing your own allows you to control the pesticides and chemicals used, ensuring a healthier and more flavorful harvest. In this article, I’ll share simple, effective tricks and hacks that will empower you to cultivate a bountiful celery crop, regardless of your gardening experience. Get ready to enjoy the freshest, most delicious celery you’ve ever tasted!
Zieh dein eigenes Staudensellerie zu Hause: Ein umfassender DIY-Leitfaden
Hey Leute! Habt ihr euch jemals gefragt, wie ihr frischen, knackigen Staudensellerie direkt in eurer Küche oder eurem Garten anbauen könnt? Ich zeige euch, wie es geht! Es ist einfacher als ihr denkt und super befriedigend, wenn ihr eure eigenen, selbstgezogenen Selleriestangen ernten könnt. Lasst uns loslegen!
Was du brauchst: Die Zutaten für deinen Sellerie-Erfolg
Bevor wir anfangen, hier eine Liste der Dinge, die du benötigst:
* Ein Staudensellerie-Bund aus dem Supermarkt: Wähle einen Bund mit einem gesunden, festen Strunk.
* Ein Messer: Am besten ein scharfes Küchenmesser.
* Ein Glas oder eine Schale: Groß genug, um den Selleriestrunk aufzunehmen.
* Wasser: Leitungswasser ist völlig ausreichend.
* Blumenerde: Hochwertige Blumenerde für den Anbau im Topf.
* Ein Topf: Mit Drainagelöchern, um Staunässe zu vermeiden.
* (Optional) Flüssigdünger: Für zusätzliches Wachstum.
* (Optional) Gartenschere: Zum Trimmen der Wurzeln.
Phase 1: Den Sellerie-Neustart – Die Regrowing-Magie
Hier beginnt der Spaß! Wir werden den Selleriestrunk dazu bringen, neue Wurzeln zu schlagen.
1. Sellerie vorbereiten: Schneide den Selleriestrunk etwa 5-7 cm vom unteren Ende ab. Du solltest die Stangen oben zum Essen verwenden können, während der Strunk die Basis für unser neues Selleriepflänzchen bildet. Achte darauf, dass du den Strunk nicht zu kurz abschneidest, da er die Basis für das Wachstum bildet.
2. In Wasser stellen: Platziere den Selleriestrunk mit der Schnittfläche nach unten in das Glas oder die Schale. Fülle das Glas mit Wasser, sodass der untere Teil des Strunks bedeckt ist, aber nicht die gesamte Oberseite.
3. Sonniger Standort: Stelle das Glas an einen hellen, sonnigen Ort, z.B. auf eine Fensterbank. Sellerie liebt Licht!
4. Wasserwechsel: Wechsle das Wasser alle 1-2 Tage, um es frisch und sauber zu halten. Das verhindert, dass sich Bakterien bilden und fördert das Wurzelwachstum.
5. Geduld ist eine Tugend: Nach etwa 5-7 Tagen solltest du sehen, wie kleine Wurzeln aus dem unteren Teil des Strunks sprießen. Auch in der Mitte des Strunks sollten kleine grüne Blätter erscheinen. Das ist ein Zeichen dafür, dass dein Sellerie bereit ist für den nächsten Schritt!
Phase 2: Umtopfen in Erde – Der Umzug ins neue Zuhause
Sobald dein Sellerie Wurzeln geschlagen hat, ist es Zeit, ihn in Erde umzutopfen.
1. Topf vorbereiten: Fülle den Topf mit Blumenerde. Lass etwa 2-3 cm Platz bis zum Rand.
2. Sellerie einpflanzen: Grabe ein kleines Loch in die Mitte der Erde, das groß genug ist, um den Selleriestrunk aufzunehmen. Setze den Strunk vorsichtig in das Loch und bedecke ihn mit Erde, sodass die Wurzeln gut bedeckt sind, aber die neuen Blätter frei liegen.
3. Angießen: Gieße den Sellerie nach dem Einpflanzen gründlich an. Die Erde sollte feucht, aber nicht durchnässt sein.
4. Standortwahl: Stelle den Topf an einen sonnigen Ort. Sellerie braucht mindestens 6 Stunden Sonnenlicht pro Tag.
Phase 3: Pflege und Wachstum – Der Weg zum knackigen Sellerie
Jetzt beginnt die eigentliche Arbeit, aber keine Sorge, es ist nicht schwer!
1. Bewässerung: Halte die Erde feucht, aber vermeide Staunässe. Gieße den Sellerie regelmäßig, besonders an heißen Tagen. Überprüfe die Erde, indem du deinen Finger etwa 2 cm tief in die Erde steckst. Wenn sie sich trocken anfühlt, ist es Zeit zum Gießen.
2. Düngen (Optional): Wenn du möchtest, kannst du deinen Sellerie alle paar Wochen mit einem Flüssigdünger düngen. Befolge die Anweisungen auf der Düngerpackung. Das fördert das Wachstum und sorgt für kräftige, gesunde Pflanzen.
3. Schädlinge im Auge behalten: Achte auf Schädlinge wie Blattläuse oder Schnecken. Wenn du Schädlinge entdeckst, kannst du sie mit natürlichen Methoden bekämpfen, z.B. mit einem Wasserstrahl oder mit Neemöl.
4. Geduld, Geduld: Es dauert einige Zeit, bis dein Sellerie ausgewachsen ist. Hab Geduld und pflege ihn gut.
Phase 4: Erntezeit – Die Belohnung für deine Mühe
Nach einigen Monaten (ca. 3-4 Monate, je nach Bedingungen) ist dein Sellerie bereit für die Ernte!
1. Erntezeitpunkt: Du kannst einzelne Stangen ernten, sobald sie die gewünschte Größe erreicht haben. Oder du erntest den gesamten Sellerie, indem du ihn knapp über dem Boden abschneidest.
2. Erntemethode: Verwende ein scharfes Messer, um die Stangen oder den gesamten Sellerie abzuschneiden.
3. Genießen: Wasche die Selleriestangen gründlich und genieße sie roh in Salaten, als Dip-Gemüse oder gekocht in Suppen und Eintöpfen.
Zusätzliche Tipps und Tricks für den Sellerie-Anbau
* Sellerie bleichen (Optional): Um hellere, mildere Selleriestangen zu erhalten, kannst du sie bleichen. Das bedeutet, dass du die Stangen etwa 2-3 Wochen vor der Ernte mit Erde oder Pappe abdeckst, sodass nur die oberen Blätter Licht bekommen.
* Sellerie im Freien anbauen: Wenn du einen Garten hast, kannst du deinen Sellerie auch im Freien anbauen. Wähle einen sonnigen Standort mit gut durchlässigem Boden.
* Sellerie vermehren: Du kannst deinen Sellerie auch durch Samen vermehren, aber das ist etwas aufwendiger.
* Sellerie ist ein Starkzehrer: Das bedeutet, er benötigt viele Nährstoffe. Achte darauf, ihn regelmäßig zu düngen.
* Sellerie liebt Feuchtigkeit: Sorge für eine ausreichende Bewässerung, besonders an heißen Tagen.
* Sellerie ist kälteempfindlich: Schütze ihn vor Frost.
Häufige Probleme und Lösungen
* Gelbe Blätter: Können ein Zeichen für Überwässerung oder Nährstoffmangel sein. Reduziere die Bewässerung und dünge den Sellerie.
* Schädlinge: Bekämpfe Schädlinge mit natürlichen Methoden.
* Langsames Wachstum: Kann an zu wenig Licht, Nährstoffmangel oder falscher Bewässerung liegen. Überprüfe die Bedingungen und passe sie gegebenenfalls an.
Fazit: Dein eigener Sellerie-Garten – Ein Erfolgserlebnis
Ich hoffe, dieser Leitfaden hat dir geholfen, deinen eigenen Staudensellerie zu Hause anzubauen. Es ist ein lohnendes Projekt, das dir frischen, gesunden Sellerie direkt aus deinem eigenen Anbau liefert. Viel Spaß beim Gärtnern! Und denk daran: Geduld und Pflege sind der Schlüssel zum Erfolg. Lasst es mich wissen, wenn ihr Fragen habt oder eure eigenen Erfahrungen teilen möchtet!
Conclusion
So, there you have it! Growing celery at home from kitchen scraps isn’t just a fun experiment; it’s a sustainable way to reduce food waste, enjoy fresh, flavorful celery, and connect with the natural world, even if you only have a windowsill. This simple DIY trick transforms what would otherwise be discarded into a vibrant, living plant, offering a continuous supply of this versatile vegetable.
Why is this a must-try? Because it’s incredibly easy, cost-effective, and rewarding. You don’t need a green thumb or extensive gardening knowledge to succeed. With just a celery base, some water, and a little patience, you can witness the magic of regeneration firsthand. Imagine the satisfaction of harvesting celery stalks that you nurtured from a humble kitchen leftover!
Beyond the basic method, there are plenty of ways to customize your celery-growing experience. For example, you can experiment with different types of celery, such as Pascal or Utah varieties, to see which thrives best in your environment. Once your celery has established roots, consider transplanting it into a larger pot or even directly into your garden for more robust growth. You can also try companion planting, pairing your celery with herbs like parsley or basil, which are known to deter pests and enhance flavor.
Don’t be afraid to get creative with your celery cultivation. Some gardeners have even successfully grown celery hydroponically, using nutrient-rich water solutions instead of soil. The possibilities are endless!
But the real beauty of this DIY project lies in its simplicity and accessibility. It’s a fantastic way to introduce children to the wonders of gardening and teach them about the importance of sustainability. It’s also a great conversation starter and a unique way to impress your friends and family with your resourcefulness.
We wholeheartedly encourage you to give this DIY trick a try. It’s a small effort with a potentially big payoff. Not only will you have fresh celery at your fingertips, but you’ll also be contributing to a more sustainable lifestyle.
Once you’ve embarked on your celery-growing adventure, we’d love to hear about your experience! Share your photos, tips, and stories in the comments below. Let’s create a community of home gardeners who are passionate about reducing waste and growing their own food. Your insights could inspire others to take the plunge and discover the joys of growing celery at home. So, grab a celery base, get your hands dirty, and let the growing begin! This is a fantastic way to get fresh celery without having to go to the store.
Frequently Asked Questions (FAQ)
How long does it take to grow celery from a base?
The initial regrowth phase, where you see new leaves sprouting from the celery base in water, typically takes about 1-2 weeks. After transplanting to soil, it can take several months (around 3-4) for the celery to mature and produce full-sized stalks ready for harvest. The exact timeframe depends on factors like sunlight, temperature, and soil quality. Don’t expect a full head of celery overnight; patience is key!
What kind of water should I use?
Tap water is generally fine, but letting it sit out for a few hours to allow chlorine to dissipate is beneficial. Filtered water is also a good option. Avoid using distilled water, as it lacks the minerals that plants need. Change the water every 1-2 days to prevent bacterial growth and keep the celery base healthy.
How much sunlight does the celery base need?
During the initial regrowth phase in water, indirect sunlight is best. Avoid placing the celery base in direct sunlight, as this can scorch the new leaves. Once transplanted to soil, celery needs at least 6 hours of sunlight per day to thrive. A sunny windowsill or a spot in your garden that receives ample sunlight is ideal.
What kind of soil is best for growing celery?
Celery prefers rich, well-draining soil that is high in organic matter. A mixture of potting soil, compost, and perlite is a good option. The soil should be able to retain moisture but not become waterlogged. Before planting, amend the soil with compost or aged manure to provide essential nutrients.
How often should I water the celery after transplanting?
Celery needs consistent moisture to grow properly. Water deeply whenever the top inch of soil feels dry to the touch. Avoid letting the soil dry out completely, as this can stress the plant and affect its growth. During hot weather, you may need to water more frequently. Mulching around the base of the plant can help retain moisture and suppress weeds.
What are some common problems when growing celery, and how can I fix them?
Some common problems include yellowing leaves, stunted growth, and pest infestations. Yellowing leaves can be caused by overwatering, underwatering, or nutrient deficiencies. Ensure proper watering practices and fertilize with a balanced fertilizer if needed. Stunted growth can be due to insufficient sunlight or poor soil quality. Provide adequate sunlight and amend the soil with compost. Pests like aphids and celery leaf miners can be controlled with insecticidal soap or neem oil. Regularly inspect your plants for signs of pests and take action promptly.
Can I grow celery indoors year-round?
Yes, you can grow celery indoors year-round, provided you have adequate sunlight or artificial lighting. A sunny windowsill or a grow light can provide the necessary light for healthy growth. Maintain a consistent temperature and humidity level, and water regularly. Indoor-grown celery may not reach the same size as outdoor-grown celery, but you can still enjoy fresh, flavorful stalks.
How do I harvest celery?
You can harvest individual stalks as needed or harvest the entire plant at once. To harvest individual stalks, simply cut them off at the base of the plant with a sharp knife. To harvest the entire plant, cut it off at the soil level. Celery is best harvested when the stalks are firm and crisp.
Can I regrow celery multiple times from the same base?
While you can regrow celery from the base multiple times, the subsequent harvests may be smaller and less vigorous than the first. The plant’s energy reserves will eventually deplete, and it will no longer produce new growth. However, you can still get several harvests from a single base, making it a worthwhile endeavor.
Is growing celery at home organic?
Growing celery at home can be organic if you use organic soil, fertilizers, and pest control methods. Avoid using synthetic pesticides and herbicides, and opt for natural alternatives like insecticidal soap, neem oil, and companion planting. Growing your own celery allows you to control the inputs and ensure that it is free from harmful chemicals.

Leave a Comment