
Grow Butternut Squash like a pro, even if you’re short on space! Ever dreamed of harvesting your own delicious butternut squash but thought you needed acres of land? Think again! This DIY guide unveils a clever and surprisingly effective method: growing butternut squash in tires on your terrace.
For centuries, resourceful gardeners have found innovative ways to cultivate food in limited spaces. From ancient rooftop gardens in Babylon to the modern-day victory gardens of World War II, the spirit of growing your own food, no matter the constraints, has always thrived. Now, we’re taking that ingenuity to the next level with a modern twist.
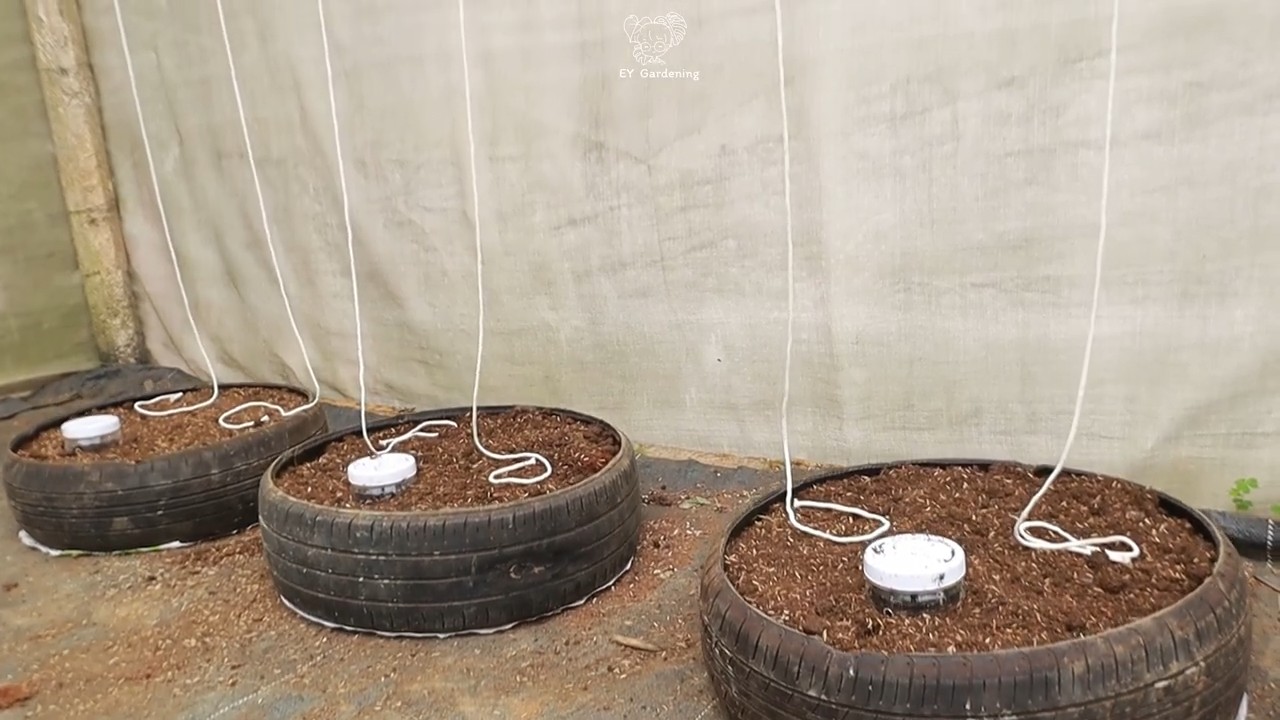
Why tires, you ask? Well, they’re readily available, often free, and provide excellent drainage and insulation for your squash. Plus, they add a unique, rustic charm to your terrace garden. Imagine the satisfaction of harvesting plump, homegrown butternut squash right outside your door! This DIY trick is perfect for apartment dwellers, balcony gardeners, or anyone looking to maximize their small outdoor space. I’m excited to show you how easy it is to grow butternut squash using this simple, eco-friendly technique. Let’s get started!
Growing Butternut Squash in Tires on Your Terrace: A DIY Guide
Hey there, fellow gardening enthusiasts! I’m so excited to share my experience with growing butternut squash in tires right on my terrace. It’s a fantastic way to maximize space, recycle old tires, and enjoy fresh, homegrown squash. Trust me, it’s easier than you think!
Why Tires?
Before we dive in, you might be wondering, “Why tires?” Well, there are several reasons why using tires as planters is a great idea:
* Space Saving: Tires create a contained space, perfect for smaller terraces or balconies.
* Soil Warming: The black rubber absorbs heat, warming the soil and promoting faster growth, especially beneficial in cooler climates.
* Recycling: It’s an eco-friendly way to repurpose old tires, keeping them out of landfills.
* Pest Control: Elevated tires can help deter some ground-dwelling pests.
* Aesthetic Appeal: With a little paint and creativity, tires can become unique and eye-catching planters.
Materials You’ll Need
Okay, let’s gather our supplies. Here’s what you’ll need to get started:
* Old Tires: The number depends on how many squash plants you want to grow. I recommend at least one tire per plant.
* Butternut Squash Seeds or Seedlings: Choose your favorite variety!
* Potting Soil: A high-quality potting mix is essential for healthy growth.
* Compost: Compost adds nutrients and improves soil drainage.
* Gardening Gloves: To protect your hands.
* Shovel or Trowel: For moving soil and planting.
* Drill (Optional): For drainage holes.
* Paint (Optional): To decorate the tires.
* Landscape Fabric (Optional): To line the tires and prevent soil erosion.
* Watering Can or Hose: For watering your plants.
* Fertilizer (Optional): A balanced fertilizer can boost growth.
* Mulch (Optional): To retain moisture and suppress weeds.
Preparing the Tires
This step is crucial for creating a healthy growing environment.
1. Cleaning the Tires: First, thoroughly clean the tires with soap and water to remove any dirt, grime, or residue. Rinse them well and let them dry completely.
2. Drilling Drainage Holes (Optional but Recommended): If your tires don’t have drainage holes, use a drill to create several holes in the bottom. This will prevent waterlogging, which can harm your squash plants. I usually drill about 4-5 holes, spaced evenly around the tire.
3. Painting the Tires (Optional): This is where you can get creative! Paint the tires with bright colors or fun designs to add a personal touch to your terrace garden. Use exterior paint that is safe for plants. Let the paint dry completely before moving on to the next step. I love using vibrant blues and greens to make my tires pop!
4. Lining the Tires (Optional): To prevent soil from seeping out and to help retain moisture, you can line the tires with landscape fabric. Cut a piece of fabric slightly larger than the tire’s inner diameter and secure it to the inside of the tire with staples or glue.
Planting Your Butternut Squash
Now for the fun part – planting!
1. Filling the Tires with Soil: Fill the tires with a mixture of potting soil and compost. I usually use a ratio of 2:1 (two parts potting soil to one part compost). Leave a few inches of space at the top of the tire.
2. Planting Seeds or Seedlings:
* From Seeds: Sow the seeds directly into the soil, following the instructions on the seed packet. Usually, you’ll need to plant them about an inch deep and space them a few inches apart. Water gently after planting. I usually plant 2-3 seeds per tire and thin them out later if needed.
* From Seedlings: Gently remove the seedlings from their containers and plant them in the center of the tire. Make sure the top of the root ball is level with the soil surface. Water thoroughly after planting.
3. Watering: Water the soil thoroughly after planting. Keep the soil consistently moist, but not waterlogged.
4. Mulching (Optional): Add a layer of mulch around the base of the plants to help retain moisture, suppress weeds, and regulate soil temperature. Straw, wood chips, or shredded leaves work well.
Caring for Your Butternut Squash Plants
Consistent care is key to a bountiful harvest.
1. Watering: Butternut squash needs consistent moisture, especially during hot weather. Water deeply whenever the top inch of soil feels dry. Avoid watering the leaves, as this can promote fungal diseases. I prefer to water in the morning to allow the leaves to dry before nightfall.
2. Fertilizing: Feed your plants with a balanced fertilizer every few weeks to promote healthy growth and fruit production. Follow the instructions on the fertilizer package. I like to use a liquid fertilizer diluted in water.
3. Sunlight: Butternut squash needs at least 6-8 hours of sunlight per day. Make sure your tires are placed in a sunny spot on your terrace.
4. Pollination: Butternut squash plants have separate male and female flowers. Bees and other pollinators are essential for pollination. If you’re not seeing many bees, you may need to hand-pollinate the flowers. To do this, use a small paintbrush to transfer pollen from the male flowers to the female flowers. You can identify female flowers by the small fruit (the squash) at the base of the flower.
5. Pruning: Pruning can help improve air circulation and promote fruit production. Remove any yellowing or diseased leaves. You can also prune the vines to encourage the plant to focus its energy on producing fruit.
6. Pest and Disease Control: Keep an eye out for pests and diseases. Common pests include squash bugs, squash vine borers, and aphids. Common diseases include powdery mildew and squash mosaic virus. Treat any problems promptly with organic pest control methods or fungicides. I’ve found that neem oil is effective against many common pests.
7. Support: As the vines grow, they may need support. You can use stakes, trellises, or even let them trail over the edge of the tires.
Harvesting Your Butternut Squash
The moment we’ve all been waiting for!
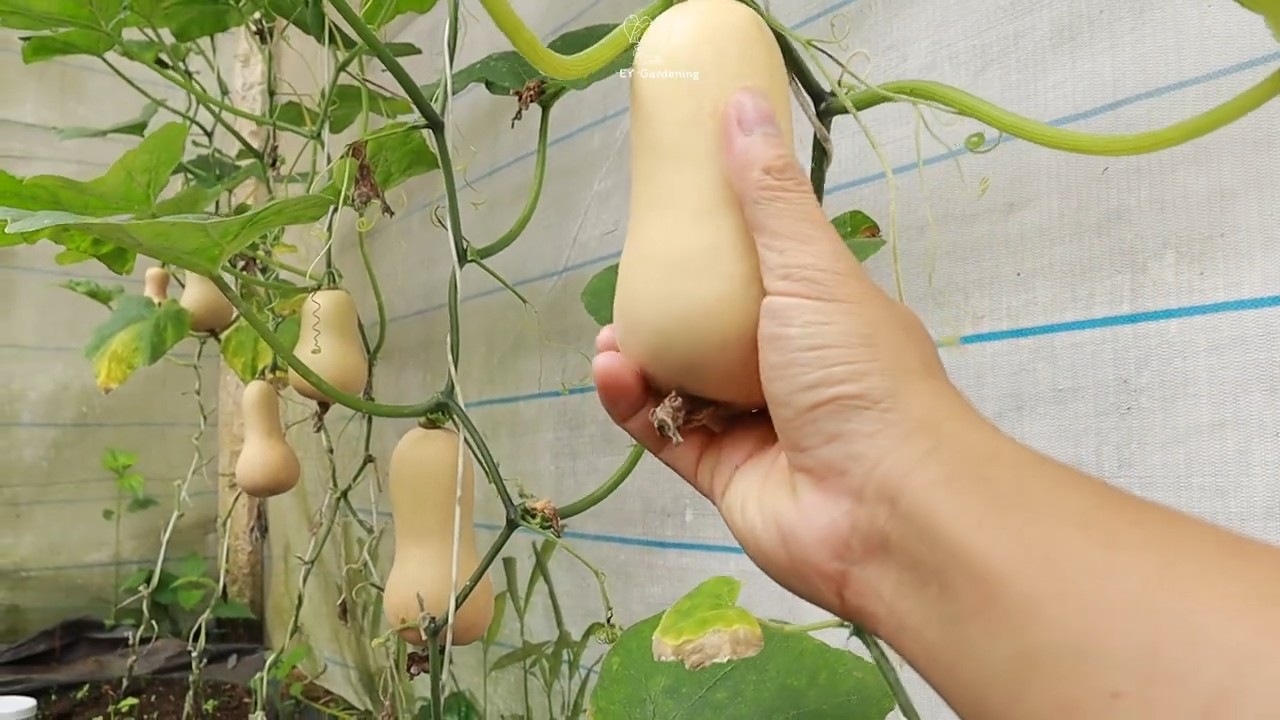
1. Knowing When to Harvest: Butternut squash is typically ready to harvest in the fall, about 90-100 days after planting. The squash should be a deep tan color and the skin should be hard. The stem should also be dry and brown.
2. Harvesting: Use a sharp knife or pruning shears to cut the squash from the vine, leaving a few inches of stem attached.
3. Curing: Cure the squash in a warm, dry place for about two weeks. This will help to harden the skin and improve its storage life.
4. Storing: Store the cured squash in a cool, dry place. Properly stored butternut squash can last for several months.
Troubleshooting
Even with the best planning, sometimes things don’t go as expected. Here are a few common issues and how to address them:
* Yellowing Leaves: Could be a sign of overwatering, underwatering, nutrient deficiency, or disease. Check the soil moisture, fertilize if needed, and inspect for pests or diseases.
* Lack of Fruit: Could be due to poor pollination, lack of sunlight, or nutrient deficiency. Hand-pollinate if necessary, ensure adequate sunlight, and fertilize regularly.
* Pests: Regularly inspect your plants for pests and treat them promptly with organic pest control methods.
* Diseases: Ensure good air circulation, avoid watering the leaves, and treat any diseases with appropriate fungicides.
Tips for Success
Here are a few extra tips to help you succeed with growing butternut squash in tires:
* Choose the Right Tire Size: Larger tires are better for butternut squash, as they provide more room for the roots to grow.
* Use High-Quality Soil: A good potting mix is essential for healthy growth.
* Provide Adequate Sunlight: Butternut squash needs at least 6-8 hours of sunlight per day.
* Water Regularly: Keep the soil consistently moist, but not waterlogged.
* Fertilize Regularly: Feed your plants with a balanced fertilizer every few weeks.
* Monitor for Pests and Diseases: Regularly inspect your plants and treat any problems promptly.
* Be Patient: Growing butternut squash takes time and effort, but the rewards are well worth it!
Growing butternut squash in tires on your terrace is a rewarding and sustainable way to enjoy fresh, homegrown produce. With a little planning and care, you can have a bountiful harvest of delicious butternut squash. Happy
Conclusion
So, there you have it! Growing butternut squash in tires on your terrace isn’t just a quirky gardening hack; it’s a game-changer for urban gardeners and anyone looking to maximize their yield in a limited space. We’ve explored how this method provides excellent drainage, warms the soil efficiently, and offers a contained environment that deters pests and makes harvesting a breeze.
But why is this DIY trick a must-try? Because it’s incredibly effective, surprisingly simple, and deeply rewarding. Imagine stepping onto your terrace and being greeted by the vibrant green foliage of your butternut squash vines, knowing that beneath them, plump, delicious squashes are developing, all thanks to a few repurposed tires and a little bit of effort. This method allows you to cultivate a substantial crop of butternut squash even if you lack a traditional garden plot. It’s a testament to the power of resourcefulness and a fantastic way to connect with nature, even in the heart of the city.
Beyond the basic method, there’s plenty of room for experimentation. Consider adding a layer of compost tea to your watering routine for an extra boost of nutrients. You could also try companion planting around the tires, using herbs like basil or marigolds to further deter pests. For those in particularly hot climates, painting the tires a lighter color can help reflect sunlight and prevent the soil from overheating. And if you’re feeling ambitious, you could even stack multiple tires to create a raised bed with even more growing space.
The beauty of this DIY approach is its adaptability. Feel free to adjust the method to suit your specific needs and preferences. The key is to provide your butternut squash with plenty of sunlight, well-draining soil, and consistent watering.
We wholeheartedly encourage you to give this method a try. It’s a fun, sustainable, and incredibly satisfying way to grow your own food. Don’t be intimidated by the idea of using tires; they’re readily available, easy to work with, and provide a surprisingly effective growing environment.
Once you’ve harvested your first tire-grown butternut squash, we’d love to hear about your experience! Share your photos, tips, and any variations you’ve tried in the comments below. Let’s build a community of urban gardeners who are passionate about growing their own food, one tire at a time. Your insights could inspire others to embrace this innovative method and discover the joy of growing butternut squash in unexpected places. Remember, every successful harvest starts with a single seed and a willingness to try something new. So, get your hands dirty, embrace the challenge, and enjoy the delicious rewards of your labor! Let’s all become experts at how to **grow butternut squash** in tires!
Frequently Asked Questions (FAQ)
1. Are tires safe to use for growing food?
This is a common concern, and it’s important to address it directly. While tires do contain chemicals, the risk of significant leaching into the soil and then into your butternut squash is generally considered low, especially with proper precautions. Modern tires are made with fewer harmful chemicals than older tires.
However, to minimize any potential risk, consider these steps:
* Choose newer tires: Look for tires manufactured in the last decade, as they are less likely to contain older, more harmful chemicals.
* Clean the tires thoroughly: Before using them, scrub the tires inside and out with soap and water to remove any loose debris or residue.
* Line the tires (optional): If you’re particularly concerned, you can line the inside of the tires with a thick plastic liner or landscape fabric to create a barrier between the soil and the tire. This is a simple and effective way to further reduce any potential leaching.
* Use high-quality soil: Ensure you’re using a good quality potting mix or garden soil that is free of contaminants. This will help to ensure that your butternut squash is growing in a healthy environment.
* Avoid using tires that are visibly damaged or deteriorating: If a tire is cracked, crumbling, or shows signs of significant wear, it’s best to avoid using it for gardening.
The consensus among many gardeners is that the benefits of using tires for growing butternut squash, such as improved drainage, soil warming, and pest control, outweigh the minimal risks associated with chemical leaching, especially when these precautions are taken.
2. What type of soil should I use in the tires?
Butternut squash thrives in well-draining, nutrient-rich soil. A good starting point is a mix of:
* Garden soil: Provides a base for the growing medium.
* Compost: Adds essential nutrients and improves soil structure.
* Peat moss or coco coir: Helps retain moisture and improve drainage.
A good ratio would be roughly 1/3 garden soil, 1/3 compost, and 1/3 peat moss or coco coir. You can also add a slow-release fertilizer to provide a steady supply of nutrients throughout the growing season. Avoid using heavy clay soil, as it can become waterlogged and hinder root growth.
3. How much sunlight do butternut squash plants need?
Butternut squash requires at least 6-8 hours of direct sunlight per day to thrive. Choose a location on your terrace that receives ample sunlight throughout the day. If your terrace is partially shaded, try to position the tires so that they receive the most sunlight possible. Insufficient sunlight can lead to stunted growth and reduced fruit production.
4. How often should I water my butternut squash plants in tires?
Watering frequency will depend on the weather conditions and the drainage of your soil. Generally, you should water your butternut squash plants deeply whenever the top inch of soil feels dry to the touch. Avoid overwatering, as this can lead to root rot. During hot, dry weather, you may need to water daily. In cooler, wetter weather, you may only need to water every few days. The tires will help with drainage, but it’s still important to monitor the soil moisture levels regularly.
5. How do I prevent pests and diseases from affecting my butternut squash?
Several pests and diseases can affect butternut squash plants, including squash bugs, squash vine borers, and powdery mildew. Here are some tips for prevention:
* Inspect plants regularly: Check your plants frequently for signs of pests or diseases. Early detection is key to preventing widespread problems.
* Handpick pests: If you find squash bugs or other pests, handpick them off the plants and dispose of them.
* Use row covers: Cover young plants with row covers to protect them from pests. Remove the row covers when the plants begin to flower to allow for pollination.
* Practice crop rotation: Avoid planting butternut squash in the same location year after year, as this can increase the risk of soilborne diseases.
* Provide good air circulation: Ensure that your plants have good air circulation to prevent powdery mildew. Space the tires adequately and prune the vines as needed.
* Use organic pesticides: If necessary, use organic pesticides such as neem oil or insecticidal soap to control pests.
6. How do I know when my butternut squash is ripe?
Butternut squash is typically ready to harvest in the fall, about 90-100 days after planting. Here are some signs that your butternut squash is ripe:
* The skin is hard and thick: The skin should be firm and resistant to scratching.
* The color is a deep tan: The squash should have a uniform tan color, without any green spots.
* The stem is dry and brown: The stem connecting the squash to the vine should be dry and brown.
To harvest, use a sharp knife or pruning shears to cut the squash from the vine, leaving a few inches of stem attached. Curing the squash for a week or two in a warm, dry place will help to improve its flavor and storage life.
Leave a Comment