
Grow Bitter Gourds Easily, even if you think you have a “brown thumb”! Have you ever dreamt of harvesting your own vibrant, healthy bitter gourds, but felt intimidated by the process? I understand! Many gardeners shy away from this nutritious vegetable, believing it’s too difficult to cultivate. But what if I told you that with a few clever DIY tricks and hacks, you can enjoy a bountiful harvest right in your own backyard?
Bitter gourd, also known as karela, has a rich history, deeply rooted in traditional medicine and culinary practices across Asia and Africa for centuries. It’s revered not only for its distinctive bitter flavor but also for its impressive health benefits. From aiding digestion to boosting immunity, this humble vegetable packs a powerful punch.
But let’s be honest, getting those gourds to thrive can be tricky. That’s where this article comes in! I’m going to share my tried-and-true DIY methods to help you grow bitter gourds easily, regardless of your gardening experience. We’ll cover everything from seed starting and soil preparation to trellising and pest control, all with simple, budget-friendly solutions. So, ditch the store-bought gourds and get ready to enjoy the satisfaction of growing your own delicious and healthy karela!
Bittergurken einfach selbst anbauen: Mein DIY-Leitfaden für Anfänger
Ich liebe es, mein eigenes Gemüse anzubauen, und Bittergurken (auch bekannt als Bittermelonen) sind da keine Ausnahme! Sie sind nicht nur super gesund, sondern auch überraschend einfach anzubauen, wenn man ein paar grundlegende Dinge beachtet. In diesem Artikel zeige ich dir Schritt für Schritt, wie du deine eigenen Bittergurken erfolgreich anbauen kannst, auch wenn du noch nie zuvor einen grünen Daumen hattest. Keine Sorge, ich führe dich durch jeden Schritt!
Was du für den Anbau von Bittergurken brauchst
Bevor wir loslegen, lass uns sicherstellen, dass du alles hast, was du brauchst. Hier ist eine Liste der wichtigsten Materialien und Werkzeuge:
* Bittergurkensamen: Du kannst sie online, in Gartencentern oder sogar in einigen Supermärkten finden. Achte darauf, dass du qualitativ hochwertige Samen kaufst.
* Anzuchttöpfe oder -schalen: Für die Voranzucht der Samen.
* Anzuchterde: Spezielle Erde für die Anzucht von Sämlingen, die nährstoffarm und locker ist.
* Gartenerde: Für das endgültige Beet oder den Topf.
* Kompost oder organischer Dünger: Um den Boden anzureichern.
* Pflanzgefäße (optional): Wenn du die Bittergurken in Töpfen anbauen möchtest. Sie sollten mindestens 30 Liter Fassungsvermögen haben.
* Rankhilfe: Bittergurken sind Kletterpflanzen und brauchen eine Rankhilfe, z.B. ein Spalier, ein Zaun oder ein Rankgitter.
* Gießkanne oder Gartenschlauch: Zum Bewässern der Pflanzen.
* Gartenhandschuhe: Zum Schutz deiner Hände.
* Gartenschere: Zum Beschneiden der Pflanzen.
* Mulch (optional): Um den Boden feucht zu halten und Unkraut zu unterdrücken.
Die Vorbereitung: Samen vorziehen oder direkt aussäen?
Du hast zwei Möglichkeiten, deine Bittergurken anzubauen: Du kannst die Samen entweder vorziehen oder direkt ins Beet säen. Ich empfehle die Voranzucht, besonders wenn du in einer Region mit kürzerer Vegetationsperiode lebst.
Samen vorziehen (empfohlen)
1. Samen vorbereiten: Bittergurkensamen haben eine harte Schale. Um die Keimung zu beschleunigen, kannst du sie vor dem Einpflanzen für 24 Stunden in lauwarmes Wasser legen. Das hilft, die Schale aufzuweichen.
2. Anzuchttöpfe befüllen: Fülle deine Anzuchttöpfe oder -schalen mit Anzuchterde.
3. Samen aussäen: Drücke die Samen etwa 1-2 cm tief in die Erde. Lege pro Topf 2-3 Samen, um sicherzustellen, dass mindestens einer keimt.
4. Bewässern: Gieße die Erde vorsichtig an, sodass sie feucht, aber nicht nass ist.
5. Warm stellen: Stelle die Töpfe an einen warmen Ort (idealerweise 25-30°C). Ein Mini-Gewächshaus oder eine Heizmatte können hilfreich sein.
6. Feucht halten: Halte die Erde feucht, indem du sie regelmäßig besprühst.
7. Keimung abwarten: Die Keimung dauert in der Regel 7-14 Tage.
8. Vereinzeln: Sobald die Sämlinge ein paar Blätter haben, kannst du die schwächeren entfernen, sodass nur der stärkste Sämling pro Topf übrig bleibt.
Direktsaat ins Beet
Wenn du dich für die Direktsaat entscheidest, solltest du warten, bis die Bodentemperatur mindestens 18°C beträgt.
1. Beet vorbereiten: Lockere den Boden gut auf und reicher ihn mit Kompost oder organischem Dünger an.
2. Samen aussäen: Säe die Samen etwa 2-3 cm tief in den Boden. Halte einen Abstand von etwa 60-90 cm zwischen den Pflanzen ein.
3. Bewässern: Gieße die Erde vorsichtig an.
4. Feucht halten: Halte die Erde feucht, bis die Samen keimen.
5. Vereinzeln: Sobald die Sämlinge ein paar Blätter haben, kannst du die schwächeren entfernen, sodass der Abstand zwischen den Pflanzen stimmt.
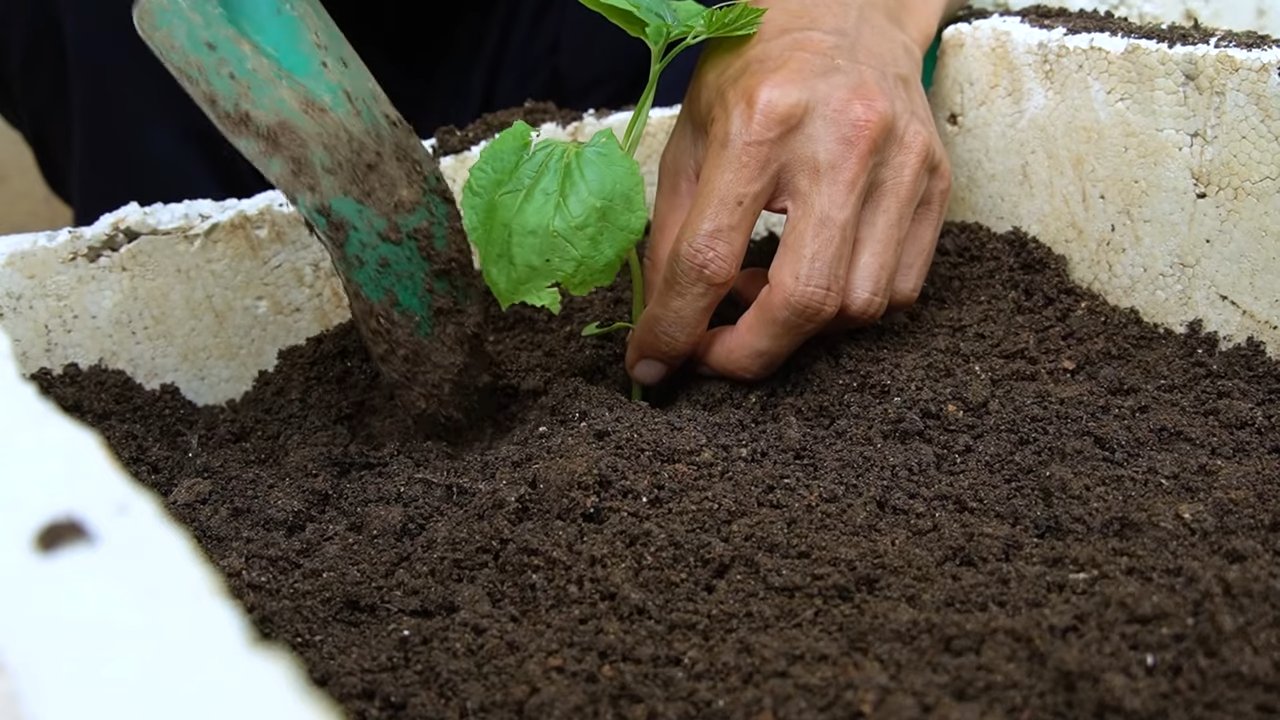
Das Auspflanzen: Der Umzug ins Freie
Sobald die Sämlinge stark genug sind (etwa 15-20 cm hoch) und keine Frostgefahr mehr besteht, können sie ins Freie umziehen.
1. Standort wählen: Bittergurken lieben die Sonne! Wähle einen sonnigen Standort mit mindestens 6-8 Stunden direkter Sonneneinstrahlung pro Tag.
2. Boden vorbereiten: Lockere den Boden gut auf und reicher ihn mit Kompost oder organischem Dünger an. Bittergurken bevorzugen einen gut durchlässigen, humusreichen Boden.
3. Pflanzlöcher graben: Grabe Löcher, die etwas größer sind als die Wurzelballen der Sämlinge. Halte einen Abstand von etwa 60-90 cm zwischen den Pflanzen ein.
4. Sämlinge einsetzen: Nimm die Sämlinge vorsichtig aus den Anzuchttöpfen und setze sie in die Pflanzlöcher. Achte darauf, dass die Wurzelballen nicht beschädigt werden.
5. Mit Erde auffüllen: Fülle die Löcher mit Erde auf und drücke sie leicht an.
6. Bewässern: Gieße die Pflanzen gründlich an.
7. Rankhilfe installieren: Installiere die Rankhilfe direkt nach dem Auspflanzen, damit die Pflanzen sofort etwas zum Klettern haben.
Die Pflege: Gießen, Düngen und Beschneiden
Die richtige Pflege ist entscheidend für eine reiche Ernte.
1. Gießen: Bittergurken brauchen regelmäßig Wasser, besonders während der heißen Sommermonate. Gieße die Pflanzen am besten früh morgens, damit die Blätter Zeit haben, abzutrocknen. Vermeide Staunässe.
2. Düngen: Dünge die Pflanzen alle 2-3 Wochen mit einem organischen Dünger oder Komposttee. Achte darauf, dass der Dünger reich an Kalium ist, da dies die Fruchtbildung fördert.
3. Beschneiden: Bittergurken können stark wuchern. Durch regelmäßiges Beschneiden kannst du die Pflanzen in Form halten und die Fruchtbildung fördern. Entferne Seitentriebe, die keine Blüten oder Früchte tragen.
4. Unkraut entfernen: Halte das Beet unkrautfrei, damit die Bittergurken nicht um Nährstoffe konkurrieren müssen.
5. Mulchen (optional): Eine Mulchschicht hilft, den Boden feucht zu halten, Unkraut zu unterdrücken und die Bodentemperatur zu regulieren.
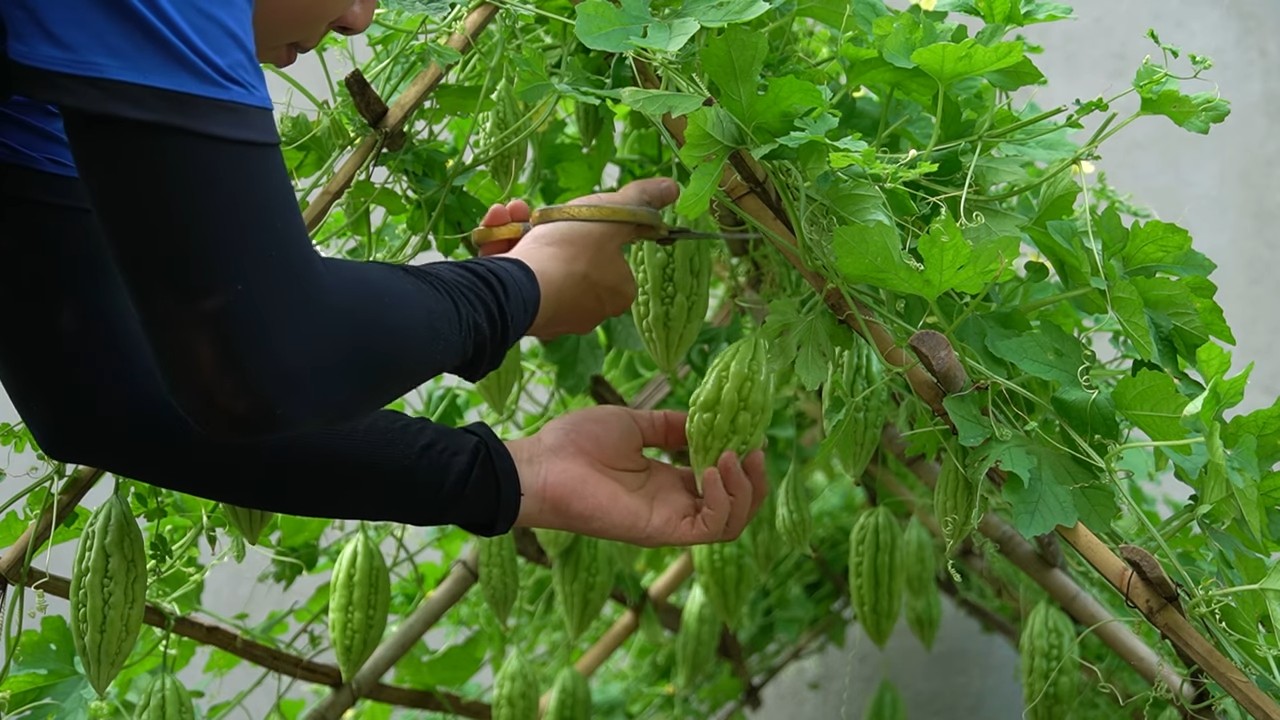
Die Ernte: Wann sind die Bittergurken reif?
Die Erntezeit hängt von der Sorte und den Anbaubedingungen ab. In der Regel sind Bittergurken etwa 2-3 Monate nach dem Auspflanzen erntereif.
1. Reife erkennen: Die Bittergurken sind reif, wenn sie ihre endgültige Größe erreicht haben und eine intensive grüne Farbe haben. Einige Sorten können auch gelblich oder orange werden.
2. Ernten: Schneide die Bittergurken mit einer Gartenschere vom Stiel ab. Trage dabei Handschuhe, da der Saft der Bittergurken die Haut reizen kann.
3. Regelmäßig ernten: Ernte die Bittergurken regelmäßig, um die Fruchtbildung anzuregen.
Häufige Probleme und Lösungen
Auch beim Anbau von Bittergurken können Probleme auftreten. Hier sind einige häufige Probleme und wie du sie lösen kannst:
* Schädlinge: Blattläuse, Spinnmilben und Gurkenkäfer können Bittergurken befallen. Sprühe die Pflanzen mit einer Lösung aus Wasser und Neemöl oder Schmierseife ein.
* Krankheiten: Echter Mehltau und Falscher Mehltau können auftreten, besonders bei feuchtem Wetter. Sorge für eine gute Belüftung der Pflanzen und sprühe sie bei Bedarf mit einem Fungizid ein.
* Gelbe Blätter: Gelbe Blätter können ein
Conclusion
So, there you have it! Growing bitter gourds easily doesn’t have to be a daunting task. By implementing this simple yet effective DIY trick, you’re not just planting seeds; you’re cultivating a thriving vine that will reward you with a bountiful harvest of these nutritious and flavorful vegetables. We’ve demystified the process, providing you with a clear, actionable strategy to overcome common challenges and maximize your yield.
This method, focusing on [mention the specific DIY trick from the main article, e.g., pre-soaking seeds and creating a nutrient-rich starter mix], is a game-changer because it addresses the critical early stages of growth. It ensures optimal germination, provides essential nutrients, and protects the delicate seedlings from pests and diseases. The result? Stronger, healthier plants that are better equipped to withstand environmental stressors and produce an abundance of bitter gourds.
But don’t just take our word for it. The real magic happens when you put this knowledge into practice. Imagine the satisfaction of harvesting your own homegrown bitter gourds, knowing that you nurtured them from tiny seeds to mature, productive plants. Think of the delicious and healthy meals you can create with your fresh harvest – from stir-fries and curries to juices and pickles.
Ready to take your bitter gourd growing to the next level?
Consider these variations to personalize your approach:
* Experiment with different soil amendments: While our recommended starter mix is a great foundation, you can tailor it to your specific soil conditions. Try adding compost, aged manure, or bone meal to further enrich the soil and provide essential nutrients.
* Explore different trellis designs: Bitter gourds are climbers, so a sturdy trellis is essential. Get creative with your trellis design – use bamboo poles, repurposed fencing, or even create a living trellis with other climbing plants.
* Try companion planting: Certain plants can help deter pests and attract beneficial insects to your bitter gourd patch. Consider planting basil, marigolds, or nasturtiums nearby.
* Seed saving: Once you have a successful harvest, save seeds from your best-performing plants to ensure a continuous supply of high-quality seeds for future seasons.
We are confident that this DIY trick will transform your bitter gourd growing experience. It’s a simple, effective, and rewarding way to cultivate these unique vegetables in your own backyard.
Now, it’s your turn! We encourage you to try this method and share your results with us. Let us know what worked well for you, what challenges you encountered, and any variations you tried. Your feedback will help us refine this technique and empower other gardeners to grow bitter gourds easily. Share your photos and stories on our social media channels using [relevant hashtag] or leave a comment on our website. We can’t wait to see your thriving bitter gourd vines!
Frequently Asked Questions (FAQ)
What is the best time of year to plant bitter gourd seeds?
The ideal time to plant bitter gourd seeds is during the late spring or early summer, after the last frost has passed and the soil has warmed up. Bitter gourds thrive in warm weather and require a long growing season of at least 90-120 days. In warmer climates, you may be able to plant a second crop in late summer for a fall harvest. Check your local climate data for the average last frost date and adjust your planting schedule accordingly.
How often should I water my bitter gourd plants?
Bitter gourd plants need consistent moisture, especially during hot and dry weather. Water deeply and regularly, aiming to keep the soil consistently moist but not waterlogged. A good rule of thumb is to water 2-3 times per week, providing enough water to soak the root zone. Mulching around the plants can help retain moisture and reduce the need for frequent watering. Monitor the soil moisture levels regularly and adjust your watering schedule as needed based on weather conditions.
What kind of fertilizer should I use for bitter gourds?
Bitter gourds are heavy feeders and benefit from regular fertilization. Start with a balanced fertilizer (e.g., 10-10-10) at planting time, following the package instructions. Once the plants start to flower and produce fruit, switch to a fertilizer that is higher in phosphorus and potassium (e.g., 5-10-10) to promote fruit development. You can also supplement with organic fertilizers such as compost tea or fish emulsion. Avoid over-fertilizing, as this can lead to excessive foliage growth at the expense of fruit production.
How do I prevent pests and diseases from affecting my bitter gourd plants?
Bitter gourds can be susceptible to various pests and diseases, including aphids, squash bugs, powdery mildew, and fruit flies. To prevent these problems, practice good garden hygiene, such as removing weeds and debris around the plants. Inspect your plants regularly for signs of pests or diseases and take action promptly. You can use organic pest control methods such as insecticidal soap, neem oil, or diatomaceous earth to control pests. For diseases, ensure good air circulation around the plants and avoid overhead watering. If necessary, use a fungicide specifically labeled for use on cucurbits.
When is the right time to harvest bitter gourds?
Bitter gourds are typically harvested when they are still green and slightly immature. The exact timing will depend on the variety and your personal preference. Generally, you should harvest them when they are about two-thirds of their mature size and the skin is still smooth and firm. Overripe bitter gourds will turn orange or yellow and become more bitter. Use a sharp knife or pruning shears to cut the gourds from the vine, leaving a short stem attached.
My bitter gourd plant is flowering, but not producing any fruit. What could be the problem?
There are several reasons why your bitter gourd plant might be flowering but not producing fruit. One possibility is that the flowers are not being pollinated. Bitter gourds have separate male and female flowers, and pollination is required for fruit set. You can hand-pollinate the flowers by transferring pollen from the male flowers to the female flowers using a small brush. Another possibility is that the plant is stressed due to lack of water, nutrients, or sunlight. Ensure that your plant is receiving adequate care and address any underlying issues.
Can I grow bitter gourds in containers?
Yes, you can grow bitter gourds in containers, but you will need a large container (at least 15-20 gallons) to accommodate the plant’s extensive root system. Choose a container with good drainage and fill it with a well-draining potting mix. Provide a sturdy trellis or support for the vine to climb on. Water and fertilize regularly, as container-grown plants tend to dry out and deplete nutrients more quickly.
How do I save seeds from my bitter gourds for next year?
To save seeds from your bitter gourds, allow a few fruits to fully mature on the vine. The gourds will turn orange or yellow and become soft. Once they are fully ripe, harvest the gourds and scoop out the seeds. Wash the seeds thoroughly to remove any pulp or debris. Spread the seeds out on a paper towel to dry completely. Once the seeds are dry, store them in an airtight container in a cool, dark, and dry place.
What are the health benefits of eating bitter gourd?
Bitter gourd is a highly nutritious vegetable with numerous health benefits. It is rich in vitamins, minerals, and antioxidants. Studies have shown that bitter gourd can help regulate blood sugar levels, lower cholesterol, boost the immune system, and even have anti-cancer properties. It is also a good source of fiber, which can aid in digestion and promote weight loss. While the bitter taste may be off-putting to some, there are many ways to prepare bitter gourd to make it more palatable.
How can I reduce the bitterness of bitter gourd?
The bitterness of bitter gourd is due to the presence of cucurbitacins. There are several ways to reduce the bitterness before cooking. One method is to soak the sliced bitter gourd in salted water for at least 30 minutes. Another method is to blanch the bitter gourd in boiling water for a few minutes before cooking. You can also remove the seeds and pith, as these are the most bitter parts of the gourd. Cooking bitter gourd with acidic ingredients such as vinegar or lemon juice can also help to neutralize the bitterness.

Leave a Comment