
Grow bigger onions, and watch your culinary creations reach a whole new level of deliciousness! Have you ever dreamt of harvesting onions so large they practically burst with flavor? I know I have! For centuries, onions have been a staple in cuisines worldwide, dating back to ancient civilizations where they were not only valued for their taste but also for their medicinal properties. From the pyramids of Egypt to the bustling markets of the Mediterranean, onions have nourished and sustained communities.
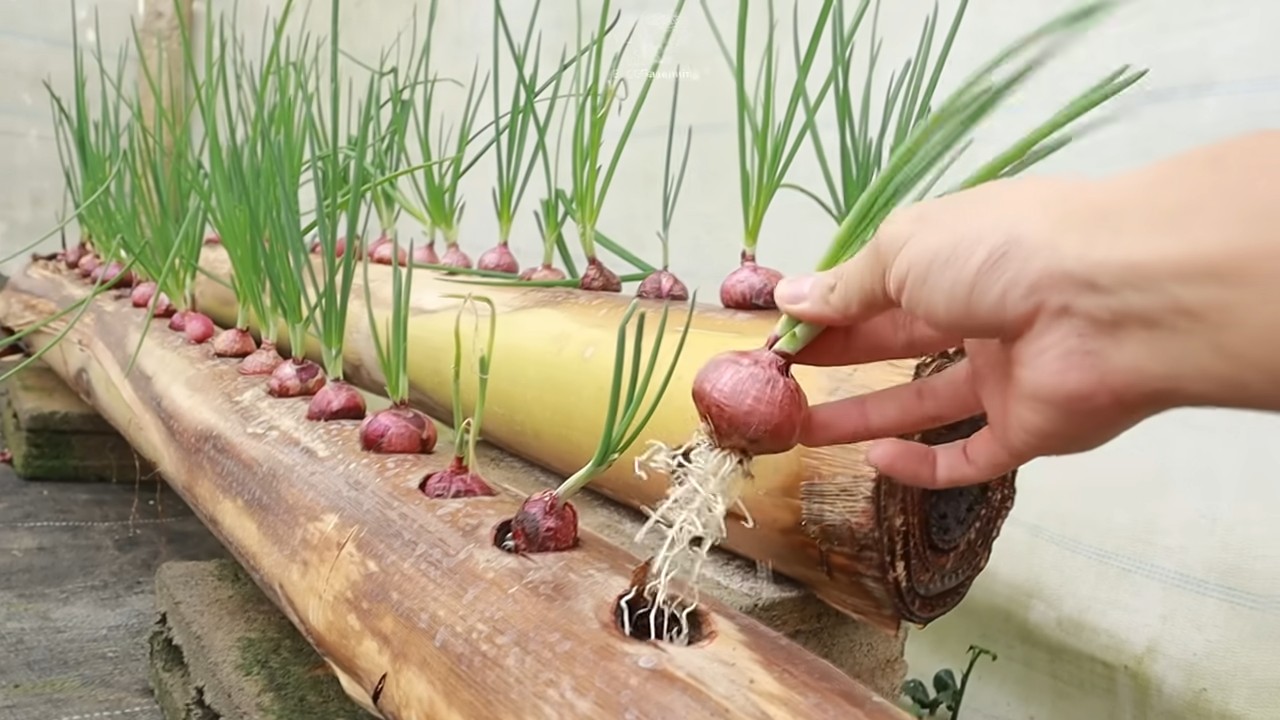
But let’s be honest, sometimes the onions we grow at home just don’t quite measure up to the giants we see in the grocery store. That’s where these DIY tricks and hacks come in! I’m going to share some simple, yet effective, methods to help you grow bigger onions right in your own backyard. Imagine the satisfaction of pulling a massive, juicy onion from the soil, knowing you nurtured it to its full potential.
These aren’t just random tips; they’re tried-and-true techniques that can make a real difference. Whether you’re a seasoned gardener or just starting out, these easy-to-follow steps will empower you to cultivate impressive onions that will be the envy of all your neighbors. So, grab your gardening gloves, and let’s get started on the path to onion-growing success!
DIY: Unleash Giant Onions in Your Garden!
Hey fellow gardeners! Ever dreamt of harvesting onions so big they practically qualify as small pumpkins? Well, I’m here to tell you it’s totally achievable, even if you’re not a seasoned pro. I’ve been experimenting with different techniques for years, and I’ve finally cracked the code to growing truly massive onions. Get ready to impress your neighbors (and yourself!) with this comprehensive guide.
Choosing the Right Onion Variety
Before we even think about soil or fertilizer, let’s talk onions. Not all onions are created equal. Some varieties are naturally smaller, while others are bred for size. Choosing the right variety is the first crucial step.
* Long-Day Onions: These are best for northern climates (think above the 36th parallel). They need 14-16 hours of daylight to bulb properly. Popular choices include Walla Walla Sweet, Yellow Spanish, and Copra.
* Short-Day Onions: These thrive in southern climates (below the 36th parallel) and require 10-12 hours of daylight. Look for varieties like Granex, White Bermuda, and Texas Sweet White.
* Intermediate-Day Onions: These are more adaptable and can be grown in a wider range of climates. Red Candy Apple and Super Sweet are good options.
My Recommendation: For sheer size potential, I’ve had the most success with Walla Walla Sweets (in my northern garden) and Texas Sweet Whites (when I visited my sister down south). They’re known for their mild flavor and impressive girth.
Preparing the Soil: The Foundation for Giant Onions
Onions are heavy feeders, meaning they need a lot of nutrients to grow big. A well-prepared soil is absolutely essential.
* Soil Testing: This is the best way to know exactly what your soil needs. You can get a soil testing kit online or through your local extension office.
* Soil Amendments: Onions love rich, well-draining soil with a slightly acidic pH (around 6.0-6.8). Amend your soil accordingly. Here’s what I usually add:
* Compost: Lots and lots of compost! This adds organic matter, improves drainage, and provides a slow-release source of nutrients. I aim for at least 4 inches of compost worked into the top 12 inches of soil.
* Well-Rotted Manure: Another excellent source of nutrients. Make sure it’s well-rotted to avoid burning the onion roots.
* Bone Meal: This provides phosphorus, which is crucial for root development.
* Greensand: This adds potassium, another essential nutrient for onion growth.
* Slow-Release Fertilizer: I like to add a balanced slow-release fertilizer (10-10-10) at planting time to give the onions a boost.
* Drainage: Onions hate soggy soil. If your soil is heavy clay, consider adding sand or perlite to improve drainage. Raised beds are also a great option.
My Tip: I like to prepare my onion beds in the fall, giving the soil amendments plenty of time to break down and integrate into the soil.
Starting Onions from Seed vs. Sets vs. Transplants
You have three options for starting your onions: seeds, sets, or transplants. Each has its pros and cons.
* Seeds: Starting from seed gives you the widest variety selection and is the most economical option. However, it requires more time and effort. You’ll need to start the seeds indoors 8-10 weeks before your last frost.
* Sets: These are small, immature onion bulbs that are easy to plant. They’re a good option if you’re short on time or space. However, they tend to produce smaller onions than those grown from seed or transplants.
* Transplants: These are young onion plants that have already been started for you. They’re a good compromise between seeds and sets. You can find them at most garden centers in the spring.
My Preference: I prefer starting my onions from seed indoors. It gives me more control over the process and allows me to choose the exact varieties I want. Plus, I find it incredibly rewarding to watch those tiny seeds grow into giant onions!
Step-by-Step Planting Guide
Okay, let’s get down to the nitty-gritty of planting!
1. Harden Off Transplants: If you’re using transplants (either purchased or started from seed), you’ll need to harden them off before planting them outdoors. This means gradually exposing them to outdoor conditions over a period of 7-10 days. Start by placing them in a sheltered spot for a few hours each day, gradually increasing the amount of time they spend outdoors.
2. Prepare Planting Holes: Space your onion plants 4-6 inches apart in rows that are 12-18 inches apart. Dig holes that are deep enough to accommodate the roots of the transplants or sets.
3. Planting Transplants: Gently remove the transplants from their containers and loosen the roots. Place each transplant in a planting hole and backfill with soil. Make sure the top of the bulb is just barely covered with soil.
4. Planting Sets: Plant the sets about 1 inch deep, with the pointed end facing up.
5. Water Thoroughly: After planting, water the onions thoroughly to settle the soil and encourage root growth.
6. Mulch: Apply a layer of mulch around the onions to help retain moisture, suppress weeds, and regulate soil temperature. Straw, shredded leaves, or grass clippings are all good options.
Watering and Feeding: The Secret to Sustained Growth
Consistent watering and regular feeding are crucial for growing big onions.
* Watering: Onions need consistent moisture, especially during bulb formation. Water deeply whenever the top inch of soil feels dry. Avoid overhead watering, as this can promote fungal diseases. Soaker hoses or drip irrigation are ideal.
* Fertilizing: Onions are heavy feeders, so you’ll need to fertilize them regularly. I like to use a liquid fertilizer (like fish emulsion or seaweed extract) every 2-3 weeks. You can also side-dress with compost or well-rotted manure.
* Nitrogen: In the early stages of growth, focus on nitrogen to promote leafy growth.
* Phosphorus and Potassium: As the bulbs begin to form, switch to a fertilizer that is higher in phosphorus and potassium. This will help the bulbs grow larger and more flavorful.
My Watering Trick: I use a moisture meter to check the soil moisture levels. This helps me avoid overwatering or underwatering.
Weed Control: Protecting Your Precious Onions
Weeds compete with onions for nutrients and water, so it’s important to keep your onion beds weed-free.
* Hand-Pulling: The best way to control weeds is to hand-pull them regularly. Be careful not to disturb the onion roots.
* Mulching: Mulch helps to suppress weed growth.
* Hoeing: You can also use a hoe to cultivate the soil and remove weeds. Be careful not to damage the onion bulbs.
My Weed-Fighting Strategy: I like to use a combination of hand-pulling and mulching to keep my onion beds weed-free. I also try to weed early and often, before the weeds have a chance to get established.
Pest and Disease Management: Keeping Your Onions Healthy
Onions are relatively pest-resistant, but they can be susceptible to certain pests and diseases.
* Onion Maggots: These are small, white larvae that feed on the roots of onions. They can cause the plants to wilt and die. To prevent onion maggots, use row covers or apply beneficial nematodes to the soil.
* Thrips: These are tiny, sucking insects that can damage onion leaves. They can be controlled with insecticidal soap or neem oil.
* Downy Mildew: This is a fungal disease that can cause yellow spots on onion leaves. To prevent downy mildew, provide good air circulation and avoid overhead watering.
* Pink Root: This is a fungal disease that causes the roots of onions to turn pink. To prevent pink root, plant resistant varieties and practice crop rotation.
My Pest Control Secret: I regularly inspect my onion plants for signs of pests or diseases. If I catch them early, I can usually control them with organic methods.
Harvesting and Curing: The Final Step to Onion Greatness
Knowing when and how to harvest and cure your onions is just as important as the growing process.
1. Harvesting: Onions are ready to harvest when the tops begin to fall over and turn brown. This usually happens in late summer or early fall.
2. Digging: Gently dig up the onions with a garden fork, being careful not to damage the bulbs.
3. Curing: Curing is
Conclusion
So, there you have it! This simple yet incredibly effective DIY trick to grow bigger onions is a game-changer for any gardener, whether you’re a seasoned pro or just starting out. We’ve walked you through the process, highlighting the science behind why it works and providing practical tips to ensure your success.
Why is this a must-try? Because who doesn’t want larger, more flavorful onions? Imagine the satisfaction of harvesting onions that are not only bigger but also healthier and more robust. Think of the delicious meals you can create with them – from hearty stews and flavorful stir-fries to caramelized onions that elevate any dish. This isn’t just about size; it’s about quality, taste, and the sheer joy of growing your own food.
But the benefits extend beyond the kitchen. By implementing this DIY trick, you’re also improving the overall health of your garden. Stronger onion plants are more resistant to pests and diseases, reducing the need for harmful chemicals. You’re contributing to a more sustainable and eco-friendly gardening practice.
Now, let’s talk about variations. While the core method remains the same, you can adapt it to suit your specific needs and preferences. For example, if you’re growing onions in containers, you might need to adjust the frequency of watering and feeding. Consider using a slow-release fertilizer specifically formulated for onions to provide a steady stream of nutrients.
Another variation involves the type of soil you use. Onions thrive in well-drained, fertile soil with a slightly acidic pH. Amend your soil with compost or other organic matter to improve its structure and nutrient content. You can also experiment with different mulches to help retain moisture and suppress weeds. Straw, wood chips, or even grass clippings can work wonders.
Furthermore, consider the variety of onions you’re growing. Some varieties are naturally larger than others. Research different onion types and choose those that are known for their size and flavor. Sweet onions, such as Walla Walla or Vidalia, tend to grow quite large and have a mild, sweet taste.
Don’t be afraid to experiment and find what works best for you and your garden. Gardening is a journey of discovery, and there’s always something new to learn.
We are confident that this DIY trick will significantly improve your onion-growing results. But don’t just take our word for it – try it out for yourself! Plant your onions, implement the technique, and watch them flourish.
We’re eager to hear about your experiences. Share your results, tips, and variations in the comments section below. Let’s create a community of onion-growing enthusiasts and learn from each other. Post pictures of your giant onions, share your favorite recipes, and let us know what challenges you faced and how you overcame them.
Remember, the key to success is consistency and attention to detail. Follow the steps outlined in this article, monitor your plants regularly, and adjust your approach as needed. With a little effort and patience, you’ll be harvesting impressive onions in no time. So, get out there, get your hands dirty, and start growing bigger, better onions today! This simple trick will help you grow bigger onions than you ever thought possible.
Frequently Asked Questions (FAQ)
What exactly is the DIY trick to grow bigger onions?
The core of the DIY trick involves providing your onion plants with consistent and ample nutrients, particularly nitrogen, during their active growth phase. This is achieved through regular feeding with a balanced fertilizer or organic amendments. Additionally, ensuring proper watering and sunlight exposure are crucial for optimal growth. The specific method detailed in the main article will outline the exact steps and timing for these practices.
How often should I water my onions after applying this trick?
Watering frequency depends on several factors, including your climate, soil type, and the stage of growth of your onions. Generally, you should aim to keep the soil consistently moist but not waterlogged. Check the soil moisture level regularly by sticking your finger about an inch into the soil. If it feels dry, it’s time to water. During hot, dry periods, you may need to water more frequently. Conversely, during rainy periods, you may need to reduce watering to prevent root rot. A good rule of thumb is to water deeply and less frequently, rather than shallowly and more often.
What type of fertilizer is best for growing bigger onions?
A balanced fertilizer with a higher nitrogen content is generally recommended for onions, especially during their early growth stages. Look for a fertilizer with an NPK ratio (Nitrogen, Phosphorus, Potassium) of around 10-20-10 or 12-12-12. You can also use organic fertilizers such as compost tea, fish emulsion, or aged manure. These organic options provide a slow-release source of nutrients and improve soil health. Avoid using fertilizers that are too high in nitrogen, as this can lead to excessive foliage growth at the expense of bulb development. Always follow the instructions on the fertilizer packaging and avoid over-fertilizing, which can damage your plants.
Can I use this trick for all types of onions?
Yes, this DIY trick can be applied to most types of onions, including bulb onions, bunching onions, and shallots. However, some onion varieties may respond better than others. Sweet onions, such as Walla Walla and Vidalia, tend to benefit greatly from this technique due to their naturally larger size potential. Experiment with different varieties to see which ones thrive best in your garden. Remember to adjust your watering and feeding schedule based on the specific needs of each variety.
How long does it take to see results from this DIY trick?
You should start to see noticeable results within a few weeks of implementing this DIY trick. The exact timeframe will depend on factors such as the variety of onions, the growing conditions, and the overall health of your plants. Look for signs of increased foliage growth and bulb development. Regular monitoring and consistent application of the technique are key to achieving optimal results. Be patient and persistent, and you’ll be rewarded with larger, healthier onions.
What if my onions start to yellow or wilt after applying this trick?
Yellowing or wilting leaves can indicate several problems, including overwatering, underwatering, nutrient deficiencies, or pest infestations. First, check the soil moisture level to ensure that you’re not overwatering or underwatering. If the soil is consistently soggy, reduce watering frequency. If the soil is dry, increase watering. Next, examine the leaves for signs of pests or diseases. If you find any, treat them accordingly with an appropriate insecticide or fungicide. Finally, consider whether your onions are getting enough sunlight. Onions need at least 6-8 hours of sunlight per day to thrive. If your onions are not getting enough sunlight, consider transplanting them to a sunnier location. If the problem persists, consult with a local gardening expert for further assistance.
Is it possible to over-fertilize my onions using this trick?
Yes, it is definitely possible to over-fertilize your onions, even with organic fertilizers. Over-fertilizing can lead to nutrient burn, which can damage or even kill your plants. Signs of over-fertilization include yellowing or browning leaves, stunted growth, and a buildup of salts in the soil. To avoid over-fertilizing, always follow the instructions on the fertilizer packaging and avoid applying more fertilizer than recommended. It’s better to err on the side of under-fertilizing than over-fertilizing. You can always add more fertilizer later if needed. Regularly monitor your plants for signs of nutrient deficiencies or excesses and adjust your feeding schedule accordingly.
Can I use this trick in containers or raised beds?
Absolutely! This DIY trick is just as effective in containers and raised beds as it is in traditional gardens. However, you may need to make some adjustments to your watering and feeding schedule. Containers and raised beds tend to dry out more quickly than in-ground gardens, so you may need to water more frequently. Additionally, the soil in containers and raised beds may become depleted of nutrients more quickly, so you may need to fertilize more often. Choose a well-draining potting mix or soil blend specifically formulated for vegetables. Ensure that your containers or raised beds are large enough to accommodate the mature size of your onion plants.
What are some common pests and diseases that affect onions, and how can I prevent them?
Common pests that affect onions include onion maggots, thrips, and aphids. Diseases that can affect onions include downy mildew, white rot, and pink root. To prevent these problems, practice good garden hygiene. Remove any dead or decaying plant material from your garden, as this can harbor pests and diseases. Rotate your crops each year to prevent the buildup of soilborne pathogens. Choose disease-resistant onion varieties whenever possible. Use row covers to protect your plants from pests. Water your onions at the base of the plants to avoid wetting the foliage, which can promote fungal diseases. If you notice any signs of pests or diseases, treat them promptly with an appropriate insecticide or fungicide.
Leave a Comment