
Grow Bean Sprouts Indoors: Imagine having a fresh, crunchy, and nutritious addition to your meals, grown right in your kitchen! Forget those bland, store-bought sprouts that lack flavor and vitality. I’m going to show you how incredibly easy it is to cultivate your own vibrant bean sprouts, adding a burst of freshness to your salads, sandwiches, and stir-fries.
Sprouting, in general, isn’t a new trend. In fact, it has a rich history, dating back thousands of years in various cultures, particularly in Asian cuisine. For centuries, sprouting has been a way to enhance the nutritional value of seeds and grains, making them more digestible and packed with vitamins. Think of it as unlocking the hidden potential within each tiny seed!
But why should you bother learning to grow bean sprouts indoors? Well, for starters, it’s incredibly cost-effective. A small bag of beans can yield a surprisingly large harvest of sprouts. Plus, you have complete control over the growing environment, ensuring they’re free from pesticides and other unwanted chemicals. More importantly, in today’s world, where access to fresh produce can sometimes be limited or expensive, knowing how to grow bean sprouts indoors offers a sustainable and reliable source of healthy food, right at your fingertips. So, let’s dive in and discover the simple secrets to sprouting success!
Grow Your Own Delicious Bean Sprouts Indoors: A Beginner’s Guide
Hey there, fellow food enthusiasts! Ever wanted to have fresh, crunchy bean sprouts on hand whenever you crave them? Well, you’re in luck! Growing your own bean sprouts at home is surprisingly easy, super rewarding, and way cheaper than buying them at the store. Plus, you know exactly what’s going into them – no weird preservatives or additives! I’m going to walk you through the whole process, step-by-step, so you can enjoy a constant supply of these nutritional powerhouses.
What You’ll Need
Before we dive in, let’s gather our supplies. The beauty of this project is that you probably already have most of these things lying around!
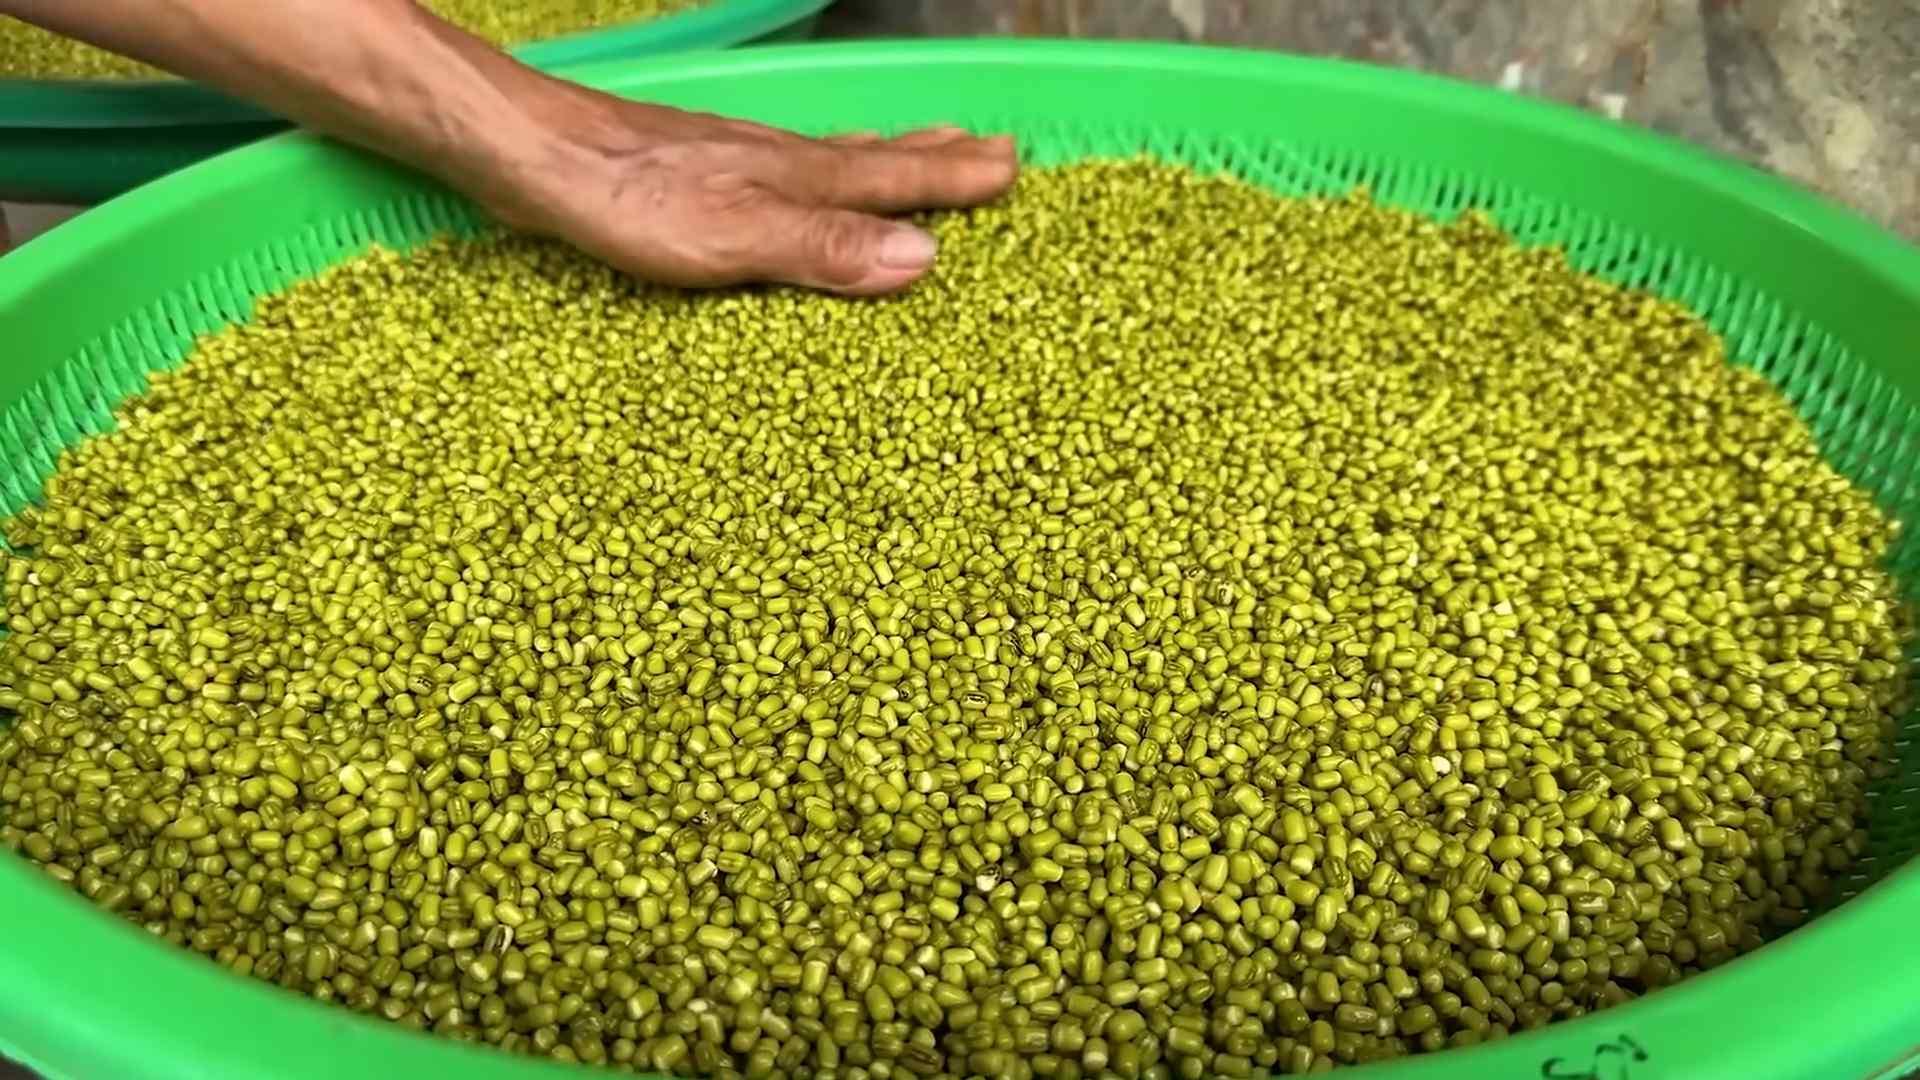
* **Bean Sprouts Seeds:** Mung beans are the most common and easiest to sprout, but you can also use adzuki beans, lentils, or even chickpeas. Just make sure they are specifically sold for sprouting and are fresh. Old beans might not sprout well. I usually get mine from a local health food store or online.
* **A Wide-Mouth Jar:** A quart-sized mason jar works perfectly. You can also use a clean plastic container, but glass is generally preferred because it’s easier to sterilize.
* **Sprouting Lid or Cheesecloth:** You’ll need something to cover the jar that allows for drainage and airflow. A sprouting lid is ideal, but a piece of cheesecloth secured with a rubber band works just as well.
* **Water:** Clean, filtered water is best.
* **A Dark Place:** Bean sprouts need darkness to grow properly. A cupboard, pantry, or even a cardboard box will do the trick.
* **A Bowl or Tray:** To set the jar in at an angle for drainage.
Step-by-Step Instructions: Sprouting Success!
Okay, let’s get sprouting! This process takes about 3-5 days, so get ready for some quick gratification.
1. **Rinse the Beans:** Place about 2-3 tablespoons of your chosen bean sprouts seeds into the jar. Rinse them thoroughly with cool water, removing any debris or broken beans. This is important to prevent mold growth.
2. **Soak the Beans:** Fill the jar with cool water, ensuring the beans are completely submerged. They’ll expand quite a bit during soaking, so leave plenty of room. Cover the jar with your sprouting lid or cheesecloth and secure it with a rubber band. Let the beans soak for 8-12 hours, or overnight. I usually do this before I go to bed so they’re ready to go in the morning.
3. **Drain and Rinse (The First Time):** After soaking, drain the water completely through the sprouting lid or cheesecloth. Rinse the beans thoroughly with fresh, cool water. This is crucial for removing any enzymes released during soaking that can contribute to bitterness.
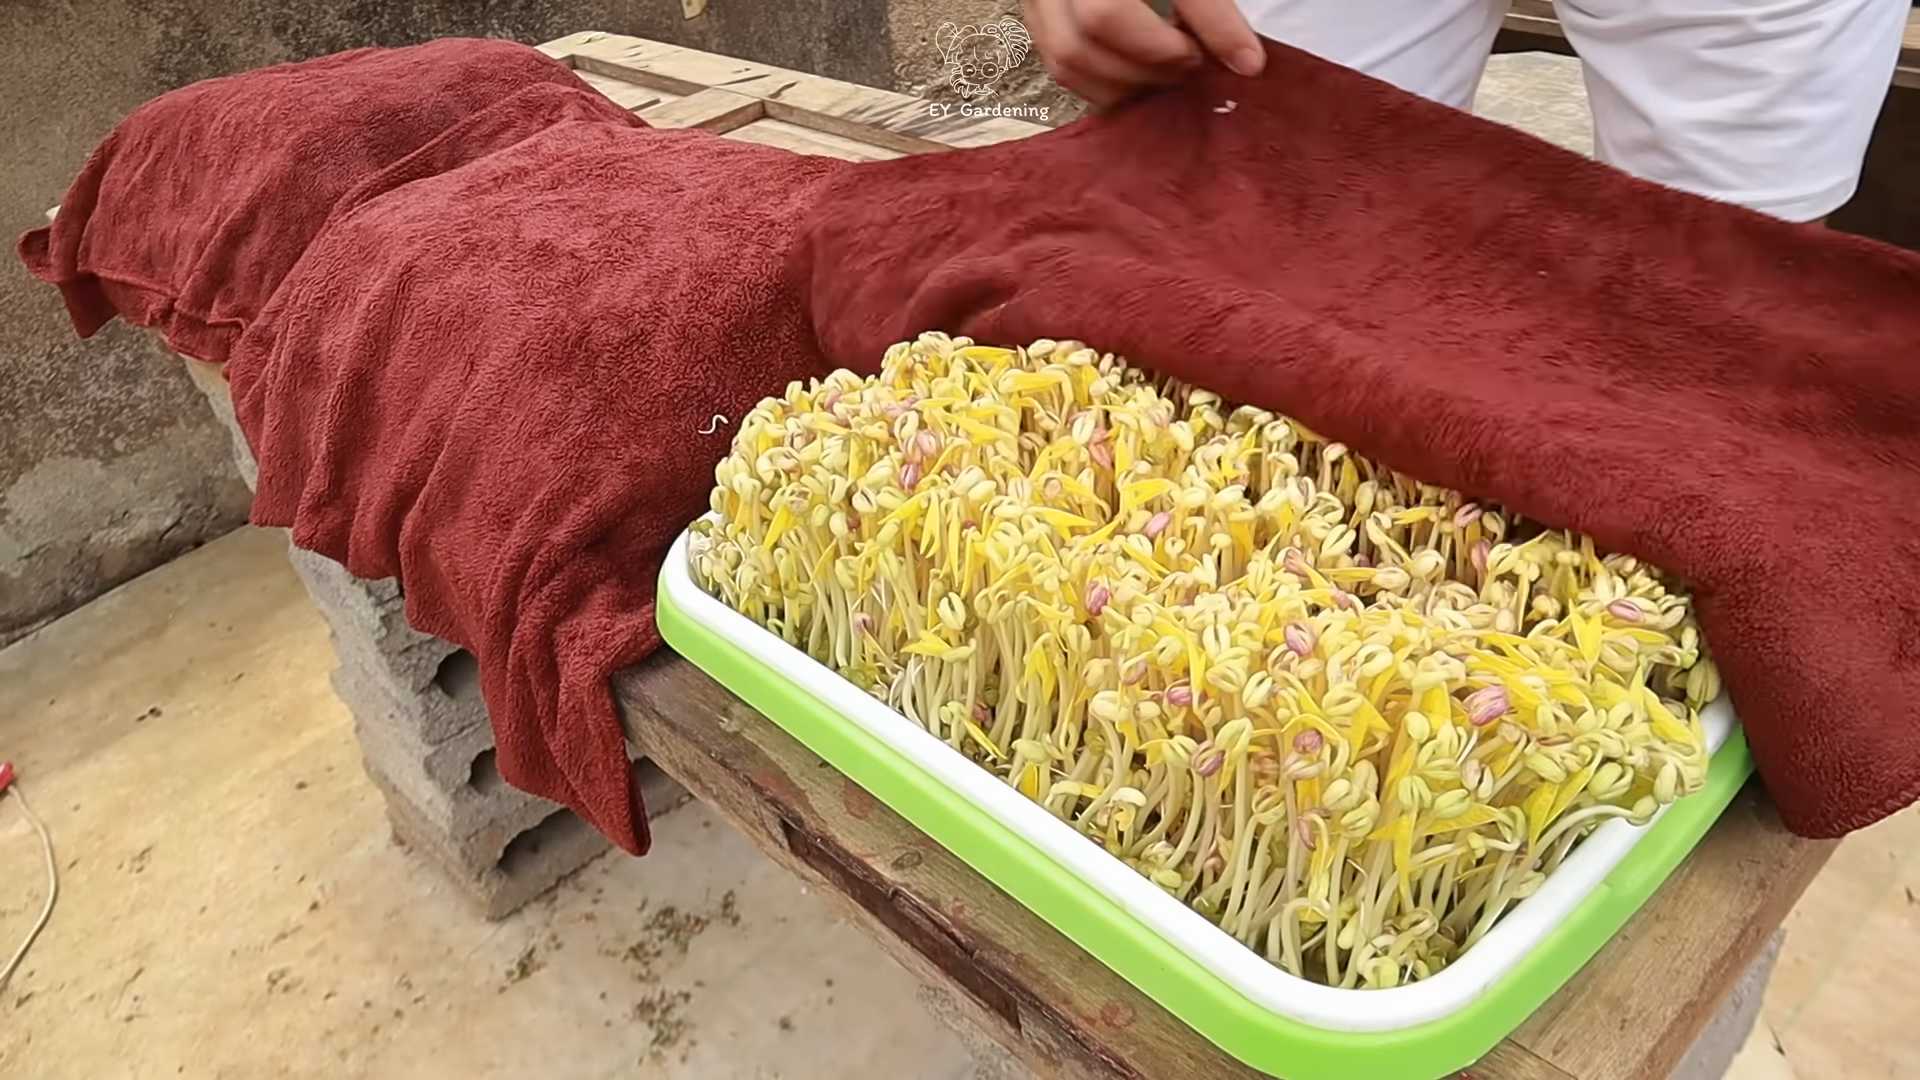
4. **Darkness is Key:** Place the jar upside down at an angle in a bowl or tray in your dark location. This allows excess water to drain out and prevents the beans from sitting in standing water, which can lead to rot. The angle is important!
5. **Rinse and Drain (Twice a Day):** This is the most important part! Rinse and drain the beans twice a day – once in the morning and once in the evening. Use cool, fresh water each time. This keeps them hydrated and prevents mold growth. Make sure to drain the water completely after each rinse. I usually do this over the sink, making sure to get all the little sprouts rinsed.
6. **Observe and Adjust:** After a day or two, you’ll start to see tiny sprouts emerging from the beans. Keep rinsing and draining twice a day. If you notice any mold (it will usually look fuzzy and white or gray), discard the entire batch immediately. Prevention is key, so make sure you’re rinsing thoroughly!
7. **Harvest Time!** After 3-5 days, your bean sprouts should be ready to harvest. They should be about 1-2 inches long and have a nice, crunchy texture. The exact time will depend on the type of bean and the temperature of your environment.
8. **Final Rinse and Storage:** Give your bean sprouts one final rinse with cool water. Remove any remaining unsprouted beans or hulls. Spread the sprouts out on a clean kitchen towel to dry slightly. Store them in an airtight container in the refrigerator. They should last for about a week.
Troubleshooting: Common Issues and Solutions
Even with the best intentions, sometimes things don’t go exactly as planned. Here are some common issues you might encounter and how to fix them:
* **Mold Growth:** This is usually caused by insufficient rinsing or poor drainage. Make sure you’re rinsing the beans thoroughly twice a day and that the jar is draining properly. If you see mold, discard the entire batch.
* **Slow Sprouting:** This could be due to old seeds, low temperatures, or insufficient moisture. Make sure your seeds are fresh and that you’re rinsing them regularly. If your house is cold, try placing the jar in a slightly warmer location (but not too warm!).
* **Bitter Taste:** This can be caused by enzymes released during soaking. Make sure you’re rinsing the beans thoroughly after soaking and during the sprouting process.
* **Rotting Beans:** This is usually caused by overwatering or poor drainage. Make sure the jar is draining properly and that the beans aren’t sitting in standing water.
Tips and Tricks for Sprouting Success
Here are a few extra tips to help you become a bean sprouting pro:
* Use a good quality sprouting lid. These lids are designed to provide optimal drainage and airflow, which can help prevent mold growth.
* Experiment with different types of beans. Mung beans are a great place to start, but don’t be afraid to try other varieties like adzuki beans, lentils, or chickpeas. Each type of bean has a unique flavor and texture.
* Adjust the sprouting time based on your preferences. Some people prefer shorter sprouts, while others prefer longer sprouts. Experiment to find what you like best.
* Keep a sprouting journal. This can help you track your progress and identify any issues. Note the type of bean you’re using, the soaking time, the rinsing frequency, and the sprouting time.
* Don’t overcrowd the jar. Using too many beans can lead to poor airflow and increased risk of mold growth. Start with a small amount and adjust as needed.
* Consider using a sprouting tray. If you’re serious about sprouting, you might want to invest in a sprouting tray. These trays are designed to provide optimal drainage and airflow, and they can make the sprouting process even easier.
* Make sure your water is clean. I always use filtered water, but tap water that has sat out for a while to let the chlorine dissipate is also fine.
Using Your Homegrown Bean Sprouts
Now that you’ve got a beautiful batch of bean sprouts, what do you do with them? The possibilities are endless! Here are a few of my favorite ways to use them:
* **Salads:** Add them to salads for a crunchy and nutritious boost.
* **Sandwiches and Wraps:** They add a great texture and flavor to sandwiches and wraps.
* **Stir-fries:** Toss them into stir-fries for a quick and easy way to add vegetables.
* **Soups:** Sprinkle them on top of soups for a fresh and crunchy garnish.
* **Spring Rolls:** They’re a classic ingredient in spring rolls.
* **As a Snack:** Just eat them raw! They’re a healthy and satisfying snack.
Why Grow Your Own Bean Sprouts?
Besides being incredibly easy and cost-effective, growing your own bean sprouts offers several other benefits:
* Freshness: You can’t beat the taste of freshly sprouted beans.
* Nutrition: Bean sprouts are packed with vitamins, minerals, and enzymes.
* Control: You know exactly what’s going into your sprouts – no pesticides or additives.
* Sustainability: Growing your own food reduces your carbon footprint.
* Fun: It’s a fun and rewarding project that the whole family can enjoy.
So, what are you waiting for? Grab some beans and get sprouting! I promise you’ll be amazed at how easy and rewarding it is to grow your own delicious and nutritious bean sprouts at home. Happy sprouting!
Conclusion
So, there you have it! Growing your own bean sprouts indoors is not only incredibly easy and cost-effective, but it also provides you with a constant supply of fresh, nutritious ingredients right at your fingertips. Forget those limp, expensive sprouts from the grocery store – with just a few simple steps, you can cultivate vibrant, crunchy bean sprouts bursting with flavor and goodness.
This DIY trick is a must-try for anyone looking to add a healthy boost to their diet, reduce their grocery bills, and experience the satisfaction of growing their own food. The process is remarkably simple, requiring minimal equipment and effort. Plus, it’s a fantastic project for families, teaching children about the wonders of plant growth and the importance of healthy eating.
But the benefits don’t stop there. Growing your own bean sprouts allows you to control the entire process, ensuring that your sprouts are free from harmful chemicals and pesticides. You can also experiment with different types of beans to create a variety of flavors and textures. Try mung beans for the classic sprout, adzuki beans for a slightly sweeter taste, or even lentils for a heartier sprout.
Consider these variations to personalize your bean sprout growing experience:
* **Sprout Blend:** Mix different types of beans together for a unique and flavorful sprout blend.
* **Spicy Sprouts:** Add a pinch of chili flakes to your soaking water for a subtle kick.
* **Garlic Sprouts:** Include a clove of crushed garlic in your sprouting jar for a savory twist.
* **Hydroponic Sprouts:** For a more advanced approach, explore hydroponic sprouting systems for even faster and more efficient growth.
We are confident that once you try this DIY trick, you’ll be hooked. The satisfaction of watching those tiny seeds transform into crunchy, delicious bean sprouts is truly rewarding. It’s a simple yet powerful way to connect with nature, nourish your body, and add a touch of freshness to your meals.
Don’t hesitate to give it a try! We encourage you to embark on your own bean sprout growing adventure and discover the joys of homegrown goodness. And most importantly, we want to hear about your experience! Share your tips, tricks, and photos with us in the comments below. Let’s build a community of sprout enthusiasts and inspire others to embrace the magic of growing their own food. Happy sprouting!
Frequently Asked Questions (FAQs)
What types of beans can I use to grow bean sprouts?
The most common and readily available bean for sprouting is the mung bean. However, you can also successfully sprout other types of beans and legumes, including adzuki beans, lentils, chickpeas, and even some types of peas. Keep in mind that different beans will have different sprouting times and flavor profiles. Avoid using kidney beans, as they contain toxins that are only destroyed through thorough cooking, not sprouting. Always use beans specifically intended for sprouting or food consumption, not those treated for agricultural purposes.
How long does it take to grow bean sprouts?
Typically, bean sprouts will be ready to harvest in 3 to 5 days. The exact time will depend on the type of bean, the temperature, and the humidity levels. Mung beans tend to sprout relatively quickly, while other beans may take a bit longer. You’ll know your sprouts are ready when they have developed a small root and a short stem with tiny leaves.
What is the best way to prevent mold growth during sprouting?
Mold growth is a common concern when sprouting beans, but it can be easily prevented with proper hygiene and ventilation. The most important step is to rinse your sprouts thoroughly at least twice a day with cool, clean water. This helps to remove any bacteria or mold spores that may be present. Ensure that your sprouting container has adequate drainage and ventilation to prevent moisture from building up. Avoid overcrowding the container, as this can also contribute to mold growth. If you notice any signs of mold, discard the entire batch of sprouts immediately.
How do I store bean sprouts after they are grown?
Once your bean sprouts are ready to harvest, rinse them thoroughly and drain them well. Pat them dry with a clean paper towel to remove excess moisture. Store the sprouts in an airtight container lined with a paper towel in the refrigerator. They should stay fresh for up to a week. Check them regularly for any signs of spoilage and discard them if they become slimy or develop an off odor.
Are bean sprouts safe to eat raw?
While bean sprouts are generally safe to eat raw, there is a small risk of foodborne illness associated with consuming raw sprouts. This is because sprouts are grown in warm, moist conditions, which can be conducive to bacterial growth. To minimize the risk, it’s essential to purchase high-quality sprouting beans from a reputable source and to follow proper sprouting techniques, including thorough rinsing and sanitation. If you are concerned about the risk of foodborne illness, you can cook your bean sprouts lightly before eating them. Steaming or stir-frying them for a few minutes will kill any harmful bacteria.
What are the nutritional benefits of eating bean sprouts?
Bean sprouts are a nutritional powerhouse, packed with vitamins, minerals, and antioxidants. They are a good source of vitamin C, vitamin K, folate, and fiber. They also contain essential minerals like iron, potassium, and magnesium. Bean sprouts are low in calories and fat, making them a healthy addition to any diet. The sprouting process also increases the bioavailability of certain nutrients, making them easier for your body to absorb.
Can I grow bean sprouts without a special sprouting jar?
Yes, you can absolutely grow bean sprouts without a special sprouting jar. A simple mason jar with a cheesecloth or mesh lid secured with a rubber band works perfectly well. You can also use a colander lined with cheesecloth or a clean kitchen towel. The key is to ensure that your container provides adequate drainage and ventilation.
My bean sprouts are not growing. What could be the problem?
There are several reasons why your bean sprouts may not be growing. First, make sure that your beans are viable and specifically intended for sprouting. Old or damaged beans may not germinate properly. Second, ensure that you are rinsing your sprouts regularly and providing them with adequate moisture. Third, check the temperature. Bean sprouts prefer a warm environment, ideally between 70 and 80 degrees Fahrenheit. Finally, make sure that your sprouts are not exposed to direct sunlight, which can inhibit growth.
How do I know if my bean sprouts have gone bad?
You’ll know your bean sprouts have gone bad if they develop a slimy texture, an off odor, or show signs of mold growth. Discard any sprouts that exhibit these characteristics immediately. It’s always better to be safe than sorry when it comes to food safety.
Can I use tap water to grow bean sprouts?
While tap water is generally safe to use, it’s best to use filtered or purified water for sprouting. Tap water may contain chlorine or other chemicals that can inhibit germination and affect the flavor of your sprouts. If you only have access to tap water, let it sit out for 24 hours to allow the chlorine to evaporate before using it for sprouting.

Leave a Comment