
Grow bean sprouts at home – it’s easier than you think, and I’m here to show you how! Forget those bland, store-bought sprouts; imagine biting into crisp, fresh, and incredibly flavorful bean sprouts that you nurtured yourself. Sounds amazing, right?
For centuries, bean sprouts have been a staple in Asian cuisine, adding a delightful crunch and a boost of nutrients to everything from stir-fries to salads. They’re not just delicious; they’re packed with vitamins and minerals, making them a healthy addition to your diet. But why rely on the grocery store when you can easily grow bean sprouts at home, controlling the quality and freshness every step of the way?
In today’s world, where we’re all looking for ways to eat healthier, save money, and connect with nature, growing your own food is more appealing than ever. This DIY trick is perfect for anyone, regardless of gardening experience. Whether you live in a sprawling house with a garden or a tiny apartment, you can enjoy the satisfaction of growing your own bean sprouts. Plus, it’s a fantastic project for kids, teaching them about the magic of seeds and the importance of healthy eating. So, let’s dive in and discover the simple secrets to cultivating your own delicious bean sprouts!
Bohnensprossen selber ziehen: Eine einfache Anleitung für zu Hause
Hallo liebe DIY-Freunde! Habt ihr Lust auf frische, knackige Bohnensprossen, aber keine Lust, sie im Supermarkt zu kaufen? Keine Sorge, ich zeige euch, wie ihr sie ganz einfach und kostengünstig zu Hause ziehen könnt. Es ist wirklich kinderleicht und macht Spaß! Außerdem wisst ihr genau, was drin ist – nämlich nur leckere, gesunde Sprossen. Los geht’s!
Was ihr braucht:
* Bohnen: Am besten eignen sich Mungbohnen, aber auch Adzukibohnen oder Linsen funktionieren super. Achtet darauf, dass die Bohnen unbehandelt und keimfähig sind. Ihr findet sie oft im Bioladen oder Reformhaus.
* Ein Keimglas oder ein anderes Gefäß: Ein Einmachglas mit einem Gitterdeckel oder einem Stück Mulltuch, das ihr mit einem Gummiband befestigt, ist ideal. Es gibt auch spezielle Keimgläser zu kaufen, aber das ist kein Muss.
* Wasser: Sauberes, gefiltertes Wasser ist am besten.
* Ein dunkler Ort: Ein Schrank, eine Schublade oder ein abgedeckter Behälter eignen sich gut.
* Geduld: Die Sprossen brauchen ein paar Tage, um zu wachsen.
Schritt-für-Schritt-Anleitung:
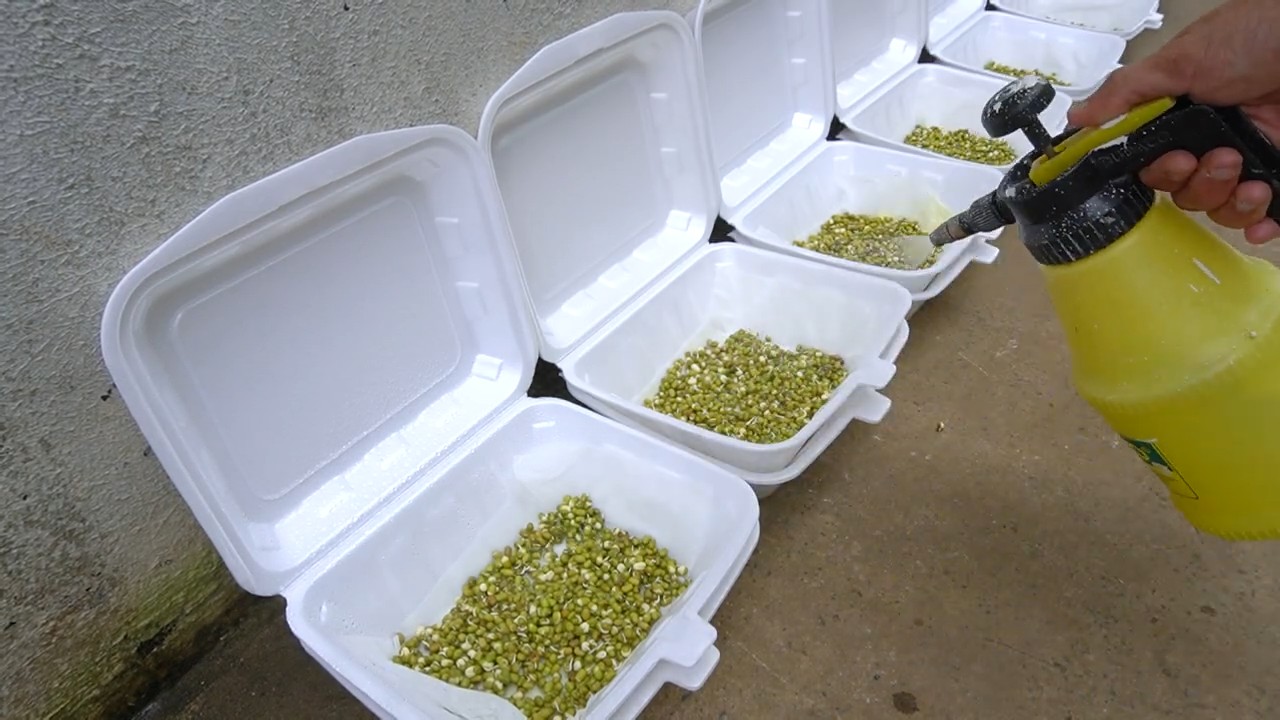
1. Bohnen vorbereiten:
* Nehmt etwa 2-3 Esslöffel Bohnen pro Keimglas. Das klingt wenig, aber die Bohnen quellen noch auf und nehmen viel Platz ein.
* Spült die Bohnen gründlich unter fließendem Wasser ab, um Staub und Schmutz zu entfernen.
* Gebt die Bohnen in euer Keimglas oder Gefäß.
* Füllt das Glas mit reichlich Wasser, so dass die Bohnen gut bedeckt sind.
* Lasst die Bohnen für 8-12 Stunden (oder über Nacht) einweichen. Dieser Schritt ist wichtig, damit die Bohnen aufquellen und der Keimprozess beginnen kann.
2. Keimglas vorbereiten:
* Nach dem Einweichen gießt ihr das Wasser ab und spült die Bohnen noch einmal gründlich durch.
* Stellt sicher, dass das Wasser gut abläuft. Die Bohnen sollten feucht, aber nicht im Wasser stehen.
* Wenn ihr ein Einmachglas mit Mulltuch verwendet, befestigt das Tuch gut mit einem Gummiband.
3. Keimprozess starten:
* Stellt das Keimglas an einen dunklen Ort. Dunkelheit fördert das Wachstum der Sprossen.
* Stellt das Glas schräg, so dass überschüssiges Wasser ablaufen kann.
* Spült die Bohnen 2-3 Mal täglich mit frischem Wasser. Das ist wichtig, um Schimmelbildung zu vermeiden und die Bohnen feucht zu halten.
* Nach dem Spülen lasst ihr das Wasser wieder gut ablaufen und stellt das Glas wieder schräg an seinen dunklen Platz.
4. Wachstum beobachten:
* Nach 1-2 Tagen solltet ihr die ersten kleinen Keime sehen.
* Spült die Bohnen weiterhin 2-3 Mal täglich.
* Die Sprossen werden jeden Tag größer.
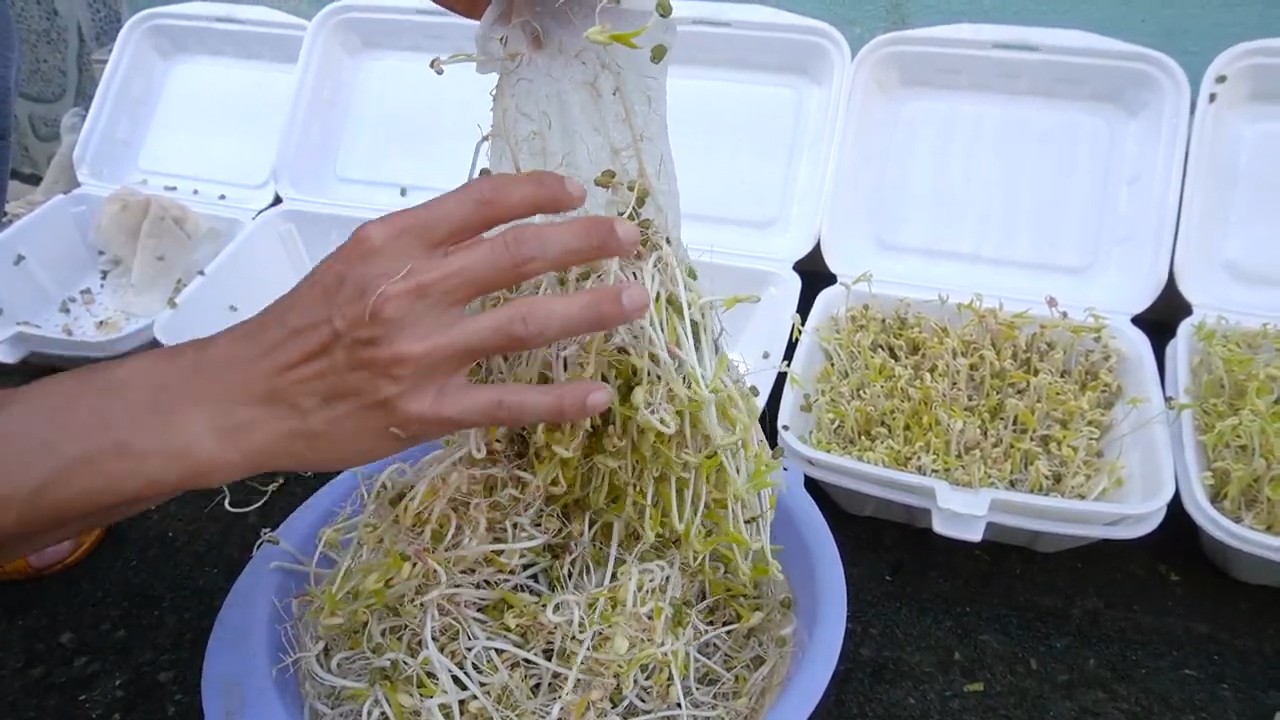
5. Ernten und genießen:
* Nach 3-5 Tagen (je nach gewünschter Länge der Sprossen) sind eure Bohnensprossen erntereif.
* Spült die Sprossen noch einmal gründlich ab.
* Entfernt eventuell noch vorhandene Hülsen.
* Lasst die Sprossen gut abtropfen.
* Fertig! Jetzt könnt ihr eure selbst gezogenen Bohnensprossen genießen.
Tipps und Tricks für perfekte Bohnensprossen:
* Hygiene ist wichtig: Achtet darauf, dass alle Utensilien sauber sind, um Schimmelbildung zu vermeiden.
* Die richtige Temperatur: Die ideale Temperatur für das Keimen liegt zwischen 18 und 22 Grad Celsius.
* Nicht zu viele Bohnen: Verwendet nicht zu viele Bohnen pro Glas, da sie beim Keimen stark an Volumen zunehmen.
* Regelmäßiges Spülen: Das regelmäßige Spülen ist entscheidend, um die Sprossen feucht zu halten und Schimmelbildung zu verhindern.
* Licht am Ende: Wenn die Sprossen fast fertig sind, könnt ihr sie für ein paar Stunden ans Licht stellen. Dadurch werden sie grüner und entwickeln mehr Chlorophyll.
* Lagerung: Bewahrt die fertigen Sprossen im Kühlschrank auf. Sie halten sich dort etwa 3-5 Tage. Am besten in einem luftdichten Behälter oder in einem feuchten Tuch eingewickelt.
Mögliche Probleme und Lösungen:
* Schimmelbildung: Wenn ihr Schimmel entdeckt, solltet ihr die Sprossen sofort entsorgen. Achtet beim nächsten Mal auf bessere Hygiene und regelmäßigeres Spülen.
* Keine Keimung: Wenn die Bohnen nicht keimen, kann das an der Qualität der Bohnen liegen. Verwendet beim nächsten Mal frische, keimfähige Bohnen. Es kann auch an der Temperatur liegen.
* Schleimige Sprossen: Schleimige Sprossen deuten auf Bakterienwachstum hin. Spült die Sprossen gründlicher und öfter.
Verwendungsmöglichkeiten für Bohnensprossen:
Bohnensprossen sind unglaublich vielseitig und können in vielen Gerichten verwendet werden. Hier ein paar Ideen:
* Salate: Gebt Bohnensprossen in eure Salate für einen frischen, knackigen Biss.
* Suppen: Bohnensprossen sind eine tolle Ergänzung zu asiatischen Suppen wie Pho oder Ramen.
* Wok-Gerichte: Fügt Bohnensprossen am Ende des Garprozesses zu euren Wok-Gerichten hinzu.
* Frühlingsrollen: Bohnensprossen sind ein klassischer Bestandteil von Frühlingsrollen.
* Sandwiches und Wraps: Gebt Bohnensprossen auf eure Sandwiches oder Wraps für mehr Textur und Nährstoffe.
* Pur: Einfach pur als Snack knabbern!
Warum Bohnensprossen selber ziehen?
Es gibt viele gute Gründe, Bohnensprossen selber zu ziehen:
* Frische: Selbst gezogene Sprossen sind viel frischer als gekaufte.
* Geschmack: Sie schmecken einfach besser!
* Kosten: Es ist viel günstiger, Sprossen selber zu ziehen, als sie zu kaufen.
* Kontrolle: Ihr wisst genau, was drin ist und könnt sicher sein, dass keine unnötigen Zusätze enthalten sind.
* Nachhaltigkeit: Ihr vermeidet unnötige Verpackung und Transportwege.
* Spaß: Es macht einfach Spaß, zu sehen, wie die kleinen Sprossen wachsen!
Noch ein paar abschließende Worte:
Ich hoffe, diese Anleitung hat euch geholfen und ihr habt jetzt Lust bekommen, eure eigenen Bohnensprossen zu ziehen. Es ist wirklich ein tolles Gefühl, etwas selbst anzubauen und dann zu genießen. Probiert es aus und lasst mich wissen, wie es euch gefallen hat! Viel Erfolg und guten Appetit!
Conclusion
So, there you have it! Growing your own bean sprouts at home is not only incredibly easy and cost-effective, but it also provides you with a constant supply of fresh, crunchy goodness. Forget those limp, pre-packaged sprouts from the grocery store. With just a few simple supplies and a little patience, you can cultivate a vibrant batch of bean sprouts bursting with flavor and nutrients, right in your own kitchen.
Why is this DIY trick a must-try? Because it empowers you to take control of your food source, ensuring you’re consuming the freshest, most wholesome ingredients possible. You’ll avoid the preservatives and potential contaminants often found in commercially grown sprouts. Plus, the satisfaction of watching those tiny seeds transform into edible sprouts is surprisingly rewarding. It’s a mini-gardening project that yields delicious results in just a few days!
Beyond the basic method, there are plenty of ways to customize your bean sprout growing experience. Experiment with different types of beans – mung beans are the most common, but you can also try adzuki beans, lentils, or even alfalfa seeds for a variety of flavors and textures. Consider adding a touch of natural light during the final stages of growth to encourage chlorophyll production, resulting in greener, more nutrient-rich sprouts. You can also adjust the sprouting time to achieve your preferred sprout length and crunchiness. Some people prefer shorter, more delicate sprouts, while others enjoy longer, heartier ones.
Don’t be afraid to get creative! You can even infuse your sprouts with subtle flavors by adding a few drops of lemon juice or a pinch of sea salt to the rinsing water. For a spicy kick, try adding a small piece of ginger or a chili pepper to the sprouting jar.
We wholeheartedly encourage you to give this DIY bean sprout growing method a try. It’s a simple, sustainable, and delicious way to enhance your meals and boost your overall health. Once you experience the difference between homegrown and store-bought sprouts, you’ll never go back!
And most importantly, we want to hear about your experience! Share your photos, tips, and variations in the comments below. Let us know what worked best for you, what challenges you encountered, and what delicious dishes you created with your homegrown bean sprouts. Together, we can build a community of sprout enthusiasts and inspire others to embrace the joys of DIY food production. So, grab your beans, your jar, and get sprouting! You’ll be amazed at how easy it is to grow bean sprouts at home and enjoy the fresh, vibrant flavors they bring to your table.
Frequently Asked Questions (FAQ)
What types of beans can I use to grow bean sprouts?
The most common and readily available bean for sprouting is the mung bean. However, you can also successfully sprout adzuki beans, lentils, chickpeas, and even alfalfa seeds. Each type of bean will yield sprouts with slightly different flavors and textures. Mung bean sprouts are known for their mild, slightly sweet flavor and crisp texture, while adzuki bean sprouts have a nuttier taste. Lentil sprouts are smaller and have a more earthy flavor. Experiment with different types to find your favorites! Just be sure to use beans specifically intended for sprouting or cooking, not ornamental beans, as some ornamental varieties can be toxic.
How long does it take to grow bean sprouts?
Generally, it takes between 3 to 5 days to grow bean sprouts at home. The exact time will depend on the type of bean, the temperature of your environment, and your personal preference for sprout length. Mung bean sprouts typically reach a good size within 3 to 4 days. Keep an eye on your sprouts and harvest them when they reach your desired length and crunchiness.
What kind of container should I use for sprouting?
A wide-mouth mason jar is an excellent choice for sprouting beans. The wide mouth makes it easy to rinse and drain the sprouts. You can also use a sprouting tray or a specialized sprouting container with built-in drainage. Whatever container you choose, make sure it’s clean and allows for good air circulation. A breathable lid, such as cheesecloth secured with a rubber band or a sprouting lid with mesh, is essential for proper drainage and ventilation.
How often should I rinse the bean spro
So, there you have it! Growing your own bean sprouts at home is not only incredibly easy and cost-effective, but it also provides you with a constant supply of fresh, crunchy goodness. Forget those limp, pre-packaged sprouts from the grocery store. With just a few simple supplies and a little patience, you can cultivate a vibrant batch of bean sprouts bursting with flavor and nutrients, right in your own kitchen.
Why is this DIY trick a must-try? Because it empowers you to take control of your food source, ensuring you’re consuming the freshest, most wholesome ingredients possible. You’ll avoid the preservatives and potential contaminants often found in commercially grown sprouts. Plus, the satisfaction of watching those tiny seeds transform into edible sprouts is surprisingly rewarding. It’s a mini-gardening project that yields delicious results in just a few days!
Beyond the basic method, there are plenty of ways to customize your bean sprout growing experience. Experiment with different types of beans – mung beans are the most common, but you can also try adzuki beans, lentils, or even alfalfa seeds for a variety of flavors and textures. Consider adding a touch of natural light during the final stages of growth to encourage chlorophyll production, resulting in greener, more nutrient-rich sprouts. You can also adjust the sprouting time to achieve your preferred sprout length and crunchiness. Some people prefer shorter, more delicate sprouts, while others enjoy longer, heartier ones.
Don’t be afraid to get creative! You can even infuse your sprouts with subtle flavors by adding a few drops of lemon juice or a pinch of sea salt to the rinsing water. For a spicy kick, try adding a small piece of ginger or a chili pepper to the sprouting jar.
We wholeheartedly encourage you to give this DIY bean sprout growing method a try. It’s a simple, sustainable, and delicious way to enhance your meals and boost your overall health. Once you experience the difference between homegrown and store-bought sprouts, you’ll never go back!
And most importantly, we want to hear about your experience! Share your photos, tips, and variations in the comments below. Let us know what worked best for you, what challenges you encountered, and what delicious dishes you created with your homegrown bean sprouts. Together, we can build a community of sprout enthusiasts and inspire others to embrace the joys of DIY food production. So, grab your beans, your jar, and get sprouting! You’ll be amazed at how easy it is to grow bean sprouts at home and enjoy the fresh, vibrant flavors they bring to your table.
Frequently Asked Questions (FAQ)
What types of beans can I use to grow bean sprouts?
The most common and readily available bean for sprouting is the mung bean. However, you can also successfully sprout adzuki beans, lentils, chickpeas, and even alfalfa seeds. Each type of bean will yield sprouts with slightly different flavors and textures. Mung bean sprouts are known for their mild, slightly sweet flavor and crisp texture, while adzuki bean sprouts have a nuttier taste. Lentil sprouts are smaller and have a more earthy flavor. Experiment with different types to find your favorites! Just be sure to use beans specifically intended for sprouting or cooking, not ornamental beans, as some ornamental varieties can be toxic.
How long does it take to grow bean sprouts?
Generally, it takes between 3 to 5 days to grow bean sprouts at home. The exact time will depend on the type of bean, the temperature of your environment, and your personal preference for sprout length. Mung bean sprouts typically reach a good size within 3 to 4 days. Keep an eye on your sprouts and harvest them when they reach your desired length and crunchiness.
What kind of container should I use for sprouting?
A wide-mouth mason jar is an excellent choice for sprouting beans. The wide mouth makes it easy to rinse and drain the sprouts. You can also use a sprouting tray or a specialized sprouting container with built-in drainage. Whatever container you choose, make sure it’s clean and allows for good air circulation. A breathable lid, such as cheesecloth secured with a rubber band or a sprouting lid with mesh, is essential for proper drainage and ventilation.
How often should I rinse the bean sprouts?
Rinsing your bean sprouts at least twice a day is crucial to prevent mold and bacterial growth. In warmer climates, you may need to rinse them even more frequently, up to three or four times a day. Use cool, clean water to rinse the sprouts thoroughly, ensuring that all surfaces are wetted. After rinsing, drain the water completely to prevent the sprouts from sitting in excess moisture.
What if my bean sprouts start to smell bad?
A foul odor is a sign that your bean sprouts may be contaminated with bacteria or mold. If you notice a bad smell, discard the sprouts immediately. To prevent this, ensure you are rinsing the sprouts frequently and thoroughly, using clean water. Also, avoid overcrowding the sprouting container, as this can restrict air circulation and promote bacterial growth.
Can I grow bean sprouts in direct sunlight?
While bean sprouts don’t need direct sunlight to grow, exposing them to indirect light during the final stages of sprouting can help them develop chlorophyll, which gives them a greener color and increases their nutritional value. Avoid direct sunlight, as this can overheat the sprouts and cause them to dry out.
How do I store bean sprouts after they are grown?
Once your bean sprouts have reached your desired size, rinse them thoroughly and drain them well. Store them in an airtight container lined with a paper towel in the refrigerator. The paper towel will help absorb excess moisture and keep the sprouts fresh for up to a week.
Are there any health benefits to eating bean sprouts?
Yes! Bean sprouts are a nutritional powerhouse. They are a good source of vitamins, minerals, and enzymes. They are low in calories and high in fiber, making them a healthy addition to any diet. Bean sprouts are also rich in antioxidants, which can help protect your body against damage from free radicals.
Can I eat bean sprouts raw?
While many people enjoy eating bean sprouts raw, it’s important to be aware of the potential risks of foodborne illness. Raw sprouts can harbor bacteria such as Salmonella and E. coli. To minimize the risk, purchase sprouts from a reputable source and wash them thoroughly before eating. Cooking bean sprouts significantly reduces the risk of bacterial contamination.
What are some ways to use bean sprouts in my cooking?
Bean sprouts are incredibly versatile and can be used in a wide variety of dishes. They are a popular addition to stir-fries, salads, soups, and sandwiches. They can also be used as a topping for tacos, spring rolls, and other Asian-inspired dishes. Their crunchy texture and mild flavor make them a welcome addition to almost any meal.
Leave a Comment