
Grow Asparagus Fast? Absolutely! Imagine harvesting your own delicious, tender asparagus spears just a few months from now, instead of waiting the typical two to three years. Sounds too good to be true? It’s not! This guide is packed with DIY tricks and hacks that will help you accelerate asparagus growth and enjoy fresh, homegrown goodness sooner than you ever thought possible.
Asparagus has a rich history, dating back to ancient Greece and Rome, where it was prized for its medicinal properties and culinary delights. For centuries, cultivating asparagus has been a labor of love, often requiring patience and dedication. But what if you could bypass some of that waiting time and enjoy the fruits (or rather, vegetables) of your labor much faster?
Let’s face it, in today’s fast-paced world, who has time to wait years for a single harvest? That’s where these DIY tricks come in. Whether you’re a seasoned gardener or just starting out, these simple yet effective techniques will empower you to grow asparagus fast and efficiently. From soil preparation secrets to clever planting strategies, we’ll cover everything you need to know to jumpstart your asparagus patch and enjoy a bountiful harvest in record time. So, grab your gardening gloves, and let’s get started!
Growing Asparagus Faster: A DIY Guide
Asparagus, that delicious and nutritious spring vegetable, is often thought of as a long-term commitment. And it’s true, establishing a productive asparagus bed takes time. But what if I told you there are ways to significantly speed up the process? I’m going to share my secrets for getting your asparagus patch producing sooner than you ever thought possible!
Understanding Asparagus Growth
Before we dive into the how-to, let’s quickly cover the basics of asparagus growth. Asparagus is a perennial plant, meaning it lives for many years. It grows from underground crowns, which are essentially the plant’s root system. These crowns send up spears in the spring, which we harvest. The spears that aren’t harvested turn into ferns, which photosynthesize and feed the crown, building up its energy reserves for the next year’s harvest.
The key to faster asparagus production lies in giving those crowns the best possible start and maximizing their growth potential. We’ll achieve this through careful site selection, soil preparation, crown selection, planting techniques, and ongoing care.
Choosing the Right Asparagus Variety
Not all asparagus varieties are created equal. Some are known for their early production and high yields. Here are a few of my favorites:
* ‘Jersey Knight’: This is an all-male hybrid variety, which means it doesn’t produce seeds. This is a huge advantage because the plant puts all its energy into spear production instead of seed production. ‘Jersey Knight’ is also known for its disease resistance.
* ‘Jersey Giant’: Similar to ‘Jersey Knight,’ ‘Jersey Giant’ is another all-male hybrid with excellent yields and disease resistance. It tends to produce slightly larger spears.
* ‘Millennium’: This is a relatively newer variety that’s gaining popularity for its early production, high yields, and tolerance to various soil conditions.
Choosing one of these varieties will give you a head start in your quest for faster asparagus production.
Preparing the Asparagus Bed: The Foundation for Success
Asparagus needs a well-drained, sunny location with fertile soil. This is the most crucial step, so don’t skimp on the preparation!
* Sunlight: Asparagus needs at least 6-8 hours of direct sunlight per day.
* Soil Drainage: Asparagus crowns will rot in soggy soil. Make sure your chosen location has excellent drainage. If your soil is heavy clay, you’ll need to amend it extensively.
* Soil pH: Asparagus prefers a soil pH between 6.5 and 7.0. You can test your soil pH with a home testing kit or send a sample to your local agricultural extension office.
* Nutrient Richness: Asparagus is a heavy feeder, so the soil needs to be rich in organic matter.
Step-by-Step Soil Preparation
1. Clear the Area: Remove all weeds, grass, rocks, and debris from the planting area. This is much easier to do *before* you start digging.
2. Dig a Trench: Dig a trench that is approximately 12 inches wide and 12 inches deep. The length of the trench will depend on how many asparagus crowns you’re planting. Allow about 12-18 inches between crowns.
3. Amend the Soil: This is where the magic happens! Mix the soil you removed from the trench with generous amounts of organic matter. I like to use a combination of well-rotted compost, aged manure, and peat moss. Aim for a 50/50 mix of soil and organic matter.
4. Add Fertilizer: Incorporate a slow-release fertilizer formulated for vegetables into the soil mixture. Follow the instructions on the fertilizer package. Bone meal is also a great addition, as it provides phosphorus, which is essential for root development.
5. Refill the Trench (Partially): Fill the trench with about 4-6 inches of the amended soil mixture. This will create a raised bed for your asparagus crowns.
Selecting and Preparing Asparagus Crowns
Choosing healthy, vigorous asparagus crowns is essential for fast growth.
* Age: I recommend purchasing 1-year-old crowns. They are less expensive than 2-year-old crowns and will catch up quickly with proper care.
* Appearance: Look for crowns that are plump, firm, and free from signs of disease or damage. The roots should be numerous and healthy-looking.
* Soaking: Before planting, soak the asparagus crowns in a bucket of water for about an hour. This will help rehydrate them and give them a good start.
Planting the Asparagus Crowns: The Right Way
Planting depth is crucial for asparagus. Too shallow, and the crowns will dry out. Too deep, and they may rot.
1. Create Mounds: In the prepared trench, create small mounds of soil about 12-18 inches apart. These mounds will support the asparagus crowns.
2. Position the Crowns: Place an asparagus crown on top of each mound, spreading the roots out evenly around the mound.
3. Cover the Crowns: Gently cover the crowns with about 2-3 inches of the amended soil mixture. Don’t bury them too deeply at this stage.
4. Water Thoroughly: Water the newly planted crowns thoroughly to settle the soil and provide moisture.
Ongoing Care: Nurturing Your Asparagus Patch
Consistent care is essential for maximizing asparagus growth and production.
* Watering: Keep the soil consistently moist, especially during dry periods. Asparagus needs plenty of water to thrive.
* Weeding: Keep the asparagus bed free of weeds. Weeds compete with the asparagus for nutrients and water. Hand-pull weeds carefully to avoid damaging the asparagus crowns.
* Fertilizing: Fertilize the asparagus bed in early spring and again after the harvest season. Use a balanced fertilizer formulated for vegetables.
* Mulching: Apply a layer of organic mulch, such as straw or wood chips, around the asparagus plants. Mulch helps retain moisture, suppress weeds, and regulate soil temperature.
* Gradual Filling: As the asparagus spears emerge and grow, gradually fill in the trench with the remaining amended soil mixture. This will encourage the crowns to develop more roots. By the end of the first growing season, the trench should be completely filled in.
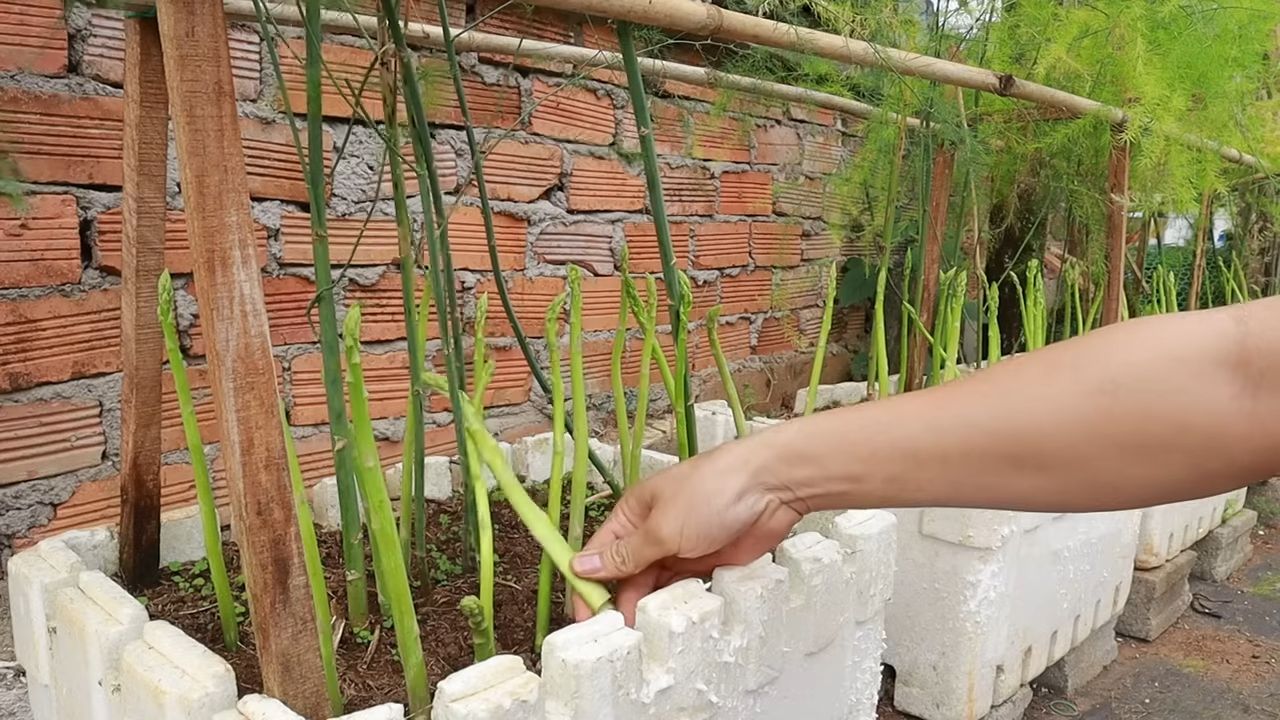
Harvesting Asparagus: Patience is Key (But Not for Long!)
This is the hardest part: waiting! But trust me, it’s worth it.
* First Year: Do not harvest any spears during the first year. This allows the crowns to establish themselves and build up their energy reserves.
* Second Year: You can harvest a few spears in the second year, but only for a short period (about 2-3 weeks). Choose spears that are at least 1/2 inch in diameter.
* Third Year and Beyond: In the third year, you can harvest asparagus for a longer period (6-8 weeks). Harvest spears when they are 6-8 inches tall.
To harvest, snap the spears off at ground level. Avoid cutting them, as this can damage the crown.
Boosting Growth with Additional Techniques
Here are a few extra tips and tricks I’ve learned over the years to further accelerate asparagus growth:
* Mycorrhizal Inoculation: When planting the crowns, consider adding mycorrhizal fungi to the soil. These beneficial fungi form a symbiotic relationship with the asparagus roots, helping them absorb more nutrients and water.
* Foliar Feeding: During the growing season, you can supplement regular fertilization with foliar feeding. This involves spraying the asparagus ferns with a diluted liquid fertilizer. This allows the plants to absorb nutrients directly through their leaves.
* Protecting from Pests and Diseases: Keep an eye out for common asparagus pests and diseases, such as asparagus beetles and rust. Take appropriate measures to control them if necessary.
* Winter Protection: In colder climates, you may want to protect your asparagus bed during the winter by applying a layer of mulch. This will help insulate the crowns and prevent them from freezing.
Troubleshooting Common Asparagus Problems
Even with the best care, you may encounter some challenges when growing asparagus. Here are a few common problems and how to address them:
* Thin Spears: Thin spears can be a sign of nutrient deficiency, overcrowding, or stress. Make sure you’re fertilizing regularly and thinning out the plants if necessary.
* Yellowing Ferns: Yellowing ferns can be caused by overwatering, underwatering, or disease. Check the soil moisture and look for signs of disease.
* Asparagus Beetles: Asparagus beetles can damage the spears and ferns. Hand-pick them off the plants or use an insecticidal soap.
* Rust: Rust is a fungal disease that can cause orange or brown spots on the ferns. Improve air circulation and apply a fungicide if necessary.
Enjoying Your Homegrown Asparagus
There’s

Conclusion
So, there you have it! Growing asparagus fast might seem like an impossible feat, but with the right techniques and a little patience, you can significantly accelerate the process and enjoy fresh, homegrown spears sooner than you ever thought possible. This DIY trick, focusing on soil preparation, proper planting, and consistent care, is a game-changer for any asparagus enthusiast. It’s not just about speeding things up; it’s about creating an optimal environment for your asparagus plants to thrive, resulting in healthier, more productive crops for years to come.
Think about the satisfaction of harvesting your own asparagus, knowing you nurtured it from a young crown to a bountiful source of deliciousness. Imagine the vibrant green spears gracing your dinner table, a testament to your gardening prowess. This isn’t just about saving time; it’s about connecting with your food and experiencing the joy of growing your own.
But don’t just take our word for it. We encourage you to try this DIY method for growing asparagus fast and see the results for yourself. Experiment with different variations to find what works best in your specific climate and soil conditions. Perhaps you’ll discover that adding a specific type of compost gives your plants an extra boost, or that a particular watering schedule yields the most tender spears.
Consider these variations to personalize your asparagus-growing journey:
* Companion Planting: Experiment with planting companion plants like tomatoes, parsley, or basil near your asparagus. These plants can help deter pests and improve soil health.
* Mulch Variations: Try different types of mulch, such as straw, wood chips, or compost, to see which one best retains moisture and suppresses weeds in your garden.
* Fertilizer Adjustments: While we’ve recommended a general fertilizer schedule, you can adjust the type and amount of fertilizer based on your soil test results and the specific needs of your plants.
* Crown Selection: Explore different asparagus varieties and choose crowns that are well-suited to your local climate and your personal taste preferences. Jersey Knight and Purple Passion are popular choices.
Remember, gardening is a journey of learning and discovery. Don’t be afraid to experiment, make mistakes, and learn from your experiences. The most important thing is to have fun and enjoy the process of growing your own food.
We’re confident that this DIY trick will help you achieve faster asparagus growth and a more abundant harvest. But we also want to hear from you! Share your experiences, tips, and photos in the comments below. Let us know what worked well for you, what challenges you faced, and any variations you tried. Your feedback will not only help other readers but also contribute to our collective knowledge of asparagus cultivation.
So, grab your gardening gloves, prepare your soil, and get ready to embark on an exciting asparagus-growing adventure. With a little effort and the right techniques, you’ll be enjoying fresh, homegrown asparagus in no time! We can’t wait to hear about your success!
Frequently Asked Questions (FAQ)
Q: How long does it typically take to grow asparagus from crowns?
A: Typically, it takes about three years to harvest asparagus spears after planting crowns. However, by implementing the techniques described in this article, you can potentially reduce this timeframe and enjoy a small harvest in the second year. The key is to focus on creating optimal growing conditions from the start.
Q: What is the best time of year to plant asparagus crowns?
A: The best time to plant asparagus crowns is in early spring, as soon as the ground can be worked. This allows the crowns to establish themselves before the heat of summer arrives. In warmer climates, you can also plant in the fall.
Q: What type of soil is best for growing asparagus?
A: Asparagus thrives in well-drained, sandy loam soil with a pH between 6.5 and 7.5. It’s crucial to amend the soil with plenty of organic matter, such as compost or well-rotted manure, to improve drainage and fertility. Avoid heavy clay soils, as they can lead to root rot.
Q: How deep should I plant asparagus crowns?
A: Plant asparagus crowns in trenches that are 6-8 inches deep and 12 inches wide. Space the crowns about 12-18 inches apart in the trench. Cover the crowns with 2-3 inches of soil initially, and gradually fill in the trench as the plants grow.
Q: How often should I water asparagus plants?
A: Asparagus plants need consistent moisture, especially during the growing season. Water deeply whenever the top inch of soil feels dry. Avoid overwatering, as this can lead to root rot. A good rule of thumb is to water thoroughly once or twice a week, depending on the weather conditions.
Q: What kind of fertilizer should I use for asparagus?
A: Asparagus benefits from regular fertilization. In the spring, apply a balanced fertilizer, such as 10-10-10, at a rate of 1 pound per 100 square feet. You can also side-dress the plants with compost or well-rotted manure throughout the growing season. Avoid using fertilizers that are high in nitrogen, as this can promote excessive foliage growth at the expense of spear production.
Q: How do I control weeds in my asparagus bed?
A: Weeds can compete with asparagus plants for nutrients and water, so it’s important to keep the bed weed-free. Mulching with organic materials, such as straw or wood chips, can help suppress weed growth. Hand-pulling weeds is also an effective method. Avoid using herbicides, as they can damage the asparagus plants.
Q: When can I start harvesting asparagus spears?
A: Do not harvest any spears during the first year after planting. In the second year, you can harvest a few spears for a short period (about 2-3 weeks). In the third year and beyond, you can harvest spears for a longer period (about 6-8 weeks). Stop harvesting when the spears become thin and spindly, as this indicates that the plants need to replenish their energy reserves.
Q: How do I harvest asparagus spears?
A: Harvest asparagus spears when they are 6-8 inches tall and about as thick as your finger. Use a sharp knife to cut the spears at ground level. Avoid pulling the spears, as this can damage the crown.
Q: What are some common pests and diseases that affect asparagus?
A: Common pests of asparagus include asparagus beetles and asparagus miners. Diseases include asparagus rust and Fusarium crown and root rot. Monitor your plants regularly for signs of pests or diseases, and take appropriate action if necessary. Organic pest control methods, such as introducing beneficial insects or using insecticidal soap, can be effective. Ensure good drainage and air circulation to prevent fungal diseases.
Q: Can I grow asparagus in containers?
A: Yes, you can grow asparagus in containers, but it requires a large container (at least 18 inches in diameter and 24 inches deep) and well-draining potting mix. Container-grown asparagus may not be as productive as plants grown in the ground, but it’s a good option for gardeners with limited space.
Q: How long will an asparagus bed last?
A: With proper care, an asparagus bed can last for 15-20 years or even longer. The key is to provide the plants with optimal growing conditions, including well-drained soil, regular fertilization, and weed control.
Q: What should I do with my asparagus bed in the fall?
A: In the fall, after the foliage has turned yellow and died back, cut it down to ground level. This will help prevent diseases from overwintering in the foliage. You can also apply a layer of compost or well-rotted manure to the bed to provide nutrients for the following growing season.
Q: How can I encourage thicker asparagus spears?
A: To encourage thicker asparagus spears, ensure that your plants are getting adequate sunlight, water, and nutrients. Avoid over-harvesting, as this can weaken the plants and result in thinner spears. You can also try adding more organic matter to the soil to improve its fertility and water-holding capacity.
Leave a Comment