
Forgotten bean plants can be a real heartbreaker, can’t they? You nurture them, watch them sprout, and then life happens, and suddenly you realize you haven’t given them the attention they deserve. But don’t despair! This isn’t the end of your bean-growing dreams. I’m here to share some simple, yet effective, DIY tricks to revive those neglected beauties and get them back on the path to producing a bountiful harvest.
Gardening, in its essence, is a timeless practice, deeply rooted in human history. From the ancient Hanging Gardens of Babylon to the humble kitchen gardens of our grandparents, cultivating plants has always been a way to connect with nature and provide sustenance. And while modern agriculture has its place, there’s something incredibly satisfying about growing your own food, especially when you’ve poured your heart and soul into it.
Let’s face it, we all lead busy lives. It’s easy to let things slip, even something as enjoyable as tending to our gardens. But a little neglect doesn’t have to mean total failure. These DIY hacks are designed to be quick, easy, and effective, even if you’re short on time. I’ll show you how to assess the damage, provide the right nutrients, and protect your forgotten bean plants from further stress. With a little TLC and these clever tricks, you’ll be amazed at how quickly your beans can bounce back and reward you with a delicious crop.
Verwandel vergessene Bohnenpflanzen in köstliche Bohnenkeimlinge!
Hey Leute! Habt ihr auch manchmal das Gefühl, dass euch die Zeit davonläuft und eure Gartenprojekte darunter leiden? Mir geht es oft so! Neulich habe ich meine Bohnenpflanzen total vergessen. Sie waren schon ziemlich groß und die Bohnen selbst waren hart und nicht mehr wirklich lecker zum Kochen. Aber anstatt sie einfach wegzuwerfen, habe ich beschlossen, etwas Neues auszuprobieren: Bohnenkeimlinge! Und ich muss sagen, es hat super funktioniert! Ich zeige euch jetzt, wie ihr das auch machen könnt. Es ist einfacher als ihr denkt und eine tolle Möglichkeit, Lebensmittelverschwendung zu vermeiden und gleichzeitig etwas Gesundes und Leckeres zu zaubern.
Was sind Bohnenkeimlinge überhaupt?
Bohnenkeimlinge sind im Grunde genommen junge Bohnenpflanzen, die gerade erst anfangen zu wachsen. Sie sind reich an Vitaminen, Mineralien und Enzymen und haben einen knackigen, frischen Geschmack. Man kann sie roh in Salaten essen, in Suppen und Pfannengerichten verwenden oder einfach als gesunden Snack knabbern.
Warum Bohnenkeimlinge aus vergessenen Bohnenpflanzen?
Normalerweise zieht man Bohnenkeimlinge aus speziellen Keimsaaten. Aber wenn man, wie ich, schon Bohnenpflanzen hat, die nicht mehr optimal sind, ist das eine super Alternative. Die Bohnen sind zwar schon etwas älter, aber sie enthalten immer noch genug Energie, um zu keimen. Außerdem ist es eine tolle Möglichkeit, etwas zu retten, das sonst im Müll landen würde.
Was du brauchst:
* Deine vergessenen Bohnenpflanzen (am besten mit noch grünen, aber harten Bohnen)
* Ein großes Glas oder eine Schüssel
* Ein Sieb oder ein Keimglas mit Siebeinsatz
* Sauberes Wasser
* Ein dunkler Ort (z.B. ein Schrank oder eine Schublade)
* Geduld (ca. 3-5 Tage)
Schritt-für-Schritt-Anleitung:
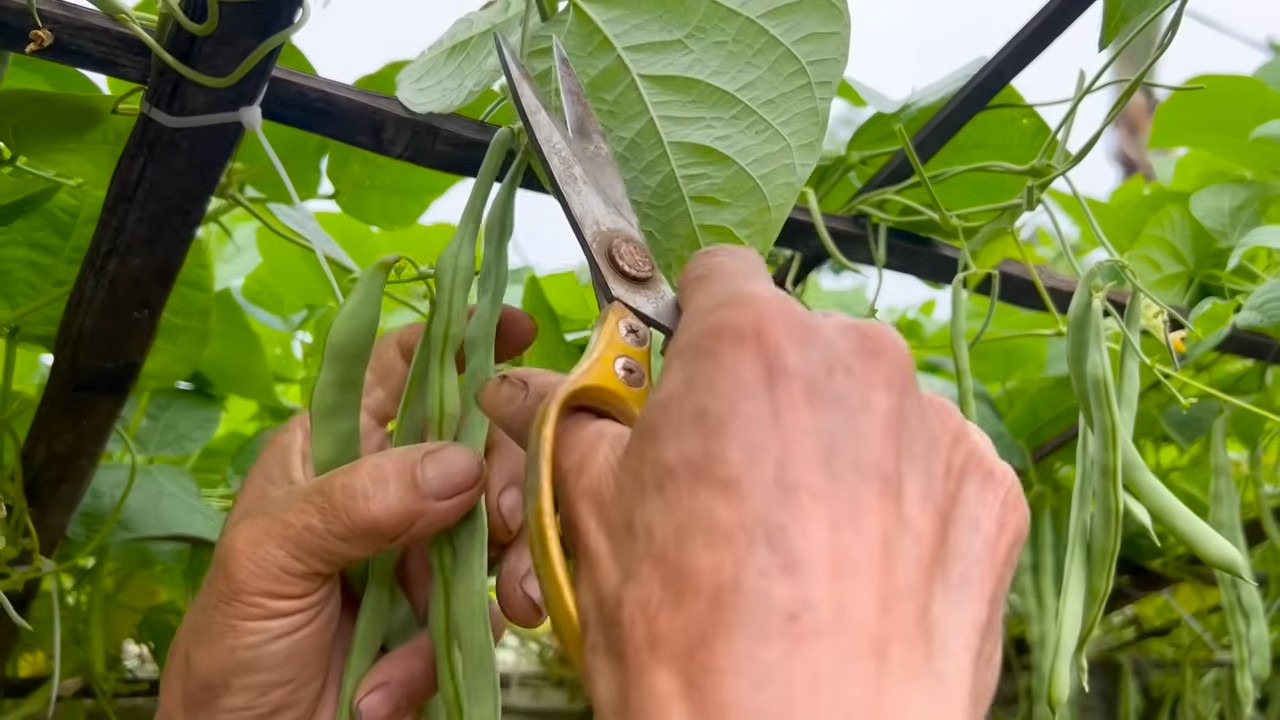
1. Die Bohnen vorbereiten:
* Zuerst pflückst du die Bohnen von den Pflanzen. Achte darauf, dass du nur die Bohnen verwendest, die noch fest und unbeschädigt sind.
* Sortiere beschädigte oder verfärbte Bohnen aus.
* Wasche die Bohnen gründlich unter fließendem Wasser, um Schmutz und eventuelle Rückstände zu entfernen.
2. Einweichen:
* Gib die gewaschenen Bohnen in ein großes Glas oder eine Schüssel.
* Fülle das Glas mit reichlich Wasser, so dass die Bohnen vollständig bedeckt sind.
* Lass die Bohnen für 8-12 Stunden (oder über Nacht) einweichen. Das Einweichen weicht die harte Schale auf und aktiviert den Keimprozess.
* Wichtig: Verwende sauberes, gefiltertes Wasser, um das Risiko von Bakterienwachstum zu minimieren.
3. Keimen:
* Nach dem Einweichen gießt du das Wasser ab und spülst die Bohnen noch einmal gründlich durch.
* Gib die Bohnen in ein Sieb oder ein Keimglas mit Siebeinsatz.
* Stelle das Sieb oder das Keimglas in eine Schüssel, damit überschüssiges Wasser abtropfen kann.
* Decke das Sieb oder das Keimglas mit einem dunklen Tuch ab oder stelle es an einen dunklen Ort. Dunkelheit fördert die Keimung.
4. Spülen und Wässern:
* Spüle die Bohnen 2-3 Mal täglich mit frischem Wasser. Das ist wichtig, um sie feucht zu halten und Schimmelbildung zu verhindern.
* Achte darauf, dass das Wasser gut abläuft, damit die Bohnen nicht im Wasser liegen.
* Tipp: Ich benutze dafür immer den gleichen Wasserhahn und stelle mir einen Timer, damit ich es nicht vergesse.
5. Beobachten und Warten:
* Nach 1-2 Tagen solltest du die ersten kleinen Keime sehen.
* Spüle die Bohnen weiterhin regelmäßig und warte, bis die Keime die gewünschte Länge erreicht haben.
* Je nach Temperatur und Bohnensorte dauert es in der Regel 3-5 Tage, bis die Bohnenkeimlinge fertig sind.
* Wichtig: Achte auf Anzeichen von Schimmelbildung. Wenn du Schimmel entdeckst, solltest du die Bohnen wegwerfen.
6. Ernten und Genießen:
* Sobald die Keime die gewünschte Länge erreicht haben (ich mag sie am liebsten, wenn sie ca. 2-3 cm lang sind), kannst du sie ernten.
* Spüle die Bohnenkeimlinge noch einmal gründlich ab.
* Entferne eventuelle Schalenreste.
* Lass die Bohnenkeimlinge gut abtropfen.
* Jetzt kannst du sie direkt essen oder im Kühlschrank aufbewahren.
* Tipp: Im Kühlschrank halten sich die Bohnenkeimlinge ca. 3-5 Tage. Am besten bewahrst du sie in einem luftdichten Behälter auf.
Weitere Tipps und Tricks:
* Die richtige Bohnensorte: Nicht alle Bohnensorten eignen sich gleich gut zum Keimen. Am besten funktionieren grüne Bohnen, Mungobohnen oder Adzukibohnen.
* Hygiene ist wichtig: Achte darauf, dass alle Utensilien, die du verwendest, sauber sind. Das minimiert das Risiko von Bakterienwachstum.
* Die richtige Temperatur: Die ideale Temperatur zum Keimen liegt zwischen 20 und 25 Grad Celsius.
* Licht oder Dunkelheit?: Während des Keimprozesses ist Dunkelheit wichtig. Sobald die Keime aber etwas größer sind, kannst du sie auch etwas Licht aussetzen, um die Chlorophyllbildung anzuregen. Dadurch werden die Keimlinge grüner und enthalten mehr Nährstoffe.
* Geschmack variieren: Du kannst den Geschmack der Bohnenkeimlinge variieren, indem du sie mit verschiedenen Gewürzen spülst. Zum Beispiel kannst du dem Spülwasser etwas Kurkuma, Ingwer oder Chili hinzufügen.
* Verwendung in der Küche: Bohnenkeimlinge sind vielseitig einsetzbar. Du kannst sie roh in Salaten essen, in Suppen und Pfannengerichten verwenden oder einfach als gesunden Snack knabbern. Sie passen auch gut zu asiatischen Gerichten.
* Gesundheitliche Vorteile: Bohnenkeimlinge sind reich an Vitaminen, Mineralien und Enzymen. Sie sind gut für die Verdauung, stärken das Immunsystem und liefern Energie.
Häufige Probleme und Lösungen:
* Schimmelbildung: Wenn du Schimmel auf den Bohnenkeimlingen entdeckst, solltest du sie wegwerfen. Schimmelbildung kann durch mangelnde Hygiene, zu hohe Luftfeuchtigkeit oder zu wenig Belüftung verursacht werden. Achte darauf, dass du die Bohnen regelmäßig spülst und für eine gute Belüftung sorgst.
* Keine Keimung: Wenn die Bohnen nicht keimen, kann das verschiedene Ursachen haben. Möglicherweise sind die Bohnen zu alt oder beschädigt. Oder die Temperatur ist nicht optimal. Achte darauf, dass du frische, unbeschädigte Bohnen verwendest und die richtige Temperatur einhältst.
* Unangenehmer Geruch: Wenn die Bohnenkeimlinge unangenehm riechen, kann das ein Zeichen für Bakterienwachstum sein. Spüle die Bohnen gründlich mit frischem Wasser und achte darauf, dass sie gut abtropfen.
Bohnenkeimlinge in der Küche: Meine Lieblingsrezepte
Ich liebe es, Bohnenkeimlinge in meinen Gerichten zu verwenden. Hier sind ein paar meiner Lieblingsrezepte:
* Bohnenkeimlingsalat: Mische Bohnenkeimlinge mit Gurke, Tomaten, Paprika und einer leichten Vinaigrette.
* Bohnenkeimlingsuppe: Gib Bohnenkeimlinge kurz vor dem Servieren in eine klare Gemüsesuppe.
* Bohnenkeimlingspfannengericht: Brate Bohnenkeimlinge mit Gemüse und Tofu
Conclusion
So, there you have it! Transforming those forgotten bean plants from a potential garden tragedy into a bounty of delicious, dried beans is not only possible, it’s incredibly rewarding. This simple DIY trick is a must-try for any gardener, whether you’re a seasoned pro or just starting out. It’s a fantastic way to reduce food waste, save money, and connect with the natural cycle of your garden.
Think about it: those bean plants, once destined for the compost heap, are now the foundation for hearty winter stews, flavorful bean salads, and even homemade refried beans. The satisfaction of harvesting your own dried beans, knowing you rescued them from oblivion, is a feeling that store-bought beans simply can’t replicate.
But the benefits extend beyond just the immediate harvest. Saving your bean seeds from year to year allows you to cultivate varieties that are perfectly adapted to your specific climate and soil conditions. This is a powerful way to build resilience in your garden and contribute to the preservation of heirloom bean varieties.
Don’t be afraid to experiment with variations on this DIY trick. For example, if you live in a particularly humid climate, you might consider drying your bean pods indoors using a dehydrator or a low-temperature oven. This will help prevent mold and ensure that your beans dry properly. You can also try different methods of threshing the beans, such as using a pillowcase or a clean tarp.
Another variation to consider is saving the bean pods themselves for use in crafts or as a natural mulch. The dried pods can add texture and visual interest to your garden beds, and they will eventually break down and enrich the soil.
This DIY trick for rescuing forgotten bean plants is more than just a way to save a harvest; it’s a way to connect with the rhythms of nature and become a more self-sufficient gardener.
We encourage you to try this DIY trick with your own forgotten bean plants. You might be surprised at how easy and rewarding it is. And once you’ve harvested your dried beans, we’d love to hear about your experience! Share your photos, tips, and recipes in the comments below. Let’s build a community of gardeners who are passionate about reducing food waste and making the most of their harvests.
Remember, even if you only manage to salvage a small amount of dried beans, it’s still a victory. Every bean saved is a bean that doesn’t go to waste, and a bean that can be used to nourish yourself and your family. So, get out there and rescue those forgotten bean plants! You’ll be glad you did.
Don’t let those forgotten bean plants go to waste!
Try this simple DIY trick and enjoy a bountiful harvest of dried beans.
FAQ
Frequently Asked Questions About Rescuing Forgotten Bean Plants
1. How do I know if my bean plants are too far gone to be rescued?
The key is to assess the condition of the bean pods themselves. If the pods are still relatively firm and haven’t started to rot or mold, there’s a good chance you can salvage the beans inside. Even if the plants look withered and dry, the beans inside the pods may still be viable. Look for pods that are turning brown or yellow and feel dry to the touch. Avoid pods that are mushy, discolored, or have a foul odor. These are likely rotten and should be discarded.
2. What if it rains while my bean pods are drying?
Rain is the enemy of drying beans! If rain is in the forecast, bring your bean pods indoors to a dry, well-ventilated area. You can spread them out on a screen or hang them in bunches to allow them to dry properly. If the pods get wet, make sure to dry them thoroughly as quickly as possible to prevent mold growth. A dehumidifier can be helpful in humid environments.
3. How long does it take for bean pods to dry completely?
The drying time will vary depending on the climate and the humidity levels. In general, it can take anywhere from two to four weeks for bean pods to dry completely. You’ll know they’re ready when the pods are brittle and snap easily, and the beans inside rattle when you shake them.
4. What’s the best way to store dried beans?
Once your beans are completely dry, store them in an airtight container in a cool, dark, and dry place. Glass jars or food-grade plastic containers work well. Properly stored dried beans can last for several years. However, their flavor and nutritional value may diminish over time, so it’s best to use them within a year or two.
5. Can I use this method for all types of beans?
Yes, this method works for most types of beans, including bush beans, pole beans, and even some types of peas. However, some beans may be more susceptible to mold or rot than others, so it’s important to monitor them closely during the drying process.
6. What if my dried beans have small holes in them?
Small holes in dried beans are often a sign of bean weevils. These are small insects that can infest dried beans and other legumes. To prevent bean weevils, you can freeze your dried beans for several days before storing them. This will kill any weevil eggs that may be present. If you find weevils in your stored beans, discard the infested beans and thoroughly clean the container before using it again.
7. Can I save the seeds from my dried beans to plant next year?
Yes, you can save the seeds from your dried beans to plant next year. This is a great way to save money and cultivate bean varieties that are well-suited to your local climate. To save seeds, select the healthiest and most productive plants. Allow the pods to dry completely on the plant, and then harvest the beans as described above. Store the dried beans in an airtight container in a cool, dark, and dry place. When planting time comes, select the largest and most uniform beans for planting.
8. My dried beans are taking a long time to cook. What am I doing wrong?
Dried beans can sometimes take a long time to cook, especially if they are old or have not been stored properly. To shorten the cooking time, you can soak the beans in water for several hours or overnight before cooking them. This will help to rehydrate the beans and make them more tender. You can also add a pinch of baking soda to the soaking water, which will help to break down the beans’ outer layer.
9. Can I use a dehydrator to dry my bean pods?
Yes, a dehydrator can be a great way to dry bean pods, especially in humid climates. Set the dehydrator to a low temperature (around 100-110°F) and spread the bean pods out in a single layer on the dehydrator trays. Check the pods regularly and remove them when they are completely dry and brittle.
10. What are some creative ways to use my homegrown dried beans?
The possibilities are endless! You can use your homegrown dried beans in soups, stews, chili, salads, dips, and even desserts. You can also grind them into flour to make bean-based breads and tortillas. Get creative and experiment with different recipes to find your favorites. Don’t forget to share your culinary creations with us!
Leave a Comment