
Eggplant Planting Success is within your reach! Have you ever dreamed of harvesting plump, glossy eggplants right from your own backyard? It’s a truly rewarding experience, but let’s be honest, sometimes those beautiful purple fruits can be a bit… temperamental. For centuries, eggplants have been cultivated across Asia and the Middle East, prized not only for their unique flavor but also for their ornamental beauty. From ancient Ayurvedic medicine to modern culinary delights, the eggplant holds a special place in many cultures.
But getting from seed to table can feel like a challenge. That’s where these DIY tricks and hacks come in! I’m going to share some simple, yet effective, techniques that will dramatically improve your eggplant planting success rate. Forget about struggling with stunted growth, blossom end rot, or pest infestations. These tips are designed to help you create the perfect environment for your eggplants to thrive, ensuring a bountiful harvest you can be proud of. So, grab your gardening gloves, and let’s get started on your journey to eggplant abundance!
Unlock Eggplant Abundance: A DIY Guide to Thriving Plants
Hey there, fellow gardeners! I’m so excited to share my secrets to growing amazing eggplants. I used to struggle with these beauties, but after a lot of trial and error, I’ve cracked the code. This guide is packed with everything I’ve learned, from seed starting to harvesting, so you can enjoy a bumper crop of delicious eggplants too!
Choosing the Right Eggplant Variety
Before we even think about planting, let’s talk varieties. Eggplants come in all shapes, sizes, and colors! Choosing the right one for your climate and preferences is key.
* Consider your climate: Short-season gardeners should opt for varieties that mature quickly, like ‘Black Beauty’ or ‘Early Long Purple’. If you have a longer growing season, you can experiment with larger, more exotic types.
* Think about size: Do you want large, globe-shaped eggplants for grilling? Or smaller, slender ones for stir-fries?
* Explore different colors: Eggplants aren’t just purple! You can find white, green, pink, and even striped varieties.
* Disease resistance: Look for varieties that are resistant to common eggplant diseases in your area.
I personally love ‘Ichiban’ for its long, slender fruits and ‘Rosa Bianca’ for its beautiful pink and white stripes.
Starting Eggplant Seeds Indoors
Eggplants need a long growing season, so starting them indoors is usually necessary, especially in cooler climates. I usually start my seeds about 8-10 weeks before the last expected frost.
1. Gather your supplies: You’ll need seed starting trays or small pots, seed starting mix, eggplant seeds, a spray bottle, and a heat mat (optional, but helpful).
2. Prepare the seed starting mix: Moisten the seed starting mix with water until it’s damp but not soggy.
3. Sow the seeds: Fill the trays or pots with the moistened mix. Sow the eggplant seeds about 1/4 inch deep, placing 2-3 seeds per cell or pot.
4. Cover the seeds: Gently cover the seeds with more seed starting mix.
5. Water gently: Use a spray bottle to mist the surface of the soil. Avoid overwatering, which can cause the seeds to rot.
6. Provide warmth: Place the trays or pots on a heat mat, if using. Eggplant seeds germinate best at temperatures between 75-85°F (24-29°C).
7. Maintain moisture: Keep the soil consistently moist, but not waterlogged. You can cover the trays or pots with a clear plastic dome or plastic wrap to help retain moisture.
8. Provide light: Once the seeds germinate (usually in 7-14 days), remove the plastic cover and place the seedlings under grow lights or in a sunny window. They need at least 12-14 hours of light per day.
9. Thin the seedlings: Once the seedlings have their first true leaves (the second set of leaves), thin them to one strong seedling per cell or pot. Simply snip off the weaker seedlings at the soil line.
10. Fertilize lightly: Once the seedlings have been thinned, start fertilizing them with a diluted liquid fertilizer every 1-2 weeks.
Hardening Off Your Eggplant Seedlings
Before transplanting your eggplant seedlings outdoors, you need to “harden them off.” This process gradually acclimates them to the outdoor conditions, preventing shock.
1. Start a week or two before transplanting: Begin by placing the seedlings outdoors in a sheltered location for just an hour or two each day.
2. Gradually increase the time: Each day, increase the amount of time the seedlings spend outdoors, gradually exposing them to more sunlight and wind.
3. Protect from extreme weather: If there’s a risk of frost or extreme heat, bring the seedlings back indoors.
4. By the end of the week: By the end of the hardening-off period, the seedlings should be able to tolerate a full day outdoors.
Preparing the Garden Bed
Eggplants need a sunny spot with well-drained soil. I like to amend my soil with plenty of compost to improve drainage and fertility.
1. Choose a sunny location: Eggplants need at least 6-8 hours of sunlight per day.
2. Test your soil: A soil test can tell you the pH and nutrient levels of your soil. Eggplants prefer a slightly acidic soil with a pH of 6.0-6.8.
3. Amend the soil: Add plenty of compost or well-rotted manure to the soil to improve drainage and fertility. I usually add a few inches of compost to my garden bed.
4. Till or dig the soil: Till or dig the soil to a depth of at least 12 inches. This will help loosen the soil and improve drainage.
5. Create raised beds (optional): Raised beds can improve drainage and warm up the soil more quickly in the spring.
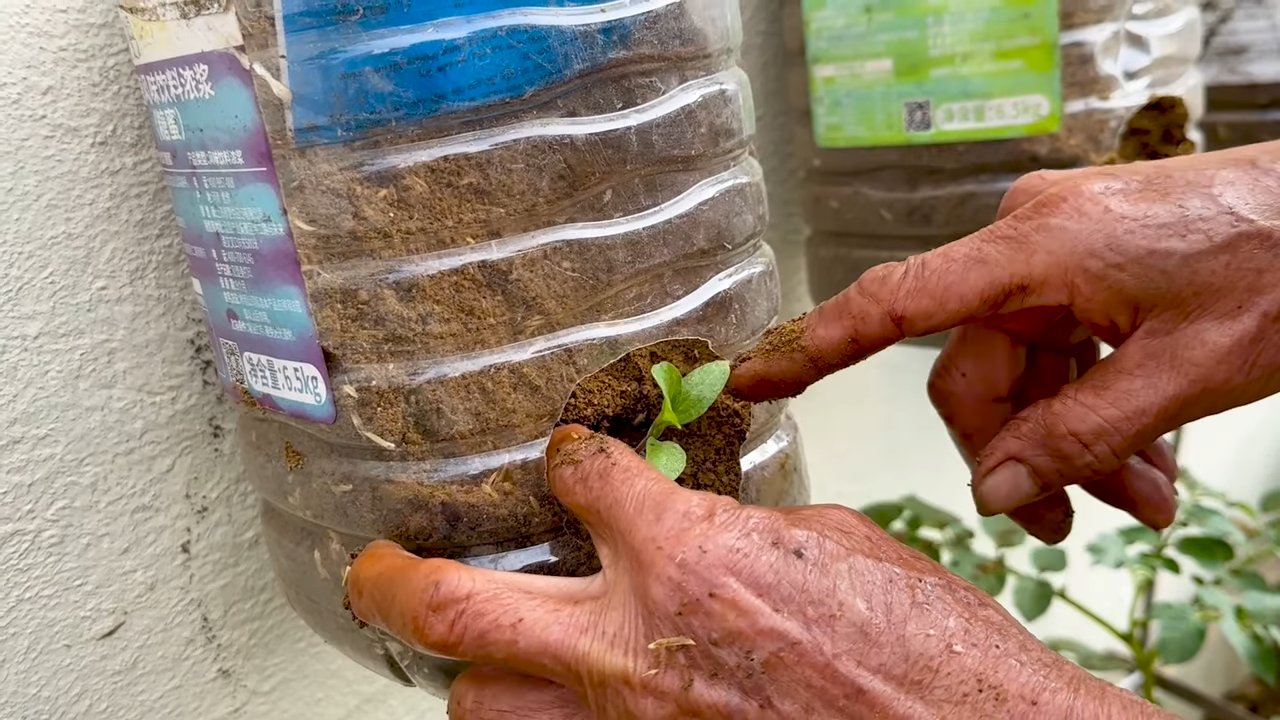
Transplanting Eggplant Seedlings Outdoors
Once the danger of frost has passed and the soil has warmed up, it’s time to transplant your eggplant seedlings outdoors.
1. Choose a cloudy day: Transplanting on a cloudy day will help reduce stress on the seedlings.
2. Dig holes: Dig holes that are slightly larger than the root balls of the seedlings. Space the holes about 18-24 inches apart.
3. Remove the seedlings from their containers: Gently remove the seedlings from their containers, being careful not to damage the roots.
4. Place the seedlings in the holes: Place the seedlings in the holes, making sure the top of the root ball is level with the surrounding soil.
5. Fill the holes with soil: Fill the holes with soil and gently firm the soil around the seedlings.
6. Water thoroughly: Water the seedlings thoroughly after transplanting.
7. Mulch around the plants: Mulch around the plants with straw, wood chips, or other organic mulch to help retain moisture and suppress weeds.
Caring for Your Eggplant Plants
Eggplants need regular watering, fertilizing, and pest control to thrive.
* Watering: Water your eggplant plants deeply and regularly, especially during hot, dry weather. Aim for about 1 inch of water per week.
* Fertilizing: Fertilize your eggplant plants every 2-3 weeks with a balanced fertilizer. I like to use a fertilizer that’s high in phosphorus and potassium to promote flowering and fruiting.
* Pest control: Eggplants are susceptible to a variety of pests, including aphids, flea beetles, and tomato hornworms. Inspect your plants regularly for pests and take action as needed. I like to use organic pest control methods, such as insecticidal soap or neem oil.
* Staking or caging: As the eggplants grow, they may need to be staked or caged to support the heavy fruits.
* Pruning: Pruning can help improve air circulation and sunlight penetration, which can reduce the risk of disease. Remove any suckers (small shoots that grow from the base of the plant) and any yellowing or diseased leaves.
Dealing with Common Eggplant Problems
Even with the best care, eggplants can sometimes encounter problems. Here are a few common issues and how to address them:
* Blossom-end rot: This is caused by a calcium deficiency. Make sure your soil has enough calcium and water your plants consistently. You can also add calcium to the soil by mixing in crushed eggshells or bone meal.
* Flea beetles: These tiny beetles can chew holes in the leaves of your eggplant plants. Cover your plants with row covers or use insecticidal soap to control them.
* Aphids: These small, sap-sucking insects can weaken your eggplant plants. Spray them with insecticidal soap or neem oil.
* Verticillium wilt: This fungal disease can cause your eggplant plants to wilt and die. Choose disease-resistant varieties and avoid planting eggplants in the same spot year after year.
Harvesting Your Eggplants
Harvesting eggplants at the right time is crucial for getting the best flavor and texture.
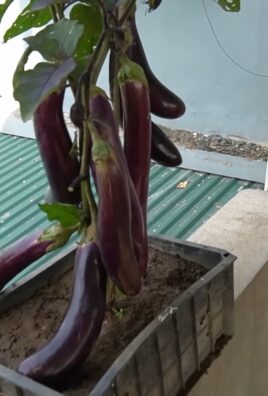
1. Check for ripeness: Eggplants are usually ready to harvest when they are firm, glossy, and have a deep, even color. The skin should be smooth and unblemished.
2. Press gently: Gently press the eggplant with your thumb. If it gives slightly, it’s ripe. If it’s hard as a rock, it’s not ready yet.
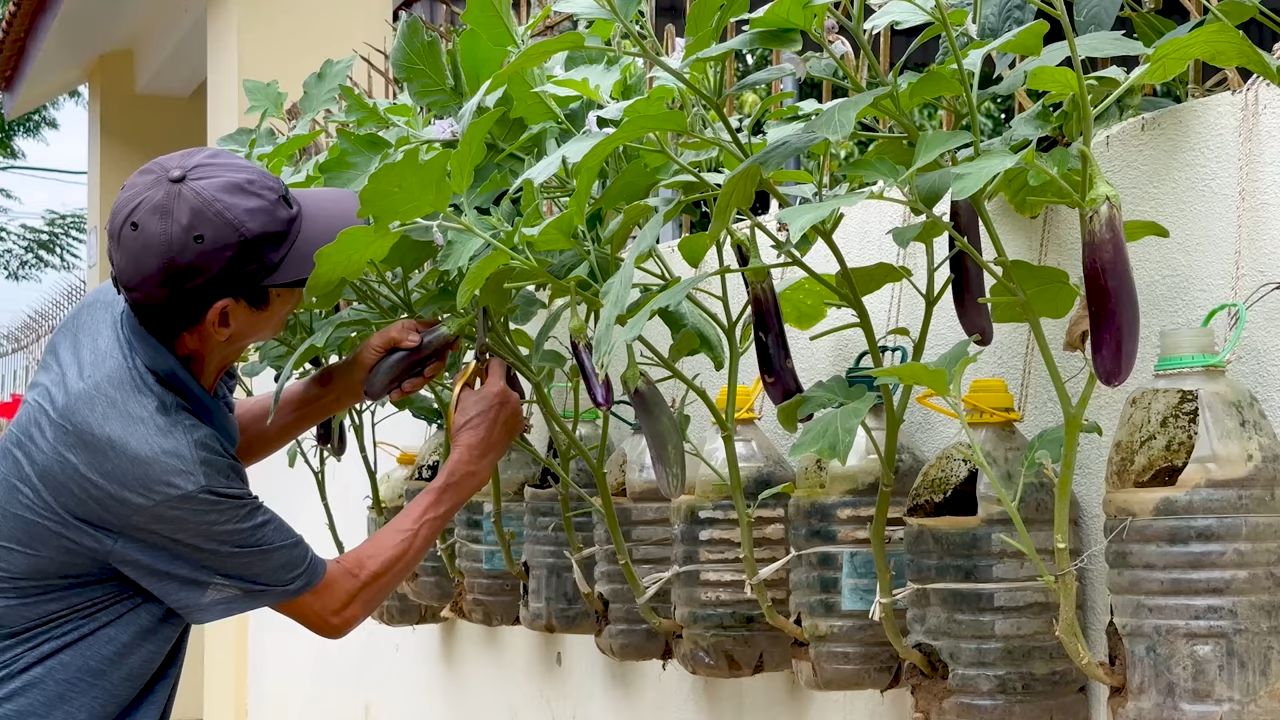
3. Use pruning shears or a sharp knife: Cut the eggplant from the plant, leaving about an inch of stem attached.
4. Harvest regularly: Harvest your eggplants regularly to encourage the plant to produce more fruit.
5. Store properly: Store eggplants in the refrigerator for up
Conclusion
Achieving Eggplant Planting Success doesn’t have to be a daunting task. By implementing this simple yet effective DIY trick, you’re not just planting eggplants; you’re cultivating a thriving garden ecosystem that promotes healthy growth, abundant yields, and a reduced reliance on chemical interventions. We’ve shown you how to create a nutrient-rich environment right from the start, giving your eggplant seedlings the best possible foundation to flourish.
Think about it: no more struggling with stunted growth, yellowing leaves, or disappointing harvests. This method addresses the core needs of eggplant plants – consistent moisture, readily available nutrients, and protection from common soilborne diseases – all in one fell swoop. It’s a proactive approach that saves you time, money, and frustration in the long run.
But the beauty of this DIY trick lies in its adaptability. Feel free to experiment with variations to suit your specific needs and preferences. For instance, if you’re dealing with particularly acidic soil, consider adding a small amount of lime to the planting hole to raise the pH. Or, if you’re looking to boost phosphorus levels for enhanced flowering and fruiting, incorporate a handful of bone meal into the mix. You can also tailor the organic matter component to your local resources – composted leaves, well-rotted manure, or even kitchen scraps (avoiding meat and dairy) can all be excellent additions.
Don’t be afraid to get creative and personalize this method to your unique gardening situation. The key is to understand the underlying principles – providing a nutrient-rich, well-draining, and disease-suppressing environment – and then adapt the specific ingredients and techniques accordingly.
We are confident that this DIY trick will revolutionize your eggplant growing experience. It’s a game-changer that will empower you to achieve Eggplant Planting Success, regardless of your previous experience or the challenges you’ve faced in the past.
So, what are you waiting for? Grab your gardening gloves, gather your supplies, and give this DIY trick a try. We’re eager to hear about your results! Share your experiences, photos, and tips in the comments section below. Let’s build a community of successful eggplant growers and learn from each other’s successes and challenges. Together, we can unlock the secrets to bountiful eggplant harvests and enjoy the delicious fruits (or rather, vegetables) of our labor. Happy gardening!
Frequently Asked Questions (FAQ)
What exactly is the DIY trick you’re referring to?
The DIY trick involves amending the planting hole with a specific mixture of organic materials and nutrients to create an optimal environment for eggplant seedlings. This typically includes compost, aged manure, bone meal (or a phosphorus-rich alternative), and potentially other amendments depending on your soil conditions. The goal is to provide consistent moisture, readily available nutrients, and protection from soilborne diseases, all of which are crucial for Eggplant Planting Success.
Why is this DIY trick better than simply planting eggplants directly in the ground?
While eggplants can survive when planted directly in the ground, they often struggle to thrive, especially in less-than-ideal soil conditions. This DIY trick addresses several key limitations of typical garden soil:
* **Nutrient Deficiency:** Many garden soils lack the essential nutrients that eggplants need for vigorous growth and abundant fruit production. The amendments in the planting hole provide a readily available source of these nutrients, ensuring that the plants have everything they need from the start.
* **Poor Drainage:** Eggplants prefer well-draining soil, but heavy clay soils can retain too much moisture, leading to root rot and other problems. The organic matter in the planting hole improves drainage and aeration, creating a healthier root environment.
* **Soilborne Diseases:** Certain soilborne diseases can attack eggplant roots, causing stunted growth and even death. The compost and other organic materials in the planting hole can help suppress these diseases by promoting beneficial microbial activity.
* **Inconsistent Moisture:** Maintaining consistent moisture levels is crucial for eggplant growth. The organic matter in the planting hole acts like a sponge, holding moisture and releasing it slowly to the roots.
What if I don’t have access to all the ingredients you mentioned? Can I substitute anything?
Absolutely! The specific ingredients can be adapted based on what’s available to you. Here are some possible substitutions:
* **Aged Manure:** If you don’t have access to aged manure, you can use well-rotted compost, worm castings, or even a commercial organic fertilizer.
* **Bone Meal:** Bone meal is a good source of phosphorus, but you can also use rock phosphate, colloidal phosphate, or a phosphorus-rich organic fertilizer.
* **Compost:** Compost is a key ingredient, but you can use different types of compost, such as leaf compost, mushroom compost, or vermicompost.
* **Lime:** If you don’t have access to lime, wood ashes can be used to raise the pH of acidic soil.
The most important thing is to provide a balanced mix of nutrients and organic matter that will improve soil drainage, fertility, and disease resistance.
How much of each ingredient should I use in the planting hole?
The exact amounts will depend on the size of your planting hole and the quality of your soil. However, a general guideline is to use approximately:
* 1/3 compost
* 1/3 aged manure (or substitute)
* 1/4 cup bone meal (or substitute)
Mix these ingredients thoroughly with the existing soil in the planting hole before planting your eggplant seedling.
When is the best time to plant eggplants using this DIY trick?
Eggplants are warm-season crops and should be planted after the last frost when the soil has warmed up to at least 60°F (15°C). In most regions, this is typically in late spring or early summer.
How often should I water my eggplants after planting them using this method?
Water deeply and regularly, especially during hot, dry weather. Aim to keep the soil consistently moist but not waterlogged. Mulching around the plants can help retain moisture and suppress weeds.
Will this DIY trick work for other vegetables besides eggplants?
Yes, this method can be beneficial for other heavy-feeding vegetables, such as tomatoes, peppers, and squash. The key is to tailor the specific amendments to the needs of the particular plant.
How can I tell if my eggplants are getting enough nutrients?
Healthy eggplant plants should have dark green leaves, strong stems, and abundant flowers and fruits. If the leaves are yellowing, stunted, or have other abnormalities, it could be a sign of nutrient deficiency. A soil test can help you determine the specific nutrient levels in your soil and identify any deficiencies that need to be addressed.
What if I encounter pests or diseases despite using this DIY trick?
While this DIY trick can help prevent some problems, it’s not a guarantee against all pests and diseases. Monitor your plants regularly for signs of infestation or disease and take appropriate action if necessary. Organic pest control methods, such as insecticidal soap or neem oil, can be effective for controlling many common eggplant pests.
How long will it take to see results from using this DIY trick?
You should start to see positive results within a few weeks of planting. The plants should grow more vigorously, have darker green leaves, and produce more flowers and fruits compared to plants grown without this method. Remember that Eggplant Planting Success is a journey, and consistent care and attention are essential for achieving the best possible results.
Leave a Comment