
DIY Hydroponic Vegetables: Imagine harvesting fresh, crisp lettuce or juicy tomatoes right from your living room, regardless of the season! Sounds like a dream, right? Well, it’s a dream that can easily become a reality with a little ingenuity and a DIY spirit. For centuries, humans have sought innovative ways to cultivate food, and hydroponics, the art of growing plants without soil, has a rich history dating back to ancient civilizations like the Hanging Gardens of Babylon.
But you don’t need to be an ancient king to enjoy the benefits of soilless gardening. In today’s world, where space is often limited and concerns about food security are growing, learning how to grow DIY Hydroponic Vegetables offers a fantastic solution. It’s not just about convenience; it’s about control. You get to dictate the nutrients your plants receive, minimize pests and diseases, and significantly reduce water consumption compared to traditional gardening.
This article is your ultimate guide to unlocking the secrets of DIY hydroponics. I’ll walk you through simple, budget-friendly methods to create your own hydroponic systems at home. Whether you’re a seasoned gardener or a complete beginner, I’m confident that you’ll find these tricks and hacks incredibly useful and rewarding. Get ready to embark on a journey towards fresh, homegrown goodness, all thanks to the magic of DIY!
DIY Hydroponic Vegetables: A Beginner’s Guide
Hey there, fellow gardening enthusiasts! Ever dreamed of growing your own fresh veggies indoors, year-round, without all the fuss of soil? Well, you’re in the right place! I’m going to walk you through building your very own hydroponic system. It’s easier than you think, and the rewards are incredibly delicious.
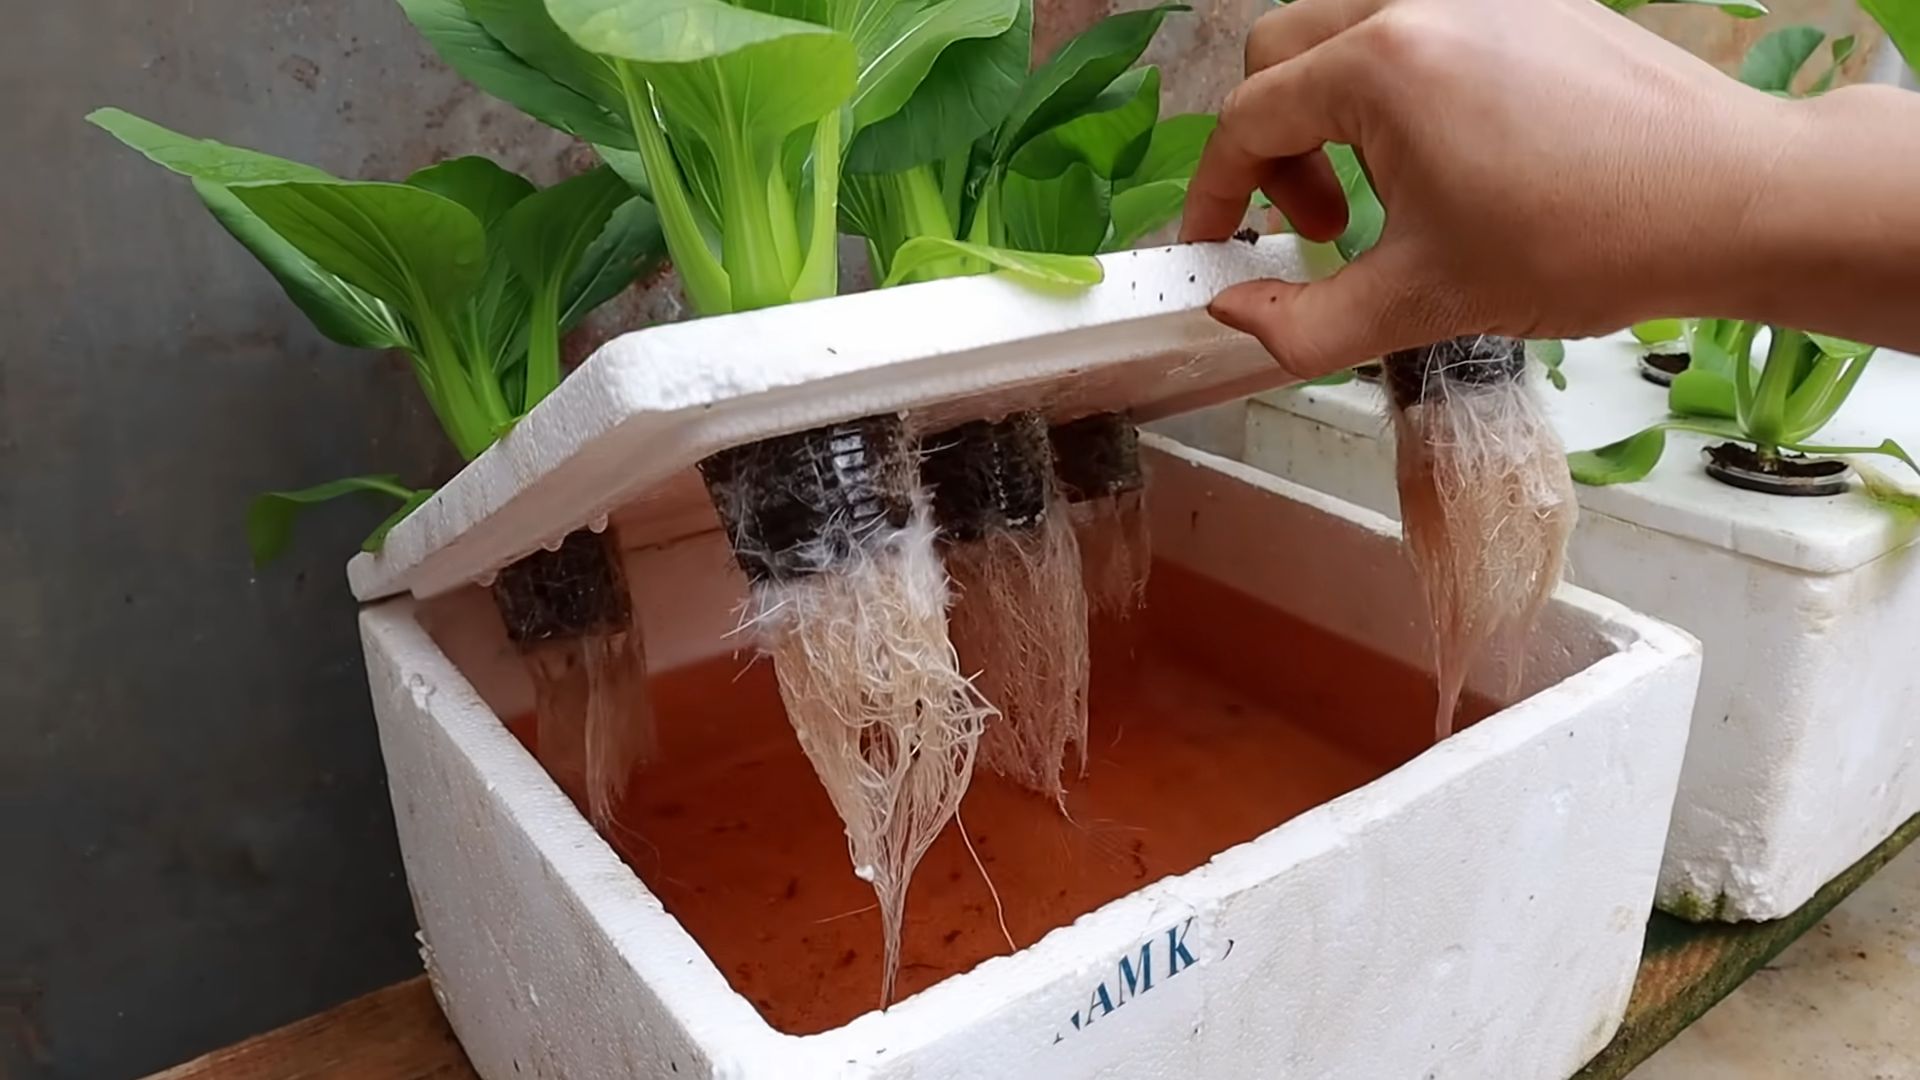
This guide will focus on a simple Deep Water Culture (DWC) system, perfect for beginners. DWC is a method where plant roots are suspended in a nutrient-rich water solution, constantly aerated to provide oxygen. Let’s get started!
What You’ll Need: The Shopping List
Before we dive in, let’s gather our supplies. Don’t worry, most of these are readily available at your local hardware store or online.
* **Container:** A dark-colored plastic storage tote (approximately 10-20 gallons). Dark colors prevent algae growth.
* **Net Pots:** 3-inch net pots (the number depends on how many plants you want to grow).
* **Air Pump:** A small aquarium air pump.
* **Air Stone:** An aquarium air stone (the longer, the better for even aeration).
* **Air Tubing:** Aquarium air tubing to connect the air pump to the air stone.
* **Hydroponic Nutrients:** A balanced hydroponic nutrient solution (specifically formulated for leafy greens or vegetables, depending on what you’re growing).
* **Growing Medium:** Rockwool cubes or coco coir plugs (for starting your seeds).
* **pH Testing Kit:** A pH testing kit (liquid or digital). Maintaining the correct pH is crucial.
* **pH Up and pH Down Solutions:** To adjust the pH of your nutrient solution.
* **Seeds:** Your choice of vegetable seeds (lettuce, spinach, herbs, strawberries, and peppers work well for DWC).
* **Optional: Grow Light:** If you don’t have a sunny spot, a grow light will be essential. LED grow lights are energy-efficient and work great.
* **Drill with Hole Saw Attachment:** To create holes for the net pots.
* **Measuring Cups and Spoons:** For accurate nutrient mixing.
Step-by-Step Instructions: Building Your DWC System
Okay, let’s get our hands dirty (well, not really, since it’s hydroponics!). Follow these steps carefully, and you’ll have your system up and running in no time.
1. **Prepare the Container:**
* First, clean the plastic tote thoroughly with soap and water. Rinse it well to remove any residue.
* Decide how many plants you want to grow and space them evenly across the lid of the tote.
* Using your hole saw attachment, drill holes in the lid that are slightly smaller than the diameter of your net pots. This will ensure a snug fit.
* Make sure the holes are large enough to hold the net pots securely but not so large that they fall through.
2. **Assemble the Air System:**
* Connect one end of the air tubing to the air pump.
* Attach the other end of the tubing to the air stone.
* Place the air stone at the bottom of the tote. You might want to use a suction cup to keep it in place.
* Position the air pump outside the tote, ensuring it’s higher than the water level to prevent backflow.
3. **Prepare the Nutrient Solution:**
* Fill the tote with water, leaving a few inches of space at the top.
* Carefully measure and add the hydroponic nutrients according to the manufacturer’s instructions. It’s crucial to follow the instructions precisely to avoid nutrient imbalances.
* Use your pH testing kit to check the pH of the solution. The ideal pH range for most hydroponic vegetables is between 5.5 and 6.5.
* If the pH is too high, add a small amount of pH Down solution. If it’s too low, add a small amount of pH Up solution.
* Stir the solution well after each adjustment and retest the pH.
4. **Start Your Seeds:**
* While you’re setting up the system, start your seeds in rockwool cubes or coco coir plugs.
* Moisten the cubes or plugs with water and place one or two seeds in each.
* Keep the cubes or plugs moist and in a warm, well-lit location until the seeds germinate and develop a few leaves.
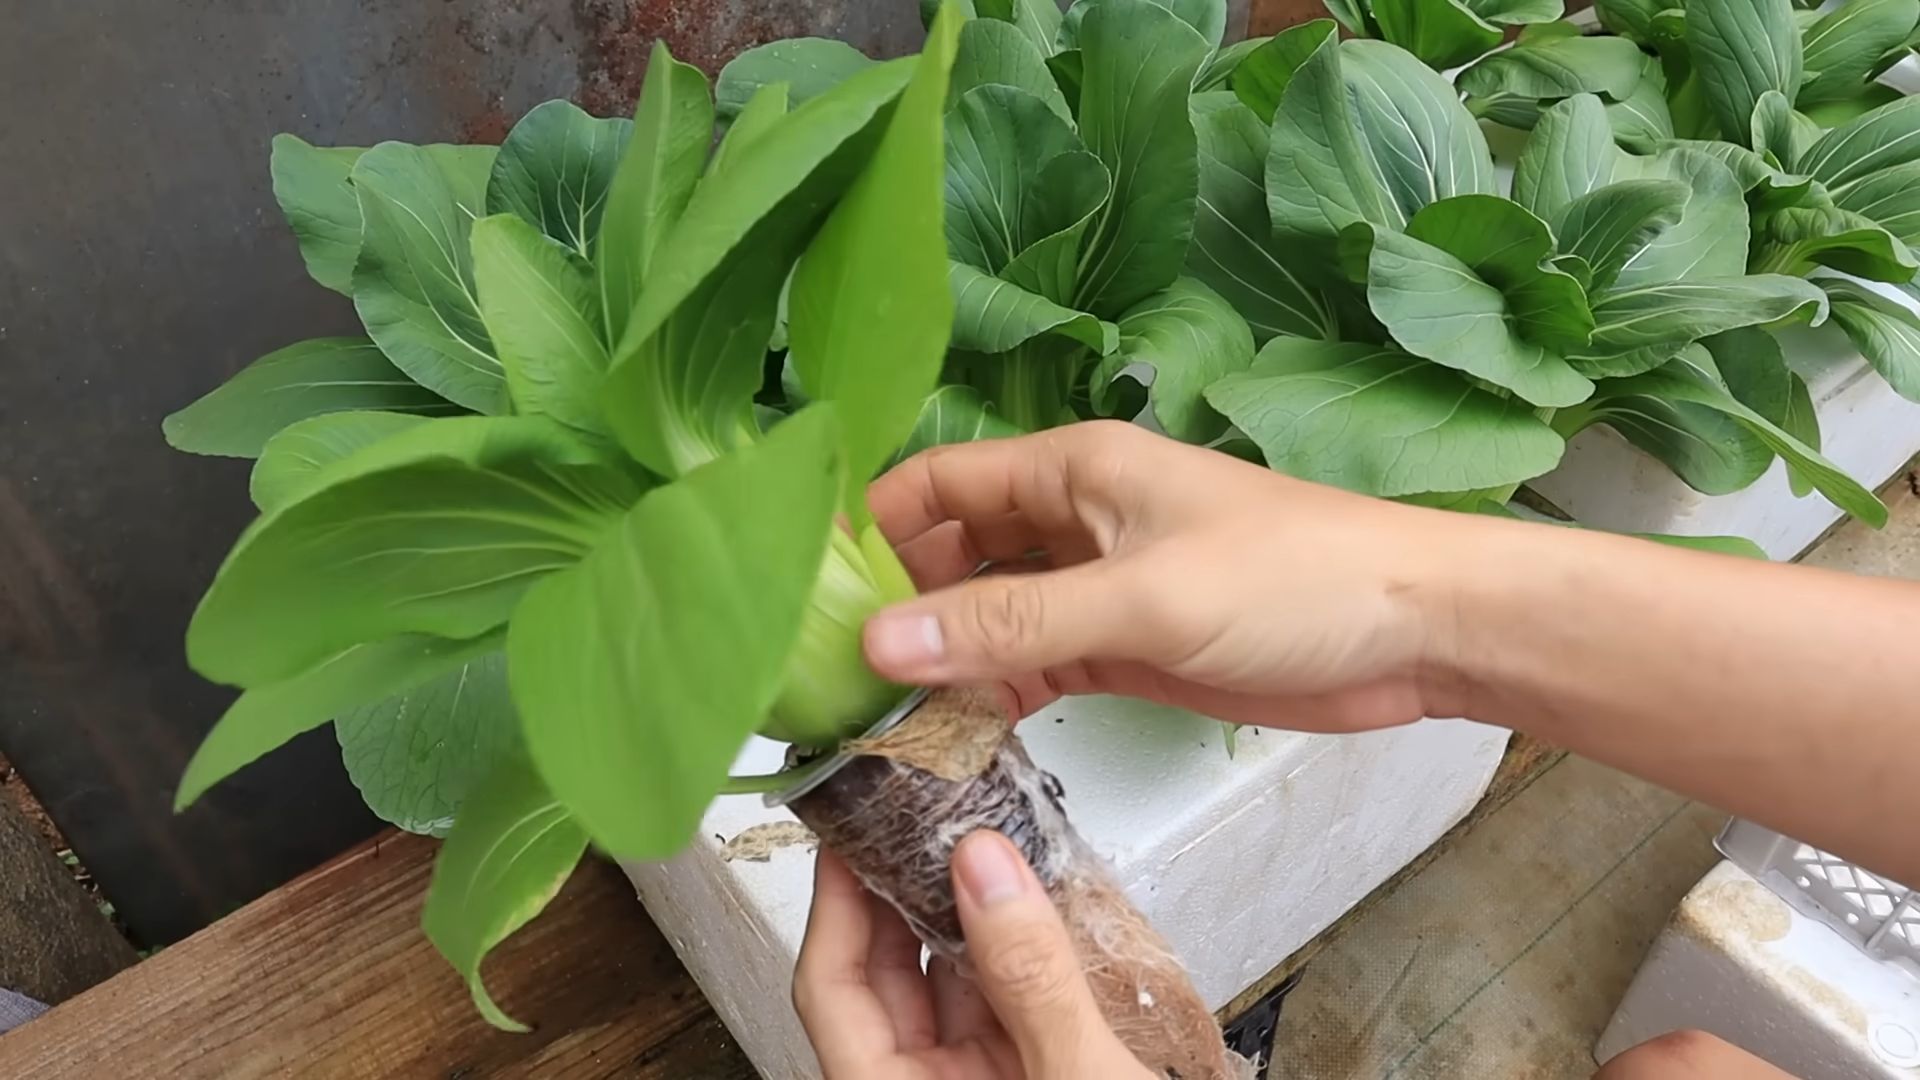
5. **Transplant Seedlings:**
* Once your seedlings have a few leaves and a decent root system (usually after a week or two), it’s time to transplant them into the net pots.
* Gently remove the seedlings from the rockwool cubes or coco coir plugs.
* Place each seedling in a net pot, ensuring the roots are dangling down. You can use some additional rockwool or coco coir to support the seedling in the net pot if needed.
* Place the net pots into the holes in the lid of the tote. The roots should be submerged in the nutrient solution.
6. **Power Up the System:**
* Plug in the air pump. You should see bubbles rising from the air stone, indicating that the nutrient solution is being aerated.
* If you’re using a grow light, position it above the plants, following the manufacturer’s recommendations for distance and light cycle.
7. **Monitor and Maintain:**
* Check the pH of the nutrient solution regularly (at least once a week) and adjust as needed.
* Monitor the water level in the tote and add more water and nutrients as needed to maintain the correct concentration.
* Change the nutrient solution completely every 2-3 weeks to prevent nutrient buildup and maintain optimal plant health.
* Inspect your plants regularly for any signs of pests or diseases. Address any issues promptly.
Troubleshooting Tips: Common Issues and Solutions
Even with the best planning, you might encounter a few hiccups along the way. Here are some common problems and how to fix them:
* **Algae Growth:** Algae can grow in the nutrient solution if exposed to light. Make sure your container is dark-colored and that the lid is tightly sealed. You can also add a small amount of hydrogen peroxide to the solution to kill algae.
* **Nutrient Deficiencies:** Yellowing leaves or stunted growth can indicate nutrient deficiencies. Double-check your nutrient solution and adjust the concentration as needed. Make sure you’re using a balanced hydroponic nutrient solution.
* **pH Imbalance:** An incorrect pH can prevent plants from absorbing nutrients. Regularly check and adjust the pH of the nutrient solution.
* **Root Rot:** Root rot is a fungal disease that can occur if the roots are not properly aerated. Ensure your air pump and air stone are working correctly and that the nutrient solution is well-oxygenated.
* **Pests:** Pests can be a problem even in hydroponic systems. Inspect your plants regularly and treat any infestations with appropriate organic pesticides.
Choosing the Right Vegetables: What Grows Well in DWC?
While you can technically grow almost anything hydroponically, some vegetables are better suited for DWC than others. Here are a few great options for beginners:
* **Lettuce:** Lettuce is easy to grow and thrives in DWC. You can harvest leaves continuously as needed.
* **Spinach:** Similar to lettuce, spinach is a fast-growing leafy green that does well in DWC.
* **Herbs:** Herbs like basil, mint, and parsley are excellent choices for hydroponics. They’re easy to grow and add fresh flavor to your meals.
* **Strawberries:** Strawberries can be grown hydroponically, but they require a bit more attention. Make sure to provide adequate support for the plants.
* **Peppers:** Smaller pepper varieties, like chili peppers, can be grown successfully in DWC. They may require additional support as they grow.
Harvesting Your Bounty: Enjoying the Fruits (and Vegetables!) of Your Labor
The best part of hydroponics is, of course, harvesting your own fresh, delicious vegetables! Harvest your crops as they ripen, and enjoy the satisfaction of knowing you grew them yourself.
* **Lettuce and Spinach:** Harvest individual leaves as needed, allowing the plant to continue growing.
* **Herbs:** Snip off stems as needed, encouraging the plant to bush out.
* **Strawberries:** Pick strawberries when they are fully red and ripe.
* **Peppers:** Harvest peppers when they reach their desired size and color.
Advanced Techniques: Taking Your Hydroponics to the Next Level
Once you’ve mastered the basics of DWC, you can explore more advanced techniques to further optimize your hydroponic garden.
* **Adding a Timer:** Use a timer to control the air pump, cycling it on and off to conserve energy.
* **Using a Water Chiller:** If your nutrient solution gets too warm, a water chiller can help maintain the optimal temperature for plant growth.
* **Experimenting
Conclusion
So, there you have it! Creating your own DIY hydroponic vegetable garden isn’t just a fun project; it’s a gateway to fresher, healthier, and more sustainable eating. We’ve walked you through the steps, demystified the process, and hopefully, inspired you to take the plunge.
Why is this DIY hydroponic vegetable method a must-try? Because it puts you in control. You control the nutrients, the environment, and ultimately, the quality of the food you’re consuming. Imagine plucking a perfectly ripe tomato or a crisp head of lettuce directly from your indoor garden, knowing exactly where it came from and what went into growing it. That’s the power of hydroponics.
Beyond the control aspect, this method offers incredible efficiency. You’ll use significantly less water than traditional gardening, and because you’re growing indoors, you’re shielded from pests and diseases that can decimate outdoor crops. This means less reliance on harmful pesticides and herbicides, resulting in cleaner, healthier produce for you and your family.
But the benefits don’t stop there. Hydroponics allows you to grow vegetables year-round, regardless of the weather outside. Say goodbye to seasonal limitations and hello to a constant supply of fresh, delicious produce. Plus, it’s a fantastic way to introduce children to the wonders of gardening and teach them about where their food comes from.
Ready to take your DIY hydroponic vegetable garden to the next level? Consider experimenting with different nutrient solutions to see how they affect the growth and flavor of your vegetables. You could also try different growing mediums, such as coco coir or perlite, to find what works best for your setup. Another exciting variation is to incorporate a timer for your grow lights to automate the process and ensure consistent light exposure.
Don’t be afraid to get creative and personalize your hydroponic system to suit your specific needs and preferences. Maybe you want to build a vertical hydroponic tower to maximize space, or perhaps you’d like to add a small fish tank to create an aquaponic system, where the fish waste provides nutrients for the plants. The possibilities are endless!
We wholeheartedly encourage you to give this DIY hydroponic vegetable project a try. It’s a rewarding experience that will not only provide you with fresh, healthy food but also connect you with the natural world in a unique and meaningful way.
Once you’ve set up your hydroponic garden and started harvesting your own vegetables, we’d love to hear about your experience! Share your photos, tips, and challenges in the comments below. Let’s build a community of hydroponic enthusiasts and learn from each other. Together, we can revolutionize the way we grow and consume food. So, grab your supplies, roll up your sleeves, and get ready to embark on a journey of fresh, flavorful, and sustainable gardening!
Frequently Asked Questions (FAQ)
What exactly is hydroponics, and is it difficult to learn?
Hydroponics is a method of growing plants without soil, using mineral nutrient solutions in water. Instead of soil providing nutrients, the roots are directly exposed to a nutrient-rich solution. It might sound complicated, but the basic principles are quite simple. While there’s a learning curve, especially when it comes to fine-tuning nutrient solutions and managing environmental factors, starting with a simple DIY system like the one described in this article makes it very approachable for beginners. Many resources are available online and in libraries to help you learn more about the specific needs of different vegetables. Don’t be intimidated; start small, experiment, and learn as you go!
What are the best vegetables to grow hydroponically for beginners?
Some vegetables are easier to grow hydroponically than others, especially for beginners. Leafy greens like lettuce, spinach, and kale are excellent choices because they grow quickly and don’t require pollination. Herbs like basil, mint, and chives are also relatively easy to grow and can add a lot of flavor to your meals. Strawberries are another popular option for hydroponic gardening. As you gain experience, you can try growing more challenging vegetables like tomatoes, peppers, and cucumbers, which require more precise nutrient management and environmental control.
How often do I need to change the nutrient solution in my hydroponic system?
The frequency of nutrient solution changes depends on several factors, including the size of your system, the type of vegetables you’re growing, and the rate at which they’re consuming nutrients. As a general rule, you should change the nutrient solution every 1-2 weeks. However, it’s essential to monitor the pH and nutrient levels of your solution regularly using a pH meter and a TDS (total dissolved solids) meter. If the pH drifts too far from the optimal range (typically between 5.5 and 6.5), or if the nutrient levels drop significantly, you may need to change the solution more frequently. Also, keep an eye out for algae growth in your reservoir, as this can indicate an imbalance in the nutrient solution.
What kind of lighting is needed for a DIY hydroponic vegetable garden?
Adequate lighting is crucial for successful hydroponic gardening, especially indoors. The type of lighting you need depends on the type of vegetables you’re growing and the amount of natural light available. For leafy greens and herbs, fluorescent lights or LED grow lights are usually sufficient. For fruiting vegetables like tomatoes and peppers, you’ll need more intense lighting, such as high-pressure sodium (HPS) or metal halide (MH) lights. LED grow lights are becoming increasingly popular due to their energy efficiency and long lifespan. When choosing grow lights, consider the light spectrum, intensity, and duration of light exposure. Aim for at least 14-16 hours of light per day for most vegetables.
Can I use tap water for my hydroponic system, or do I need to use distilled water?
Whether you can use tap water for your hydroponic system depends on the quality of your tap water. If your tap water is relatively clean and free of excessive minerals or chlorine, it may be suitable for hydroponics. However, if your tap water is hard or contains high levels of chlorine or other contaminants, it’s best to use filtered or distilled water. You can test your tap water using a water testing kit to determine its suitability for hydroponics. If you do use tap water, let it sit for 24 hours before adding it to your system to allow the chlorine to evaporate.
How do I prevent algae growth in my hydroponic system?
Algae growth can be a common problem in hydroponic systems, especially in systems that are exposed to light. Algae can compete with your vegetables for nutrients and oxygen, and it can also clog your system. To prevent algae growth, keep your nutrient reservoir covered and shielded from light. You can also add a small amount of hydrogen peroxide to your nutrient solution to kill algae. Regularly clean your system to remove any algae that does grow.
What do I do if my hydroponic vegetables are not growing well?
If your hydroponic vegetables are not growing well, there could be several reasons. First, check the pH and nutrient levels of your solution to ensure they are within the optimal range. Also, make sure your plants are getting enough light. If the leaves are yellowing, it could indicate a nutrient deficiency. If the leaves are wilting, it could indicate a lack of water or oxygen. Check the roots for signs of rot or disease. Adjust your growing conditions as needed to address any problems. Don’t be afraid to experiment and learn from your mistakes.
Is hydroponics organic?
This is a complex question. While hydroponics doesn’t inherently preclude organic practices, it’s not automatically considered organic under current USDA regulations. The USDA’s National Organic Program (NOP) has historically prohibited hydroponically grown crops from being certified organic, primarily due to the lack of soil. However, there’s ongoing debate and evolving perspectives on this issue. Some argue that hydroponics can be organic if organic nutrient sources are used and sustainable practices are followed. The key is to use nutrient solutions derived from natural sources and avoid synthetic pesticides and herbicides. Always check with your local certifying agency for the most up-to-date regulations.
How much does it cost to set up a DIY hydroponic vegetable garden?
The cost of setting up a DIY hydroponic vegetable garden can vary widely depending on the size and complexity of your system. A small, simple system using recycled materials can cost as little as $50-$100. A larger, more sophisticated system with grow lights, pumps, and timers can cost several hundred dollars or more. The initial investment may seem significant, but keep in mind that you’ll save money on groceries in the long run. Plus, you’ll be growing your own fresh, healthy food, which is priceless.
Where can I find more information and resources on DIY hydroponic vegetable gardening?
There are many excellent resources available online and in libraries to help you learn more about DIY hydroponic vegetable gardening. Search for reputable websites, forums, and blogs dedicated to hydroponics. Look for books and articles on hydroponic techniques, nutrient management, and pest control. You can also find helpful videos on YouTube and other video-sharing platforms. Don’t be afraid to ask questions and connect with other hydroponic gardeners. The hydroponic community is very supportive and willing to share their knowledge and experience.

Leave a Comment