
Container Gardening Water Spinach: Ever dreamt of harvesting fresh, vibrant greens right from your balcony or patio? I know I have! There’s something incredibly satisfying about growing your own food, and it’s easier than you might think, especially with the right tricks up your sleeve. This DIY guide is your passport to a thriving water spinach patch, even if you’re short on space.
Water spinach, also known as Ong Choy or Kang Kong, isn’t just delicious; it’s deeply rooted in Asian culinary traditions. For centuries, it’s been a staple in stir-fries, soups, and salads across Southeast Asia and beyond. Imagine bringing that fresh, authentic flavor to your own kitchen, grown with your own two hands!
But why container gardening water spinach, you ask? Well, let’s face it, not everyone has a sprawling backyard. Apartment living, limited space, or even just a desire for a low-maintenance garden can make traditional gardening a challenge. That’s where container gardening comes in! It’s the perfect solution for urban dwellers and anyone looking to enjoy fresh produce without the hassle of a large garden plot. Plus, water spinach is incredibly fast-growing, so you’ll be enjoying your harvest in no time. I’m going to show you how to easily grow this delicious vegetable in containers, so you can enjoy fresh, homegrown goodness no matter where you live!
Growing Water Spinach in Containers: A Beginner’s Guide
Hey there, fellow gardening enthusiasts! Ever wanted to grow your own fresh, leafy greens but thought you didn’t have enough space? Well, I’m here to tell you that you absolutely can, even if all you have is a balcony or a sunny windowsill! Today, I’m going to walk you through the surprisingly simple process of growing water spinach (also known as kangkong or ong choy) in containers. Trust me, it’s easier than you think, and the reward of harvesting your own delicious, nutritious greens is totally worth it.
Why Water Spinach?
Before we dive in, let’s talk about why water spinach is such a great choice for container gardening:
* Fast Growth: Water spinach is a rapid grower. You can expect to start harvesting leaves within just a few weeks of planting.
* Easy to Grow: It’s relatively low-maintenance and forgiving, making it perfect for beginner gardeners.
* Nutritious: This leafy green is packed with vitamins and minerals, including vitamin A, vitamin C, and iron.
* Delicious: Water spinach has a mild, slightly sweet flavor that’s delicious in stir-fries, soups, and salads.
* Space-Saving: It thrives in containers, making it ideal for small spaces.
* Water-Loving: As the name suggests, water spinach loves water, which simplifies watering schedules.
What You’ll Need
Okay, let’s gather our supplies. Here’s what you’ll need to get started:
* Water Spinach Seeds or Cuttings: You can find water spinach seeds online or at some Asian grocery stores. Alternatively, you can use cuttings from a friend’s plant or a store-bought bunch.
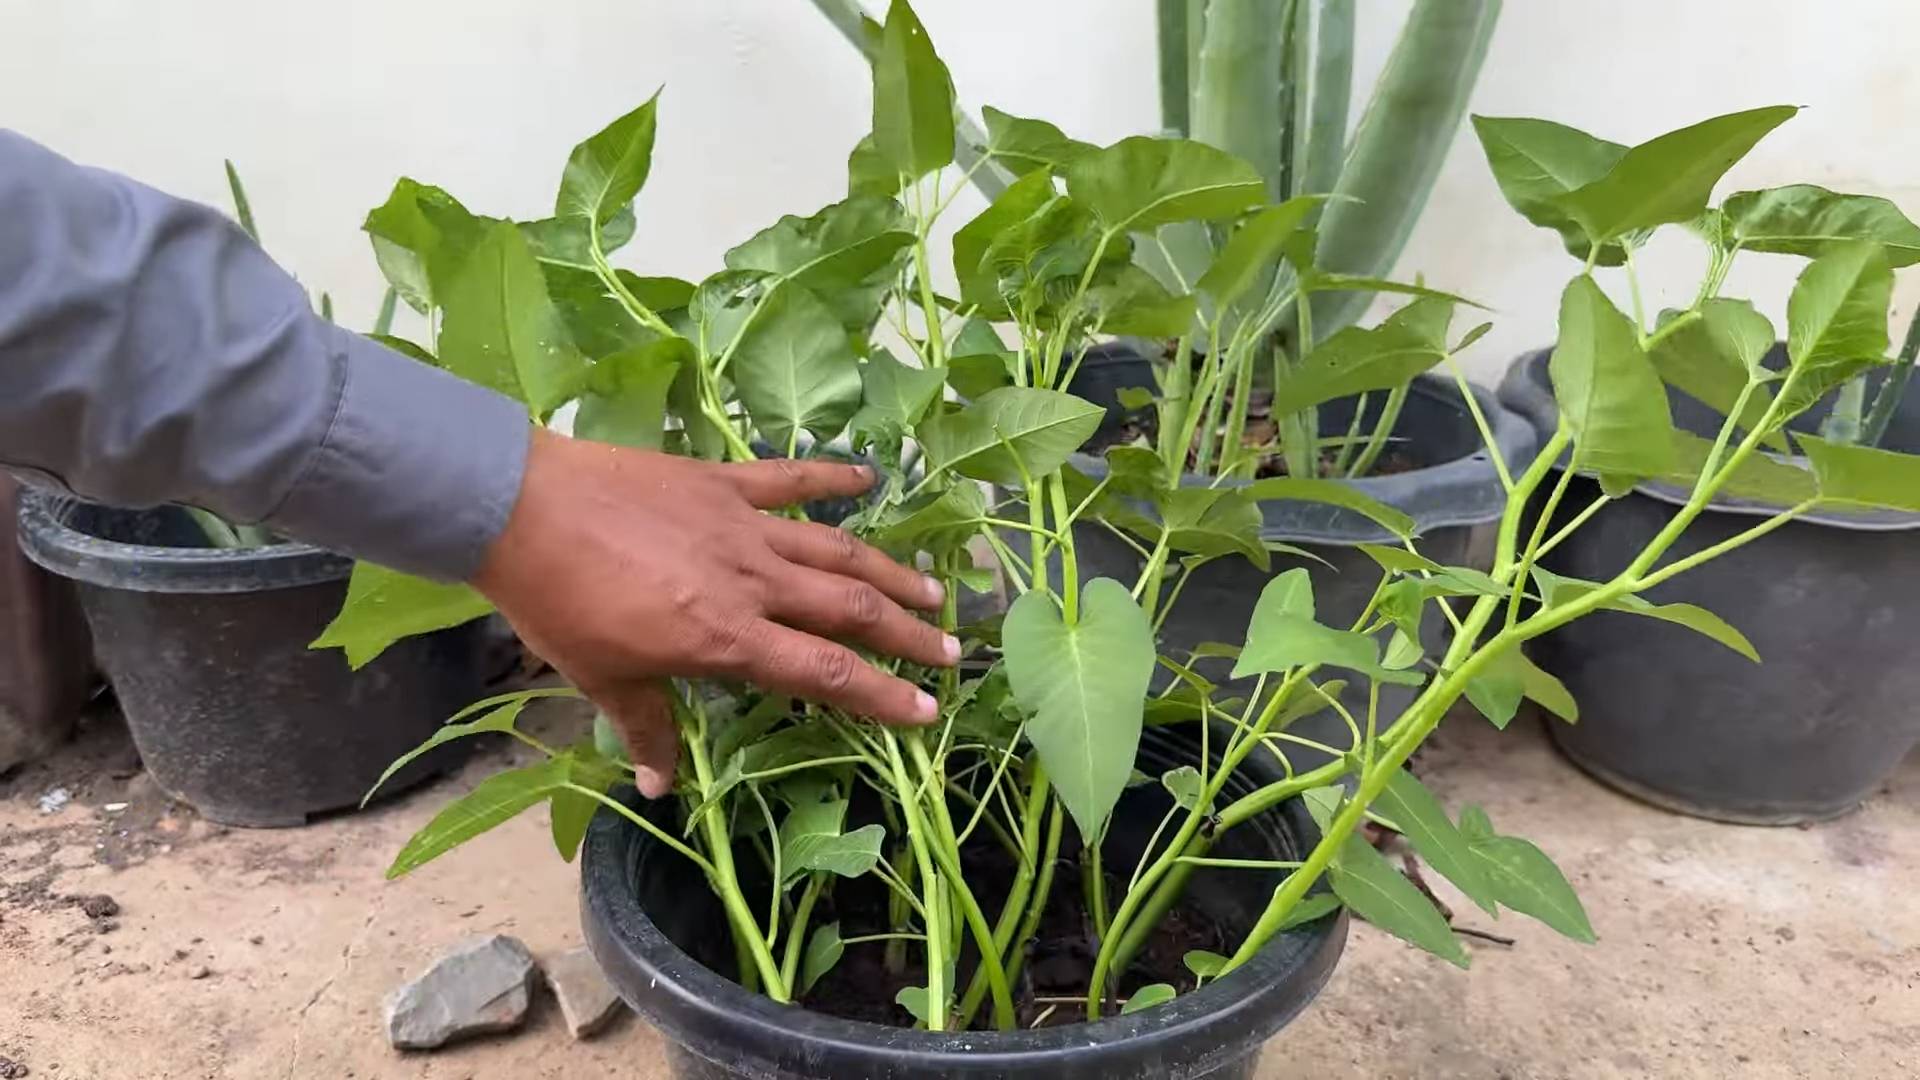
* Container: Choose a container that’s at least 12 inches deep and wide. A plastic tub, a large pot, or even a repurposed bucket will work just fine. Make sure it has drainage holes!
* Potting Mix: Use a good-quality potting mix that’s well-draining but also retains moisture. I like to use a mix of compost, peat moss, and perlite.
* Water: You’ll need plenty of water to keep your water spinach happy.
* Fertilizer (Optional): A balanced liquid fertilizer can help boost growth, but it’s not essential.
* Sunlight: Water spinach needs at least 6 hours of sunlight per day.
* Water Tray or Basin: This is optional but highly recommended. Water spinach loves to sit in water, so a tray or basin to hold water beneath the container will help keep it consistently moist.
Getting Started: Planting Your Water Spinach
Now for the fun part! Let’s get those seeds or cuttings in the soil.
1. Prepare the Container: First, make sure your container is clean and has drainage holes. If it doesn’t have drainage holes, you’ll need to drill some.
2. Fill the Container with Potting Mix: Fill the container with your potting mix, leaving about an inch or two of space at the top.
3. Sowing Seeds (If Using Seeds): If you’re using seeds, sprinkle them evenly over the surface of the soil. Then, cover them with a thin layer of potting mix (about ¼ inch). Gently water the soil.
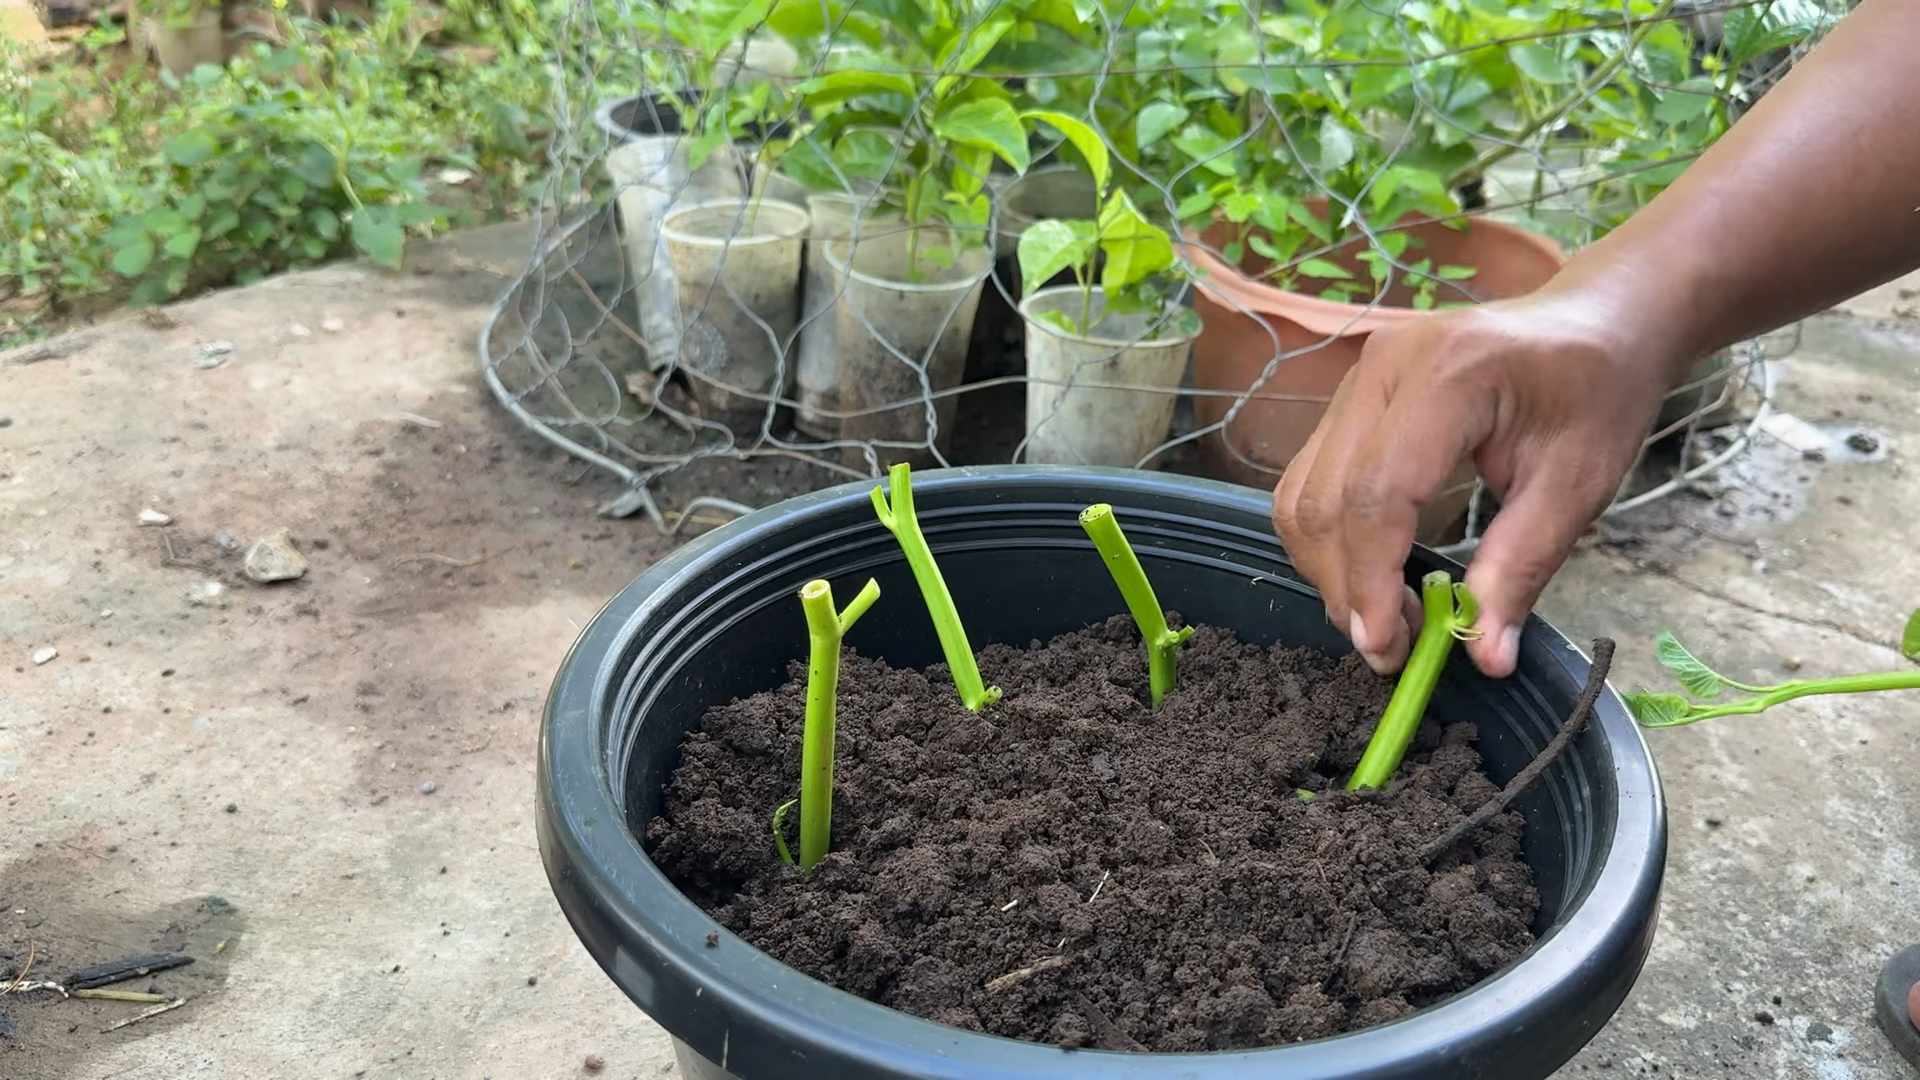
4. Planting Cuttings (If Using Cuttings): If you’re using cuttings, dip the cut ends in rooting hormone (optional, but it helps). Then, insert the cuttings into the soil, spacing them a few inches apart. Make sure at least one node (the point where leaves grow) is buried in the soil. Gently water the soil.
5. Water Thoroughly: Water the soil thoroughly until water drains out of the drainage holes.
6. Place in a Sunny Location: Place the container in a sunny location that receives at least 6 hours of sunlight per day.
Maintaining Your Water Spinach
Water spinach is relatively low-maintenance, but here are a few things you’ll need to do to keep it happy and healthy:
1. Watering: This is the most important part! Water spinach loves water, so you’ll need to water it frequently, especially during hot weather. The soil should always be moist, but not soggy. If you’re using a water tray or basin, keep it filled with water. I usually check the soil moisture twice a day, especially during the summer.
2. Fertilizing (Optional): If you want to give your water spinach a boost, you can fertilize it every few weeks with a balanced liquid fertilizer. Follow the instructions on the fertilizer label. I usually dilute the fertilizer to half strength to avoid burning the plants.
3. Weeding: Keep an eye out for weeds and remove them as soon as you see them.
4. Pest Control: Water spinach is generally pest-resistant, but you may occasionally encounter aphids or other pests. If you do, you can spray them with insecticidal soap or neem oil. I prefer to use organic pest control methods whenever possible.
5. Pruning: Pruning is important for encouraging bushier growth. Once your water spinach plants are a few inches tall, you can start pinching off the tips of the stems. This will encourage them to branch out and produce more leaves.
Harvesting Your Water Spinach
Now for the best part – harvesting! You can start harvesting your water spinach leaves when they are about 6-8 inches long.
1. Harvesting Leaves: To harvest, simply cut the stems a few inches above the soil line. The plants will regrow, and you can continue harvesting leaves for several weeks.
2. Successive Harvesting: You can harvest water spinach multiple times from the same plant. Just make sure to leave a few leaves on the plant so it can continue to grow.
3. Timing: Harvest in the morning for the best flavor.
4. Storage: Water spinach is best used fresh, but you can store it in the refrigerator for a few days. Wrap it in a damp paper towel and place it in a plastic bag.
Troubleshooting
Even with the best care, you might encounter a few problems along the way. Here are some common issues and how to fix them:
* Yellowing Leaves: This could be a sign of overwatering, underwatering, or nutrient deficiency. Check the soil moisture and adjust your watering accordingly. If the soil is consistently moist, you may be overwatering. If the soil is dry, you may be underwatering. If you suspect a nutrient deficiency, try fertilizing with a balanced liquid fertilizer.
* Slow Growth: This could be due to lack of sunlight, poor soil, or nutrient deficiency. Make sure your water spinach is getting at least 6 hours of sunlight per day. If the soil is poor, try amending it with compost or other organic matter. If you suspect a nutrient deficiency, try fertilizing with a balanced liquid fertilizer.
* Pests: As mentioned earlier, water spinach is generally pest-resistant, but you may occasionally encounter aphids or other pests. Spray them with insecticidal soap or neem oil.
Tips for Success
Here are a few extra tips to help you succeed with growing water spinach in containers:
* Choose the Right Container: Make sure your container is large enough to accommodate the roots of the water spinach plants. A container that’s at least 12 inches deep and wide is ideal.
* Use Good-Quality Potting Mix: Use a potting mix that’s well-draining but also retains moisture. I like to use a mix of compost, peat moss, and perlite.
* Water Regularly: Water spinach loves water, so you’ll need to water it frequently, especially during hot weather.
* Fertilize Regularly (Optional): Fertilizing every few weeks with a balanced liquid fertilizer can help boost growth.
* Prune Regularly: Pruning encourages bushier growth and more leaves.
* Harvest Regularly: Harvesting encourages the plants to continue producing new leaves.
* Consider a Water Tray: Using a water tray or basin to keep the container consistently moist can significantly improve growth.
Enjoy Your Homegrown Water Spinach!
And there you have it! Growing water spinach in containers is a simple and rewarding way to enjoy fresh, leafy greens, even if you don’t have a lot of space. With a little bit of care and attention, you’ll be harvesting your own delicious water spinach in no time. Happy gardening!
Conclusion
So, there you have it! Growing your own water spinach, or *kangkong*, in containers is not only achievable but also incredibly rewarding. This simple DIY trick transforms even the smallest of spaces into a thriving edible garden, bringing fresh, nutritious greens right to your kitchen. Forget those wilted, overpriced bunches at the grocery store – imagine stepping outside and harvesting vibrant, crisp water spinach whenever you need it.
Why is this a must-try? Because it’s easy, economical, and environmentally friendly. You’re reducing your carbon footprint by cutting down on transportation, minimizing plastic packaging, and controlling exactly what goes into your food. Plus, there’s something deeply satisfying about nurturing a plant from seed to table. It connects you to the natural world and provides a tangible sense of accomplishment.
But the benefits don’t stop there. Container gardening water spinach offers incredible flexibility. You can tailor the growing conditions to suit your specific climate and space. Live in a cooler region? Bring your containers indoors during the colder months and enjoy a year-round harvest. Limited sunlight? Consider supplementing with grow lights to ensure optimal growth.
Variations to Explore:
* Vertical Gardening: Maximize your space by using vertical planters or stacking containers. This is a fantastic option for balconies or small patios.
* Aquaponics Integration: If you’re feeling adventurous, explore integrating your water spinach container garden with a small aquaponics system. The fish waste provides natural fertilizer for the plants, and the plants filter the water for the fish – a truly symbiotic relationship!
* Companion Planting: Experiment with companion plants like basil or mint to deter pests and enhance the flavor of your water spinach.
* Different Varieties: While the common variety is delicious, explore different cultivars of water spinach. Some offer slightly different flavors or textures.
This DIY trick for container gardening water spinach is more than just a gardening project; it’s an investment in your health, your well-being, and the environment. It’s a chance to reconnect with nature, learn new skills, and enjoy the freshest, most flavorful greens imaginable.
We wholeheartedly encourage you to give this a try. Don’t be intimidated if you’re a beginner – water spinach is surprisingly resilient and forgiving. Start small, experiment, and learn as you go. The most important thing is to get your hands dirty and enjoy the process.
And once you’ve harvested your first batch of homegrown water spinach, we’d love to hear about your experience! Share your photos, tips, and recipes in the comments below. Let’s build a community of container gardening water spinach enthusiasts and inspire others to grow their own food. Happy gardening!
Frequently Asked Questions (FAQ)
What kind of container is best for growing water spinach?
The ideal container for growing water spinach should be at least 12 inches deep and wide. This allows ample space for the roots to develop. Plastic tubs, large pots, or even repurposed containers like old buckets or storage bins work well. Ensure the container has drainage holes to prevent waterlogging, although water spinach thrives in moist conditions, it doesn’t like to sit in stagnant water. Dark-colored containers can help retain heat, which is beneficial in cooler climates. Consider the weight of the container when filled with soil and water, especially if you’re placing it on a balcony or elevated surface.
What type of soil should I use for container gardening water spinach?
Water spinach prefers rich, well-draining soil that retains moisture. A good mix would be equal parts of potting soil, compost, and peat moss or coco coir. The potting soil provides structure, the compost adds nutrients, and the peat moss or coco coir helps retain moisture. You can also add a slow-release fertilizer to the soil mix to provide a steady supply of nutrients throughout the growing season. Avoid using garden soil directly in containers, as it can become compacted and doesn’t drain well.
How often should I water my container water spinach?
Water spinach loves water, so consistent watering is crucial. Aim to keep the soil consistently moist, but not waterlogged. Water deeply whenever the top inch of soil feels dry to the touch. During hot weather, you may need to water daily or even twice a day. Check the drainage holes to ensure excess water is draining properly. You can also place a saucer under the container to catch excess water, but be sure to empty it regularly to prevent mosquito breeding.
How much sunlight does water spinach need?
Water spinach thrives in full sun, requiring at least 6-8 hours of direct sunlight per day. However, it can tolerate partial shade, especially in hotter climates. If you’re growing water spinach indoors, place it near a sunny window or supplement with grow lights. Insufficient sunlight can result in leggy growth and reduced yields. Rotate the container regularly to ensure all sides of the plant receive adequate sunlight.
How do I fertilize my container water spinach?
Water spinach is a heavy feeder, so regular fertilization is essential for optimal growth. Use a balanced liquid fertilizer diluted to half strength every 2-3 weeks. You can also add compost tea or fish emulsion to the soil as a natural fertilizer. Avoid over-fertilizing, as this can lead to excessive foliage growth at the expense of flower and seed production. Monitor the plant’s growth and adjust the fertilization schedule accordingly.
When and how do I harvest water spinach?
You can start harvesting water spinach about 4-6 weeks after planting. Harvest the young, tender stems and leaves by cutting them off a few inches above the soil line. This encourages the plant to produce new growth. Regular harvesting will also prevent the plant from becoming too leggy. You can harvest water spinach multiple times throughout the growing season. The more you harvest, the more it will produce.
What are some common pests and diseases that affect water spinach?
Water spinach is generally pest-resistant, but it can be susceptible to aphids, spider mites, and whiteflies. These pests can be controlled with insecticidal soap or neem oil. Diseases are rare, but fungal infections can occur in humid conditions. Ensure good air circulation around the plants and avoid overwatering to prevent fungal problems. Remove any infected leaves promptly to prevent the spread of disease.
Can I grow water spinach indoors?
Yes, you can grow water spinach indoors, especially if you live in a cooler climate. Provide adequate sunlight or supplement with grow lights. Maintain a warm temperature and high humidity. Water regularly and fertilize as needed. Indoor-grown water spinach may not grow as vigorously as outdoor-grown plants, but you can still enjoy a decent harvest.
How do I save seeds from water spinach?
Allow some of your water spinach plants to flower and produce seeds. Once the seed pods are dry and brown, harvest them and extract the seeds. Store the seeds in a cool, dry place until you’re ready to plant them. Note that seeds saved from hybrid varieties may not produce plants that are true to type.
Is water spinach safe to eat?
Yes, water spinach is safe to eat when grown properly. However, it’s important to source your seeds from a reputable supplier and avoid growing water spinach in contaminated water or soil. Water spinach can accumulate nitrates from the soil, so it’s best to avoid over-fertilizing with nitrogen-rich fertilizers. Wash the leaves thoroughly before eating to remove any dirt or debris.


Leave a Comment