
Colorful bell peppers planting can transform your garden from a simple patch of green into a vibrant, edible masterpiece! Have you ever dreamed of strolling through your backyard, plucking a perfectly ripe, jewel-toned bell pepper straight from the vine? Well, get ready to turn that dream into reality with these easy and effective DIY tricks!
Bell peppers, originally cultivated in Central and South America, have a rich history dating back thousands of years. They weren’t always the sweet, colorful delights we know today; early varieties were often smaller and spicier. Over time, through careful cultivation and selection, they evolved into the sweet, crunchy peppers we love to add to salads, stir-fries, and countless other dishes. The vibrant colors – red, yellow, orange, and even purple – aren’t just visually appealing; they also indicate different levels of ripeness and nutritional content.
But let’s be honest, sometimes growing bell peppers can feel a little tricky. They need the right conditions, the right nutrients, and a little bit of TLC to truly thrive. That’s where these DIY hacks come in! I’m going to share some of my favorite, tried-and-true methods for ensuring a bountiful harvest of colorful bell peppers planting, even if you’re a beginner gardener. From simple soil amendments to clever pest control solutions, these tips will help you overcome common challenges and enjoy the satisfaction of growing your own delicious, colorful peppers. So, grab your gardening gloves, and let’s get started!
Bunte Paprika selbst anpflanzen: So geht’s!
Hallo liebe Gartenfreunde! Ich liebe es, meinen Garten mit leuchtenden Farben zu füllen, und nichts ist dafür besser geeignet als knackige, bunte Paprika. Sie sind nicht nur ein Augenschmaus, sondern auch super lecker und vielseitig in der Küche einsetzbar. In diesem Artikel zeige ich euch, wie ihr ganz einfach eure eigenen bunten Paprika anpflanzen könnt – von der Aussaat bis zur Ernte. Keine Angst, es ist einfacher als ihr denkt!
Was du für den Paprika-Anbau brauchst
Bevor wir loslegen, hier eine Liste mit allem, was du für den erfolgreichen Paprika-Anbau benötigst:
* Paprika-Samen: Wähle deine Lieblingsfarben und -sorten! Ich empfehle eine Mischung aus Rot, Gelb, Orange und vielleicht sogar Lila oder Braun für einen besonders farbenfrohen Garten. Achte auf qualitativ hochwertige Samen von vertrauenswürdigen Anbietern.
* Anzuchterde: Diese ist nährstoffarm und locker, ideal für die Keimung der Samen.
* Anzuchttöpfe oder -schalen: Kleine Töpfe oder Schalen mit Drainagelöchern sind perfekt für die Voranzucht.
* Mini-Gewächshaus oder Klarsichtfolie: Um eine hohe Luftfeuchtigkeit für die Keimung zu gewährleisten.
* Pikierstab oder Bleistift: Zum Vereinzeln der Sämlinge.
* Gemüseerde: Nährstoffreiche Erde für das Auspflanzen in größere Töpfe oder ins Beet.
* Töpfe (mind. 10 Liter) oder ein sonniger Platz im Gartenbeet: Für das endgültige Auspflanzen der Paprikapflanzen.
* Pflanzstäbe: Um die Pflanzen bei Bedarf zu stützen.
* Flüssigdünger für Gemüse: Für eine optimale Nährstoffversorgung während der Wachstumsphase.
* Gießkanne oder Gartenschlauch: Zum regelmäßigen Gießen.
* Geduld und Liebe: Das Wichtigste überhaupt!
Aussaat und Voranzucht: Der Grundstein für eine reiche Ernte
Die Voranzucht ist entscheidend für den Erfolg, da Paprika eine lange Wachstumsperiode hat. Beginne am besten im Februar oder März mit der Aussaat.
1. Vorbereitung der Anzuchttöpfe: Fülle die Anzuchttöpfe oder -schalen mit Anzuchterde. Drücke die Erde leicht an.
2. Aussaat der Samen: Lege pro Topf oder Zelle 2-3 Samen auf die Erde. Bedecke die Samen mit einer dünnen Schicht Erde (ca. 0,5 cm).
3. Bewässerung: Befeuchte die Erde vorsichtig mit einer Sprühflasche oder einer Gießkanne mit feinem Brausekopf. Die Erde sollte feucht, aber nicht nass sein.
4. Mini-Gewächshaus-Effekt: Stelle die Anzuchttöpfe in ein Mini-Gewächshaus oder decke sie mit Klarsichtfolie ab. Das sorgt für eine hohe Luftfeuchtigkeit, die für die Keimung wichtig ist.
5. Der richtige Standort: Stelle das Mini-Gewächshaus an einen warmen und hellen Ort. Eine Temperatur von 22-25°C ist ideal für die Keimung.
6. Geduld ist gefragt: Die Keimung dauert in der Regel 1-2 Wochen. Lüfte das Mini-Gewächshaus täglich kurz, um Schimmelbildung zu vermeiden.
7. Nach der Keimung: Sobald die ersten Keimlinge erscheinen, entferne die Klarsichtfolie oder lüfte das Mini-Gewächshaus regelmäßig. Stelle die Anzuchttöpfe an einen helleren, aber nicht zu sonnigen Ort.
Pikieren: Den kleinen Pflanzen mehr Raum geben
Sobald die Sämlinge ihre ersten richtigen Blätter (nach den Keimblättern) entwickelt haben, ist es Zeit zum Pikieren. Das bedeutet, dass du die kleinen Pflanzen vereinzelst und in größere Töpfe umpflanzt.
1. Vorbereitung der Töpfe: Fülle kleine Töpfe (ca. 8-10 cm Durchmesser) mit Gemüseerde.
2. Vereinzeln der Sämlinge: Lockere die Erde in den Anzuchttöpfen vorsichtig auf. Hebe die Sämlinge mit einem Pikierstab oder Bleistift vorsichtig aus der Erde. Versuche, die Wurzeln so wenig wie möglich zu beschädigen.
3. Einpflanzen: Setze jeden Sämling in einen separaten Topf mit Gemüseerde. Achte darauf, dass die Wurzeln nicht geknickt sind. Die Sämlinge können etwas tiefer gesetzt werden als zuvor.
4. Andrücken und Gießen: Drücke die Erde um die Sämlinge leicht an und gieße sie vorsichtig.
5. Der richtige Standort: Stelle die pikierten Pflanzen an einen hellen und warmen Ort.
Auspflanzen: Ab ins Freie oder in den Topf
Nach den Eisheiligen (Mitte Mai), wenn keine Frostgefahr mehr besteht, können die Paprikapflanzen ins Freie oder in größere Töpfe umgepflanzt werden.
1. Vorbereitung des Standorts: Wähle einen sonnigen und windgeschützten Platz für deine Paprikapflanzen. Der Boden sollte locker, humos und nährstoffreich sein. Wenn du die Paprika in Töpfe pflanzt, verwende Töpfe mit einem Volumen von mindestens 10 Litern.
2. Bodenverbesserung: Verbessere den Boden im Gartenbeet mit Kompost oder anderem organischen Material.
3. Auspflanzen: Grabe Löcher, die etwas größer sind als die Wurzelballen der Paprikapflanzen. Setze die Pflanzen vorsichtig in die Löcher und fülle sie mit Erde auf. Achte darauf, dass die Pflanzen nicht tiefer gesetzt werden als zuvor.
4. Abstand: Halte einen Abstand von ca. 40-50 cm zwischen den Pflanzen ein.
5. Gießen: Gieße die Pflanzen nach dem Auspflanzen gründlich an.
6. Stützen: Setze Pflanzstäbe neben die Pflanzen, um sie bei Bedarf zu stützen. Besonders bei starkem Wind oder schweren Früchten ist dies wichtig.
Pflege: Damit deine Paprika prächtig gedeihen
Die richtige Pflege ist entscheidend für eine reiche Ernte.
1. Gießen: Gieße die Paprikapflanzen regelmäßig, besonders während trockener Perioden. Die Erde sollte immer leicht feucht sein, aber Staunässe ist zu vermeiden. Gieße am besten morgens oder abends, um Verbrennungen der Blätter durch die Sonne zu vermeiden.
2. Düngen: Dünge die Paprikapflanzen regelmäßig mit einem Flüssigdünger für Gemüse. Beginne damit ca. 2-3 Wochen nach dem Auspflanzen. Befolge die Anweisungen auf der Düngerpackung.
3. Ausgeizen: Entferne regelmäßig die Seitentriebe (Geiztriebe), die sich in den Blattachseln bilden. Das fördert die Bildung von größeren und reiferen Früchten.
4. Schutz vor Schädlingen und Krankheiten: Kontrolliere die Pflanzen regelmäßig auf Schädlinge und Krankheiten. Bei Bedarf kannst du biologische Schädlingsbekämpfungsmittel einsetzen. Achte auf Blattläuse, Spinnmilben und Pilzkrankheiten.
5. Mulchen: Eine Mulchschicht aus Stroh oder Rasenschnitt hilft, die Feuchtigkeit im Boden zu halten und Unkraut zu unterdrücken.
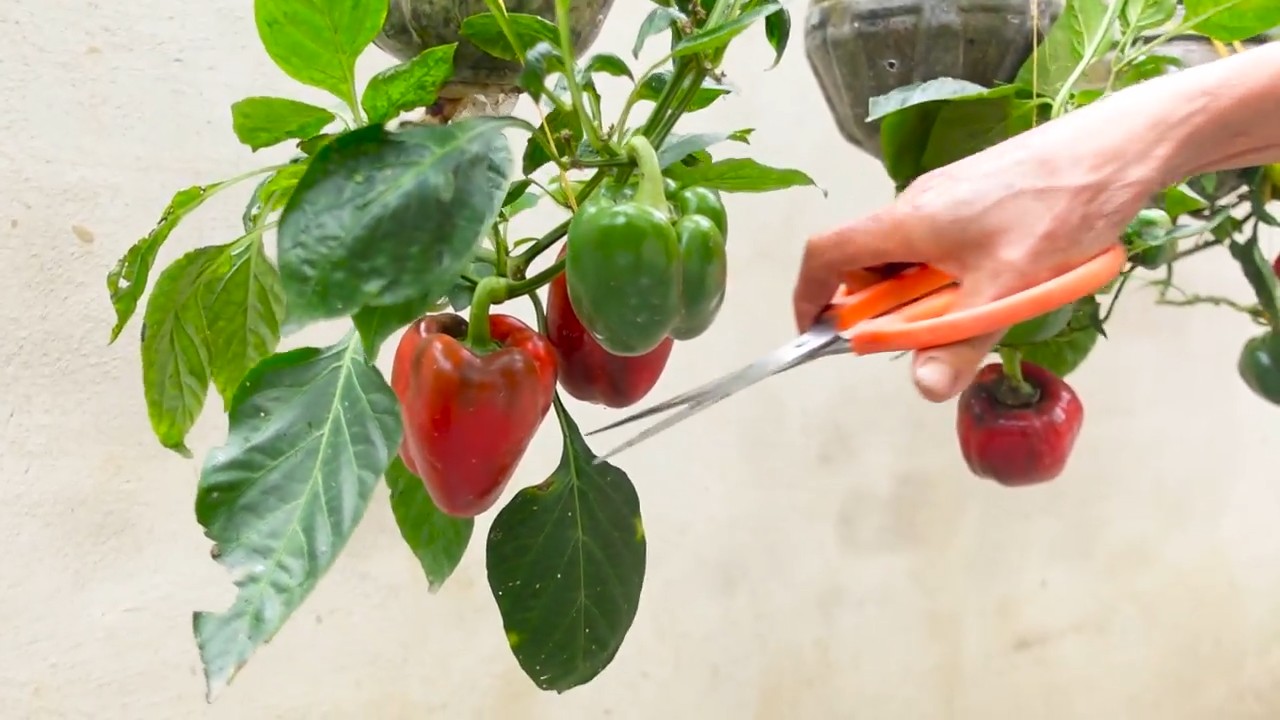
Ernte: Der Lohn deiner Mühe
Die Erntezeit für Paprika ist in der Regel von August bis Oktober.
1. Reife erkennen: Die Paprika sind reif, wenn sie ihre volle Farbe erreicht haben und sich leicht vom Stiel lösen lassen.
2. Ernten: Schneide die Paprika mit einem scharfen Messer oder einer Schere vom Stiel ab.
3. Lagerung: Frische Paprika können im Kühlschrank einige Tage gelagert werden. Du kannst sie auch einfrieren oder einlegen, um sie länger haltbar zu machen.
Zusätzliche Tipps für eine erfolgreiche Paprika-Ernte
* Sortenwahl: Wähle Sorten, die für dein Klima geeignet sind. Informiere dich im Fachhandel oder im
Conclusion
So, there you have it! Transforming your garden (or even your balcony!) into a vibrant tapestry of colorful bell peppers is not only achievable but also incredibly rewarding. This DIY trick, focusing on strategic planting and attentive care, is a must-try for any gardener, regardless of experience level. Forget bland supermarket peppers; imagine the satisfaction of harvesting your own rainbow of sweet, crisp, and visually stunning produce.
The beauty of this method lies in its adaptability. While we’ve outlined a specific approach, feel free to experiment with different companion plants. Basil, for instance, is known to deter pests and improve the flavor of bell peppers. Marigolds are another excellent choice, adding a splash of color while keeping unwanted insects at bay. Consider also the variety of bell peppers you choose. From the classic red and yellow to the more exotic purple and chocolate, the possibilities are endless. You could even try growing miniature bell peppers in containers for a charming and productive addition to your patio.
Don’t be afraid to tweak the watering schedule based on your local climate and soil conditions. Remember, consistently moist (but not waterlogged) soil is key to healthy pepper growth. Similarly, adjust the amount of sunlight your plants receive to ensure they get at least six to eight hours of direct sunlight each day. If you live in a particularly hot climate, providing some afternoon shade can prevent sunscald.
This DIY trick for planting colorful bell peppers isn’t just about growing vegetables; it’s about connecting with nature, fostering creativity, and enjoying the fruits (or rather, vegetables!) of your labor. It’s about adding a touch of beauty and vibrancy to your life, one pepper at a time.
We wholeheartedly encourage you to give this method a try. Whether you’re a seasoned gardener or a complete beginner, we believe you’ll be amazed by the results. And most importantly, we want to hear about your experience! Share your photos, tips, and challenges in the comments below. Let’s create a community of colorful bell pepper enthusiasts and learn from each other. What varieties did you plant? What companion plants did you use? What challenges did you overcome? Your insights could be invaluable to other gardeners. So, grab your seeds, get your hands dirty, and embark on this colorful adventure. Happy gardening!
Frequently Asked Questions (FAQ)
What is the best time to plant colorful bell peppers?
The ideal time to plant colorful bell peppers depends on your climate. In general, you should start seeds indoors 6-8 weeks before the last expected frost. Once the danger of frost has passed and the soil has warmed to at least 60°F (15°C), you can transplant the seedlings outdoors. If you live in a warmer climate with a longer growing season, you can start seeds directly in the ground after the last frost. However, starting indoors gives you a head start and allows the plants to develop a stronger root system.
What kind of soil is best for growing colorful bell peppers?
Colorful bell peppers thrive in well-drained, fertile soil that is rich in organic matter. The ideal soil pH is between 6.0 and 7.0. Before planting, amend the soil with compost, aged manure, or other organic materials to improve drainage and fertility. Avoid heavy clay soils, as they can become waterlogged and hinder root growth. If you have clay soil, consider growing your bell peppers in raised beds or containers.
How much sunlight do colorful bell peppers need?
Colorful bell peppers require at least 6-8 hours of direct sunlight per day to produce abundant, flavorful fruit. Choose a planting location that receives full sun throughout the day. If you live in a particularly hot climate, providing some afternoon shade can prevent sunscald, which can damage the peppers.
How often should I water my colorful bell peppers?
Water your colorful bell peppers regularly, especially during hot, dry weather. The goal is to keep the soil consistently moist but not waterlogged. Water deeply at the base of the plants, avoiding wetting the foliage, which can increase the risk of fungal diseases. A good rule of thumb is to water when the top inch of soil feels dry to the touch. Mulching around the plants can help retain moisture and suppress weeds.
What are some common pests and diseases that affect colorful bell peppers?
Colorful bell peppers can be susceptible to various pests and diseases, including aphids, spider mites, whiteflies, blossom-end rot, and fungal diseases. Regularly inspect your plants for signs of infestation or disease. To prevent problems, practice good garden hygiene, such as removing weeds and debris, and providing adequate air circulation. If you encounter pests, consider using organic pest control methods, such as insecticidal soap or neem oil. Blossom-end rot is caused by a calcium deficiency and can be prevented by ensuring the soil is properly amended with calcium-rich materials and by providing consistent watering.
How do I fertilize my colorful bell peppers?
Fertilize your colorful bell peppers regularly throughout the growing season to promote healthy growth and abundant fruit production. Use a balanced fertilizer that is specifically formulated for vegetables. Follow the instructions on the fertilizer label for application rates and frequency. You can also supplement with organic fertilizers, such as compost tea or fish emulsion. Avoid over-fertilizing, as this can lead to excessive foliage growth at the expense of fruit production.
When are colorful bell peppers ready to harvest?
Colorful bell peppers are typically ready to harvest 60-90 days after transplanting, depending on the variety. The peppers will change color from green to their mature color (red, yellow, orange, purple, etc.) when they are ripe. The peppers should also feel firm and slightly heavy for their size. Use a sharp knife or pruning shears to cut the peppers from the plant, leaving a short stem attached.
Can I grow colorful bell peppers in containers?
Yes, colorful bell peppers can be successfully grown in containers. Choose a container that is at least 12 inches in diameter and has drainage holes. Use a high-quality potting mix that is well-draining and rich in organic matter. Provide adequate sunlight and water, and fertilize regularly. Container-grown bell peppers may require more frequent watering than those grown in the ground.
What are some good companion plants for colorful bell peppers?
Several plants can benefit colorful bell peppers when planted nearby. Basil is a classic companion plant that repels pests and improves the flavor of bell peppers. Marigolds also deter pests and add a splash of color to the garden. Other good companion plants include onions, garlic, carrots, and spinach. Avoid planting bell peppers near fennel or brassicas (cabbage, broccoli, cauliflower), as they can inhibit growth.
How can I encourage more fruit production on my colorful bell pepper plants?
To encourage more fruit production on your colorful bell pepper plants, ensure they are receiving adequate sunlight, water, and nutrients. Pruning the plants can also help. Remove any suckers (small shoots that grow from the base of the plant) to encourage the plant to focus its energy on fruit production. You can also pinch off the tips of the branches to encourage branching and more fruit set. Finally, consider hand-pollinating the flowers, especially if you are growing your bell peppers indoors or in a greenhouse.
Leave a Comment