
Cleaning tips for a tidy home – who doesn’t crave that feeling of walking into a sparkling, fresh-smelling space? I know I do! But let’s be honest, maintaining a tidy home can feel like a never-ending battle. From dust bunnies multiplying under the sofa to that persistent grime in the bathroom, the challenges are real. But don’t despair! This isn’t just another list of chores; it’s your guide to transforming your cleaning routine into a series of manageable, even enjoyable, DIY projects.
For centuries, cultures around the world have developed unique and ingenious methods for keeping their homes clean. Think of the ancient Egyptians, who used natron (a naturally occurring salt mixture) for cleaning and disinfecting, or the Japanese tradition of ōsōji, the annual year-end deep clean. These practices highlight the enduring importance of cleanliness in our lives, not just for hygiene, but also for mental well-being and creating a sense of peace and order.
That’s why I’m so excited to share these DIY cleaning tricks with you. In today’s busy world, finding the time and energy for extensive cleaning can be tough. These hacks are designed to be quick, effective, and often use ingredients you already have in your pantry. Whether you’re looking to banish stubborn stains, declutter your living space, or simply maintain a more organized home, these cleaning tips for a tidy home will empower you to create a space you truly love to live in. Let’s dive in and discover how to make your home shine!

DIY Home Cleaning Hacks for a Sparkling Clean Home
Okay, let’s face it, cleaning isn’t exactly anyone’s favorite pastime. But a clean home is a happy home, right? I’m going to share some of my favorite DIY cleaning hacks that will make your life easier and your home sparkle without breaking the bank. These are tried and tested methods that I use regularly, and I promise they’ll make a difference!
Cleaning Your Microwave Like a Pro
Microwaves are notorious for splatters and food buildup. Instead of scrubbing for ages, try this simple steam cleaning method.
What you’ll need:
* 1 cup water
* 1/4 cup white vinegar
* Microwave-safe bowl
* Sponge or cloth
Step-by-step instructions:
1. Mix the solution: In your microwave-safe bowl, combine the water and white vinegar. The vinegar helps to loosen grime and deodorize.
2. Microwave it: Place the bowl in the microwave and heat on high for 5-7 minutes. You want the solution to boil and create steam.
3. Let it sit: Don’t open the microwave immediately! Let the steam work its magic for another 2-3 minutes. This will soften all the stuck-on food.
4. Wipe it down: Carefully remove the bowl (it will be hot!). Use a sponge or cloth to easily wipe away all the loosened food particles. You’ll be amazed at how easily everything comes off.
5. Dry it: Finally, dry the inside of the microwave with a clean cloth.
Freshening Up Your Dishwasher
Dishwashers can get pretty gross over time, with food particles and hard water buildup. Here’s how to give yours a deep clean.
What you’ll need:
* 1 cup white vinegar
* 1 cup baking soda
* Dish soap
* Old toothbrush
Step-by-step instructions:
1. Empty the dishwasher: Make sure your dishwasher is completely empty before you start.
2. Vinegar rinse: Place a dishwasher-safe cup filled with white vinegar on the top rack of the dishwasher.
3. Run a hot cycle: Run the dishwasher on a hot cycle. The vinegar will help to dissolve grease and grime.
4. Baking soda scrub: After the cycle is complete, sprinkle a cup of baking soda on the bottom of the dishwasher.
5. Another hot cycle: Run another hot cycle. The baking soda will help to deodorize and further clean the dishwasher.
6. Clean the filter: Remove the dishwasher filter (usually located at the bottom) and clean it with dish soap and an old toothbrush. Rinse thoroughly and replace.
7. Wipe down the door and seals: Use a damp cloth to wipe down the dishwasher door, paying special attention to the seals. This will help to prevent mold and mildew growth.
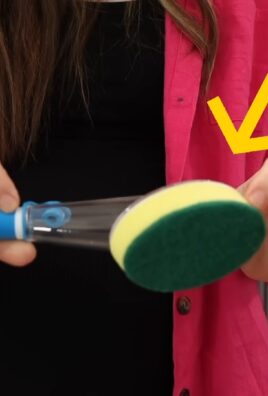
Cleaning Grout with Baking Soda Paste
Dirty grout can make even the cleanest tiles look dingy. This baking soda paste is a natural and effective way to brighten your grout.
What you’ll need:
* Baking soda
* Water
* Old toothbrush
* Spray bottle with white vinegar (optional, for extra cleaning power)
Step-by-step instructions:
1. Make the paste: Mix baking soda and water to form a thick paste. You want it to be thick enough to stick to the grout.
2. Apply the paste: Apply the baking soda paste to the grout lines. You can use your fingers or an old toothbrush to apply it.
3. Let it sit: Let the paste sit for at least 15-20 minutes. For really stubborn stains, you can let it sit for up to an hour.
4. Scrub the grout: Use an old toothbrush to scrub the grout lines. You’ll see the dirt and grime start to lift.
5. Rinse with water: Rinse the grout with clean water. You can use a damp sponge or cloth to wipe away the baking soda residue.
6. Vinegar boost (optional): For extra cleaning power, spray the grout with white vinegar after scrubbing and before rinsing. The vinegar will react with the baking soda, creating a fizzing action that helps to loosen dirt.
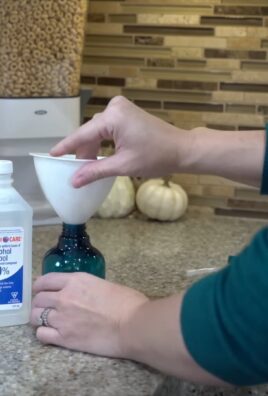
Making Your Own All-Purpose Cleaner
Why spend a fortune on expensive cleaning products when you can make your own effective all-purpose cleaner with just a few simple ingredients?
What you’ll need:
* Spray bottle
* 1/2 cup white vinegar
* 1/4 cup rubbing alcohol (70% isopropyl alcohol)
* 1 teaspoon dish soap
* 2 cups water
* 10-15 drops essential oil (optional, for fragrance)
Step-by-step instructions:
1. Combine ingredients: In your spray bottle, combine the white vinegar, rubbing alcohol, dish soap, and water.
2. Add essential oils (optional): If you want to add a fragrance, add 10-15 drops of your favorite essential oil. Lemon, lavender, and tea tree oil are all great choices for cleaning.
3. Shake well: Shake the bottle well to combine all the ingredients.
4. Use as needed: Spray the cleaner on surfaces and wipe clean with a cloth or sponge. This cleaner is great for countertops, sinks, appliances, and more.
Important Note: Always test the cleaner on a small, inconspicuous area first to make sure it doesn’t damage the surface. Avoid using this cleaner on natural stone surfaces like marble or granite, as the vinegar can etch the stone.
Cleaning Your Shower Head for Better Water Pressure
Over time, shower heads can get clogged with mineral deposits, which can reduce water pressure. Here’s how to clean your shower head and restore it to its former glory.
What you’ll need:
* White vinegar
* Plastic bag
* Rubber band or twist tie
* Old toothbrush
Step-by-step instructions:
1. Fill the bag with vinegar: Fill a plastic bag with white vinegar. You want enough vinegar to completely submerge the shower head.
2. Attach the bag to the shower head: Place the bag over the shower head, making sure the shower head is completely submerged in the vinegar. Secure the bag with a rubber band or twist tie.
3. Let it soak: Let the shower head soak in the vinegar for at least 30 minutes, or preferably overnight. This will dissolve the mineral deposits.
4. Remove the bag and scrub: Remove the bag and use an old toothbrush to scrub away any remaining mineral deposits.
5. Rinse thoroughly: Rinse the shower head thoroughly with water.
6. Run the shower: Run the shower for a few minutes to flush out any remaining vinegar and debris.
Cleaning Your Blinds Without Taking Them Down
Cleaning blinds can be a real pain, especially if you have to take them down. Here’s a quick and easy way to clean your blinds while they’re still hanging.
What you’ll need:
* Old sock
* White vinegar
* Water
* Spray bottle
Step-by-step instructions:
1. Mix the cleaning solution: In a spray bottle, mix equal parts white vinegar and water.
2. Prepare the sock: Turn an old sock inside out and slip it over your hand.
3. Spray the sock: Lightly spray the sock with the vinegar and water solution. You don’t want it to be soaking wet, just damp.
4. Clean the blinds: Use the sock-covered hand to wipe down each slat of the blinds. The sock will trap the dust and dirt.
5. Rinse and repeat: If the sock gets too dirty, rinse it with water and re-spray it with the cleaning solution. Repeat until all the blinds are clean.
6. Dry the blinds: Let the blinds air dry completely.
Deodorizing Your Garbage Disposal
Garbage disposals can get pretty smelly over time. Here’s how to freshen yours up.
What you’ll need:
* Ice cubes
* Lemon or lime wedges
* Salt
Step-by-step instructions:
1. Run cold water: Turn on the cold water in your sink.
2. Add ice cubes: Drop a handful of ice cubes into the garbage disposal.
3. Add lemon or lime wedges: Add a few lemon or lime wedges to the disposal.
4. Add salt: Sprinkle a tablespoon of salt into the disposal.
5. Turn on the disposal: Turn on the garbage disposal and let it run for about 30 seconds. The ice cubes will help to scrub the disposal blades, while the lemon or lime will freshen the scent. The salt acts

Conclusion
So, there you have it! These simple yet incredibly effective cleaning tips are your secret weapon for achieving a truly tidy home. Forget spending hours scrubbing and stressing; these DIY tricks are designed to be quick, easy, and, most importantly, to deliver outstanding results. We’ve covered everything from banishing stubborn stains to revitalizing tired surfaces, all using ingredients you likely already have in your pantry.
Why is this a must-try? Because a clean home isn’t just about aesthetics; it’s about creating a healthier, more peaceful, and more productive environment for you and your family. Imagine coming home after a long day to a sparkling kitchen, a dust-free living room, and a bathroom that feels like a spa. These cleaning tips make that a reality, without breaking the bank or sacrificing your precious time.
But don’t just take our word for it! The beauty of these DIY solutions lies in their adaptability. Feel free to experiment with different essential oils in your cleaning solutions to create your signature scent. For example, try adding a few drops of lavender oil to your all-purpose cleaner for a calming aroma, or use lemon oil for an extra boost of freshness. You can also adjust the ratios of ingredients to suit the specific needs of your home. If you have particularly stubborn grime, try increasing the concentration of vinegar or baking soda in your cleaning paste.
Ready to transform your home into a haven of cleanliness and tranquility? We urge you to give these cleaning tips a try. Start with one or two that resonate with you and see the difference they can make. We’re confident that you’ll be amazed by the results.
And most importantly, we want to hear about your experience! Share your before-and-after photos, your favorite variations, and any other tips you’ve discovered along the way in the comments section below. Let’s create a community of clean-home enthusiasts and inspire each other to maintain a tidy and healthy living space. Your insights could be invaluable to someone else who’s struggling with a particular cleaning challenge. So, grab your supplies, roll up your sleeves, and get ready to experience the joy of a truly tidy home!
Frequently Asked Questions (FAQs)
What if I don’t have all the ingredients listed?
That’s perfectly alright! Many of these cleaning tips are adaptable. For example, if you don’t have white vinegar, you can often substitute it with lemon juice, although the results might vary slightly depending on the specific cleaning task. Baking soda is a versatile ingredient, but if you’re out, you might be able to use washing soda as an alternative for certain cleaning applications. The key is to understand the purpose of each ingredient and find a suitable substitute that offers similar properties. For instance, vinegar is acidic and helps to dissolve grime and mineral deposits, while baking soda is a mild abrasive and deodorizer.
Are these cleaning tips safe for all surfaces?
While most of these cleaning tips are generally safe for a wide range of surfaces, it’s always a good idea to test them in an inconspicuous area first, especially on delicate or sensitive materials like wood, marble, or painted surfaces. This will help you ensure that the cleaning solution doesn’t cause any discoloration, damage, or unwanted reactions. For example, vinegar can be too acidic for some natural stone surfaces, so it’s best to avoid using it on marble or granite countertops. Similarly, abrasive cleaners like baking soda should be used with caution on polished surfaces to prevent scratching.
How often should I use these cleaning tips?
The frequency of cleaning depends on your lifestyle, the size of your home, and your personal preferences. However, as a general guideline, it’s recommended to perform a quick daily cleaning routine to maintain a basic level of tidiness. This might include wiping down kitchen counters, sweeping floors, and tidying up clutter. Weekly cleaning tasks could involve mopping floors, cleaning bathrooms, and dusting furniture. Deep cleaning, which includes tasks like cleaning appliances, washing windows, and organizing closets, can be done on a monthly or quarterly basis. The key is to establish a cleaning schedule that works for you and stick to it as much as possible.
Can I use these cleaning tips if I have allergies or sensitivities?
If you have allergies or sensitivities to certain cleaning products or ingredients, it’s crucial to take precautions before using these DIY cleaning tips. Always wear gloves and a mask to protect your skin and respiratory system from potential irritants. Choose ingredients that are known to be hypoallergenic and avoid using strong fragrances or essential oils that might trigger an allergic reaction. It’s also a good idea to ventilate the area well while cleaning to minimize exposure to airborne particles. If you experience any adverse reactions, such as skin irritation, breathing difficulties, or headaches, discontinue use immediately and consult with a healthcare professional.
How do I store homemade cleaning solutions?
Proper storage is essential to maintain the effectiveness and safety of your homemade cleaning solutions. Always store them in airtight containers labeled with the contents and the date they were made. Keep them out of reach of children and pets to prevent accidental ingestion. Store them in a cool, dark place away from direct sunlight and heat, as these factors can degrade the ingredients and reduce their cleaning power. Some cleaning solutions, such as those containing vinegar or hydrogen peroxide, should be stored in opaque containers to prevent light from affecting their stability. It’s also important to note that some homemade cleaning solutions may have a limited shelf life, so it’s best to use them within a few months of preparation.
What are some other ways to maintain a tidy home besides cleaning?
While cleaning is essential for maintaining a tidy home, there are other habits and strategies that can help you keep your living space organized and clutter-free. One of the most effective is to declutter regularly. Get rid of items you no longer need, use, or love. This will not only free up space but also make cleaning easier and more efficient. Another helpful tip is to put things away immediately after using them. This prevents clutter from accumulating and makes it easier to find things when you need them. You can also create designated storage areas for different items to keep them organized and accessible. Finally, establish a daily tidying routine to maintain a basic level of cleanliness and prevent messes from piling up.
How can I make cleaning more enjoyable?
Cleaning doesn’t have to be a chore! There are several ways to make it more enjoyable and even therapeutic. One way is to listen to your favorite music, podcast, or audiobook while you clean. This can help you stay motivated and entertained. You can also turn cleaning into a workout by incorporating some light exercises, such as squats or lunges, while you clean. Another tip is to reward yourself after completing a cleaning task. This could be anything from taking a relaxing bath to watching your favorite TV show. Finally, try to focus on the positive aspects of cleaning, such as the satisfaction of seeing a clean and organized space and the health benefits of living in a tidy environment.

Leave a Comment