
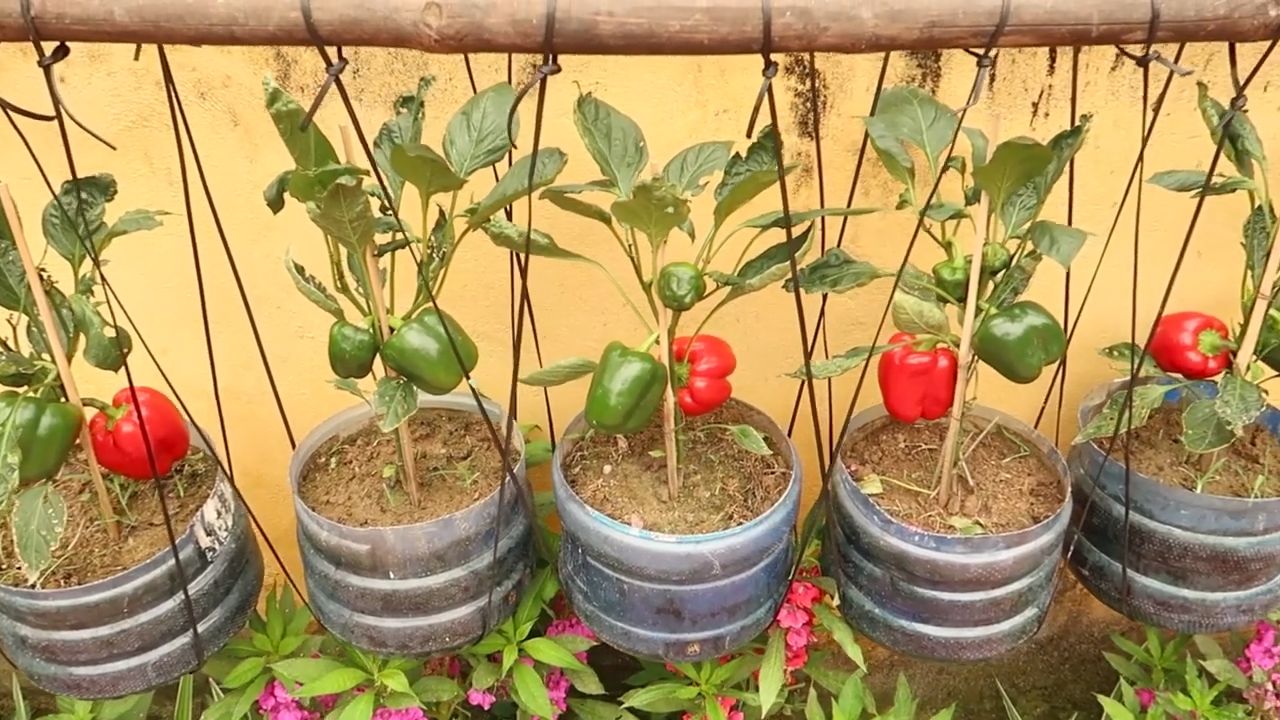
Chili pepper harvest increase – that’s what every chili-loving gardener dreams of, right? I know I do! Imagine baskets overflowing with vibrant red, green, and yellow peppers, ready to spice up your meals and share with friends. But sometimes, despite our best efforts, our chili plants just don’t seem to produce as much as we’d hoped.
For centuries, chili peppers have been a staple in cuisines around the world, adding a fiery kick to dishes from Mexico to Thailand. They’re not just delicious; they’re also packed with vitamins and antioxidants. But what if I told you there are simple, DIY tricks you can use to significantly boost your chili pepper harvest increase?
This isn’t about complicated gardening techniques or expensive equipment. We’re talking about clever hacks and easy-to-implement strategies that can make a real difference. Whether you’re a seasoned gardener or just starting out, these tips will help you maximize your yield and enjoy a bountiful harvest of delicious chili peppers. So, grab your gardening gloves, and let’s get started on unlocking the secrets to a truly impressive chili pepper harvest!
Chili-Ernte steigern: Mein ultimativer DIY-Guide für eine reiche Chili-Ernte
Hallo liebe Chili-Liebhaber! Ich bin total begeistert, euch heute meine bewährten DIY-Tricks zu zeigen, mit denen ich meine Chili-Ernte Jahr für Jahr vervielfache. Keine Sorge, ihr braucht keine grünen Daumen-Superkräfte, nur ein bisschen Geduld und meine einfachen Anleitungen. Los geht’s!
Die Grundlage: Optimale Bedingungen schaffen
Bevor wir uns den speziellen Tricks widmen, ist es wichtig, dass eure Chili-Pflanzen die bestmöglichen Grundbedingungen haben. Das ist wie beim Kochen: Die besten Zutaten sind die halbe Miete!
* Standort: Chili-Pflanzen lieben die Sonne! Sucht ihnen einen Platz, an dem sie mindestens 6-8 Stunden direkte Sonneneinstrahlung pro Tag bekommen. Ein Südbalkon oder ein sonniger Gartenplatz sind ideal.
* Boden: Der Boden sollte gut durchlässig und nährstoffreich sein. Staunässe ist der Tod jeder Chili-Pflanze! Ich mische immer etwas Kompost oder gut verrotteten Mist unter die Erde, um sie mit wichtigen Nährstoffen zu versorgen.
* Bewässerung: Gießt eure Chili-Pflanzen regelmäßig, aber nicht zu viel. Die Erde sollte immer leicht feucht sein, aber nicht nass. Am besten testet ihr mit dem Finger, ob die oberste Erdschicht trocken ist, bevor ihr gießt.
* Dünger: Chili-Pflanzen sind hungrig! Während der Wachstums- und Blütezeit brauchen sie regelmäßig Dünger. Ich verwende am liebsten einen speziellen Chili-Dünger, der auf die Bedürfnisse der Pflanzen abgestimmt ist. Ihr könnt aber auch einen Tomatendünger verwenden.
DIY-Trick 1: Der Eierschalen-Boost
Eierschalen sind ein echter Geheimtipp für eine reiche Chili-Ernte! Sie sind reich an Kalzium, das für die Entwicklung starker Zellwände und die Bildung von Früchten unerlässlich ist. Und das Beste: Sie sind kostenlos und einfach zu bekommen!
Benötigte Materialien:
* Eierschalen (am besten von Bio-Eiern)
* Mörser und Stößel (oder ein Mixer)
* Wasser
Anleitung:
1. Eierschalen sammeln und reinigen: Sammelt über einige Wochen Eierschalen und spült sie gründlich aus, um alle Essensreste zu entfernen. Lasst sie anschließend gut trocknen.
2. Eierschalen zerkleinern: Zerkleinert die getrockneten Eierschalen mit einem Mörser und Stößel zu einem feinen Pulver. Wenn ihr einen Mixer habt, könnt ihr die Eierschalen auch darin zerkleinern. Achtet darauf, dass das Pulver so fein wie möglich ist, damit die Pflanzen das Kalzium besser aufnehmen können.
3. Eierschalen-Pulver in den Boden einarbeiten: Gebt das Eierschalen-Pulver direkt in den Boden um eure Chili-Pflanzen herum. Arbeitet es leicht ein, damit es nicht an der Oberfläche liegen bleibt.
4. Eierschalen-Wasser herstellen: Ihr könnt das Eierschalen-Pulver auch verwenden, um Eierschalen-Wasser herzustellen. Gebt dazu einen Esslöffel Eierschalen-Pulver in einen Liter Wasser und lasst die Mischung über Nacht ziehen. Gießt eure Chili-Pflanzen am nächsten Tag mit dem Eierschalen-Wasser.
Wie oft anwenden?
Ich gebe meinen Chili-Pflanzen alle 2-3 Wochen Eierschalen-Pulver oder Eierschalen-Wasser.
DIY-Trick 2: Der Kaffeesatz-Kick
Kaffeesatz ist ein weiterer Abfallprodukt, das sich hervorragend für die Chili-Pflanzenpflege eignet. Er ist reich an Stickstoff, der für das Wachstum der Pflanzen unerlässlich ist. Außerdem lockert er den Boden auf und hält Schädlinge fern.
Benötigte Materialien:
* Kaffeesatz (am besten von Bio-Kaffee)
* Wasser
Anleitung:
1. Kaffeesatz sammeln und trocknen: Sammelt euren Kaffeesatz nach dem Kaffeekochen und lasst ihn gut trocknen. Das verhindert Schimmelbildung.
2. Kaffeesatz in den Boden einarbeiten: Gebt den getrockneten Kaffeesatz direkt in den Boden um eure Chili-Pflanzen herum. Arbeitet ihn leicht ein, damit er nicht an der Oberfläche liegen bleibt.
3. Kaffeesatz-Dünger herstellen: Ihr könnt den Kaffeesatz auch verwenden, um einen Kaffeesatz-Dünger herzustellen. Gebt dazu eine Handvoll Kaffeesatz in einen Eimer mit Wasser und lasst die Mischung über Nacht ziehen. Gießt eure Chili-Pflanzen am nächsten Tag mit dem Kaffeesatz-Dünger.
Wie oft anwenden?
Ich gebe meinen Chili-Pflanzen alle 2-3 Wochen Kaffeesatz oder Kaffeesatz-Dünger. Achtet darauf, nicht zu viel Kaffeesatz zu verwenden, da er den Boden übersäuern kann.
DIY-Trick 3: Das Bittersalz-Wunder
Bittersalz (Magnesiumsulfat) ist ein echter Geheimtipp für gesunde und ertragreiche Chili-Pflanzen. Magnesium ist wichtig für die Photosynthese und die Aufnahme von Nährstoffen. Ein Magnesiummangel kann zu gelben Blättern und einer geringeren Ernte führen.
Benötigte Materialien:
* Bittersalz (in der Apotheke oder im Gartencenter erhältlich)
* Wasser
Anleitung:
1. Bittersalz-Lösung herstellen: Löst einen Esslöffel Bittersalz in einem Liter Wasser auf.
2. Chili-Pflanzen besprühen: Füllt die Bittersalz-Lösung in eine Sprühflasche und besprüht eure Chili-Pflanzen damit. Achtet darauf, dass ihr alle Blätter, auch die Unterseite, benetzt.
3. Chili-Pflanzen gießen: Ihr könnt die Bittersalz-Lösung auch zum Gießen verwenden. Gießt eure Chili-Pflanzen damit, anstatt mit normalem Wasser.
Wie oft anwenden?
Ich besprühe oder gieße meine Chili-Pflanzen alle 4-6 Wochen mit Bittersalz-Lösung.
DIY-Trick 4: Das Ausgeizen für mehr Ertrag
Ausgeizen bedeutet, die Seitentriebe (Geiztriebe) zu entfernen, die sich in den Blattachseln bilden. Dadurch konzentriert die Pflanze ihre Energie auf die Bildung von Früchten und nicht auf das Wachstum von unnötigen Trieben.
Benötigte Materialien:
* Eine scharfe Schere oder ein Messer
Anleitung:
1. Geiztriebe identifizieren: Sucht nach den kleinen Trieben, die sich in den Blattachseln bilden. Das sind die Stellen, an denen die Blätter aus dem Hauptstamm wachsen.
2. Geiztriebe entfernen: Schneidet die Geiztriebe mit einer scharfen Schere oder einem Messer ab. Achtet darauf, den Hauptstamm nicht zu verletzen.
Wann ausgeizen?
Ich beginne mit dem Ausgeizen, sobald die Chili-Pflanzen etwa 20-30 cm hoch sind. Ich wiederhole den Vorgang alle paar Wochen, um sicherzustellen, dass keine neuen Geiztriebe entstehen.
DIY-Trick 5: Die Bestäubungshilfe
Chili-Pflanzen sind in der Regel selbstbestäubend, aber manchmal brauchen sie ein bisschen Hilfe, besonders wenn sie in Innenräumen stehen oder wenn das Wetter schlecht ist.
Benötigte Materialien:
* Ein weicher Pinsel oder ein Wattestäbchen
Anleitung:
1. Pollen sammeln: Nehmt einen weichen Pinsel oder ein Wattestäbchen und streicht damit vorsichtig über die Staubgefäße (die gelben Teile) einer Blüte. Dadurch nehmt ihr Pollen auf.
2. Pollen übertragen: Übertragt den Pollen auf die Narbe (den klebrigen Teil) einer anderen Blüte.
Wie oft bestäuben?
Ich bestäube meine Chili-Pflanzen alle paar Tage, besonders wenn sie in Innenräumen stehen.
DIY-Trick 6: Der Schutz vor Schädlingen
Schädlinge können eine Chili-Ernte ruinieren. Deshalb ist es wichtig, die Pflanzen regelmäßig zu kontrollieren und bei Bedarf Maßnahmen zu er

Conclusion
So, there you have it! This simple, yet incredibly effective DIY trick for boosting your chili pepper harvest is a game-changer for any gardener, from the seasoned pro to the enthusiastic beginner. We’ve walked you through the process, highlighting the benefits and offering insights into why this method works so well. It’s not just about getting more peppers; it’s about maximizing the potential of your plants and enjoying the fruits (or rather, the peppers!) of your labor.
Why is this a must-try? Because it’s cost-effective, environmentally friendly, and yields tangible results. Forget expensive fertilizers and complicated techniques. This method utilizes readily available resources and leverages the natural processes of your chili pepper plants to encourage increased fruit production. Imagine the satisfaction of harvesting a bumper crop of vibrant, flavorful chili peppers, all thanks to a simple adjustment to your gardening routine.
But don’t just take our word for it. We encourage you to experiment and adapt this technique to your specific growing conditions and chili pepper varieties. Perhaps you’ll find that adding a specific type of compost tea further enhances the results. Or maybe you’ll discover that adjusting the frequency of the treatment based on your local climate yields even better outcomes. The possibilities are endless!
Consider these variations to tailor the technique to your needs:
* Experiment with different types of organic matter: While we’ve suggested a specific mix, feel free to explore other options like worm castings, aged manure, or even finely ground eggshells. Each of these can contribute unique nutrients and beneficial microbes to the soil.
* Adjust the frequency based on your plant’s needs: Observe your chili pepper plants closely. If they seem to be responding well, you can increase the frequency of the treatment. If they show any signs of stress, reduce it.
* Combine with other beneficial practices: This DIY trick works best when combined with other good gardening practices, such as proper watering, adequate sunlight, and regular pest control.
Ultimately, the goal is to create a thriving environment for your chili pepper plants, allowing them to reach their full potential. This DIY trick is a powerful tool in achieving that goal.
We are confident that you’ll see a noticeable difference in your chili pepper harvest after implementing this technique. The increased yield, the vibrant color, and the intense flavor of your peppers will be a testament to your efforts.
So, what are you waiting for? Give this DIY trick a try and witness the transformation in your chili pepper garden. We’re eager to hear about your experiences! Share your results, tips, and variations in the comments section below. Let’s learn from each other and collectively unlock the secrets to a bountiful chili pepper harvest. Remember, successful gardening is a journey of continuous learning and experimentation. Embrace the process, enjoy the rewards, and get ready to spice up your life with an abundance of homegrown chili peppers! Let us know how this method helped you with your chili pepper harvest increase!
Frequently Asked Questions (FAQ)
Q: How often should I apply this DIY trick to my chili pepper plants?
A: The frequency depends on several factors, including the age of your plants, the growing conditions, and the specific type of organic matter you’re using. As a general guideline, start by applying the treatment every two weeks. Observe your plants closely for any signs of improvement or stress. If they seem to be thriving, you can increase the frequency to once a week. If you notice any yellowing leaves or other signs of stress, reduce the frequency or discontinue the treatment temporarily. Remember, it’s always best to err on the side of caution and adjust the frequency based on your plant’s individual needs.
Q: What type of chili pepper plants does this DIY trick work best on?
A: This DIY trick is generally effective on most varieties of chili pepper plants, including bell peppers, jalapenos, habaneros, and cayenne peppers. However, some varieties may respond better than others. It’s always a good idea to test the technique on a small number of plants first to see how they react before applying it to your entire crop. Pay attention to the specific needs of your chili pepper variety and adjust the treatment accordingly.
Q: Can I use this DIY trick on other types of plants besides chili peppers?
A: While this DIY trick is specifically designed to boost chili pepper production, it may also be beneficial for other fruiting plants, such as tomatoes, eggplants, and cucumbers. The underlying principle of providing essential nutrients and beneficial microbes to the soil can be applied to a wide range of plants. However, it’s important to research the specific needs of each plant and adjust the treatment accordingly. Some plants may require different types of organic matter or different frequencies of application.
Q: What if I don’t have access to all the ingredients listed in the recipe?
A: Don’t worry! The beauty of this DIY trick is that it’s adaptable. If you don’t have access to all the ingredients, you can substitute them with other similar materials. For example, if you don’t have compost tea, you can use well-rotted compost or worm castings. The key is to provide your plants with a source of essential nutrients and beneficial microbes. Experiment with different combinations of ingredients to see what works best for you.
Q: How long will it take to see results after applying this DIY trick?
A: The time it takes to see results can vary depending on several factors, including the age of your plants, the growing conditions, and the specific type of organic matter you’re using. In general, you should start to see noticeable improvements within a few weeks of applying the treatment. Look for signs of increased growth, more vibrant foliage, and a greater number of flowers and fruits. Be patient and consistent with your application, and you’ll eventually be rewarded with a bountiful chili pepper harvest.
Q: Is this DIY trick safe for organic gardening?
A: Yes, this DIY trick is perfectly safe for organic gardening, as long as you use organic ingredients. Avoid using any synthetic fertilizers or pesticides, as these can harm your plants and the environment. By using natural and sustainable materials, you can create a healthy and thriving garden without compromising your commitment to organic practices.
Q: Can I overdo this DIY trick? Is it possible to give my plants too much of this treatment?
A: Yes, it is possible to overdo it. While this DIY trick is beneficial, excessive application can lead to nutrient imbalances or other problems. Over-fertilizing can cause leaf burn, stunted growth, or even death. It’s important to observe your plants closely and adjust the frequency of the treatment accordingly. If you notice any signs of stress, such as yellowing leaves or wilting, reduce the frequency or discontinue the treatment temporarily. Remember, moderation is key.
Q: What should I do if I encounter pests or diseases on my chili pepper plants?
A: Prevention is always the best approach when it comes to pests and diseases. Maintain healthy soil, provide adequate sunlight and water, and regularly inspect your plants for any signs of trouble. If you do encounter pests or diseases, there are several organic control methods you can try. These include using insecticidal soap, neem oil, or beneficial insects. Always follow the instructions carefully and avoid using any harsh chemicals that could harm your plants or the environment.
Q: Where can I find more information about growing chili peppers?
A: There are many excellent resources available online and in libraries that can provide you with more information about growing chili peppers. Look for websites and books that are specific to your region and climate. You can also consult with local gardening experts or join a gardening club to learn from experienced growers. The more you learn about chili peppers, the better equipped you’ll be to grow a successful and bountiful crop.

Leave a Comment