
Bottle Gardening Mustard Greens: Imagine fresh, peppery mustard greens bursting with flavor, grown right on your windowsill! Forget trekking to the grocery store – with a few simple tricks, you can cultivate your own vibrant greens using recycled bottles. This isn’t just about saving money; it’s about connecting with nature and enjoying the unparalleled taste of homegrown goodness.
The practice of growing food in containers, including repurposed items, has roots stretching back centuries. From ancient rooftop gardens to modern-day urban farms, people have always found creative ways to cultivate sustenance in limited spaces. Bottle gardening, in particular, offers a sustainable and accessible approach to gardening, especially for those with limited space or resources. It’s a testament to human ingenuity and our enduring desire to nurture life.
Why should you try this DIY trick? Well, for starters, store-bought mustard greens often lack the freshness and vibrancy of homegrown varieties. Plus, you have complete control over the growing process, ensuring your greens are free from harmful pesticides and chemicals. Bottle Gardening Mustard Greens is also incredibly rewarding. There’s something truly special about watching tiny seeds sprout and transform into a delicious, nutritious harvest. I’m excited to share my favorite tips and tricks to help you get started, so you can enjoy a constant supply of fresh mustard greens right at your fingertips!
Senfgrün im Flaschengarten: Dein DIY-Projekt für frische Blätter
Hey Gartenfreunde! Habt ihr Lust auf knackig-frische Senfgrünblätter direkt aus eurer Küche? Dann seid ihr hier genau richtig! Ich zeige euch, wie ihr ganz einfach einen Flaschengarten für Senfgrün anlegen könnt. Das ist nicht nur super platzsparend, sondern auch ein echter Hingucker. Und das Beste: Ihr habt immer frische Zutaten für eure Salate und Gerichte parat. Los geht’s!
Was du brauchst: Die Materialliste
Bevor wir loslegen, hier eine Liste mit allen Materialien, die du für deinen Senfgrün-Flaschengarten benötigst:
* Eine Plastikflasche (ca. 1,5 – 2 Liter): Am besten eine durchsichtige PET-Flasche. Denk dran, sie vorher gründlich auszuwaschen!
* Ein scharfes Messer oder eine Schere: Zum Zerteilen der Flasche. Sei vorsichtig!
* Erde: Am besten Anzuchterde oder eine Mischung aus Blumenerde und Kompost.
* Senfgrün-Samen: Gibt’s im Gartencenter oder online. Achte auf Bio-Qualität, wenn du Pestizide vermeiden möchtest.
* Kieselsteine oder Blähton: Für die Drainage.
* Wasser: Zum Befeuchten der Erde und zum Gießen.
* Sprühflasche: Zum Befeuchten der Blätter.
* Optional: Ein Stück Stoff oder Vlies, um die Erde am Ausspülen zu hindern.
Schritt-für-Schritt-Anleitung: So baust du deinen Flaschengarten
Jetzt geht’s ans Eingemachte! Folge diesen Schritten, um deinen eigenen Senfgrün-Flaschengarten zu bauen:
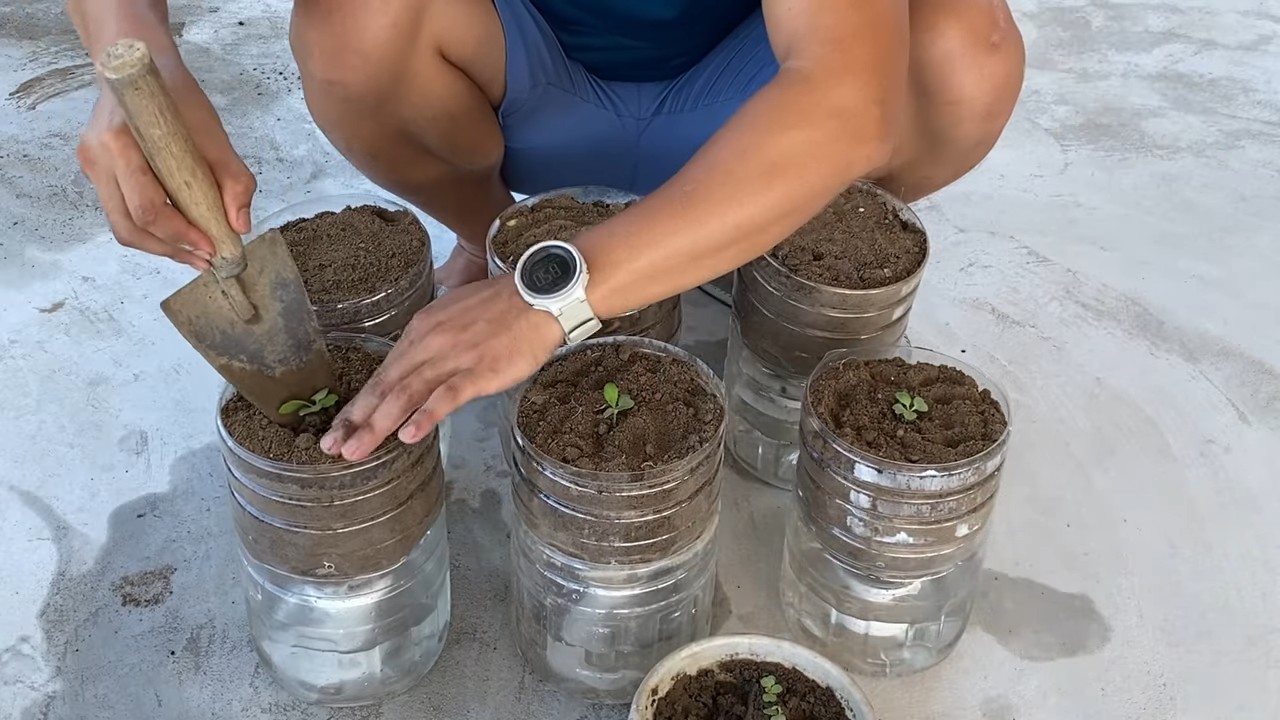
1. Flasche vorbereiten: Nimm deine saubere Plastikflasche und schneide sie mit dem Messer oder der Schere in zwei Teile. Am besten schneidest du sie etwa ein Drittel vom Flaschenhals ab. Der untere Teil der Flasche wird unser Pflanzgefäß, der obere Teil dient als eine Art Mini-Gewächshaus.
2. Drainage anlegen: Gib eine Schicht Kieselsteine oder Blähton (ca. 2-3 cm hoch) in den unteren Teil der Flasche. Das sorgt für eine gute Drainage und verhindert Staunässe, die Senfgrün gar nicht mag.
3. Erde einfüllen: Fülle nun die Erde in den unteren Teil der Flasche. Lass etwa 2-3 cm Platz bis zum Rand. Drücke die Erde leicht an.
4. Samen aussäen: Verteile die Senfgrün-Samen gleichmäßig auf der Erde. Achte darauf, dass sie nicht zu dicht liegen, damit die Pflänzchen genug Platz zum Wachsen haben.
5. Samen bedecken: Bedecke die Samen mit einer dünnen Schicht Erde (ca. 0,5 cm).
6. Angießen: Befeuchte die Erde vorsichtig mit Wasser. Am besten verwendest du eine Sprühflasche, damit die Samen nicht weggespült werden. Die Erde sollte feucht, aber nicht nass sein.
7. Mini-Gewächshaus aufsetzen: Setze den oberen Teil der Flasche (den Flaschenhals) verkehrt herum auf den unteren Teil. So entsteht ein Mini-Gewächshaus, das für ein feuchtwarmes Klima sorgt und die Keimung der Samen beschleunigt.
8. Standort wählen: Stelle deinen Flaschengarten an einen hellen, aber nicht zu sonnigen Ort. Direkte Sonneneinstrahlung kann die jungen Pflänzchen verbrennen. Ein Fensterbrett ist ideal.
Die Pflege: So bleibt dein Senfgrün fit
Damit dein Senfgrün prächtig gedeiht, ist die richtige Pflege wichtig. Hier ein paar Tipps:
* Gießen: Halte die Erde immer leicht feucht. Gieße regelmäßig, aber vermeide Staunässe. Am besten überprüfst du die Feuchtigkeit der Erde mit dem Finger. Wenn sie sich trocken anfühlt, ist es Zeit zum Gießen.
* Lüften: Lüfte deinen Flaschengarten regelmäßig, indem du den oberen Teil der Flasche kurz abnimmst. Das verhindert Schimmelbildung und sorgt für eine gute Luftzirkulation.
* Befeuchten: Besprühe die Blätter regelmäßig mit Wasser. Das hält sie frisch und saftig.
* Düngen: Senfgrün braucht nicht viel Dünger. Wenn du möchtest, kannst du aber alle paar Wochen etwas organischen Flüssigdünger ins Gießwasser geben.
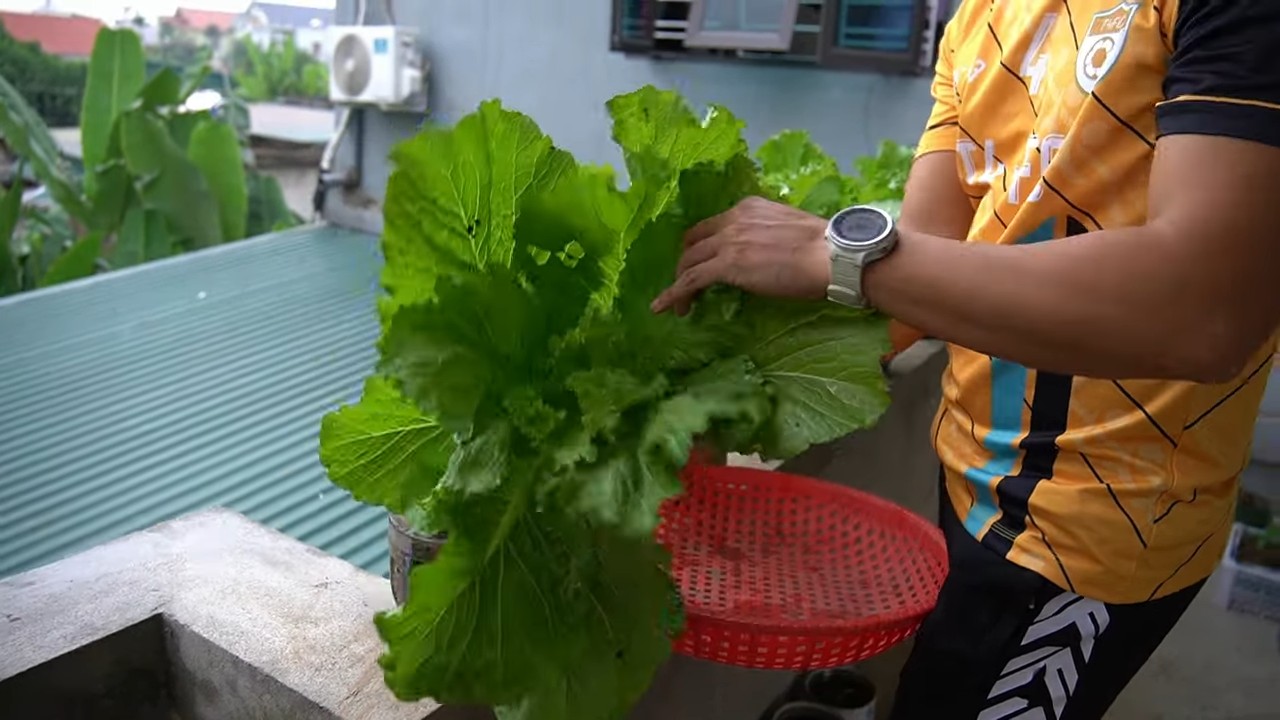
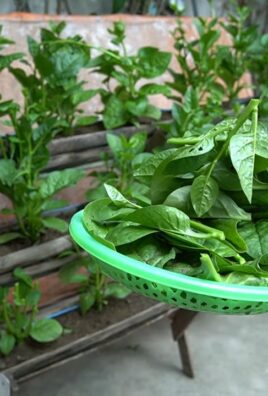
* Ernten: Du kannst dein Senfgrün ernten, sobald die Blätter eine Größe von etwa 5-7 cm erreicht haben. Schneide die Blätter einfach mit einer Schere ab. Die Pflanze wird weiterwachsen und neue Blätter bilden.
Häufige Probleme und Lösungen
Auch beim Flaschengarten können mal Probleme auftreten. Hier ein paar häufige Probleme und wie du sie lösen kannst:
* Schimmel: Wenn sich Schimmel bildet, ist die Luftfeuchtigkeit zu hoch. Lüfte den Flaschengarten öfter und sorge für eine bessere Luftzirkulation. Du kannst auch etwas Holzkohle in die Erde geben, um die Feuchtigkeit zu regulieren.
* Gelbe Blätter: Gelbe Blätter können ein Zeichen für zu viel oder zu wenig Wasser sein. Überprüfe die Feuchtigkeit der Erde und passe die Bewässerung entsprechend an.
* Schädlinge: Senfgrün ist relativ resistent gegen Schädlinge. Sollten sich aber doch mal Blattläuse oder andere Schädlinge zeigen, kannst du sie mit einem natürlichen Insektizid bekämpfen.
Extra-Tipps für deinen Senfgrün-Flaschengarten
* Verschiedene Sorten: Probiere verschiedene Senfgrün-Sorten aus! Es gibt milde und scharfe Sorten, mit glatten oder krausen Blättern. So kannst du deinen Flaschengarten noch abwechslungsreicher gestalten.
* Upcycling: Verwende alte Marmeladengläser oder andere Behälter anstelle einer Plastikflasche. So kannst du deinen Flaschengarten noch nachhaltiger gestalten.
* Dekoration: Dekoriere deinen Flaschengarten mit kleinen Steinen, Muscheln oder anderen Deko-Elementen. So wird er zu einem echten Hingucker.
* Beschriftung: Beschrifte deinen Flaschengarten mit dem Namen der Pflanze und dem Datum der Aussaat. So behältst du den Überblick.
Senfgrün in der Küche: Vielseitig und lecker
Senfgrün ist nicht nur ein Hingucker im Flaschengarten, sondern auch eine vielseitige Zutat in der Küche. Die Blätter haben einen würzigen, leicht scharfen Geschmack und passen hervorragend zu Salaten, Suppen, Gemüsegerichten und vielem mehr.
* Salate: Senfgrün verleiht Salaten eine besondere Note. Kombiniere es mit anderen Blattsalaten, Tomaten, Gurken und einem leckeren Dressing.
* Suppen: Gib kurz vor dem Servieren ein paar gehackte Senfgrünblätter in deine Suppe. Das sorgt für einen frischen Geschmack.
* Gemüsegerichte: Senfgrün passt gut zu Wok-Gerichten, Pfannengerichten und gedünstetem Gemüse.
* Pesto: Aus Senfgrün lässt sich auch ein leckeres Pesto zubereiten. Einfach mit Knoblauch, Nüssen, Parmesan und Olivenöl pürieren.
* Smoothies: Gib ein paar Senfgrünblätter in deinen Smoothie. Das sorgt für einen extra Vitamin-Kick.
Fazit: Dein eigener Senfgrün-Flaschengarten ist ein voller Erfolg!
Ich hoffe, diese Anleitung hat dir geholfen, deinen eigenen Senfgrün-Flaschengarten anzulegen. Mit ein bisschen Geduld und Pflege wirst du bald frische, knackige Blätter ernten können. Viel Spaß beim Gärtnern! Und denk dran: Gärtnern ist nicht nur ein Hobby, sondern auch eine Lebenseinstellung. Es verbindet uns mit der Natur, lehrt uns Geduld und schenkt uns Freude. Also, worauf wartest du noch? Leg los und verwandle deine Wohnung in eine grüne Oase!
Conclusion
So, there you have it! Transforming discarded bottles into thriving miniature gardens bursting with fresh mustard greens is not just a fun project; it’s a sustainable, space-saving, and incredibly rewarding way to bring the garden indoors. We’ve walked you through the simple steps, highlighting the ease and accessibility of this DIY trick. Forget expensive gardening equipment or sprawling plots of land. With a few repurposed bottles, some soil, and a handful of mustard green seeds, you can cultivate your own little patch of peppery goodness right on your windowsill.
But why is this bottle gardening method a must-try? Beyond the obvious environmental benefits of recycling, it offers a unique opportunity to connect with nature, even in the smallest of living spaces. Imagine the satisfaction of harvesting your own fresh greens for salads, sandwiches, or stir-fries, knowing that you nurtured them from tiny seeds within a recycled bottle. It’s a tangible reminder of the power of resourcefulness and the beauty of sustainable living.
The possibilities don’t end with mustard greens, either. This bottle gardening technique is incredibly versatile. Experiment with other leafy greens like spinach, arugula, or even herbs like basil and parsley. Consider using different types of bottles – wine bottles, soda bottles, even larger water jugs – to create a diverse and visually appealing indoor garden. You can also explore different soil mixes to optimize growth for specific plants. Perhaps a blend with more perlite for better drainage, or a richer compost for nutrient-hungry greens.
Don’t be afraid to get creative with your bottle gardens! Paint the bottles with vibrant colors, add decorative stones or pebbles, or even create a tiered system by stacking the bottles on top of each other. The only limit is your imagination.
We genuinely believe that this DIY bottle gardening project is a game-changer for anyone looking to embrace sustainable living and enjoy fresh, homegrown produce. It’s a simple, affordable, and incredibly satisfying way to connect with nature and reduce your environmental footprint.
So, what are you waiting for? Gather your bottles, grab some seeds, and get ready to embark on your own bottle gardening adventure. We’re confident that you’ll be amazed by the results. And most importantly, we want to hear about your experience! Share your photos, tips, and variations with us in the comments below. Let’s build a community of bottle gardeners and inspire others to embrace this wonderful DIY trick. Let us know what worked for you, what challenges you faced, and what delicious dishes you created with your homegrown mustard greens. Your feedback is invaluable and will help us refine and improve this guide for future gardeners. Happy gardening!
Frequently Asked Questions (FAQ)
What kind of bottles are best for bottle gardening mustard greens?
The beauty of bottle gardening is its adaptability! You can use a wide variety of bottles, but some are better suited than others. Clear plastic bottles, like those used for water or soda, are a popular choice because they allow ample sunlight to reach the plants. Glass bottles, such as wine bottles, can also be used, but they may require more careful placement to ensure adequate light exposure. Consider the size of the bottle as well. Smaller bottles are ideal for starting seeds or growing smaller varieties of greens, while larger bottles can accommodate more mature plants. Ensure the bottles are thoroughly cleaned before use to remove any residue that could harm your plants.
How often should I water my bottle garden?
Watering frequency depends on several factors, including the type of soil you’re using, the size of the bottle, the temperature, and the humidity. As a general rule, check the soil moisture daily. If the top inch of soil feels dry to the touch, it’s time to water. Water gently and thoroughly, ensuring that the water drains out of the drainage holes at the bottom of the bottle. Avoid overwatering, as this can lead to root rot. During hotter months or in drier climates, you may need to water more frequently. Conversely, during cooler months or in humid climates, you may need to water less often. Observe your plants closely and adjust your watering schedule accordingly.
What kind of soil should I use for growing mustard greens in bottles?
A well-draining potting mix is essential for successful bottle gardening. Avoid using garden soil, as it can be too heavy and compact, hindering root growth and drainage. A good potting mix will typically contain a blend of peat moss, perlite, and vermiculite. You can also amend your potting mix with compost to provide additional nutrients for your mustard greens. Consider adding a slow-release fertilizer to the soil at planting time to provide a steady supply of nutrients throughout the growing season.
How much sunlight do mustard greens need in a bottle garden?
Mustard greens thrive in full sun, which means they need at least six hours of direct sunlight per day. If you’re growing your bottle garden indoors, place it near a sunny window that receives ample sunlight. If you don’t have access to a sunny window, you can supplement with artificial grow lights. LED grow lights are an energy-efficient option that provides the necessary light spectrum for healthy plant growth. Rotate your bottle garden regularly to ensure that all sides of the plants receive equal sunlight.
How do I prevent pests and diseases in my bottle garden?
Prevention is key when it comes to pests and diseases in your bottle garden. Start by using clean bottles and fresh potting mix. Inspect your plants regularly for any signs of pests or diseases. Common pests that may affect mustard greens include aphids, spider mites, and whiteflies. If you spot any pests, you can try washing them off with a strong stream of water or using insecticidal soap. To prevent fungal diseases, ensure good air circulation around your plants and avoid overwatering. If you notice any signs of disease, such as yellowing leaves or spots, remove the affected leaves immediately.
Can I grow other vegetables or herbs in bottles besides mustard greens?
Absolutely! The bottle gardening technique is incredibly versatile and can be used to grow a wide variety of vegetables and herbs. Some other great options for bottle gardening include spinach, arugula, lettuce, kale, basil, parsley, and chives. When choosing what to grow, consider the size of the bottle and the space requirements of the plant. Smaller bottles are ideal for herbs and leafy greens, while larger bottles can accommodate larger plants like tomatoes or peppers.
How do I harvest mustard greens from my bottle garden?
Harvesting mustard greens is easy! Simply snip off the outer leaves with scissors or a knife, leaving the inner leaves to continue growing. This cut-and-come-again method allows you to harvest fresh greens over an extended period. Harvest the leaves when they are young and tender for the best flavor. Avoid harvesting more than one-third of the plant at a time to ensure that it continues to grow and produce new leaves.
How long will my mustard greens last in a bottle garden?
The lifespan of your mustard greens in a bottle garden depends on several factors, including the variety of mustard greens, the growing conditions, and your harvesting practices. With proper care, you can expect to harvest fresh greens for several weeks or even months. Once the plants start to bolt (produce flowers), the leaves will become bitter and less palatable. At this point, it’s time to start a new batch of seeds.
What are some creative ways to display my bottle garden?
There are endless possibilities for displaying your bottle garden! You can hang the bottles from a wall or ceiling using rope or wire, create a tiered system by stacking the bottles on top of each other, or simply place them on a windowsill or shelf. Get creative with your decorations! Paint the bottles with vibrant colors, add decorative stones or pebbles, or even create a miniature landscape around the bottles. The goal is to create a visually appealing and functional display that showcases your beautiful bottle garden.
Leave a Comment