
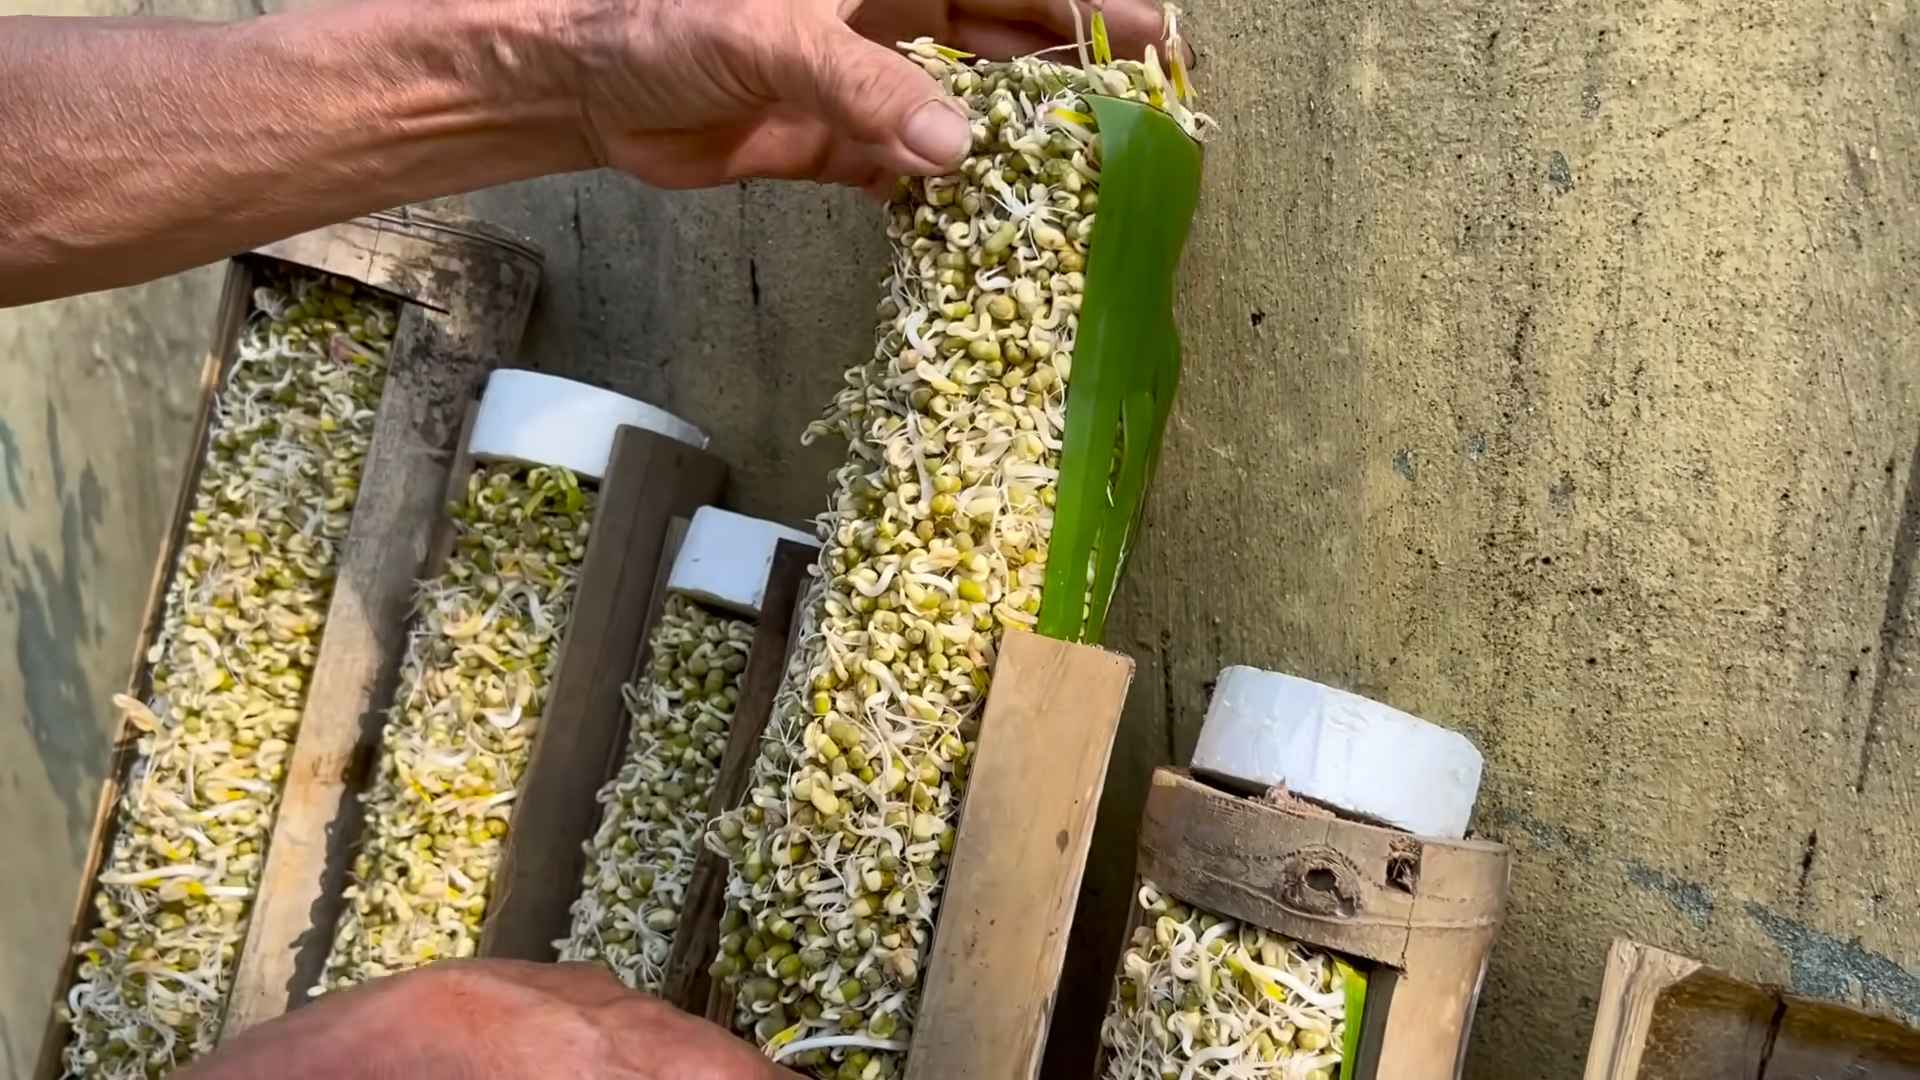
Bean Sprouts Growing DIY: Ever dreamt of having a constant supply of fresh, crunchy bean sprouts right at your fingertips? Forget those limp, sad-looking sprouts from the grocery store! I’m going to show you how incredibly easy it is to cultivate your own vibrant, delicious bean sprouts at home. This isn’t just about saving money; it’s about connecting with the natural world and enjoying the unparalleled flavor of homegrown goodness.
Sprouting beans has a rich history, deeply rooted in Asian cultures where they’ve been a staple for centuries. Think of the vibrant stir-fries and refreshing salads – bean sprouts add a delightful crunch and a boost of nutrients. But you don’t need to be a seasoned gardener to enjoy this culinary treasure.
In today’s fast-paced world, we’re often disconnected from our food sources. This Bean Sprouts Growing DIY guide will empower you to take control of your diet and experience the satisfaction of nurturing life from a tiny seed. Plus, it’s a fantastic way to add a healthy and affordable ingredient to your meals. Ready to ditch the store-bought sprouts and embark on this exciting journey with me? Let’s get sprouting!
Grow Your Own Bean Sprouts: A Simple DIY Guide
Hey there, fellow DIY enthusiasts! I’m so excited to share one of my favorite kitchen hacks with you: growing your own bean sprouts! It’s surprisingly easy, incredibly rewarding, and gives you a constant supply of fresh, crunchy goodness for salads, stir-fries, and more. Plus, it’s a fantastic way to reduce food waste and save money. Let’s dive in!
What You’ll Need
Before we get started, let’s gather our supplies. The beauty of this project is that you probably already have most of what you need!
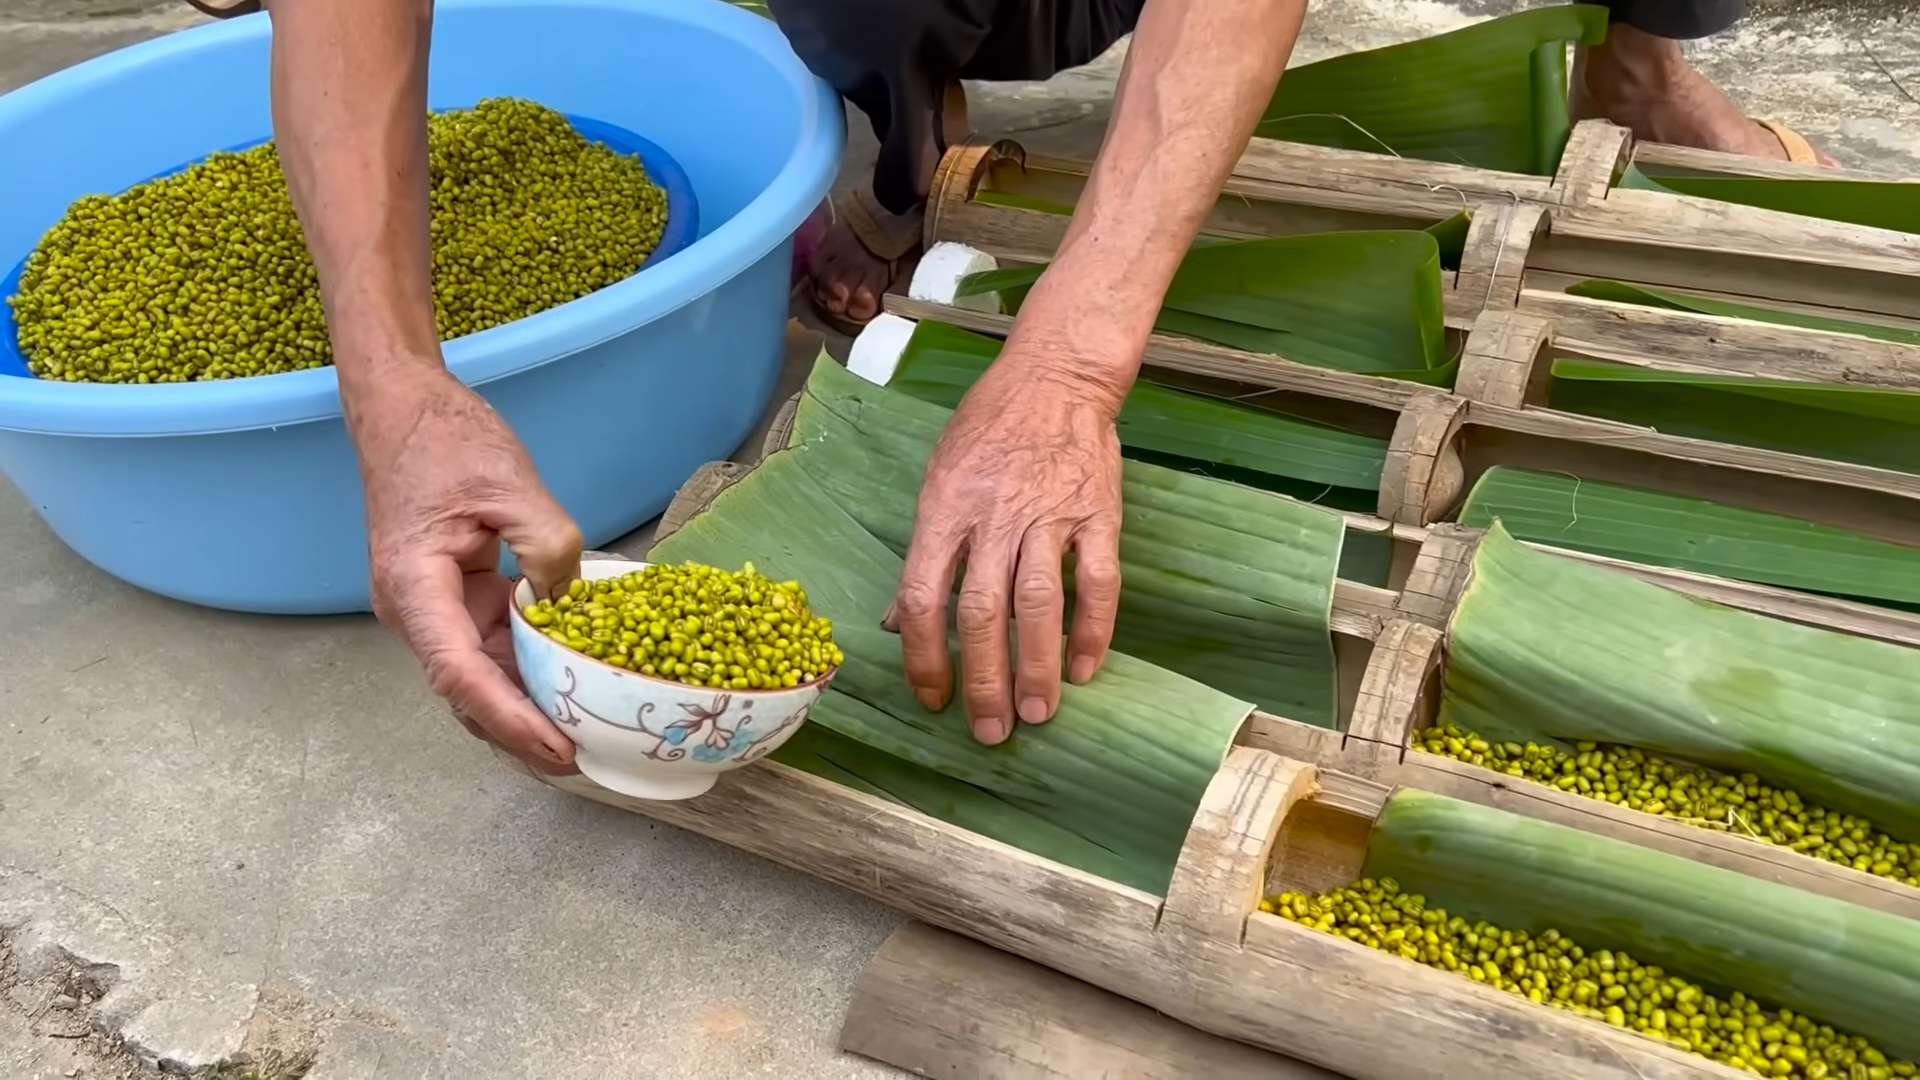
* **Bean Seeds:** Mung beans are the most common and easiest to sprout, but you can also use adzuki beans, lentils, chickpeas, or even radish seeds. Just make sure they’re specifically labeled for sprouting or food use, not treated for planting.
* **A Wide-Mouth Jar:** A quart-sized mason jar works perfectly.
* **Sprouting Lid or Cheesecloth:** You’ll need something to cover the jar and allow for drainage. Sprouting lids are convenient, but a piece of cheesecloth secured with a rubber band works just as well.
* **Water:** Clean, filtered water is best.
* **A Dark Place:** A cupboard, pantry, or even a covered box will do the trick.
* **A Bowl or Tray:** To catch any drips.
Step-by-Step Instructions: Sprouting Success!
Okay, let’s get sprouting! Here’s a detailed breakdown of the process:
1. **Rinse the Beans:** Place about 2-3 tablespoons of your chosen bean seeds into the jar. Rinse them thoroughly with cool water, removing any debris or damaged beans. This step is crucial for preventing mold and ensuring healthy sprouts.
2. **Soak the Beans:** Fill the jar with cool water, ensuring the beans are completely submerged. They’ll expand significantly as they absorb water. Let them soak for 8-12 hours, or even overnight. This kickstarts the germination process. I usually do this before I go to bed so they are ready in the morning.
3. **Drain and Rinse Again:** After soaking, drain the water completely using your sprouting lid or cheesecloth. Rinse the beans again with cool water, ensuring all the soaking water is removed. This helps prevent bacterial growth.
4. The First Dark Period: Place the jar upside down in a bowl or tray at an angle, allowing any excess water to drain out. This is important to prevent the beans from sitting in water, which can lead to rot. Now, place the jar in your chosen dark location. This is where the magic happens! The darkness encourages the sprouts to grow long and white.
5. **Rinse and Drain Twice Daily:** This is the most important part of the process! Twice a day, morning and evening, remove the jar from the dark, rinse the sprouts thoroughly with cool water, and drain them completely. This keeps them hydrated and prevents mold. I usually do this over the sink, making sure to get all the beans moving around to rinse them well.
6. **Repeat the Dark Period:** After rinsing and draining, return the jar to its dark location, upside down in the bowl or tray. Continue this process for 3-5 days, or until the sprouts reach your desired length.
7. The Light Exposure (Optional): If you want your sprouts to develop a slightly greener color and a bit more chlorophyll, you can expose them to indirect sunlight for the last day or so. Just be careful not to put them in direct sunlight, as this can overheat them and cause them to dry out.
8. **Harvest and Enjoy!** Once your sprouts are ready, give them one final rinse and drain. They’re now ready to eat! Store them in an airtight container in the refrigerator. They should last for up to a week, but they’re best enjoyed fresh.
Troubleshooting: Common Issues and Solutions
Even with the best intentions, sometimes things don’t go exactly as planned. Here are a few common issues you might encounter and how to fix them:
* **Mold:** If you see any fuzzy or discolored growth on your sprouts, it’s likely mold. Unfortunately, you’ll need to discard the entire batch. To prevent mold, make sure you’re rinsing and draining the sprouts thoroughly twice a day, and that you’re using clean water and a clean jar.
* **Rotting Smell:** A foul odor is another sign of bacterial growth or rotting. Again, discard the batch and start over, paying close attention to rinsing and draining.
* **Slow Growth:** If your sprouts aren’t growing as quickly as you’d like, make sure they’re in a warm enough environment (around 70-75°F is ideal). You can also try soaking them for a longer period initially.
* **Dry Sprouts:** If your sprouts seem dry, you might not be rinsing them frequently enough. Increase the frequency of rinsing, especially in warmer climates.
* Uneven Sprouting: Sometimes, not all the beans will sprout at the same rate. This is normal. Just continue the rinsing and draining process, and the slower sprouts will eventually catch up.
Tips and Tricks for Sprouting Like a Pro
Here are a few extra tips to help you become a sprouting master:
* Use High-Quality Seeds: The quality of your seeds will directly impact the success of your sprouting. Choose seeds specifically labeled for sprouting or food use from a reputable source.
* Experiment with Different Beans: Once you’ve mastered mung beans, try sprouting other types of beans, lentils, or even seeds like alfalfa or radish. Each has a unique flavor and texture.
* Adjust the Amount of Seeds: Depending on the size of your jar and your desired yield, you may need to adjust the amount of seeds you use. Start with 2-3 tablespoons and adjust accordingly.
* Keep it Clean: Maintaining a clean environment is crucial for preventing mold and bacteria. Wash your jar and sprouting lid thoroughly between batches.
* Don’t Overcrowd: Avoid using too many seeds, as this can lead to overcrowding and poor air circulation, increasing the risk of mold.
* Taste Test: Taste your sprouts regularly to check for bitterness or off-flavors. If they taste bitter, they may need to be rinsed more frequently or exposed to light for a longer period.
* Enjoy the Process: Sprouting is a fun and rewarding activity. Don’t be afraid to experiment and learn from your mistakes.
Creative Ways to Use Your Homegrown Sprouts
Now that you have a bounty of fresh bean sprouts, let’s talk about how to use them! Here are a few of my favorite ways to incorporate them into my meals:
* Salads: Add a handful of sprouts to your favorite salad for a crunchy and nutritious boost.
* Stir-Fries: Bean sprouts are a classic ingredient in stir-fries. Add them towards the end of cooking to maintain their crispness.
* Sandwiches and Wraps: Layer sprouts into sandwiches and wraps for added texture and flavor.
* Soups: Sprinkle sprouts on top of soups for a fresh and crunchy garnish.
* Spring Rolls: Bean sprouts are a key ingredient in fresh spring rolls.
* Smoothies: Add a small handful of sprouts to your smoothies for an extra dose of nutrients.
* As a Snack: Enjoy a handful of sprouts as a healthy and refreshing snack.
Why Grow Your Own Bean Sprouts?
Beyond the delicious taste and versatility, there are so many reasons to grow your own bean sprouts:
* Freshness: You can’t beat the freshness of homegrown sprouts. They’re harvested at their peak flavor and nutritional value.
* Cost-Effective: Growing your own sprouts is significantly cheaper than buying them from the store.
* Nutritious: Bean sprouts are packed with vitamins, minerals, and enzymes.
* Sustainable: Growing your own sprouts reduces your carbon footprint and supports sustainable food practices.
* Fun and Educational: Sprouting is a fun and educational activity for all ages.
So, there you have it! Everything you need to know to start growing your own bean sprouts at home. It’s a simple, rewarding, and delicious way to add fresh, nutritious food to your diet. Happy sprouting!
Conclusion
So, there you have it! Growing your own bean sprouts at home is not only incredibly easy and cost-effective, but it also provides you with a constant supply of fresh, crunchy goodness. Forget those limp, sad-looking sprouts from the grocery store – with this simple DIY trick, you’ll be enjoying vibrant, flavorful bean sprouts in just a few days.
Why is this a must-try? Because it puts you in control. You know exactly what’s going into your food – no preservatives, no questionable additives, just pure, wholesome bean sprouts. Plus, it’s a fantastic way to reduce your grocery bill and minimize food waste. Think about all those plastic containers you’ll be saving from the landfill!
But the benefits don’t stop there. Growing your own bean sprouts is also a surprisingly rewarding experience. Watching those tiny seeds transform into edible sprouts is a little bit magical, and it’s a great way to connect with nature, even if you live in an apartment. It’s also a fantastic project to do with kids, teaching them about where their food comes from and the wonders of germination.
Ready to get creative? While mung beans are the most common choice for sprouting, don’t be afraid to experiment! You can try sprouting other types of beans, such as adzuki beans, lentils, or even alfalfa seeds. Each variety will have its own unique flavor and texture, adding a delightful twist to your salads, stir-fries, and sandwiches.
Another variation to consider is the sprouting method itself. While the jar method is simple and effective, you can also use a sprouting tray or even a specialized sprouting machine for larger batches. These options can provide better air circulation and drainage, potentially leading to even faster and more consistent growth.
And speaking of growth, remember to adjust the sprouting time based on your personal preference. Some people prefer their bean sprouts to be short and crunchy, while others like them longer and more tender. Experiment with different sprouting times to find your perfect texture.
This bean sprouts growing DIY is a game-changer. It’s simple, sustainable, and incredibly satisfying. So, ditch the store-bought sprouts and give it a try! We’re confident that you’ll be amazed at how easy it is to grow your own fresh, delicious bean sprouts at home.
Don’t just take our word for it, though. We encourage you to try this DIY trick for yourself and share your experience with us! Let us know what kind of beans you used, what variations you tried, and how your bean sprouts turned out. We’d love to hear your tips and tricks for successful sprouting. Share your photos and stories in the comments below – let’s build a community of home sprouters!
Frequently Asked Questions (FAQ)
What kind of beans are best for sprouting?
Mung beans are the most popular and readily available choice for sprouting, and they generally produce the most consistent results. However, you can also sprout other types of beans, such as adzuki beans, lentils, chickpeas, and even alfalfa seeds. Keep in mind that different beans may have different sprouting times and require slightly different conditions. Always ensure the beans you use are intended for sprouting and are food-grade. Avoid using beans that are treated with pesticides or other chemicals.
How long does it take to grow bean sprouts?
Typically, bean sprouts will be ready to harvest in 3 to 5 days. The exact sprouting time will depend on the type of bean, the temperature, and the humidity. Warmer temperatures will generally speed up the sprouting process, while cooler temperatures will slow it down. Check your sprouts daily and harvest them when they reach your desired length and texture.
What if my bean sprouts start to smell bad?
A foul odor is a sign that your bean sprouts may be contaminated with bacteria or mold. This can happen if the sprouts are not rinsed frequently enough or if the sprouting environment is too warm and humid. If you notice a bad smell, discard the sprouts immediately and start a new batch, being sure to rinse them thoroughly at least twice a day. Using clean equipment and fresh water is crucial to prevent contamination.
How do I prevent mold from growing on my bean sprouts?
Preventing mold growth is essential for successful sprouting. Here are some tips:
* Use clean equipment: Wash your sprouting jar or tray thoroughly with soap and water before each use.
* Rinse frequently: Rinse your bean sprouts at least twice a day with fresh, cool water. This will help to remove any bacteria or mold spores that may be present.
* Ensure good drainage: Make sure your sprouting container has adequate drainage to prevent water from pooling at the bottom.
* Provide good air circulation: Avoid overcrowding the sprouts and ensure they have access to fresh air.
* Maintain a cool temperature: High temperatures can promote mold growth. Keep your sprouting environment cool and well-ventilated.
How do I store bean sprouts?
Once your bean sprouts are ready to harvest, rinse them thoroughly and drain them well. Store them in an airtight container in the refrigerator. They should keep for up to a week. To prolong their freshness, you can line the container with a paper towel to absorb excess moisture.
Can I eat the bean sprout roots?
Yes, the roots of bean sprouts are perfectly edible. They are just as nutritious and flavorful as the rest of the sprout.
Are there any health benefits to eating bean sprouts?
Yes, bean sprouts are a good source of vitamins, minerals, and fiber. They are low in calories and fat, making them a healthy addition to your diet. They are particularly rich in vitamin C, vitamin K, and folate.
Can I grow bean sprouts without soil?
Yes, this DIY method focuses on growing bean sprouts without soil, using only water and a jar or sprouting tray. This is a hydroponic method, which means the plants get their nutrients from the water.
What if my beans don’t sprout?
Several factors can prevent beans from sprouting. First, ensure your beans are fresh and intended for sprouting. Old beans may have a lower germination rate. Second, check the temperature. Too cold or too hot temperatures can inhibit sprouting. The ideal temperature is usually between 70-75°F (21-24°C). Third, make sure the beans are getting enough moisture but are not sitting in standing water. Finally, ensure the beans are not exposed to direct sunlight, which can dry them out.
Can I use tap water for sprouting?
While tap water is generally safe to use, it may contain chlorine or other chemicals that can inhibit sprouting. If you are concerned about the quality of your tap water, you can use filtered water or let the tap water sit out for 24 hours to allow the chlorine to evaporate.
Are there any safety precautions I should take when growing bean sprouts?
Yes, it’s important to take certain safety precautions to prevent foodborne illness. Always use clean equipment and fresh water. Rinse the sprouts thoroughly at least twice a day. Store the sprouts properly in the refrigerator. And if you notice any signs of spoilage, such as a foul odor or mold growth, discard the sprouts immediately. Pregnant women, young children, and people with weakened immune systems should be especially careful when consuming raw sprouts. Some sources recommend lightly cooking sprouts to reduce the risk of foodborne illness.
Leave a Comment