
Balcony mint growing tips are your secret weapon to unlocking a fragrant, flavorful oasis right outside your door! Imagine stepping onto your balcony and being greeted by the invigorating scent of fresh mint, ready to be plucked for a refreshing mojito, a soothing cup of tea, or a zesty addition to your favorite dishes. But let’s be honest, sometimes growing herbs, especially on a balcony, can feel like a battle against the elements and limited space.
Mint has a rich history, dating back to ancient civilizations where it was prized for its medicinal and culinary properties. From the Egyptians using it in religious ceremonies to the Romans flavoring their sauces and wines, mint has always been a beloved herb. Today, we’re bringing this ancient tradition to our modern balconies!
That’s where these DIY tricks and hacks come in. I’m here to share my tried-and-true methods for successfully cultivating a thriving mint garden, even in the most challenging balcony environments. You’ll learn how to choose the right containers, optimize sunlight exposure, prevent common pests, and, most importantly, control mint’s notorious spreading habit. Because let’s face it, mint can be a bit of a bully in the garden! With these balcony mint growing tips, you’ll be enjoying a bountiful harvest of fresh mint in no time, transforming your balcony into a fragrant and functional green space. So, grab your gardening gloves, and let’s get started!
Growing Mint on Your Balcony: A DIY Guide to Fresh Flavor
Okay, so you want to grow mint on your balcony? Awesome! Fresh mint is a game-changer for everything from mojitos to teas to adding a vibrant touch to your cooking. Plus, it smells amazing! But mint can be a bit… enthusiastic. It spreads like wildfire if you let it. That’s why growing it in containers on your balcony is the perfect solution. I’m going to walk you through everything you need to know to have a thriving mint patch right outside your door.
What You’ll Need
Before we dive in, let’s gather our supplies. This is a pretty straightforward project, so you probably have some of this stuff already.
* Containers: Choose pots that are at least 12 inches in diameter. Mint likes room to spread its roots, even in a container. Make sure they have drainage holes! This is crucial.
* Potting Mix: Don’t skimp on the potting mix. A good quality, well-draining mix is essential. I recommend a mix specifically formulated for containers.
* Mint Starts: You can buy mint starts from a local nursery or garden center. Look for healthy-looking plants with vibrant green leaves. You can also propagate mint from cuttings, which I’ll touch on later.
* Watering Can or Hose: For, well, watering!
* Optional: Slow-Release Fertilizer: This isn’t strictly necessary, but it can give your mint a boost.
* Gardening Gloves: To keep your hands clean and protected.
* Pruning Shears or Scissors: For harvesting and keeping your mint in check.
Choosing the Right Mint Variety
Did you know there are tons of different kinds of mint? It’s true! Here are a few popular choices for balcony gardens:
* Spearmint: This is the classic mint flavor, perfect for mojitos and teas.
* Peppermint: A stronger, more intense mint flavor, great for candies and desserts.
* Chocolate Mint: Yes, it really tastes like chocolate and mint! It’s a fun and unique variety.
* Apple Mint: A milder, fruitier mint flavor.
* Orange Mint: A citrusy twist on the classic mint flavor.
I recommend starting with spearmint or peppermint, as they’re the most versatile. But feel free to experiment and find your favorite!
Planting Your Mint
Okay, let’s get our hands dirty! This is the fun part.
1. Prepare Your Containers: Make sure your containers are clean and have good drainage. If you’re using old pots, give them a good scrub with soap and water.
2. Fill with Potting Mix: Fill your containers with potting mix, leaving about an inch or two of space at the top.
3. Gently Remove Mint from Nursery Pot: Carefully remove your mint starts from their nursery pots. Gently loosen the roots with your fingers. If the roots are tightly bound, you can gently tease them apart.
4. Plant the Mint: Dig a small hole in the potting mix and place the mint plant in the hole. Make sure the top of the root ball is level with the surface of the soil.
5. Backfill with Potting Mix: Fill in the hole with potting mix and gently pat it down.
6. Water Thoroughly: Water the newly planted mint thoroughly until water drains out of the drainage holes. This helps settle the soil and get the roots established.
Caring for Your Balcony Mint
Now that your mint is planted, it’s time to learn how to keep it happy and healthy.
* Sunlight: Mint thrives in partial shade to full sun. On a balcony, aim for at least 4-6 hours of sunlight per day. If your balcony is very sunny, provide some afternoon shade to prevent the leaves from scorching.
* Watering: Mint likes consistently moist soil, but not soggy. Water when the top inch of soil feels dry to the touch. In hot weather, you may need to water daily. Check the soil moisture regularly.
* Fertilizing: If you’re using a slow-release fertilizer, follow the instructions on the package. Otherwise, you can fertilize your mint every few weeks with a balanced liquid fertilizer. Dilute the fertilizer to half strength to avoid burning the roots.
* Pruning: This is key to keeping your mint from getting leggy and overgrown. Regularly prune your mint by pinching off the top leaves. This encourages bushier growth and prevents the plant from flowering. Flowering can diminish the flavor of the leaves.
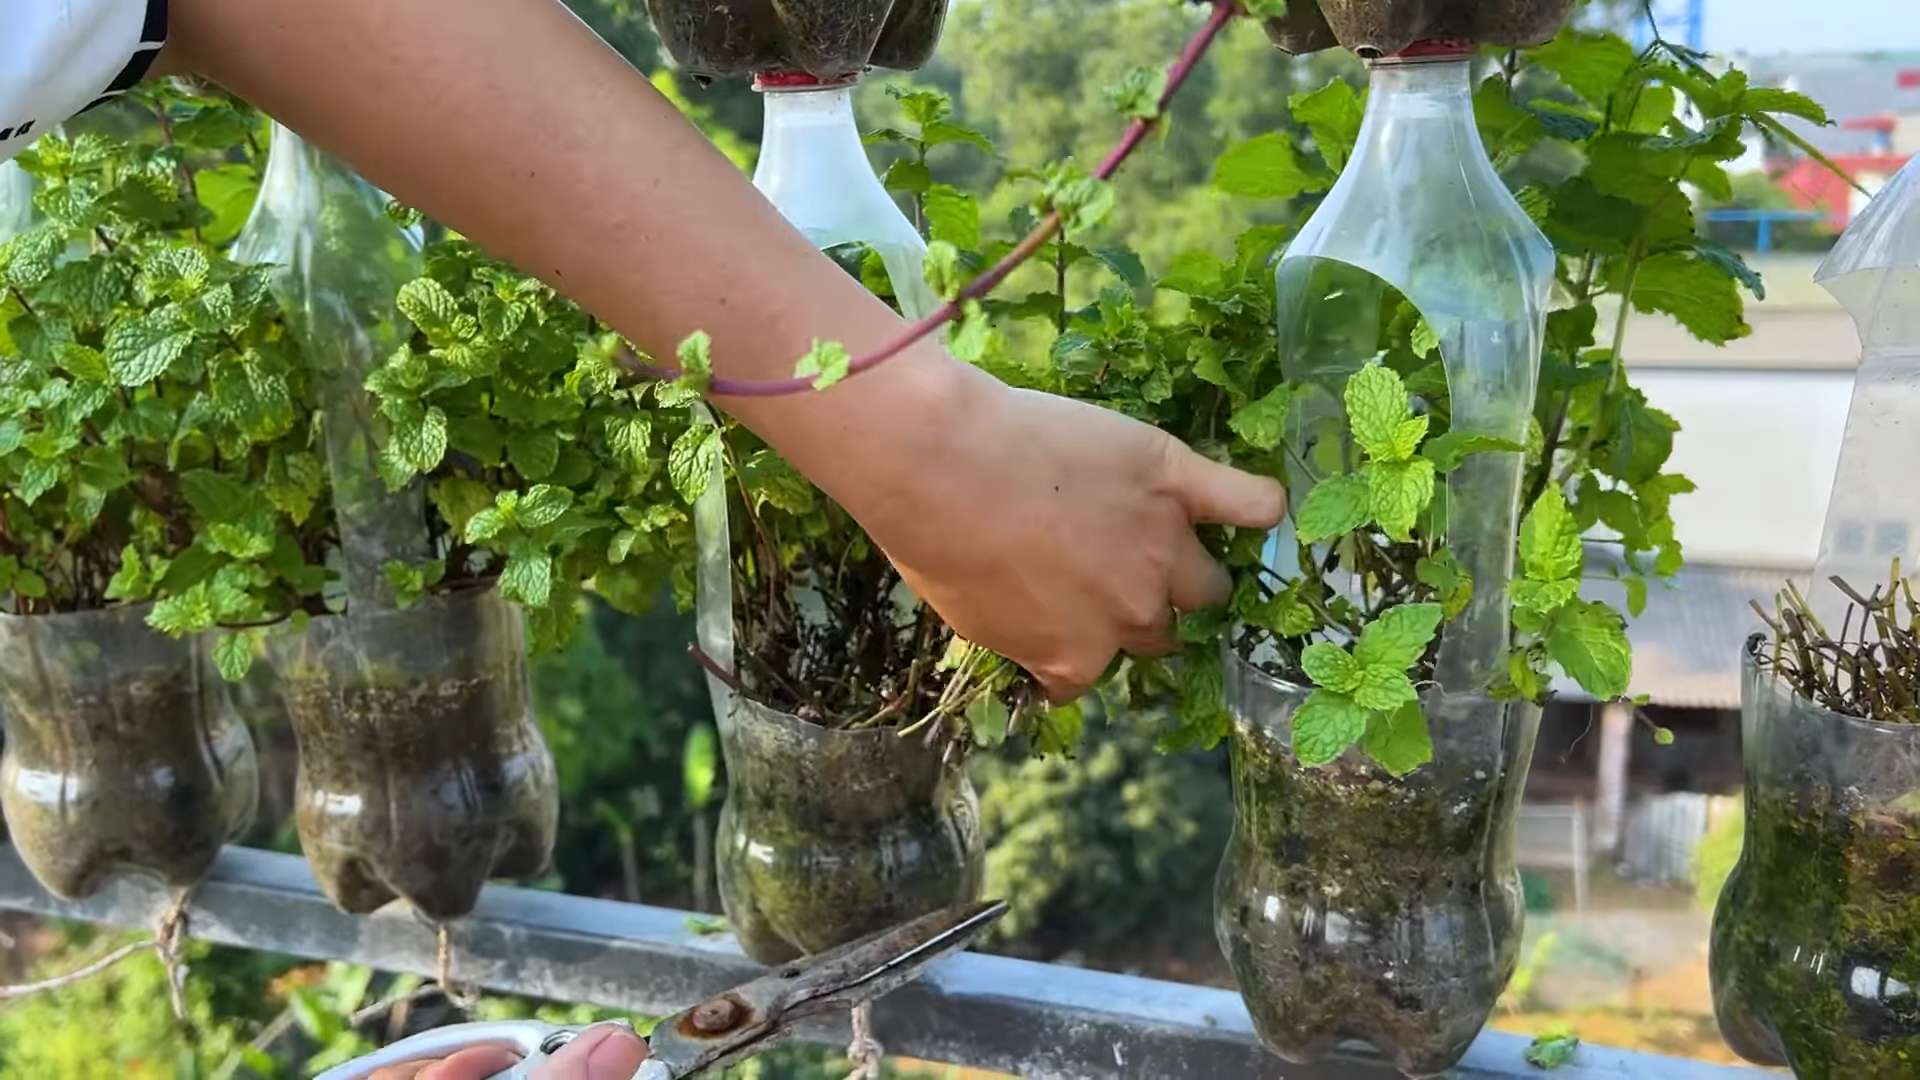
* Harvesting: Harvest mint leaves as needed. Simply snip off stems with scissors or pruning shears. The more you harvest, the more the plant will grow!
* Pest Control: Mint is generally pest-resistant, but occasionally you might encounter aphids or spider mites. If you see any pests, you can try spraying them with insecticidal soap or neem oil.
* Overwintering: Mint is a perennial, which means it can survive for several years. In colder climates, you may need to protect your mint during the winter. You can bring the containers indoors or insulate them with burlap or straw. Cut back the plant before overwintering.
Propagating Mint from Cuttings
Want to expand your mint collection without buying more plants? Propagating mint from cuttings is super easy!
1. Take a Cutting: Choose a healthy stem that’s about 4-6 inches long. Cut the stem just below a leaf node (the point where a leaf grows from the stem).
2. Remove Lower Leaves: Remove the leaves from the bottom inch or two of the stem.
3. Place in Water: Place the cutting in a glass of water, making sure the bottom nodes are submerged.
4. Wait for Roots: Place the glass in a bright, indirect light location. Change the water every few days. Within a week or two, you should see roots starting to grow.
5. Plant in Potting Mix: Once the roots are about an inch long, you can plant the cutting in a pot filled with potting mix.
6. Water and Care: Water the newly planted cutting thoroughly and care for it as you would any other mint plant.
Troubleshooting
Even with the best care, you might encounter some problems with your balcony mint. Here are a few common issues and how to fix them:
* Yellowing Leaves: This could be a sign of overwatering, underwatering, or nutrient deficiency. Check the soil moisture and adjust your watering accordingly. If the soil is consistently wet, let it dry out a bit before watering again. If the leaves are pale yellow, try fertilizing with a balanced liquid fertilizer.
* Leggy Growth: This is usually caused by insufficient sunlight or lack of pruning. Make sure your mint is getting enough sunlight and prune it regularly to encourage bushier growth.
* Brown Spots on Leaves: This could be a sign of fungal disease. Remove any affected leaves and improve air circulation around the plant. Avoid overhead watering, as this can promote fungal growth. You can also try spraying with a fungicide.
* Pests: As mentioned earlier, aphids and spider mites are the most common pests that affect mint. Treat them with insecticidal soap or neem oil.
Harvesting and Using Your Fresh Mint
Okay, so you’ve got a thriving mint patch on your balcony. Now what? Time to harvest and enjoy the fruits (or rather, leaves) of your labor!
* When to Harvest: You can harvest mint leaves at any time, but the flavor is usually best in the morning, after the dew has dried.
* How to Harvest: Simply snip off stems with scissors or pruning shears. You can harvest individual leaves or entire stems.
* Storing Fresh Mint: Fresh mint is best used immediately, but you can store it in the refrigerator for a few days. Wrap the mint in a damp paper towel and place it in a plastic bag.
* Drying Mint: To dry mint, tie stems together and hang them upside down in a cool, dry place. Once the leaves are completely dry, you can crumble them and store them in an airtight container.
* Using Fresh Mint: The possibilities are endless! Add it to mojitos, teas, salads, sauces, desserts, and more. Get creative and experiment with different recipes.
Mint in Recipes
Here are a few ideas to get you started:
* Mojitos: Muddle mint leaves with lime juice, sugar, and rum. Top with club soda and ice.
* Mint Tea: Steep fresh mint leaves in hot water for a refreshing and soothing tea.
* Mint Sauce: Combine chopped mint leaves with vinegar, sugar, and water for a classic mint sauce.
* Mint Chocolate Chip Ice Cream: Add chopped mint leaves to your favorite ice cream recipe.
* Mint Pesto: Substitute mint for basil in
Conclusion
So, there you have it! Transforming your balcony into a fragrant, mint-filled oasis is not only achievable but surprisingly simple. We’ve walked you through the essential steps, from choosing the right container and soil to mastering the art of watering and pruning. But why is this DIY balcony mint growing trick a must-try? Because it offers a wealth of benefits that extend far beyond simply having fresh mint on hand.
Imagine stepping onto your balcony and being greeted by the invigorating aroma of fresh mint. Picture yourself effortlessly snipping a few sprigs to add to your morning tea, a refreshing summer cocktail, or a flavorful addition to your favorite dishes. This isn’t just about convenience; it’s about connecting with nature, even in the heart of the city. It’s about reducing your reliance on store-bought herbs, which can often be expensive and lack the vibrant flavor of homegrown varieties. And it’s about the sheer joy of nurturing something from a tiny seedling to a thriving plant.
Beyond the practical advantages, growing mint on your balcony is also incredibly rewarding. It’s a therapeutic activity that can help reduce stress and promote a sense of calm. Watching your mint plants flourish is a testament to your care and attention, providing a tangible sense of accomplishment. Plus, mint is a remarkably resilient plant, making it perfect for beginner gardeners. Even if you’ve never grown anything before, you’re likely to find success with this easy-to-grow herb.
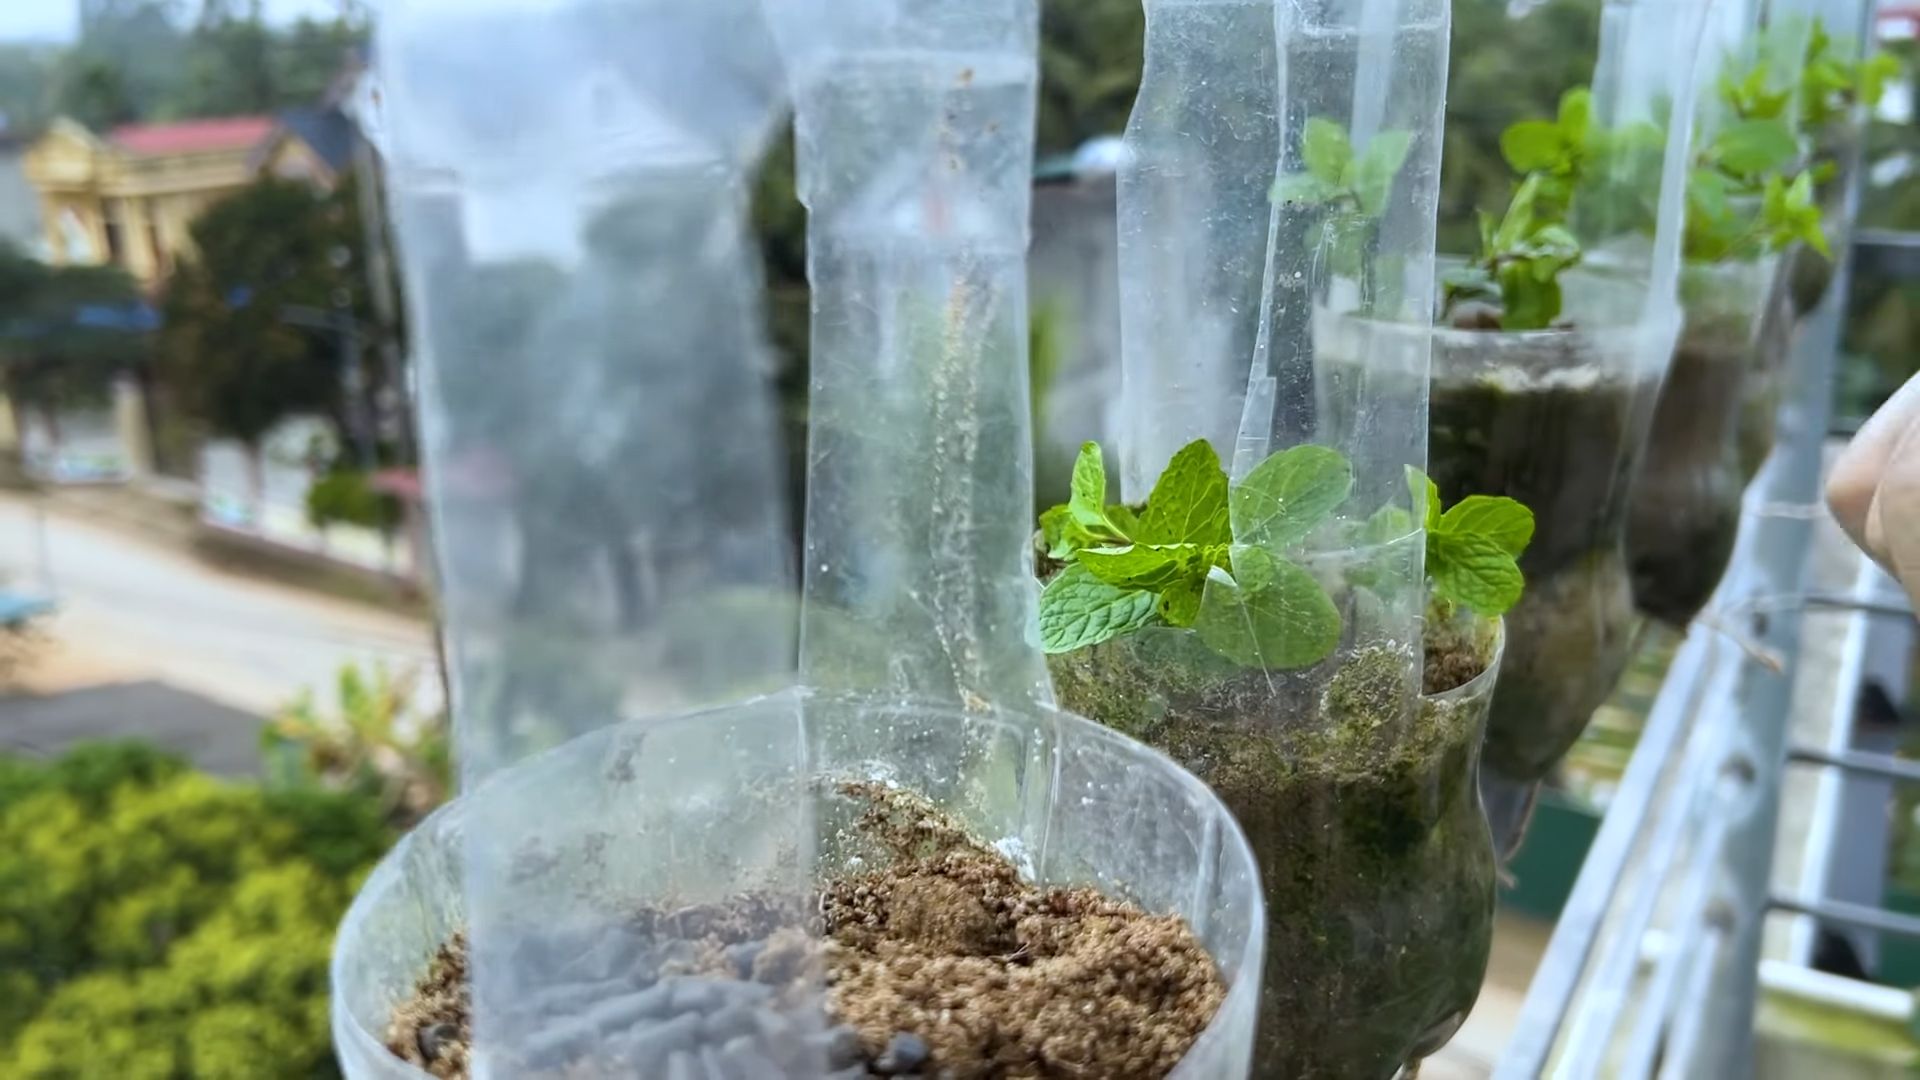
But the possibilities don’t stop there! Feel free to experiment with different varieties of mint. Peppermint, spearmint, chocolate mint, and even apple mint each offer unique flavors and aromas. Try planting a few different varieties in separate containers to create a diverse and fragrant collection. You can also get creative with your container choices. Use repurposed items like old buckets, tin cans, or even hanging baskets to add a touch of personality to your balcony garden. Consider companion planting by adding flowers like marigolds to deter pests and attract pollinators.
Don’t be afraid to experiment and personalize your balcony mint garden to suit your own tastes and preferences.
We encourage you to take the plunge and try this DIY balcony mint growing trick for yourself. It’s an investment that will pay off in fresh herbs, a beautiful balcony, and a sense of accomplishment. And most importantly, don’t forget to share your experience with us! We’d love to see photos of your balcony mint gardens and hear about your successes (and any challenges you might encounter). Share your tips and tricks in the comments below, and let’s create a community of balcony mint enthusiasts! Happy growing!
Frequently Asked Questions (FAQ)
1. What is the best type of container to use for growing mint on a balcony?
The best type of container for growing mint on a balcony is one that provides adequate drainage and is large enough to accommodate the plant’s root system. Mint is a vigorous grower and can quickly become root-bound in small containers. A pot that is at least 12 inches in diameter and 12 inches deep is generally recommended. Terracotta pots are a good choice because they allow for good air circulation and drainage. Plastic pots are also suitable, but be sure to choose a dark color to prevent the roots from overheating in direct sunlight. You can also use repurposed containers like buckets, tin cans, or even old tires, as long as they have drainage holes. Hanging baskets are another option, but they tend to dry out more quickly, so you’ll need to water them more frequently. Remember to consider the weight of the container when choosing one for your balcony, especially if you have weight restrictions.
2. What kind of soil should I use for growing mint?
Mint thrives in well-draining soil that is rich in organic matter. A good potting mix specifically formulated for herbs is an excellent choice. You can also create your own potting mix by combining equal parts of garden soil, compost, and perlite or vermiculite. The garden soil provides nutrients, the compost adds organic matter, and the perlite or vermiculite improves drainage. Avoid using heavy clay soil, as it can become waterlogged and suffocate the roots. Before planting, amend the soil with compost or aged manure to improve its fertility and drainage. You can also add a slow-release fertilizer to provide the plants with a steady supply of nutrients.
3. How much sunlight does mint need?
Mint prefers partial shade, especially during the hottest part of the day. While it can tolerate full sun, the leaves may become scorched or stressed in intense heat. Aim for at least 4-6 hours of sunlight per day. If your balcony receives direct sunlight all day long, try to provide some shade during the afternoon. You can do this by using shade cloth, positioning the plants near a wall or railing, or moving them to a shadier location during the hottest hours. If you’re growing mint indoors, place it near a sunny window that receives plenty of indirect light. Rotate the plant regularly to ensure that all sides receive equal exposure to sunlight.
4. How often should I water my mint plants?
Water your mint plants regularly, especially during hot, dry weather. The soil should be kept consistently moist, but not waterlogged. Check the soil moisture by sticking your finger into the soil. If the top inch feels dry, it’s time to water. Water deeply, until the water drains out of the bottom of the pot. Avoid watering the leaves directly, as this can promote fungal diseases. Water in the morning to allow the leaves to dry out before nightfall. During cooler weather, you can reduce the frequency of watering. Overwatering is a common mistake that can lead to root rot, so be sure to allow the soil to dry out slightly between waterings.
5. How do I prune mint plants?
Pruning is essential for keeping mint plants healthy and productive. Regular pruning encourages bushier growth and prevents the plants from becoming leggy. Pinch off the tips of the stems regularly to promote branching. You can also harvest leaves as needed for culinary use. When harvesting, cut the stems back to just above a leaf node. This will encourage new growth from the node. If your mint plants start to flower, pinch off the flower buds to prevent them from going to seed. Allowing the plants to flower can reduce their leaf production and flavor. You can also prune the plants back hard in the spring to rejuvenate them.
6. How do I deal with pests and diseases on my mint plants?
Mint is generally a pest-resistant plant, but it can occasionally be affected by aphids, spider mites, or whiteflies. These pests can be controlled with insecticidal soap or neem oil. Apply the insecticide according to the manufacturer’s instructions. Fungal diseases, such as powdery mildew, can also affect mint plants, especially in humid conditions. To prevent fungal diseases, ensure good air circulation around the plants and avoid overwatering. If you notice signs of fungal disease, remove the affected leaves and treat the plants with a fungicide. You can also try spraying the plants with a solution of baking soda and water.
7. Can I grow different varieties of mint together?
It’s generally not recommended to grow different varieties of mint together in the same container. Mint is a very invasive plant and can quickly spread and take over other plants. Different varieties of mint can also cross-pollinate, resulting in plants with unpredictable flavors and characteristics. If you want to grow multiple varieties of mint, it’s best to plant them in separate containers. This will prevent them from competing with each other and ensure that you can enjoy the unique flavors of each variety.
8. How do I overwinter mint plants on a balcony?
Mint is a perennial plant, meaning that it will come back year after year. However, in colder climates, it may need some protection during the winter months. Before the first frost, prune the plants back to a few inches above the soil line. Move the containers to a sheltered location, such as a garage or shed. Water the plants sparingly during the winter, just enough to keep the soil from drying out completely. In the spring, when the weather warms up, move the plants back to their original location and resume regular watering and fertilizing. You can also propagate mint from cuttings in the fall to ensure that you have new plants for the following spring.
9. Is mint safe for pets?
While mint is generally considered safe for pets in small quantities, it’s important to be aware that some varieties of mint, such as pennyroyal, can be toxic to dogs and cats. If you have pets, it’s best to avoid growing pennyroyal and to keep other varieties of mint out of their reach. If your pet ingests a large amount of mint, it may experience symptoms such as vomiting, diarrhea, or lethargy. If you suspect that your pet has ingested a toxic amount of mint, contact your veterinarian immediately.
10. How can I use my balcony-grown mint?
The possibilities for using your balcony-grown mint are endless! Fresh mint can be used to flavor a wide variety of dishes, drinks, and desserts. Add it to salads, soups, stews, and sauces. Use it to make refreshing mint tea or mojitos. Garnish desserts with fresh mint leaves. You can also dry mint leaves for later use. Simply hang the stems upside down in a cool, dry place until the leaves are completely dry. Store the dried leaves in an airtight container. Mint can also be used to make homemade beauty products, such as mint-infused oil or mint-scented soap.

Leave a Comment