
Balcony chili pepper growing might seem daunting, especially if you’re short on space, but trust me, it’s totally achievable and incredibly rewarding! Imagine plucking fresh, fiery chilies right from your own balcony to spice up your next meal. Forget those bland, store-bought peppers – we’re talking about vibrant, flavorful chilies grown with your own two hands.
Chili peppers have a rich history, dating back thousands of years in South America, where they were not only a culinary staple but also held cultural and medicinal significance. Today, their popularity has spread worldwide, and thankfully, you don’t need a sprawling farm to enjoy them.
So, why should you embark on this balcony chili pepper growing adventure? Well, besides the obvious benefit of having a constant supply of fresh chilies, it’s also a fantastic way to connect with nature, even in a small urban space. Plus, it’s a surprisingly therapeutic hobby! This DIY guide will walk you through everything you need to know, from choosing the right varieties to troubleshooting common problems. I’m going to share my favorite tips and tricks to help you cultivate a thriving chili pepper garden, even if you’ve never grown anything before. Let’s get started and turn your balcony into a spicy paradise!
Chili-Anbau auf dem Balkon: Mein DIY-Guide für eine feurige Ernte
Hallo liebe Chili-Enthusiasten! Ich liebe es, frische Chilis direkt vom Balkon zu ernten. Es ist einfacher als man denkt und bringt eine tolle Würze in die Küche. In diesem Artikel zeige ich euch Schritt für Schritt, wie ihr eure eigenen Chili-Pflanzen auf dem Balkon ziehen könnt – von der Aussaat bis zur Ernte. Los geht’s!
Was du brauchst: Die Zutaten für deinen Chili-Erfolg
Bevor wir loslegen, hier eine Liste mit allem, was du für dein Chili-Projekt benötigst:
* Chili-Samen: Wähle deine Lieblingssorten! Ob mild oder feurig, die Auswahl ist riesig. Achte auf qualitativ hochwertige Samen von vertrauenswürdigen Anbietern.
* Anzuchterde: Spezielle Anzuchterde ist nährstoffarm und locker, ideal für die Keimung der Samen.
* Anzuchttöpfe oder -schalen: Kleine Töpfe oder Schalen mit Drainagelöchern sind perfekt für die Vorzucht.
* Größere Töpfe oder Kübel: Sobald die Pflanzen größer sind, brauchen sie mehr Platz. Wähle Töpfe mit mindestens 10 Litern Volumen.
* Blumenerde: Hochwertige Blumenerde mit guter Drainage ist wichtig für das Wachstum der Pflanzen.
* Dünger: Flüssigdünger oder Langzeitdünger speziell für Gemüse oder Chili-Pflanzen.
* Gießkanne oder Sprühflasche: Zum Bewässern der Pflanzen.
* Pflanzstäbe (optional): Für Sorten, die dazu neigen, umzuknicken.
* Handschuhe: Zum Schutz deiner Hände.
* Etiketten: Um die verschiedenen Chili-Sorten zu kennzeichnen.
* Mini-Gewächshaus oder Klarsichtfolie (optional): Um die Keimung zu beschleunigen.
Phase 1: Die Aussaat – Der Start in die Chili-Saison
Die Aussaat ist der erste und wichtigste Schritt. Hier zeige ich dir, wie du es richtig machst:
1. Vorbereitung der Anzuchttöpfe: Fülle die Anzuchttöpfe oder -schalen mit Anzuchterde. Drücke die Erde leicht an.
2. Aussaat der Samen: Lege pro Topf 1-2 Samen auf die Erde. Bedecke die Samen mit einer dünnen Schicht Anzuchterde (ca. 0,5 cm).
3. Bewässerung: Befeuchte die Erde vorsichtig mit einer Sprühflasche. Die Erde sollte feucht, aber nicht nass sein.
4. Abdeckung (optional): Decke die Töpfe mit einem Mini-Gewächshaus oder Klarsichtfolie ab, um die Luftfeuchtigkeit zu erhöhen. Dies beschleunigt die Keimung.
5. Standort: Stelle die Töpfe an einen warmen und hellen Ort. Eine Temperatur von 22-28°C ist ideal für die Keimung.
6. Geduld: Die Keimung kann je nach Sorte und Temperatur 1-3 Wochen dauern. Halte die Erde während dieser Zeit feucht.
Phase 2: Pikieren – Den kleinen Chili-Pflanzen mehr Raum geben
Sobald die ersten Blätter (Keimblätter) zu sehen sind und die Pflänzchen etwas größer geworden sind (ca. 2-3 cm), ist es Zeit zum Pikieren. Das bedeutet, dass du die kleinen Pflanzen in größere Töpfe umpflanzt, damit sie mehr Platz zum Wachsen haben.
1. Vorbereitung der größeren Töpfe: Fülle die größeren Töpfe mit Blumenerde.
2. Vorsichtiges Ausheben: Löse die kleinen Chili-Pflanzen vorsichtig aus den Anzuchttöpfen. Achte darauf, die Wurzeln nicht zu beschädigen. Am besten geht das mit einem Pikierstab oder einem Löffel.
3. Einsetzen in die neuen Töpfe: Setze jede Chili-Pflanze in einen eigenen Topf. Die Pflanze sollte etwas tiefer sitzen als zuvor.
4. Bewässerung: Gieße die Pflanzen vorsichtig an.
5. Standort: Stelle die pikierten Pflanzen an einen hellen und warmen Ort.
Phase 3: Die Pflege – Damit deine Chili-Pflanzen prächtig gedeihen
Die richtige Pflege ist entscheidend für eine reiche Chili-Ernte. Hier sind meine Tipps:
* Bewässerung: Gieße die Chili-Pflanzen regelmäßig, aber vermeide Staunässe. Die Erde sollte immer leicht feucht sein. An heißen Tagen kann es notwendig sein, täglich zu gießen.
* Düngung: Dünge die Pflanzen regelmäßig mit einem Flüssigdünger oder Langzeitdünger. Beginne mit dem Düngen etwa 2-3 Wochen nach dem Pikieren. Achte auf die Dosierungsanleitung des Düngers.
* Standort: Chili-Pflanzen lieben die Sonne! Stelle sie an einen sonnigen und windgeschützten Ort auf dem Balkon.
* Schneiden (optional): Du kannst die Chili-Pflanzen beschneiden, um das Wachstum zu fördern und die Ernte zu erhöhen. Entferne dazu die Triebspitzen.
* Schutz vor Schädlingen: Kontrolliere die Pflanzen regelmäßig auf Schädlinge wie Blattläuse oder Spinnmilben. Bei Bedarf kannst du biologische Schädlingsbekämpfungsmittel einsetzen.
* Unterstützung: Einige Chili-Sorten, besonders solche mit großen Früchten, benötigen Unterstützung durch Pflanzstäbe, um nicht umzuknicken.
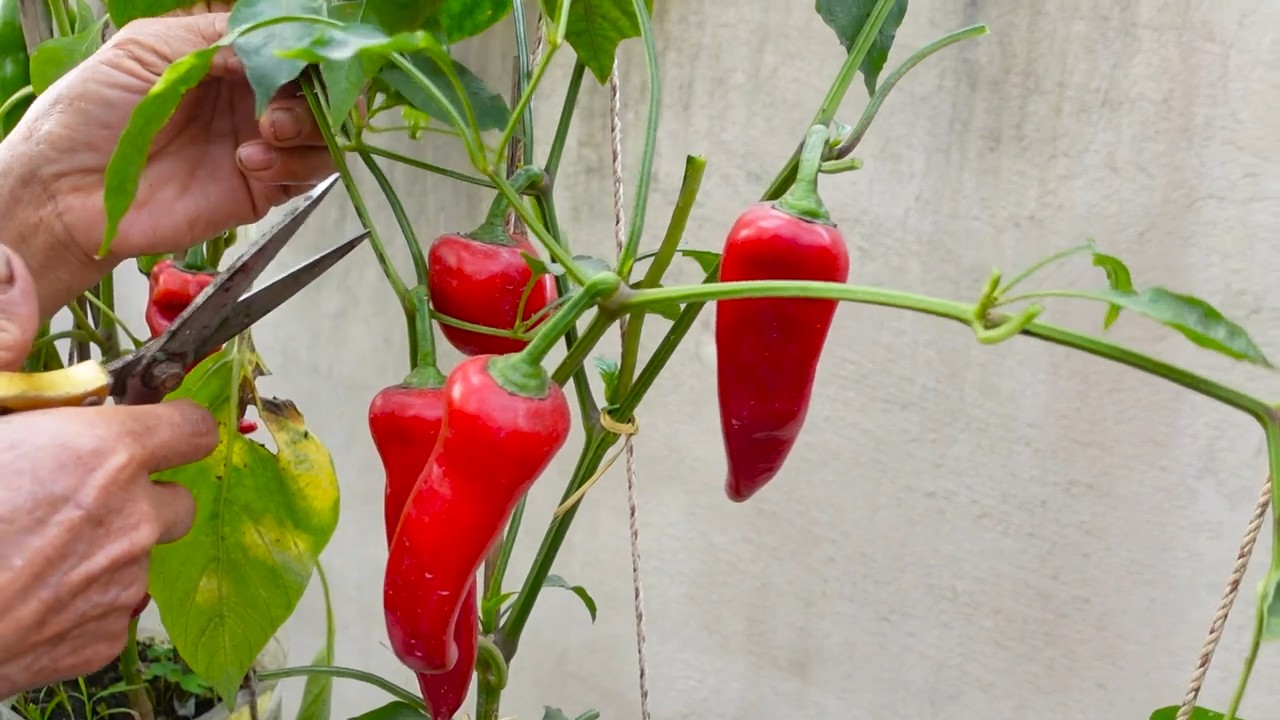
Phase 4: Die Ernte – Der Lohn deiner Mühe
Endlich ist es soweit: Die Chilis sind reif und können geerntet werden!
1. Reife erkennen: Die Farbe der Chilis ändert sich, wenn sie reif sind. Je nach Sorte werden sie rot, gelb, orange oder braun. Die Früchte sollten sich fest anfühlen.
2. Ernten: Schneide die Chilis mit einer Schere oder einem Messer ab. Trage dabei Handschuhe, um Hautreizungen zu vermeiden.
3. Verwendung: Frische Chilis können sofort verwendet werden. Du kannst sie auch trocknen, einfrieren oder zu Chili-Öl oder -Soße verarbeiten.
Zusätzliche Tipps für den Chili-Anbau auf dem Balkon
* Sortenwahl: Wähle Chili-Sorten, die für den Anbau im Topf geeignet sind. Kleinwüchsige Sorten wie “Jalapeño” oder “Habanero” eignen sich besonders gut.
* Drainage: Achte darauf, dass die Töpfe eine gute Drainage haben, damit das Wasser ablaufen kann. Du kannst eine Schicht Kies oder Tonscherben auf den Boden der Töpfe legen.
* Überwinterung: Einige Chili-Sorten sind mehrjährig und können überwintert werden. Schneide die Pflanzen im Herbst zurück und stelle sie an einen hellen und kühlen Ort (ca. 10-15°C). Gieße sie nur sparsam.
* Balkonlage: Achte auf die Ausrichtung deines Balkons. Ein Südbalkon ist ideal für Chili-Pflanzen, da er die meiste Sonne abbekommt.
* Windschutz: Schütze die Pflanzen vor starkem Wind, indem du sie an einer windgeschützten Stelle aufstellst oder einen Windschutz anbringst.
Häufige Probleme und Lösungen
* Blattläuse: Sprühe die Pflanzen mit einer Lösung aus Wasser und Schmierseife ab.
* Spinnmilben: Erhöhe die Luftfeuchtigkeit und sprühe die Pflanzen mit Wasser ab.
* Gelbe Blätter: Überwässerung oder Nährstoffmangel. Überprüfe die Bewässerung und dünge die Pflanzen.
* Keine Früchte: Mangelnde Bestäubung. Hilf mit einem Pinsel nach oder stelle die Pflanzen an einen Ort, wo Wind sie bestäuben kann.
Ich hoffe, dieser Guide hilft dir dabei, eine reiche Chili-Ernte auf deinem Balkon zu erzielen. Viel Spaß beim Gärtnern und guten Appetit!

Conclusion
So, there you have it! Transforming your balcony into a vibrant, chili pepper paradise is not only achievable, but incredibly rewarding. We’ve explored the ins and outs of balcony chili pepper growing, from selecting the perfect varieties to nurturing them through their fiery journey. This isn’t just about adding a touch of green to your outdoor space; it’s about cultivating your own source of fresh, flavorful heat, right at your fingertips.
Why is this DIY trick a must-try? Because it empowers you to control the quality and freshness of your chili peppers, offering a taste experience far superior to anything you can find in a grocery store. Imagine the satisfaction of harvesting your own Scotch Bonnets for a Caribbean-inspired jerk chicken, or snipping off a few Thai chilies to add a kick to your homemade curry. The possibilities are endless!
Beyond the sheer deliciousness, balcony chili pepper growing is a fantastic way to connect with nature, even in the heart of the city. It’s a mindful activity that allows you to slow down, observe the growth cycle, and appreciate the simple beauty of a thriving plant. Plus, it’s a conversation starter! Your friends and neighbors will be amazed by your green thumb and eager to learn your secrets.
Ready to take your balcony garden to the next level? Consider these variations to personalize your chili pepper growing experience:
* Vertical Gardening: Maximize your space by using vertical planters or hanging baskets. This is especially useful for smaller balconies.
* Companion Planting: Plant basil, marigolds, or other herbs alongside your chili peppers to deter pests and attract beneficial insects.
* Hydroponics: Explore hydroponic systems for a more controlled and efficient growing environment.
* Different Containers: Experiment with terracotta pots, fabric pots, or even repurposed containers to find what works best for your aesthetic and growing needs.
* Chili Pepper Infused Oils and Vinegars: Once you have a bountiful harvest, preserve your peppers by infusing them into oils and vinegars for long-lasting flavor.
Don’t be afraid to experiment and adapt these techniques to suit your specific balcony conditions and preferences. The key is to start small, learn from your mistakes, and enjoy the process.
We are confident that with a little effort and dedication, you can transform your balcony into a thriving chili pepper oasis. So, grab your seeds, pots, and soil, and get ready to embark on this exciting culinary adventure.
We can’t wait to hear about your experiences! Share your photos, tips, and challenges in the comments below. Let’s create a community of balcony chili pepper growers and inspire each other to cultivate the spiciest, most flavorful gardens imaginable. Happy growing!
Frequently Asked Questions (FAQ)
Q: What are the best chili pepper varieties to grow on a balcony?
A: The best chili pepper varieties for balcony growing are typically compact and well-suited to container gardening. Some excellent choices include:
* Thai Chilies: These are small, prolific, and pack a significant punch. They’re perfect for adding heat to Asian-inspired dishes.
* Jalapeños: A classic choice, jalapeños are relatively easy to grow and offer a moderate level of heat.
* Serrano Peppers: Similar to jalapeños but slightly hotter, serranos are great for salsas and sauces.
* Habaneros: For those who crave intense heat, habaneros are a must-try. Be careful when handling them!
* Scotch Bonnets: Another fiery option, Scotch Bonnets have a distinctive fruity flavor that complements their heat.
* Cayenne Peppers: These long, slender peppers are ideal for drying and grinding into chili powder.
* Poblano Peppers: Milder than many other varieties, poblanos are perfect for stuffing or roasting.
* Sweet Peppers (like Bell Peppers): While not spicy, bell peppers can thrive in the same conditions and add color and variety to your balcony garden.
Consider the amount of sunlight your balcony receives and choose varieties that are appropriate for your climate. Also, think about your personal preferences in terms of heat level and flavor.
Q: How much sunlight do chili peppers need on a balcony?
A: Chili peppers thrive in full sun, requiring at least 6-8 hours of direct sunlight per day. If your balcony doesn’t receive enough sunlight, you may need to supplement with grow lights. Position your plants in the sunniest spot on your balcony and rotate them regularly to ensure even exposure.
Q: What type of soil is best for growing chili peppers in containers?
A: Use a well-draining potting mix specifically formulated for container gardening. Avoid using garden soil, as it can become compacted and prevent proper drainage. A good potting mix will retain moisture while allowing excess water to escape, preventing root rot. You can also amend your potting mix with perlite or vermiculite to improve drainage and aeration.
Q: How often should I water my balcony chili peppers?
A: Water your chili peppers when the top inch of soil feels dry to the touch. Avoid overwatering, as this can lead to root rot. The frequency of watering will depend on the weather conditions, the size of your containers, and the type of potting mix you’re using. During hot, dry periods, you may need to water daily. Check the soil moisture regularly and adjust your watering schedule accordingly.
Q: Do chili peppers need fertilizer?
A: Yes, chili peppers benefit from regular fertilization. Use a balanced fertilizer specifically formulated for vegetables or flowering plants. Follow the instructions on the fertilizer package and avoid over-fertilizing, as this can burn the roots. You can also use organic fertilizers, such as compost tea or fish emulsion. Fertilize your plants every 2-4 weeks during the growing season.
Q: How do I protect my balcony chili peppers from pests and diseases?
A: Regularly inspect your plants for signs of pests or diseases. Common pests that affect chili peppers include aphids, spider mites, and whiteflies. You can control these pests with insecticidal soap, neem oil, or by handpicking them off the plants. To prevent diseases, ensure good air circulation around your plants and avoid overwatering. If you notice any signs of disease, such as leaf spots or wilting, remove the affected leaves or plants immediately.
Q: When should I harvest my chili peppers?
A: The timing of harvest depends on the variety of chili pepper and your personal preference. Most chili peppers will change color as they ripen, typically from green to red, yellow, or orange. You can harvest them at any stage of ripeness, but the flavor and heat will intensify as they mature. Use scissors or pruning shears to cut the peppers from the plant, leaving a small stem attached.
Q: How can I overwinter my chili pepper plants on a balcony?
A: In colder climates, you can overwinter your chili pepper plants indoors to protect them from frost. Before the first frost, prune back the plants and move them to a bright, sunny location indoors. Reduce watering and fertilization during the winter months. In the spring, gradually acclimate the plants to outdoor conditions before moving them back to your balcony.
Q: Can I grow chili peppers from seed on my balcony?
A: Yes, you can grow chili peppers from seed on your balcony. Start the seeds indoors 6-8 weeks before the last expected frost. Use a seed-starting mix and keep the soil moist and warm. Once the seedlings have developed several sets of true leaves, transplant them into larger containers and gradually acclimate them to outdoor conditions before moving them to your balcony.
Q: What if my chili pepper plants are not producing fruit?
A: Several factors can contribute to a lack of fruit production in chili pepper plants. These include insufficient sunlight, improper watering, lack of pollination, and nutrient deficiencies. Ensure that your plants are receiving at least 6-8 hours of direct sunlight per day, water them regularly but not excessively, and fertilize them with a balanced fertilizer. You can also hand-pollinate the flowers by gently shaking the plants or using a small brush to transfer pollen from one flower to another.

Leave a Comment