
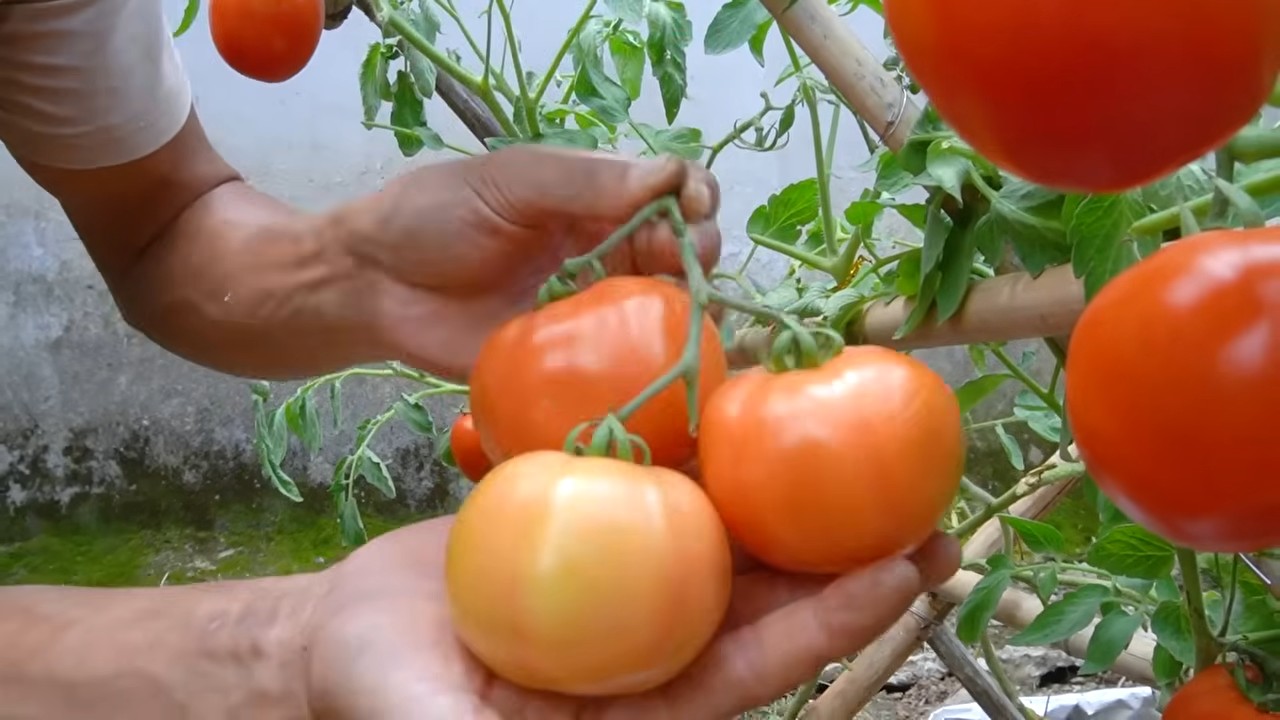
Tomato plant growth can be incredibly rewarding, but let’s be honest, sometimes it feels like you’re speaking a different language to your leafy friends! Have you ever dreamt of plump, juicy tomatoes bursting with flavor, only to be met with spindly plants and a disappointing harvest? I know I have! For centuries, cultivating tomatoes has been a cherished tradition, dating back to the Aztecs and Incas who first enjoyed these vibrant fruits. Today, growing your own tomatoes connects us to that rich history and provides a delicious, healthy food source right in our backyards.
But here’s the thing: achieving optimal tomato plant growth doesn’t have to be a mystery. That’s why I’ve compiled a collection of simple, yet effective DIY tricks and hacks that will transform your tomato-growing game. Whether you’re a seasoned gardener or just starting out, these tips will help you overcome common challenges, boost your yields, and enjoy the satisfaction of harvesting your own homegrown goodness. From clever watering techniques to DIY supports and pest control solutions, we’ll cover everything you need to know to nurture thriving tomato plants. Get ready to unlock the secrets to a bountiful tomato harvest – let’s get growing!
DIY Tomato Plant Trellis: Unleash Your Inner Gardener!
Hey there, fellow tomato enthusiasts! Are you tired of your tomato plants sprawling all over the ground, susceptible to pests and diseases? Do you dream of a bountiful harvest of juicy, sun-ripened tomatoes? Well, you’ve come to the right place! I’m going to walk you through building a super sturdy and effective tomato trellis that will not only support your plants but also make harvesting a breeze. Trust me, this DIY project is easier than you think, and the results are totally worth it.
Why Build a Trellis?
Before we dive into the nitty-gritty, let’s quickly chat about why trellising your tomato plants is a game-changer:
* Improved Air Circulation: Trellising allows for better airflow around the plant, reducing the risk of fungal diseases like blight.
* Increased Sunlight Exposure: By keeping the plant upright, more leaves get access to sunlight, leading to increased photosynthesis and, ultimately, more tomatoes!
* Easier Harvesting: No more bending over and searching through tangled foliage! Trellised tomatoes are much easier to spot and pick.
* Pest Control: Keeping the fruit off the ground minimizes contact with soil-borne pests and diseases.
* Space Saving: Trellising allows you to grow more tomato plants in a smaller area.
* Aesthetically Pleasing: Let’s be honest, a well-trellised tomato plant looks pretty darn impressive!
Choosing the Right Trellis Design
There are tons of different trellis designs out there, but I’m going to show you how to build a simple yet robust cage-style trellis using readily available materials. This design is perfect for both determinate (bush) and indeterminate (vining) tomato varieties.
Materials You’ll Need
Okay, let’s gather our supplies. Here’s what you’ll need:
* Concrete Reinforcement Mesh (Remesh): This is the star of the show! You can find it at most home improvement stores. A single sheet is usually large enough to make several trellises. Look for a mesh with relatively large openings (around 6×6 inches) to allow for easy harvesting.
* Bolt Cutters: Essential for cutting the remesh. Safety glasses are a must!
* Gloves: Protect your hands from the sharp edges of the remesh.
* Measuring Tape: For accurate cuts.
* Zip Ties (Heavy Duty): To secure the trellis into a cylindrical shape.
* Optional: Metal Stakes or Rebar: For extra support, especially for taller or heavier tomato varieties.
* Optional: Bright Colored Spray Paint: To make the trellis more visible and aesthetically pleasing.
Step-by-Step Instructions: Building Your Tomato Trellis
Alright, let’s get building!
Phase 1: Cutting the Remesh
1. Measure and Mark: Decide on the desired height and diameter of your trellis. A good height is around 4-5 feet. For the diameter, aim for around 18-24 inches. This will give your tomato plant plenty of room to grow. Use your measuring tape and a marker to mark the remesh according to your chosen dimensions. For example, if you want a 4-foot tall trellis with a 20-inch diameter, you’ll need to cut a piece of remesh that is 4 feet tall and approximately 63 inches long (circumference = pi x diameter, so 3.14 x 20 = 62.8).
2. Cut the Remesh: Put on your safety glasses and gloves! Using the bolt cutters, carefully cut along the marked lines. Take your time and make clean cuts. It’s better to cut a little long than too short.
3. Smooth the Edges (Optional): The cut edges of the remesh can be sharp. You can use a file or grinder to smooth them down, or simply be careful when handling the trellis.
Phase 2: Forming the Trellis
1. Shape the Cylinder: Carefully bend the cut piece of remesh into a cylindrical shape. This might take a little muscle, but the remesh is surprisingly flexible.
2. Secure the Seam: Overlap the ends of the remesh by a few inches. Using heavy-duty zip ties, secure the overlapping sections together. Space the zip ties about every 6-8 inches along the seam. Make sure the zip ties are tight and secure. Trim off the excess zip tie ends with scissors or wire cutters.
Phase 3: Adding Support (Optional)
1. Insert Stakes or Rebar: If you’re growing tall or heavy tomato varieties, or if you live in a windy area, you might want to add extra support to your trellis. Drive metal stakes or rebar into the ground around the outside of the trellis.
2. Attach Trellis to Stakes: Use zip ties or wire to attach the trellis to the stakes. This will help prevent the trellis from tipping over.
Phase 4: Painting (Optional)
1. Prepare the Trellis: If you want to paint your trellis, make sure it’s clean and dry.
2. Apply Paint: Use a spray paint designed for metal. Apply several thin coats, allowing each coat to dry completely before applying the next. Choose a bright color to make the trellis more visible in your garden.
Installing Your Trellis
1. Choose the Right Location: Select a sunny spot in your garden that gets at least 6-8 hours of sunlight per day.
2. Prepare the Soil: Make sure the soil is well-drained and amended with compost or other organic matter.
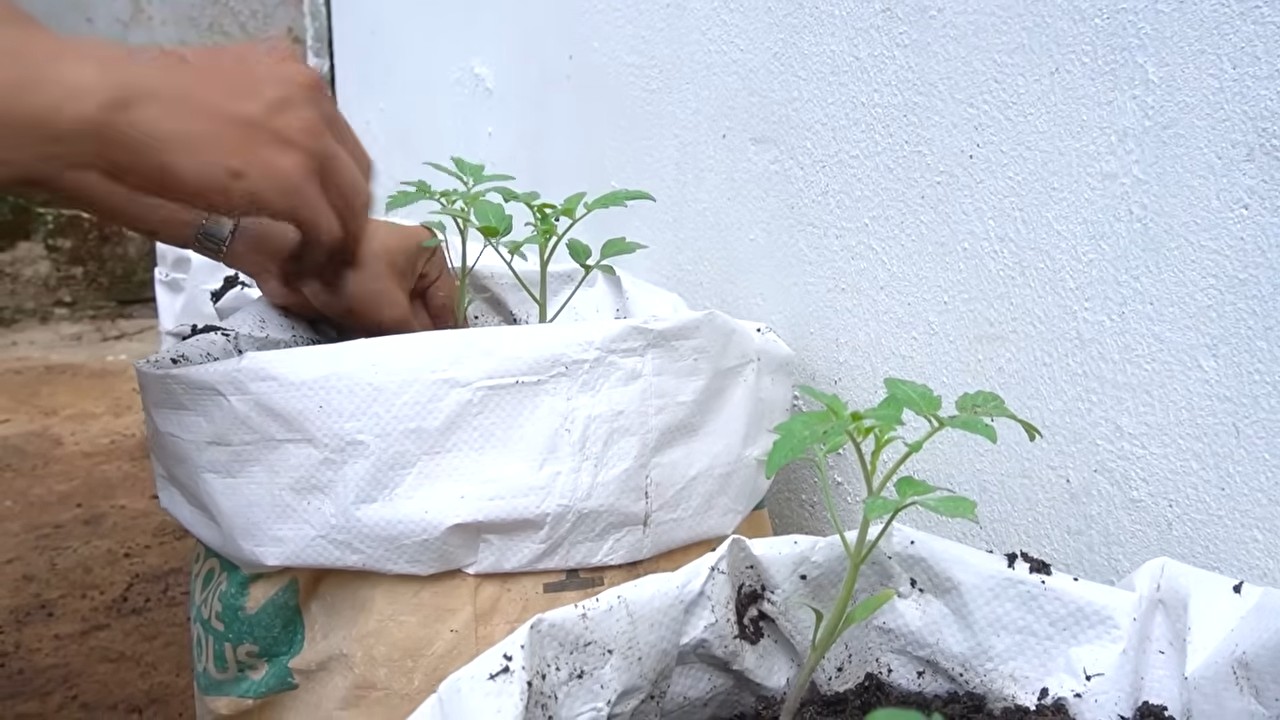
3. Plant Your Tomato Seedling: Dig a hole large enough to accommodate the root ball of your tomato seedling. Gently remove the seedling from its container and place it in the hole. Backfill with soil and water thoroughly.
4. Position the Trellis: Carefully place the trellis around the tomato seedling, making sure the plant is centered inside the cage. Gently guide any existing branches through the openings in the mesh.
5. Secure the Trellis (If Needed): If you’re using stakes or rebar, make sure they are firmly planted in the ground and securely attached to the trellis.
Maintaining Your Trellis
1. Guide the Growth: As your tomato plant grows, gently guide the branches through the openings in the mesh. This will help the plant stay upright and prevent it from becoming too crowded.
2. Prune as Needed: Prune away any suckers (small shoots that grow between the main stem and the branches) to encourage more fruit production.
3. Water and Fertilize Regularly: Water your tomato plant deeply and regularly, especially during hot, dry weather. Fertilize with a balanced fertilizer according to the package directions.
4. Harvest Your Tomatoes: Once your tomatoes are ripe, harvest them regularly. This will encourage the plant to produce more fruit.
Tips and Tricks for Success
* Use Heavy-Duty Zip Ties: Don’t skimp on the zip ties! Use heavy-duty zip ties to ensure that your trellis stays securely fastened.
* Consider the Variety: Choose a trellis design that is appropriate for the type of tomato you are growing. Determinate varieties (bush tomatoes) don’t need as much support as indeterminate varieties (vining tomatoes).
* Don’t Be Afraid to Experiment: There are many different ways to build a tomato trellis. Don’t be afraid to experiment and find what works best for you.
* Recycle and Reuse: You can reuse your tomato trellises year after year. Simply clean them off at the end of the season and store them in a dry place.
* Safety First: Always wear safety glasses and gloves when working with remesh and bolt cutters.
Troubleshooting
* Trellis Tipping Over: If your trellis is tipping over, add more stakes or rebar for extra support. You can also try burying the bottom of the trellis a few inches into the ground.
* Plant Outgrowing Trellis: If your tomato plant is outgrowing the trellis, you can add an extension to the top of the trellis using more remesh and zip ties.
* Zip Ties Breaking: If your zip ties are breaking, use heavier-duty zip ties or replace them with wire.
Alternative Materials
While I highly recommend using concrete reinforcement mesh for its durability and ease of use, here are a few alternative materials you could consider:
* Wooden Stakes and Twine: This is a more traditional method of trellising tomatoes. You’ll need to drive wooden stakes into the ground and then tie the tomato plant to the stakes using twine.
* Bamboo Poles: Bamboo poles are another good option for trellising tomatoes. They are lightweight and relatively inexpensive.
* Cattle Panels: Cattle panels are similar to concrete reinforcement mesh, but they are typically larger and
Conclusion
So, there you have it! This simple, yet incredibly effective DIY trick for boosting your tomato plant growth is a game-changer for any gardener, regardless of experience level. We’ve walked you through the process, highlighting the science behind why it works, and hopefully, dispelled any doubts you might have had.
Why is this a must-try? Because it’s a cost-effective, environmentally friendly way to significantly improve your tomato yield. Forget expensive fertilizers laden with chemicals. This method leverages readily available resources and harnesses the natural power of decomposition to create a nutrient-rich environment for your tomato plants. Imagine plucking plump, juicy, and flavorful tomatoes from your garden, knowing you achieved it with a simple, sustainable technique. The satisfaction is unparalleled!
But the benefits extend beyond just increased yield. This DIY approach also promotes healthier plants, making them more resistant to diseases and pests. A stronger root system, thanks to the enhanced nutrient availability, translates to a more resilient plant capable of withstanding environmental stressors. You’ll spend less time battling common tomato plant ailments and more time enjoying the fruits (literally!) of your labor.
Looking for variations? Absolutely! While we’ve focused on a specific method, feel free to experiment with different organic materials. Coffee grounds, crushed eggshells, or even banana peels can be added to the mix to further enrich the soil. Just remember to research the specific nutrient content of each material and adjust the quantities accordingly. You can also tailor the application frequency based on your soil type and the specific needs of your tomato plants. Observe your plants closely and adjust as needed. Some gardeners find that a weekly application works best, while others prefer a bi-weekly approach.
Don’t be afraid to get creative and adapt this DIY trick to your unique gardening situation. The key is to understand the underlying principles – providing a slow-release source of nutrients and improving soil health – and then experiment to find what works best for you.
We are confident that this DIY trick will revolutionize your tomato gardening experience. It’s easy, affordable, and incredibly rewarding. So, what are you waiting for? Give it a try and witness the transformation firsthand!
We’re eager to hear about your results! Share your experiences, tips, and variations in the comments below. Let’s build a community of tomato-growing enthusiasts and learn from each other. Your insights could help other gardeners achieve their tomato-growing dreams. Remember to document your progress with photos and videos – we’d love to see your thriving tomato plants! Let us know if this DIY trick helped your tomato plant growth!
Frequently Asked Questions (FAQ)
What exactly does this DIY trick do for tomato plant growth?
This DIY trick primarily focuses on enriching the soil around your tomato plants with essential nutrients. It acts as a slow-release fertilizer, providing a steady stream of nourishment over time. This is crucial for tomato plants, which are heavy feeders and require a consistent supply of nutrients, especially nitrogen, phosphorus, and potassium, to support vigorous growth, abundant flowering, and the development of large, flavorful fruits. By improving soil health and nutrient availability, this trick promotes stronger root systems, healthier foliage, and ultimately, a significantly higher yield of tomatoes. It also helps improve the soil structure, allowing for better drainage and aeration, which are vital for healthy root development.
How often should I apply this DIY trick to my tomato plants?
The frequency of application depends on several factors, including your soil type, the age and size of your tomato plants, and the specific ingredients you’re using in your DIY mixture. As a general guideline, you can start with an application every two weeks. Observe your plants closely for signs of nutrient deficiencies, such as yellowing leaves or stunted growth. If you notice these signs, you may need to increase the frequency of application to once a week. Conversely, if your plants are growing vigorously and appear healthy, you can reduce the frequency to once every three weeks. Remember, it’s always better to err on the side of caution and start with a less frequent application, gradually increasing it as needed.
Can I use this DIY trick on other plants besides tomatoes?
Yes, absolutely! While this trick is particularly beneficial for tomato plants due to their high nutrient requirements, it can also be used on other heavy-feeding plants, such as peppers, eggplants, and cucumbers. The key is to adjust the ingredients and quantities based on the specific needs of each plant. For example, leafy greens may require a higher proportion of nitrogen, while flowering plants may benefit from a higher proportion of phosphorus. Research the specific nutrient requirements of the plants you’re growing and tailor your DIY mixture accordingly. Always observe your plants closely for any signs of nutrient imbalances and adjust your application accordingly.
What if I don’t have all the ingredients listed in the recipe? Can I substitute them?
Yes, you can definitely substitute ingredients based on what you have available. The core principle is to provide a balanced mix of nutrients. For example, if you don’t have access to a specific type of compost, you can use another type of organic matter, such as well-rotted manure or leaf mold. If you don’t have bone meal, you can use another source of phosphorus, such as rock phosphate. The important thing is to understand the nutrient content of each ingredient and choose substitutes that provide similar benefits. Remember to research the specific nutrient content of your substitutes and adjust the quantities accordingly.
Is this DIY trick safe for organic gardening?
Yes, this DIY trick is perfectly safe for organic gardening, as long as you use organic ingredients. Avoid using any synthetic fertilizers or pesticides in your DIY mixture. Stick to natural, organic materials, such as compost, manure, bone meal, and other organic amendments. This will ensure that your tomatoes are grown in a healthy, sustainable, and environmentally friendly way. Always check the labels of any ingredients you use to ensure that they are certified organic.
My tomato plants are already producing fruit. Is it too late to use this DIY trick?
No, it’s never too late to use this DIY trick! Even if your tomato plants are already producing fruit, providing them with a boost of nutrients can still improve the size, flavor, and overall quality of your tomatoes. In fact, many gardeners find that applying this trick during the fruiting stage can lead to a significant increase in yield and a noticeable improvement in the taste of their tomatoes. Just be sure to apply the mixture carefully, avoiding direct contact with the fruits to prevent any potential damage.
Can I use this DIY trick on container-grown tomato plants?
Yes, this DIY trick is also suitable for container-grown tomato plants. However, you’ll need to adjust the quantities of ingredients based on the size of the container. Container-grown plants tend to dry out more quickly than plants grown in the ground, so you may also need to water them more frequently. Be sure to monitor the moisture levels in the container and adjust your watering schedule accordingly. Also, remember that container soil will deplete nutrients faster than garden soil, so you may need to apply the DIY trick more frequently.
What are some signs that my tomato plants are not getting enough nutrients?
There are several signs that indicate your tomato plants may not be getting enough nutrients. These include yellowing leaves (especially older leaves), stunted growth, weak stems, poor flowering, and small or misshapen fruits. The specific symptoms will vary depending on which nutrients are deficient. For example, a nitrogen deficiency typically manifests as yellowing of the lower leaves, while a phosphorus deficiency can cause stunted growth and purplish leaves. If you notice any of these signs, it’s important to take action quickly to address the nutrient deficiency. Applying this DIY trick can help to replenish the soil with essential nutrients and restore your tomato plants to health.


Leave a Comment