
Growing peanuts in buckets might sound like a quirky experiment, but trust me, it’s a surprisingly rewarding and space-saving way to enjoy fresh, homegrown peanuts! Forget acres of farmland; with a little know-how, you can cultivate these delicious legumes right on your patio, balcony, or even indoors.
Peanuts, originally from South America, have a rich history, dating back thousands of years. They’ve become a staple in cuisines worldwide, from savory dishes to sweet treats. But have you ever considered growing your own? It’s easier than you think!
In today’s fast-paced world, connecting with nature can be a real challenge. That’s where DIY gardening comes in. Growing peanuts in buckets offers a fantastic opportunity to get your hands dirty, learn about plant life cycles, and enjoy the satisfaction of harvesting your own food. Plus, it’s a fantastic project for families, teaching kids about where their food comes from.
This article is your ultimate guide to successfully growing peanuts in buckets. We’ll cover everything from choosing the right variety and preparing your containers to nurturing your plants and harvesting your bounty. Get ready to embark on a fun and fulfilling gardening adventure!
Growing Peanuts in Buckets: A Beginner’s Guide
Hey there, fellow gardening enthusiasts! Ever thought about growing your own peanuts? It might sound a bit unusual, especially if you don’t have a sprawling farm, but trust me, it’s totally doable – and surprisingly rewarding – even in buckets! I’ve been experimenting with this for a few seasons now, and I’m excited to share my tips and tricks for a successful peanut harvest, right from your patio or balcony.
Why Grow Peanuts in Buckets?
Before we dive into the how-to, let’s talk about why bucket gardening is perfect for peanuts:
* Space-Saving: Peanuts need room to spread their roots, but buckets offer a contained environment that’s ideal for smaller spaces.
* Control: You have complete control over the soil quality, watering, and sunlight exposure.
* Mobility: Need to move your plants to chase the sun or protect them from frost? No problem! Buckets make it easy.
* Fun and Educational: It’s a fantastic project for kids (and adults!) to learn about plant life cycles.
What You’ll Need
Okay, let’s gather our supplies. Here’s what you’ll need to get started:
* Large Buckets: 5-gallon buckets are a good starting point, but bigger is better. I’ve had success with 10-gallon buckets as well. Make sure they have drainage holes!
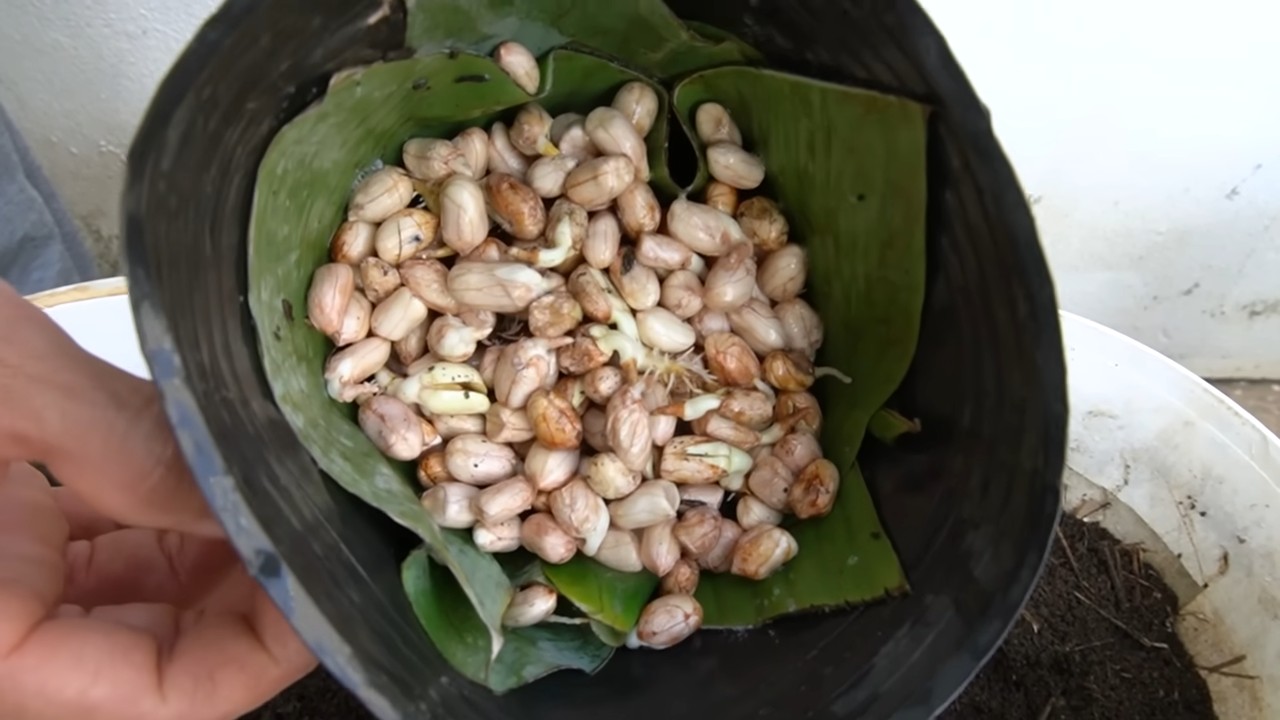
* Peanut Seeds: Raw, unroasted peanuts from a reputable source. Avoid salted or roasted peanuts, as they won’t germinate. Spanish or Valencia varieties tend to do well in containers.
* Potting Mix: A well-draining potting mix is crucial. Avoid using garden soil, as it can compact and hinder root growth. I like to use a mix of compost, peat moss, and perlite.
* Water: Essential for keeping your peanut plants hydrated.
* Sunlight: Peanuts need at least 6-8 hours of direct sunlight per day.
* Optional:
* Liquid fertilizer (for feeding your plants)
* Pea gravel or small stones (for drainage)
* Mulch (to retain moisture and suppress weeds)
Step-by-Step Guide to Growing Peanuts in Buckets
Alright, let’s get our hands dirty! Here’s the step-by-step process I follow:
1. Preparing the Buckets
* Drill Drainage Holes: If your buckets don’t already have them, drill several drainage holes in the bottom. This is super important to prevent waterlogging, which can rot the peanut pods.
* Add Drainage Layer (Optional): I like to add a layer of pea gravel or small stones to the bottom of the bucket to further improve drainage. This isn’t strictly necessary, but I find it helps.
* Fill with Potting Mix: Fill the bucket with your well-draining potting mix, leaving a few inches of space at the top.
2. Planting the Peanut Seeds
* Soak the Seeds (Optional): Some people recommend soaking the peanut seeds in water for a few hours before planting to help them germinate faster. I’ve tried it both ways and haven’t noticed a huge difference, but it can’t hurt.
* Planting Depth: Plant the peanut seeds about 1-2 inches deep in the potting mix.
* Spacing: If you’re using a 5-gallon bucket, plant 2-3 seeds per bucket. For larger buckets, you can plant more, but don’t overcrowd them.
* Water Gently: Water the soil gently after planting, making sure not to wash away the seeds.
3. Caring for Your Peanut Plants
* Sunlight: Place the buckets in a location that receives at least 6-8 hours of direct sunlight per day.
* Watering: Water regularly, keeping the soil consistently moist but not waterlogged. Check the soil moisture by sticking your finger in the soil. If it feels dry an inch or two down, it’s time to water.
* Fertilizing: Peanuts are heavy feeders, so you’ll need to fertilize them regularly. I like to use a liquid fertilizer diluted to half strength every 2-3 weeks. Look for a fertilizer that’s balanced in nitrogen, phosphorus, and potassium.
* Hilling: As the peanut plants grow, they’ll produce “pegs” that grow downwards from the plant and into the soil. These pegs are what will eventually become the peanut pods. To encourage pod development, you can “hill” the soil around the base of the plants, covering the pegs with soil. I usually do this a few times during the growing season.
* Weeding: Keep the buckets free of weeds, as they can compete with the peanut plants for nutrients and water.
* Pest Control: Peanuts are generally pest-resistant, but keep an eye out for common garden pests like aphids or spider mites. If you spot any pests, treat them with an appropriate insecticide or organic pest control method.
4. Harvesting Your Peanuts
* Timing: Peanuts typically take 120-150 days to mature, depending on the variety and growing conditions. You’ll know it’s time to harvest when the leaves start to turn yellow and the plants begin to die back.
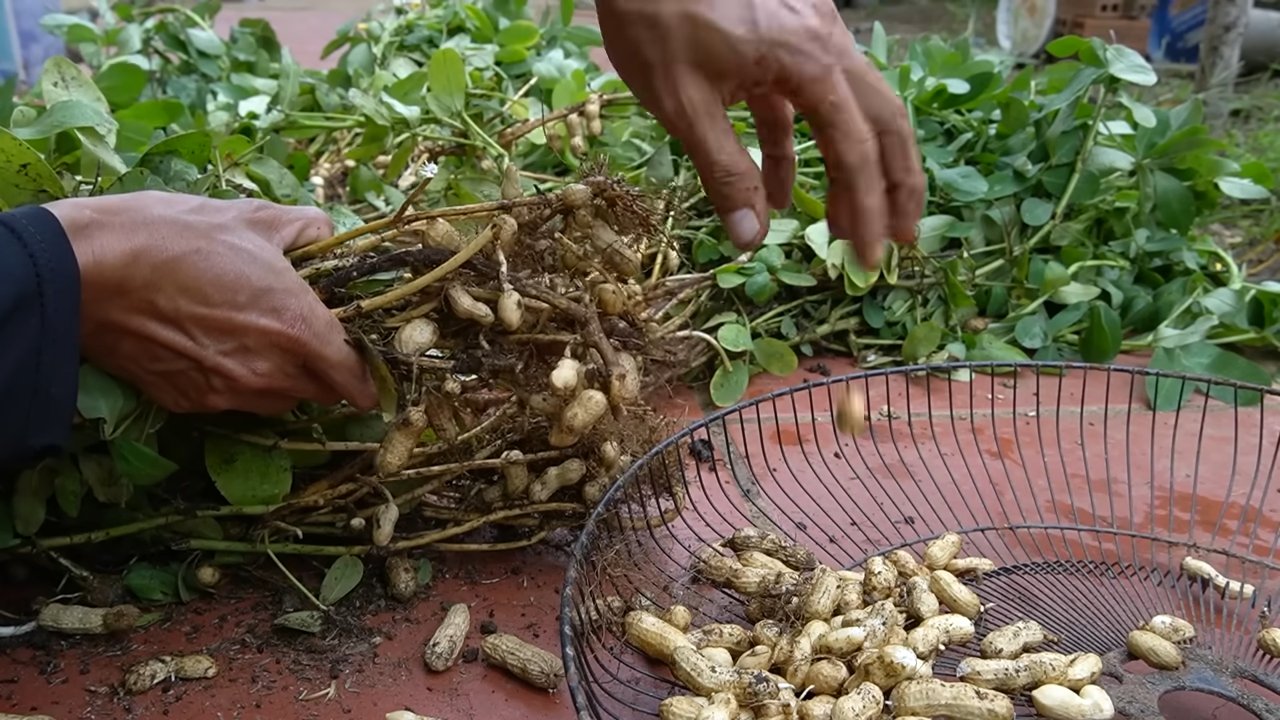
* Digging Up the Plants: Carefully dig up the entire plant, being careful not to damage the peanut pods.
* Cleaning the Peanuts: Gently shake off the excess soil from the peanut pods.
* Curing the Peanuts: This is a crucial step for developing the flavor of the peanuts. Hang the entire plant upside down in a well-ventilated area for 2-4 weeks, or until the peanut pods are completely dry.
* Shelling the Peanuts: Once the peanuts are cured, you can shell them and enjoy them raw, roasted, or in your favorite peanut recipes!
Troubleshooting Tips
Even with the best planning, things can sometimes go wrong. Here are a few common problems you might encounter and how to fix them:
* Poor Germination: If your peanut seeds don’t germinate, it could be due to several factors, such as old seeds, poor soil quality, or improper watering. Make sure you’re using fresh seeds from a reputable source, and that your soil is well-draining and consistently moist.
* Yellowing Leaves: Yellowing leaves can be a sign of nutrient deficiency, overwatering, or underwatering. Check the soil moisture and fertilize your plants if necessary.
* Lack of Pod Production: If your peanut plants are growing well but not producing many pods, it could be due to insufficient sunlight, poor soil quality, or lack of hilling. Make sure your plants are getting enough sunlight, fertilize them regularly, and hill the soil around the base of the plants to encourage pod development.
* Pest Infestations: Keep an eye out for common garden pests and treat them promptly with an appropriate insecticide or organic pest control method.
Choosing the Right Peanut Variety
Not all peanut varieties are created equal, especially when it comes to container gardening. Here are a few varieties that I’ve found to be particularly well-suited for growing in buckets:
* Spanish Peanuts: These are small, compact plants that produce small, flavorful peanuts. They’re a good choice for smaller buckets.
* Valencia Peanuts: These are slightly larger than Spanish peanuts and produce multiple peanuts per pod. They’re also relatively early-maturing, which is a bonus.
* Virginia Peanuts: These are the largest type of peanut and require more space. While you can grow them in buckets, you’ll need a larger bucket and more space between plants.
Extra Tips for Peanut-Growing Success
Here are a few extra tips that I’ve learned over the years that can help you maximize your peanut harvest:
* Start Indoors: If you live in a cooler climate with a shorter growing season, you can start your peanut seeds indoors a few weeks before the last frost. This will give them a head start and allow you to harvest peanuts earlier in the fall.
* Use a Self-Watering Bucket: Self-watering buckets can help to regulate soil moisture and prevent overwatering or underwatering.
* Add Mycorrhizae: Mycorrhizae are beneficial fungi that can help plants absorb nutrients from the soil. Adding mycorrhizae to your potting mix can improve the health and vigor of your peanut plants.
* Rotate Your Crops: Don’t plant peanuts in the same bucket year after year. Rotate your crops to prevent soilborne diseases and nutrient depletion.
Growing peanuts in buckets is a fun and rewarding experience that anyone can enjoy. With a little bit of planning and care, you can harvest your own delicious peanuts right from your patio or balcony. So, what are you waiting for? Get out there and start growing
Conclusion
So, there you have it! Growing peanuts in buckets is not just a quirky gardening experiment; it’s a genuinely rewarding and surprisingly accessible way to cultivate your own delicious, homegrown snacks. We’ve walked through the entire process, from selecting the right peanut variety and preparing your buckets to nurturing your plants and harvesting your bounty. The beauty of this method lies in its simplicity and adaptability. Whether you’re a seasoned gardener with limited space or a curious beginner eager to try something new, growing peanuts in buckets offers a fantastic opportunity to connect with nature and enjoy the fruits (or rather, nuts!) of your labor.
Why is this DIY trick a must-try? Because it democratizes peanut cultivation! No longer do you need acres of farmland to enjoy freshly grown peanuts. Buckets provide a contained, manageable environment, perfect for patios, balconies, or even sunny indoor spaces. You gain complete control over the soil quality, watering schedule, and pest management, leading to healthier plants and a more abundant harvest. Plus, there’s an undeniable satisfaction in watching those tiny peanut plants flourish and eventually yield a crop of crunchy, flavorful peanuts. It’s a tangible connection to the food you eat, a reminder of the magic of nature, and a fun, educational experience for the whole family.
But the adventure doesn’t stop there! Feel free to experiment with different peanut varieties to discover your personal favorite. Virginia peanuts, known for their large size and excellent roasting quality, are a popular choice. Valencia peanuts, with their multiple small nuts per shell, offer a sweeter flavor. Or, try Spanish peanuts, which are often used in candies and snacks. The possibilities are endless!
Consider adding companion plants to your peanut buckets to enhance growth and deter pests. Marigolds, with their vibrant colors and pungent scent, are excellent at repelling nematodes and other harmful insects. Basil, another aromatic herb, can also help to keep pests away. And don’t be afraid to get creative with your container design. Use decorative pots, add trellises for support, or even paint your buckets to match your personal style.
Remember, successful peanut cultivation requires patience and attention. Regularly check your plants for signs of pests or diseases, and adjust your watering schedule as needed. Don’t be discouraged if you encounter challenges along the way. Gardening is a learning process, and every mistake is an opportunity to grow (pun intended!).
Ultimately, the goal is to enjoy the journey and savor the taste of your homegrown peanuts. Whether you roast them, boil them, or use them in your favorite recipes, you’ll appreciate the unique flavor and freshness that only homegrown peanuts can provide.
So, what are you waiting for? Grab a few buckets, some peanut seeds, and get ready to embark on your own peanut-growing adventure! We’re confident that you’ll be amazed by the results. And most importantly, we encourage you to share your experiences with us. Post photos of your peanut plants, share your tips and tricks, and let us know what you’ve learned along the way. Together, we can create a community of peanut-loving gardeners and spread the joy of growing your own food. Let’s all get started **growing peanuts in buckets** today!
Frequently Asked Questions (FAQ)
What kind of peanuts should I use to start growing peanuts in buckets?
You should use raw, unsalted peanuts that are specifically labeled for planting. Roasted or salted peanuts will not germinate. Look for varieties like Virginia, Valencia, or Spanish peanuts, depending on your preference. Virginia peanuts are larger and great for roasting, Valencia are sweeter, and Spanish are often used in candies. Local nurseries or seed suppliers are your best bet for finding suitable peanut seeds. Avoid using peanuts from the grocery store snack aisle, as they are often treated to prevent sprouting.
How big of a bucket do I need for growing peanuts?
A five-gallon bucket is generally recommended for growing peanuts. This size provides enough space for the roots to develop and for the plant to produce a decent yield. You can use larger buckets if you prefer, but five gallons is a good starting point. Ensure the bucket has drainage holes to prevent waterlogging.
What kind of soil is best for growing peanuts in buckets?
Peanuts prefer well-draining, sandy loam soil. A good mix would be equal parts potting soil, sand, and compost. The sand helps with drainage, while the compost provides essential nutrients. Avoid heavy clay soils, as they can become waterlogged and hinder peanut development. You can also purchase a pre-made potting mix specifically designed for vegetables.
How often should I water my peanut plants in buckets?
Water your peanut plants regularly, especially during hot and dry weather. The soil should be kept consistently moist but not waterlogged. Check the soil moisture by sticking your finger about an inch deep. If it feels dry, it’s time to water. Water deeply, allowing the water to drain out of the bottom of the bucket. Avoid overhead watering, as this can promote fungal diseases.
How much sunlight do peanut plants need?
Peanut plants need at least six to eight hours of direct sunlight per day. Choose a sunny location for your buckets where the plants will receive ample sunlight. If you’re growing peanuts indoors, you may need to supplement with grow lights.
When is the best time to plant peanuts in buckets?
The best time to plant peanuts is after the last frost, when the soil has warmed up to at least 65 degrees Fahrenheit. In most regions, this is typically in late spring or early summer. You can start peanut seeds indoors a few weeks before the last frost to get a head start.
How long does it take for peanuts to grow in buckets?
Peanuts typically take about 120 to 150 days to mature, depending on the variety and growing conditions. Be patient, as it takes time for the plants to flower, produce pegs (the stems that grow down into the soil), and develop peanuts.
How do I know when my peanuts are ready to harvest?
The best way to tell if your peanuts are ready to harvest is to check the foliage. When the leaves start to turn yellow and brown, and the plant begins to wilt, it’s a sign that the peanuts are mature. You can also dig up a few plants to check the peanuts themselves. The shells should be well-formed and the kernels should be plump and fully developed.
What are common pests and diseases that affect peanut plants in buckets?
Common pests that can affect peanut plants include aphids, spider mites, and nematodes. Diseases include leaf spot and root rot. Regularly inspect your plants for signs of pests or diseases. Use organic pest control methods, such as insecticidal soap or neem oil, to control pests. Ensure good drainage to prevent root rot.
Can I grow peanuts indoors in buckets?
Yes, you can grow peanuts indoors in buckets, but you’ll need to provide adequate light and warmth. Place the buckets in a sunny window or use grow lights to supplement natural light. Maintain a consistent temperature of around 70-80 degrees Fahrenheit.
How do I cure and store my harvested peanuts?
After harvesting, shake off any excess soil and allow the peanuts to dry in a well-ventilated area for several weeks. You can spread them out on a screen or hang them in mesh bags. Once the shells are dry and brittle, you can store the peanuts in airtight containers in a cool, dry place. You can also roast them for a longer shelf life.
Leave a Comment