
Growing potatoes in containers might sound like something only seasoned gardeners can achieve, but trust me, it’s a surprisingly simple and rewarding DIY project that anyone can tackle! Forget acres of farmland; you can enjoy freshly harvested potatoes even if you only have a small balcony or patio.
For centuries, potatoes have been a staple food source, playing a vital role in cultures worldwide. From the Andean highlands where they originated to the humble Irish potato famine, this versatile tuber has a rich and complex history. Now, you can connect with that history in your own small way, right in your backyard (or balcony!).
Why should you try growing potatoes in containers? Well, for starters, it’s incredibly space-efficient. Plus, it gives you complete control over the soil conditions, minimizing the risk of pests and diseases. Imagine the satisfaction of digging into a container and unearthing your own homegrown potatoes – fresher and tastier than anything you’ll find in the store! This DIY guide will walk you through every step, from choosing the right container and seed potatoes to harvesting your delicious crop. Let’s get started and turn your small space into a potato paradise!
Growing Potatoes in Containers: A Bountiful Harvest from Your Patio!
Hey there, fellow gardening enthusiasts! Ever dreamed of harvesting your own potatoes, fresh from the earth (or, in this case, a container)? Well, dream no more! Growing potatoes in containers is surprisingly easy, even if you don’t have a sprawling garden. It’s a fantastic way to enjoy homegrown spuds, and I’m here to guide you through every step of the process. Let’s get our hands dirty!
Choosing the Right Container and Seed Potatoes
Before we dive into the planting, let’s talk about the essentials: the container and the seed potatoes. These are crucial for a successful potato harvest.
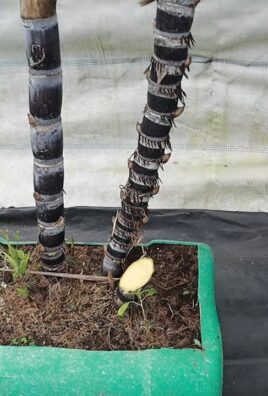
* Container Size Matters: You’ll need a container that’s at least 15 gallons in size. The bigger, the better! Think large buckets, trash cans (with drainage holes, of course!), or even grow bags specifically designed for potatoes. The depth is key, as potatoes grow vertically along the stem. Aim for at least 18 inches deep.
* Material Considerations: Plastic containers are lightweight and readily available, but they can heat up quickly in direct sunlight. Terracotta pots are more breathable but can be heavy. Grow bags are a great option because they allow for good drainage and airflow.
* Drainage is Non-Negotiable: Potatoes hate sitting in soggy soil. Ensure your container has plenty of drainage holes. If not, drill some!
* Seed Potato Selection: Don’t just grab any potato from the grocery store! Those are often treated to prevent sprouting. You need “seed potatoes,” which are specifically grown for planting. You can find them at your local garden center or online.
* Variety is the Spice of Life (and Potatoes!): Consider what kind of potatoes you enjoy eating. Russets are great for baking, Yukon Golds are perfect for mashed potatoes, and red potatoes are delicious boiled or roasted. Choose a variety that suits your taste.
* Chitting Your Seed Potatoes (Optional but Recommended): “Chitting” simply means encouraging your seed potatoes to sprout before planting. This gives them a head start and can lead to an earlier harvest. To chit, place your seed potatoes in a cool, bright location (but not direct sunlight) for a few weeks. You’ll see small, green sprouts emerge from the “eyes” of the potato.
Preparing Your Container and Soil
Now that we have our container and seed potatoes ready, let’s prepare the planting environment.
* Cleaning Your Container: If you’re reusing a container, give it a good scrub with soap and water to remove any lingering dirt or debris.
* Choosing the Right Soil: Potatoes need well-draining, slightly acidic soil. A mix of potting soil, compost, and peat moss is ideal. Avoid using garden soil, as it can be too heavy and compact.
* Creating the Initial Soil Layer: Fill the bottom of your container with about 4-6 inches of your soil mixture. This will be the starting point for your potato plants.
Planting Your Seed Potatoes
Alright, the moment we’ve been waiting for! Let’s get those potatoes in the ground (or, rather, the container).
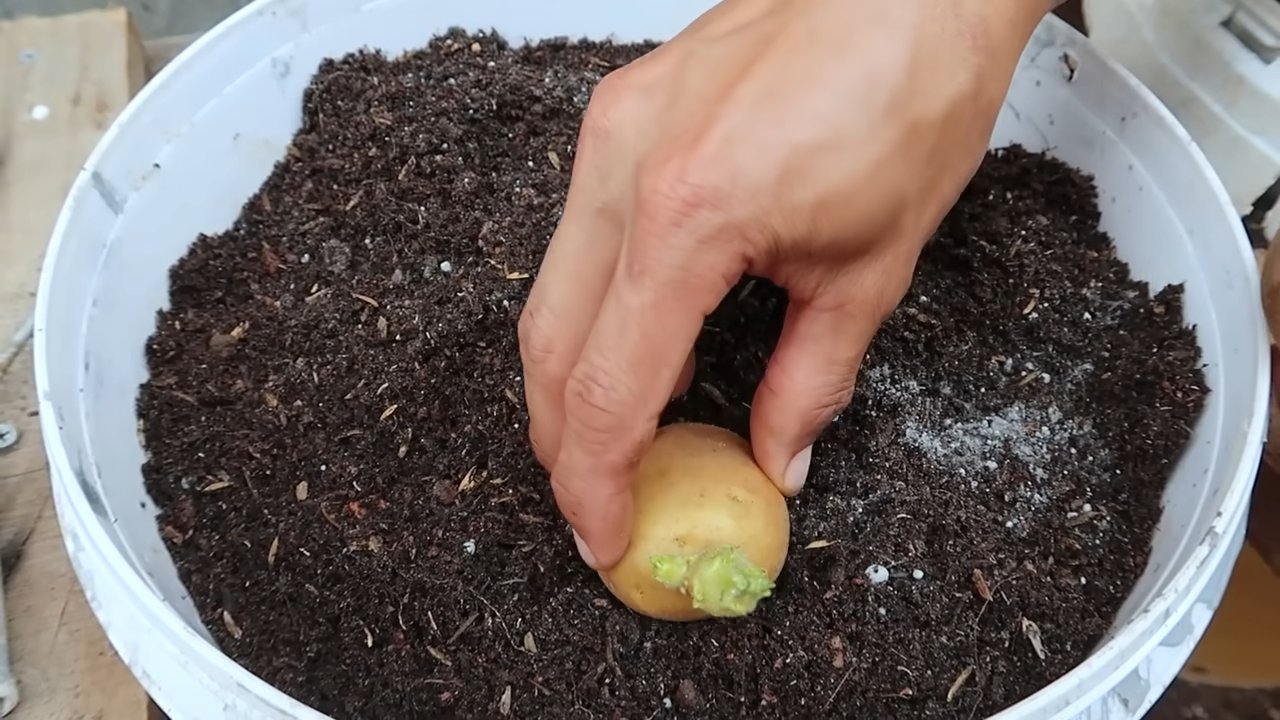
1. Cutting Seed Potatoes (If Necessary): If your seed potatoes are large (bigger than an egg), you can cut them into smaller pieces, ensuring each piece has at least one or two “eyes” (those little sprouts). Let the cut pieces dry for a day or two to prevent rotting. If your seed potatoes are small, you can plant them whole.
2. Planting the Seed Potatoes: Place your seed potatoes (or potato pieces) on top of the soil layer, with the sprouts facing upwards. Space them evenly, about 8-10 inches apart if you’re planting multiple potatoes in the same container.
3. Covering the Seed Potatoes: Cover the seed potatoes with another 4-6 inches of soil. Gently water the soil until it’s moist but not soggy.
The “Hilling” Process: Key to a Bountiful Harvest
This is where the magic happens! “Hilling” is the process of adding more soil to the container as the potato plants grow. This encourages the plants to produce more potatoes along the buried stem.
1. Waiting for Growth: After planting, it will take a week or two for the potato plants to emerge from the soil. Be patient!
2. The First Hilling: Once the plants are about 6-8 inches tall, it’s time for the first hilling. Add more soil to the container, burying the stems up to the bottom set of leaves. Leave the top few leaves exposed.
3. Subsequent Hillings: Continue hilling every 2-3 weeks as the plants grow, always burying the stems up to the bottom set of leaves. This encourages the plants to produce more and more potatoes along the stem.
4. Watering After Hilling: After each hilling, water the soil thoroughly.
Caring for Your Potato Plants
Now that your potatoes are planted and hilling is underway, let’s talk about ongoing care.
* Watering: Potatoes need consistent moisture, especially during flowering and tuber formation. Water deeply whenever the top inch of soil feels dry. Avoid overwatering, as this can lead to rot.
* Sunlight: Potatoes need at least 6-8 hours of sunlight per day. Place your container in a sunny location.
* Fertilizing: Feed your potato plants with a balanced fertilizer every few weeks. Look for a fertilizer that’s specifically formulated for vegetables.
* Pest Control: Keep an eye out for pests like aphids, potato beetles, and flea beetles. Handpick them off the plants or use an organic insecticide if necessary.
* Disease Prevention: Potatoes can be susceptible to diseases like blight. Ensure good air circulation around the plants and avoid overhead watering.
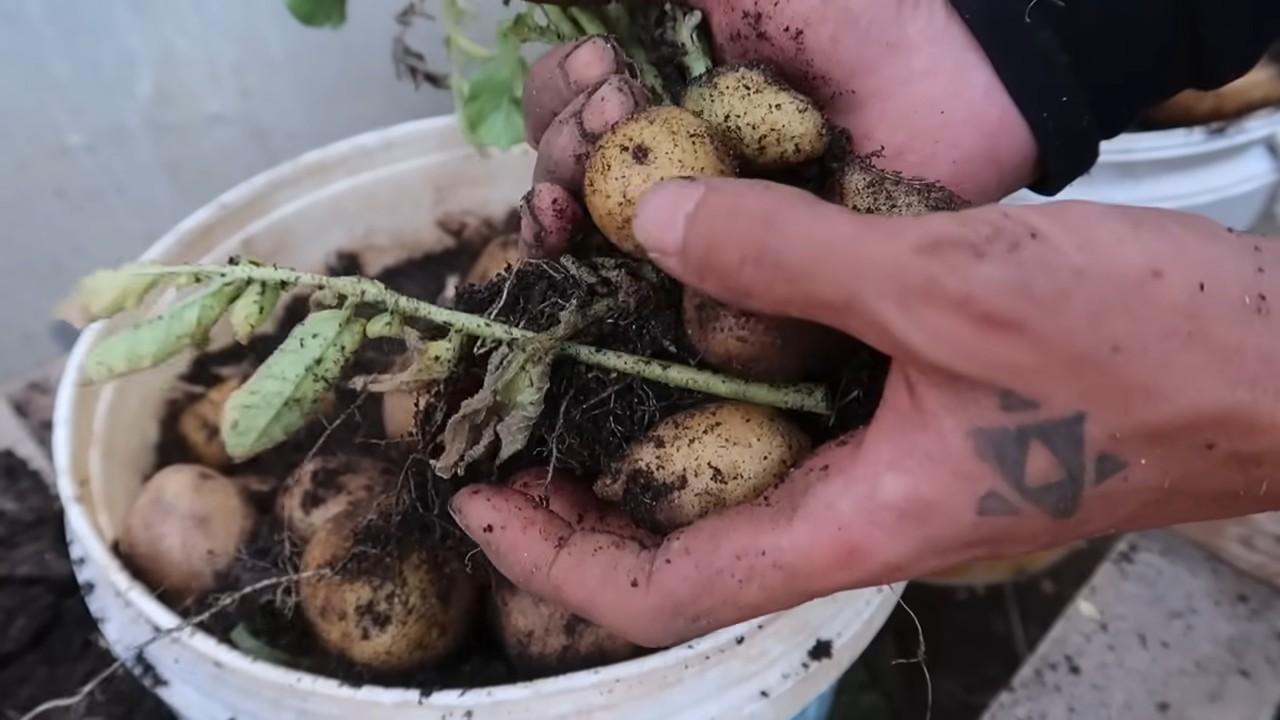
Harvesting Your Potatoes
The most exciting part! Here’s how to know when your potatoes are ready to harvest.
1. Timing is Everything: Potatoes are typically ready to harvest about 70-90 days after planting, depending on the variety.
2. Signs of Maturity: The foliage will start to turn yellow and die back. This is a sign that the potatoes are maturing.
3. Gentle Exploration: You can gently dig around the edges of the container to check the size of the potatoes. If they’re the size you want, it’s time to harvest!
4. Harvesting Techniques: Carefully tip the container onto its side and gently remove the potatoes from the soil. Be careful not to damage them.
5. Curing Your Potatoes: After harvesting, cure your potatoes by spreading them out in a cool, dark, and well-ventilated place for a week or two. This will help them develop a thicker skin and improve their storage life.
Troubleshooting Common Issues
Even with the best care, you might encounter some challenges along the way
Hey there, fellow gardening enthusiasts! Ever dreamed of harvesting your own potatoes, fresh from the earth (or, in this case, a container)? Well, dream no more! Growing potatoes in containers is surprisingly easy, even if you don’t have a sprawling garden. It’s a fantastic way to enjoy homegrown spuds, and I’m here to guide you through every step of the process. Let’s get our hands dirty!
Choosing the Right Container and Seed Potatoes
Before we dive into the planting, let’s talk about the essentials: the container and the seed potatoes. These are crucial for a successful potato harvest.
* Container Size Matters: You’ll need a container that’s at least 15 gallons in size. The bigger, the better! Think large buckets, trash cans (with drainage holes, of course!), or even grow bags specifically designed for potatoes. The depth is key, as potatoes grow vertically along the stem. Aim for at least 18 inches deep.
* Material Considerations: Plastic containers are lightweight and readily available, but they can heat up quickly in direct sunlight. Terracotta pots are more breathable but can be heavy. Grow bags are a great option because they allow for good drainage and airflow.
* Drainage is Non-Negotiable: Potatoes hate sitting in soggy soil. Ensure your container has plenty of drainage holes. If not, drill some!
* Seed Potato Selection: Don’t just grab any potato from the grocery store! Those are often treated to prevent sprouting. You need “seed potatoes,” which are specifically grown for planting. You can find them at your local garden center or online.
* Variety is the Spice of Life (and Potatoes!): Consider what kind of potatoes you enjoy eating. Russets are great for baking, Yukon Golds are perfect for mashed potatoes, and red potatoes are delicious boiled or roasted. Choose a variety that suits your taste.
* Chitting Your Seed Potatoes (Optional but Recommended): “Chitting” simply means encouraging your seed potatoes to sprout before planting. This gives them a head start and can lead to an earlier harvest. To chit, place your seed potatoes in a cool, bright location (but not direct sunlight) for a few weeks. You’ll see small, green sprouts emerge from the “eyes” of the potato.
Preparing Your Container and Soil
Now that we have our container and seed potatoes ready, let’s prepare the planting environment.
* Cleaning Your Container: If you’re reusing a container, give it a good scrub with soap and water to remove any lingering dirt or debris.
* Choosing the Right Soil: Potatoes need well-draining, slightly acidic soil. A mix of potting soil, compost, and peat moss is ideal. Avoid using garden soil, as it can be too heavy and compact.
* Creating the Initial Soil Layer: Fill the bottom of your container with about 4-6 inches of your soil mixture. This will be the starting point for your potato plants.
Planting Your Seed Potatoes
Alright, the moment we’ve been waiting for! Let’s get those potatoes in the ground (or, rather, the container).
1. Cutting Seed Potatoes (If Necessary): If your seed potatoes are large (bigger than an egg), you can cut them into smaller pieces, ensuring each piece has at least one or two “eyes” (those little sprouts). Let the cut pieces dry for a day or two to prevent rotting. If your seed potatoes are small, you can plant them whole.
2. Planting the Seed Potatoes: Place your seed potatoes (or potato pieces) on top of the soil layer, with the sprouts facing upwards. Space them evenly, about 8-10 inches apart if you’re planting multiple potatoes in the same container.
3. Covering the Seed Potatoes: Cover the seed potatoes with another 4-6 inches of soil. Gently water the soil until it’s moist but not soggy.
The “Hilling” Process: Key to a Bountiful Harvest
This is where the magic happens! “Hilling” is the process of adding more soil to the container as the potato plants grow. This encourages the plants to produce more potatoes along the buried stem.
1. Waiting for Growth: After planting, it will take a week or two for the potato plants to emerge from the soil. Be patient!
2. The First Hilling: Once the plants are about 6-8 inches tall, it’s time for the first hilling. Add more soil to the container, burying the stems up to the bottom set of leaves. Leave the top few leaves exposed.
3. Subsequent Hillings: Continue hilling every 2-3 weeks as the plants grow, always burying the stems up to the bottom set of leaves. This encourages the plants to produce more and more potatoes along the stem.
4. Watering After Hilling: After each hilling, water the soil thoroughly.
Caring for Your Potato Plants
Now that your potatoes are planted and hilling is underway, let’s talk about ongoing care.
* Watering: Potatoes need consistent moisture, especially during flowering and tuber formation. Water deeply whenever the top inch of soil feels dry. Avoid overwatering, as this can lead to rot.
* Sunlight: Potatoes need at least 6-8 hours of sunlight per day. Place your container in a sunny location.
* Fertilizing: Feed your potato plants with a balanced fertilizer every few weeks. Look for a fertilizer that’s specifically formulated for vegetables.
* Pest Control: Keep an eye out for pests like aphids, potato beetles, and flea beetles. Handpick them off the plants or use an organic insecticide if necessary.
* Disease Prevention: Potatoes can be susceptible to diseases like blight. Ensure good air circulation around the plants and avoid overhead watering.
Harvesting Your Potatoes
The most exciting part! Here’s how to know when your potatoes are ready to harvest.
1. Timing is Everything: Potatoes are typically ready to harvest about 70-90 days after planting, depending on the variety.
2. Signs of Maturity: The foliage will start to turn yellow and die back. This is a sign that the potatoes are maturing.
3. Gentle Exploration: You can gently dig around the edges of the container to check the size of the potatoes. If they’re the size you want, it’s time to harvest!
4. Harvesting Techniques: Carefully tip the container onto its side and gently remove the potatoes from the soil. Be careful not to damage them.
5. Curing Your Potatoes: After harvesting, cure your potatoes by spreading them out in a cool, dark, and well-ventilated place for a week or two. This will help them develop a thicker skin and improve their storage life.
Troubleshooting Common Issues
Even with the best care, you might encounter some challenges along the way. Here are a few common issues and how to address them:
* Leggy Plants: If your potato plants are tall and spindly, they’re likely not getting enough sunlight. Move the container to a sunnier location.
* Yellowing Leaves: Yellowing leaves can be a sign of overwatering, underwatering, or nutrient deficiency. Check the soil moisture and fertilize if necessary.
* Pest Infestations: Regularly inspect your plants for pests and take action promptly.
* Rotting Potatoes: Rotting potatoes are usually caused by overwatering or poor drainage. Ensure your container has adequate drainage and avoid overwatering.
Enjoying Your Homegrown Harvest
Congratulations! You’ve successfully grown potatoes in containers. Now it’s time to enjoy the fruits (or, rather, the tubers) of your labor. Roast them, mash them, boil them, or fry them – the possibilities are endless! There’s nothing quite like the taste of homegrown potatoes.
Growing potatoes in containers is a rewarding experience that anyone can enjoy. With a little bit of planning and effort, you can have a bountiful harvest of delicious, homegrown potatoes right on your patio or balcony. Happy gardening!
Conclusion
So, there you have it! Growing potatoes in containers is not just a gardening trend; it’s a game-changer for anyone, regardless of space or experience. We’ve walked you through the simple steps, from choosing the right container and seed potatoes to nurturing your plants and harvesting your homegrown treasure. But why is this DIY trick a must-try?
Firstly, it democratizes potato cultivation. No sprawling garden? No problem! A sunny balcony, patio, or even a well-lit deck is all you need to embark on this rewarding journey. Secondly, container gardening offers unparalleled control. You dictate the soil composition, watering schedule, and pest management, leading to healthier plants and a potentially larger, more uniform harvest. Thirdly, it’s incredibly satisfying. There’s something deeply fulfilling about nurturing a plant from a humble seed potato to a bountiful crop, knowing you played an active role in providing fresh, delicious food for yourself and your family.
But the beauty of growing potatoes in containers lies in its adaptability. Feel free to experiment!
* Try different potato varieties: From the classic Russet to the vibrant Yukon Gold or the petite fingerling potatoes, each variety offers a unique flavor and texture profile. See which one thrives best in your specific environment and suits your culinary preferences.
* Explore companion planting: Marigolds can deter nematodes, while basil can repel potato beetles. Planting these alongside your potatoes can create a symbiotic relationship that benefits both plants.
* Get creative with your containers: While we’ve suggested specific sizes and materials, don’t be afraid to think outside the box. Old laundry baskets, repurposed trash cans (with drainage holes, of course!), or even stacked tires can be transformed into potato-growing havens.
* Consider vertical gardening: If space is truly limited, explore vertical potato towers. These ingenious structures allow you to grow a significant number of potatoes in a small footprint.
Ultimately, the best way to discover the joys of container potato gardening is to simply dive in and try it. Don’t be intimidated by the process; it’s far more forgiving than you might think. Embrace the learning curve, celebrate your successes, and learn from any setbacks.
We are confident that once you experience the satisfaction of harvesting your own homegrown potatoes, you’ll be hooked. The taste of freshly dug potatoes, still warm from the sun, is simply unparalleled. It’s a flavor that you can’t find in any grocery store.
So, grab your containers, your seed potatoes, and your gardening gloves, and get ready to embark on a rewarding and delicious adventure. And most importantly, don’t forget to share your experiences with us! We’d love to hear about your successes, your challenges, and any tips or tricks you’ve discovered along the way. Share your photos and stories on our social media pages, and let’s create a community of container potato gardening enthusiasts! Let’s all learn and grow together. Happy gardening!
Frequently Asked Questions (FAQ)
What are the best potato varieties to grow in containers?
The best potato varieties for container gardening are generally those that are early to mid-season and produce smaller plants. Some excellent choices include:
* Yukon Gold: A popular all-purpose potato with a creamy texture and buttery flavor.
* Red Norland: A classic red-skinned potato that’s great for boiling and salads.
* Fingerling Potatoes (e.g., Russian Banana, French Fingerling): These small, elongated potatoes are known for their unique flavor and texture.
* Irish Cobbler: An early-season variety that produces round, white potatoes.
* Kennebec: A versatile potato that’s good for baking, frying, and mashing.
Consider your local climate and growing conditions when selecting your potato variety. Some varieties may perform better in certain regions than others. Also, think about how you plan to use the potatoes. Different varieties are better suited for different culinary applications.
How often should I water my container potatoes?
Watering frequency depends on several factors, including the size of your container, the type of soil you’re using, the weather conditions, and the growth stage of your plants. As a general rule, you should water your container potatoes deeply whenever the top inch of soil feels dry to the touch.
During hot, dry weather, you may need to water your plants daily or even twice a day. During cooler, wetter weather, you may only need to water them every few days.
When watering, be sure to water thoroughly, allowing the water to drain out of the bottom of the container. This will help to ensure that the roots are getting enough moisture. Avoid overwatering, as this can lead to root rot.
How much sunlight do container potatoes need?
Potatoes need at least six to eight hours of direct sunlight per day to thrive. Choose a location for your containers that receives plenty of sunlight throughout the day. If you live in a particularly hot climate, you may want to provide some afternoon shade to prevent the plants from overheating.
If you don’t have a sunny location, you can supplement with grow lights. Place the grow lights a few inches above the plants and keep them on for 12-16 hours per day.
What kind of soil should I use for container potatoes?
Use a well-draining potting mix that is rich in organic matter. Avoid using garden soil, as it can be too heavy and compact for container gardening. A good potting mix will provide adequate drainage and aeration, which are essential for healthy root growth.
You can also amend your potting mix with compost or other organic materials to improve its fertility and water-holding capacity. A mix of equal parts potting soil, compost, and perlite or vermiculite is a good starting point.
How do I “hill” my potatoes in a container?
“Hilling” is the process of adding more soil to the container as the potato plants grow. This encourages the plants to produce more potatoes along the buried stems.
When your potato plants are about 6-8 inches tall, add a few inches of soil to the container, burying the lower portion of the stems. Repeat this process every few weeks as the plants continue to grow, until the container is nearly full.
Be careful not to bury the leaves of the plants. The goal is to encourage the development of more potato tubers along the stems, not to suffocate the plants.
When and how do I harvest my container potatoes?
You can begin harvesting “new potatoes” (small, immature potatoes) a few weeks after the plants have flowered. To harvest new potatoes, carefully dig around the base of the plant and remove a few of the smaller tubers.
For a full harvest, wait until the plants have flowered and the foliage begins to die back. This indicates that the potatoes have reached maturity. At this point, you can simply dump the contents of the container onto a tarp or other surface and harvest all of the potatoes.
Store your harvested potatoes in a cool, dark, and dry place.
What are some common pests and diseases that affect container potatoes?
Some common pests that can affect container potatoes include potato beetles, aphids, and nematodes. Diseases include early blight, late blight, and potato scab.
To prevent pests and diseases, choose disease-resistant potato varieties, use healthy seed potatoes, and practice good sanitation. Inspect your plants regularly for signs of pests or diseases, and take action promptly if you notice any problems.
Organic pest control methods, such as insecticidal soap or neem oil, can be effective for controlling many common pests. For diseases, copper-based fungicides can be helpful.
Can I reuse the soil from my potato containers?
It’s generally not recommended to reuse the soil from your potato containers for growing potatoes again in the same container the following year. This is because potato plants can deplete the soil of nutrients and may leave behind disease pathogens.
However, you can reuse the soil for other plants that are not susceptible to the same diseases. You can also amend the soil with compost and other organic materials to replenish its nutrients.
How do I store seed potatoes before planting?
Store seed potatoes in a cool, dark, and well-ventilated place for several weeks before planting. This will allow them to sprout, which will give them a head start when you plant them.
A temperature of around 50-60°F (10-15°C) is ideal. Avoid storing seed potatoes in a warm or humid environment, as this can cause them to rot.
Can I grow potatoes in containers indoors?
While it’s possible to grow potatoes in containers indoors, it can be challenging. Potatoes need a lot of sunlight, so you’ll need to provide supplemental lighting with grow lights. You’ll also need to ensure that the plants have adequate ventilation and humidity.
Growing potatoes outdoors in containers is generally easier and more rewarding.
Leave a Comment