
Chili plant propagation might sound intimidating, but trust me, it’s easier than you think! Have you ever admired a friend’s thriving chili plant, overflowing with fiery peppers, and wished you could have the same bounty? Well, you absolutely can! This DIY guide will unlock the secrets to multiplying your chili plants, saving you money and ensuring a continuous supply of your favorite spicy ingredient.
For centuries, chili peppers have held a significant place in cultures worldwide, not just as a culinary staple, but also for their medicinal properties and even in spiritual practices. From the ancient Aztecs to modern-day chefs, the ability to cultivate and propagate these plants has been highly valued. Imagine carrying on that tradition in your own backyard!
Why is chili plant propagation so important? Well, for starters, it’s a fantastic way to expand your garden without breaking the bank. Instead of constantly buying new seedlings, you can simply take cuttings from your existing plants and create new ones. Plus, it’s incredibly rewarding to nurture a plant from a small cutting to a fully grown, pepper-producing powerhouse. This article will provide simple, step-by-step instructions and helpful tips to ensure your success. Let’s get started and turn your green thumb into a chili-growing machine!
Propagating Chili Plants from Cuttings: A Spicy DIY Adventure!
Hey fellow chili enthusiasts! Ever wished you could clone your favorite chili plant, preserving its unique heat and flavor profile? Well, you absolutely can! Propagating chili plants from cuttings is a surprisingly easy and rewarding DIY project. It’s a fantastic way to expand your chili garden without spending a fortune on new seeds or seedlings. Plus, it’s super satisfying to watch a tiny cutting transform into a thriving, pepper-producing plant. Let’s dive in!
What You’ll Need
Before we get started, let’s gather our supplies. Here’s a list of everything you’ll need for successful chili plant propagation:
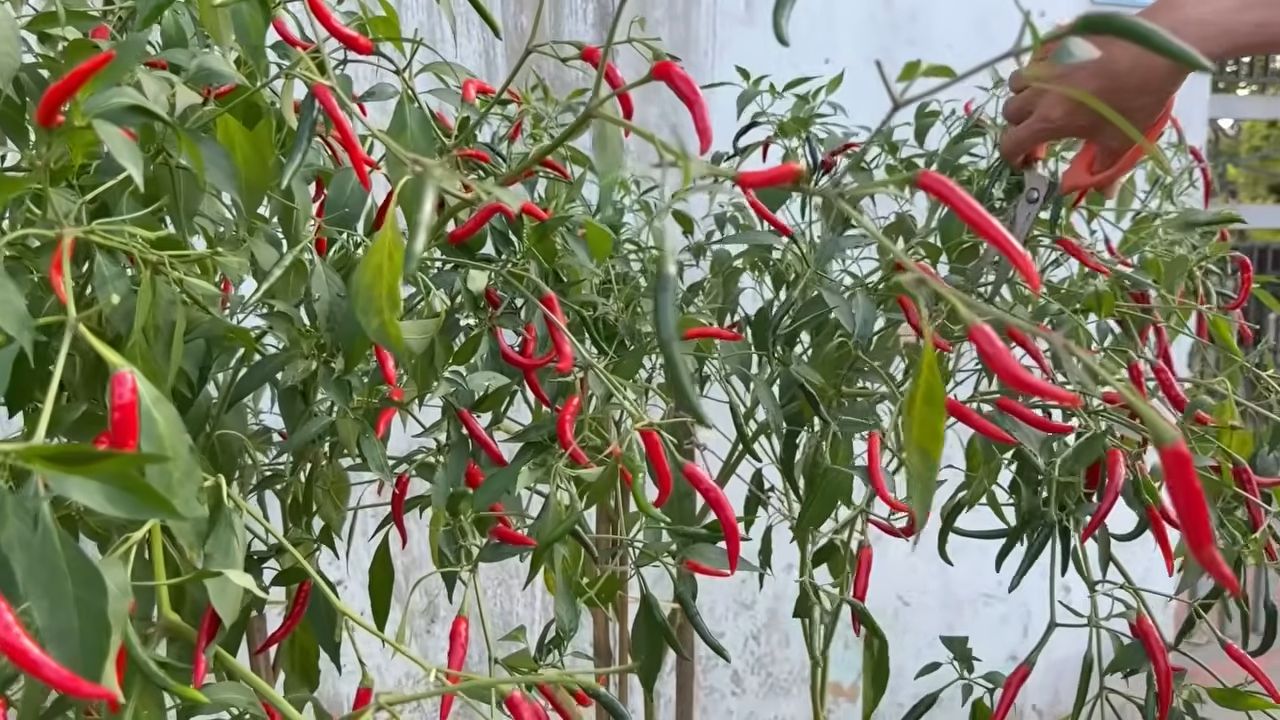
* A Healthy Chili Plant: Choose a mature, healthy chili plant that you want to clone. Look for vigorous growth and no signs of disease or pests.
* Sharp, Clean Pruning Shears or Knife: Sterilize your cutting tool with rubbing alcohol to prevent the spread of diseases.
* Rooting Hormone (Optional but Recommended): Rooting hormone encourages faster and more reliable root development. You can find it in powder or gel form at most garden centers.
* Small Pots or Containers: Choose pots that are about 3-4 inches in diameter. They should have drainage holes to prevent waterlogging.
* Potting Mix: Use a well-draining potting mix specifically formulated for seedlings or cuttings. Avoid using garden soil, as it can be too heavy and may contain pathogens. A mix of peat moss, perlite, and vermiculite works well.
* Watering Can or Spray Bottle: For gentle watering.
* Clear Plastic Bag or Humidity Dome (Optional): To create a humid environment, which helps the cuttings retain moisture.
* Warm, Bright Location: Indirect sunlight is ideal for rooting cuttings. Avoid direct sunlight, which can scorch the leaves.
Taking the Cuttings
Okay, now for the fun part! Taking cuttings is the first crucial step in propagating your chili plants. Here’s how I do it:
1. Choose the Right Stem: Select a healthy, non-flowering stem from your chili plant. Look for stems that are about 4-6 inches long and have several leaves. Avoid stems that are too woody or too soft.
2. Make the Cut: Using your sterilized pruning shears or knife, make a clean cut just below a node (the point where a leaf or branch grows from the stem). A 45-degree angle cut is often recommended, but a straight cut works just fine too. The key is to make a clean cut to minimize the risk of infection.
3. Remove Lower Leaves: Carefully remove the leaves from the bottom 1-2 inches of the cutting. This will prevent the leaves from rotting when they come into contact with the potting mix. It also encourages the plant to focus its energy on root development rather than leaf growth.
4. Prepare the Cutting (Optional): Some people gently scrape the outer layer of the stem near the cut end to encourage root formation. I’ve tried it both ways, and I haven’t noticed a huge difference, but it’s worth a try if you’re having trouble getting your cuttings to root.
Rooting the Cuttings
This is where the magic happens! Getting those cuttings to sprout roots is the key to success. Here’s my tried-and-true method:
1. Apply Rooting Hormone (Optional): If you’re using rooting hormone, dip the cut end of the cutting into the hormone powder or gel. Tap off any excess powder. This step isn’t essential, but it can significantly increase your chances of success, especially with more difficult-to-root varieties.
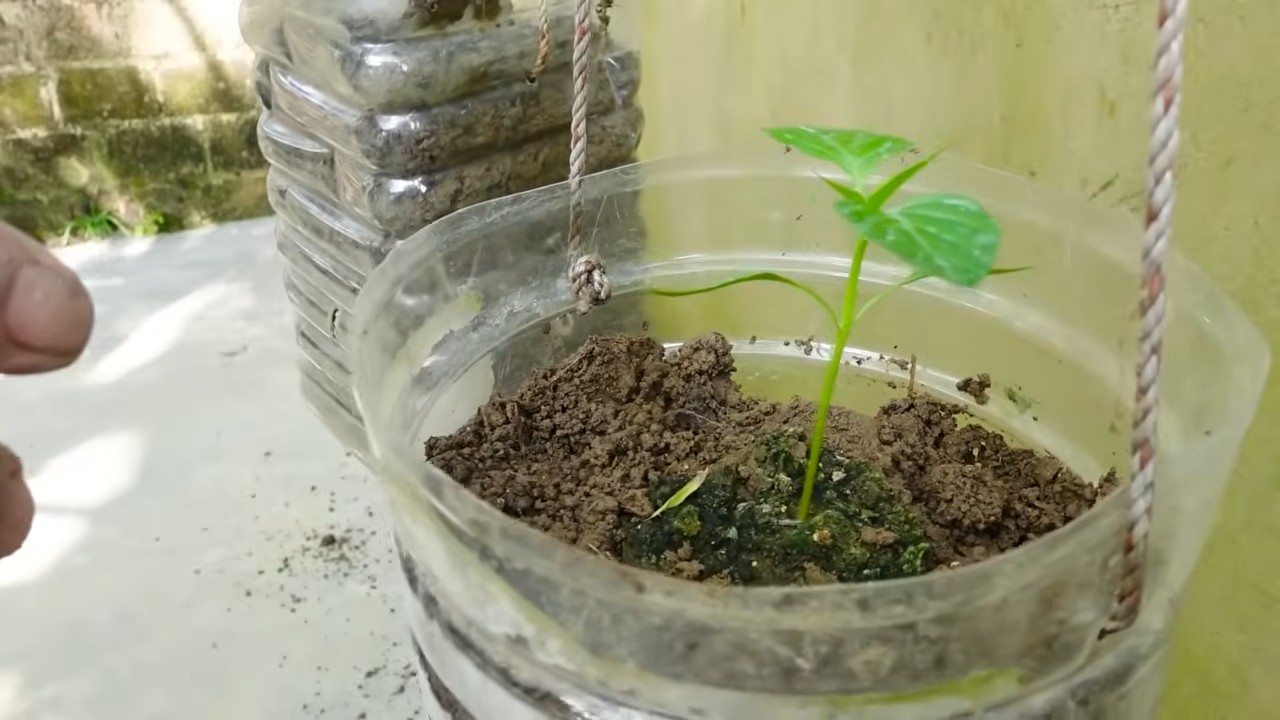
2. Plant the Cutting: Fill your small pot with the prepared potting mix. Make a small hole in the center of the potting mix with your finger or a pencil. Gently insert the cutting into the hole, making sure that the bottom 1-2 inches of the stem are buried in the soil.
3. Water Gently: Water the potting mix gently until it is evenly moist but not waterlogged. Avoid overwatering, as this can lead to root rot.
4. Create a Humid Environment (Optional): To help the cutting retain moisture, you can place a clear plastic bag over the pot or use a humidity dome. Make sure the bag doesn’t touch the leaves, as this can cause them to rot. You can also mist the inside of the bag with water to increase humidity.
5. Provide Warmth and Light: Place the pot in a warm, bright location that receives indirect sunlight. Avoid direct sunlight, which can scorch the leaves. A temperature of around 70-75°F (21-24°C) is ideal for rooting cuttings.
6. Maintain Moisture: Check the potting mix regularly and water it gently whenever it feels dry to the touch. If you’re using a plastic bag or humidity dome, open it up for a few minutes every day to allow for air circulation. This will help prevent the growth of mold and mildew.
Caring for Your Rooting Cuttings
Patience is key! It can take several weeks for your chili plant cuttings to develop roots. Here’s what to do while you wait:
1. Monitor for Root Development: After a few weeks, you can gently tug on the cutting to see if it has developed roots. If you feel resistance, that means roots have formed. You can also check for root development by gently removing the cutting from the pot and examining the root system.
2. Gradually Acclimate to Lower Humidity: If you’ve been using a plastic bag or humidity dome, gradually acclimate the cuttings to lower humidity by opening the bag or dome for longer periods each day. This will help them adjust to the drier air in your home.
3. Fertilize Sparingly: Once the cuttings have developed roots, you can start fertilizing them with a diluted liquid fertilizer. Use a fertilizer that is specifically formulated for seedlings or cuttings.
4. Transplant to a Larger Pot: Once the cuttings have developed a strong root system, you can transplant them to a larger pot. Choose a pot that is at least 6 inches in diameter. Use a well-draining potting mix.
Troubleshooting
Sometimes, things don’t go as planned. Here are some common problems you might encounter when propagating chili plants from cuttings and how to fix them:
* Cuttings Rotting: This is usually caused by overwatering or poor drainage. Make sure the potting mix is well-draining and avoid overwatering. Remove any rotting leaves or stems.
* Cuttings Wilting: This is usually caused by lack of humidity. Make sure the cuttings are in a humid environment, such as a plastic bag or humidity dome. Mist the leaves regularly with water.
* Cuttings Not Rooting: This could be due to a number of factors, such as poor quality cuttings, lack of rooting hormone, or improper environmental conditions. Try taking cuttings from a different part of the plant, using rooting hormone, and ensuring that the cuttings are in a warm, bright location with high humidity.
* Pests or Diseases: Inspect your cuttings regularly for signs of pests or diseases. Treat any infestations or infections promptly with appropriate pesticides or fungicides.
Tips for Success
Here are a few extra tips to help you succeed in propagating chili plants from cuttings:
* Take Multiple Cuttings: Not all cuttings will root successfully, so it’s always a good idea to take multiple cuttings to increase your chances of success.
* Choose the Right Time of Year: The best time to propagate chili plants from cuttings is in the spring or summer, when the plants are actively growing.
* Be Patient: Rooting cuttings can take several weeks, so be patient and don’t give up!
* Experiment: Don’t be afraid to experiment with different techniques and varieties of chili plants. You might be surprised at what you can achieve!
A Few More Thoughts
Propagating chili plants from cuttings is a fantastic way to expand your chili garden and preserve your favorite varieties. It’s a relatively simple process that can be done at home with just a few basic supplies. With a little patience and care, you can easily create new chili plants from cuttings and enjoy a bountiful harvest of spicy peppers! I’ve had great success with this method, and I’m confident that you will too. Happy growing!
Conclusion
So, there you have it! Mastering chili plant propagation is not just a fun gardening project; it’s a gateway to a never-ending supply of your favorite spicy peppers. Imagine the satisfaction of nurturing a tiny seed or cutting into a thriving plant, knowing you played a crucial role in its journey. This DIY trick is a must-try for several compelling reasons.
First and foremost, it’s incredibly cost-effective. Instead of constantly buying chili plants from nurseries, you can create your own little chili empire from a single, healthy mother plant or even from seeds harvested from your existing peppers. Think of all the money you’ll save, which you can then invest in other gardening essentials or, perhaps, a fancy new hot sauce recipe book!
Secondly, propagating your own chili plants gives you complete control over the process. You can select the healthiest, most productive plants to propagate, ensuring that your new plants inherit those desirable traits. This is particularly important if you’re growing heirloom varieties or have a specific chili pepper that you absolutely adore. You’re essentially creating clones of your best performers, guaranteeing a consistent supply of your favorite peppers.
Furthermore, chili plant propagation is a fantastic way to expand your garden without taking up too much space. You can start seeds indoors during the colder months, giving them a head start before transplanting them outdoors in the spring. This allows you to maximize your growing season and harvest a larger yield.
But the benefits don’t stop there! Propagating chili plants is also a rewarding and educational experience. You’ll learn about plant biology, the importance of proper care, and the satisfaction of watching something grow from virtually nothing. It’s a great way to connect with nature and develop a deeper appreciation for the food you eat.
Ready to take your chili growing to the next level?
Here are a few suggestions and variations to consider:
* **Experiment with different propagation methods:** While we’ve focused on seed starting and stem cuttings, you can also try air layering or grafting for more advanced techniques.
* **Use different rooting mediums:** Experiment with different soil mixes, coco coir, or even perlite to see which works best for your chili varieties.
* **Try propagating different chili varieties:** Each variety has its own unique characteristics, so try propagating a range of peppers to discover your favorites.
* **Consider using a rooting hormone:** While not always necessary, rooting hormone can help to speed up the rooting process and increase your success rate, especially with stem cuttings.
* **Don’t be afraid to experiment with different light conditions:** Chili plants need plenty of sunlight, but too much direct sunlight can scorch young seedlings. Experiment with different light levels to find the sweet spot.
We encourage you to try this DIY trick and share your experience with us! Let us know which methods worked best for you, what challenges you encountered, and any tips or tricks you discovered along the way. Your feedback will help other gardeners learn and grow, and together, we can create a thriving community of chili pepper enthusiasts. So, grab your seeds, cuttings, and gardening tools, and get ready to embark on a spicy adventure! Happy growing!
FAQ
Frequently Asked Questions About Chili Plant Propagation
Q: What is the best time of year to propagate chili plants?
A: The best time to propagate chili plants depends on your climate and the method you’re using. For seed starting, it’s generally recommended to start seeds indoors 6-8 weeks before the last expected frost. This allows the seedlings to develop a strong root system before being transplanted outdoors. For stem cuttings, the best time is typically during the growing season, when the plant is actively producing new growth. Spring and early summer are ideal.
Q: What kind of soil should I use for propagating chili plants?
A: For seed starting, use a seed starting mix that is light, airy, and well-draining. Avoid using garden soil, as it can be too heavy and may contain pathogens that can harm young seedlings. For stem cuttings, you can use a similar seed starting mix or a mixture of perlite and vermiculite. The key is to provide a medium that retains moisture but also allows for good drainage.
Q: How often should I water chili plant seedlings or cuttings?
A: Keep the soil consistently moist, but not waterlogged. Water when the top inch of soil feels dry to the touch. Overwatering can lead to root rot, so it’s important to ensure good drainage. Use a spray bottle to gently mist the seedlings or cuttings, rather than pouring water directly onto them.
Q: How much light do chili plant seedlings or cuttings need?
A: Chili plant seedlings need plenty of light to grow strong and healthy. If you’re starting seeds indoors, provide them with 12-16 hours of light per day using grow lights or a sunny windowsill. Stem cuttings also benefit from bright, indirect light. Avoid placing them in direct sunlight, as this can scorch the leaves.
Q: How long does it take for chili plant seeds to germinate?
A: Chili plant seeds can take anywhere from 7 to 21 days to germinate, depending on the variety, temperature, and moisture levels. To speed up germination, you can soak the seeds in warm water for 24 hours before planting. Maintaining a consistent soil temperature of 80-85°F (27-29°C) is also crucial.
Q: How long does it take for chili plant stem cuttings to root?
A: Chili plant stem cuttings typically take 2-4 weeks to root, depending on the variety, humidity, and temperature. Keep the cuttings in a warm, humid environment to encourage root development. You can use a humidity dome or a plastic bag to create a mini-greenhouse effect.
Q: What are some common problems I might encounter when propagating chili plants?
A: Some common problems include damping off (a fungal disease that affects seedlings), root rot (caused by overwatering), and pest infestations (such as aphids or spider mites). To prevent these problems, use sterile soil, avoid overwatering, and monitor your plants regularly for signs of pests or diseases.
Q: Can I propagate chili plants from store-bought peppers?
A: Yes, you can propagate chili plants from seeds harvested from store-bought peppers, but there are a few things to keep in mind. First, the peppers may be hybrids, which means that the offspring may not be true to type. Second, the peppers may have been treated with chemicals that can inhibit germination. To increase your chances of success, choose organic peppers and allow the seeds to dry completely before planting.
Q: What is the best way to harden off chili plant seedlings before transplanting them outdoors?
A: Hardening off is the process of gradually acclimating seedlings to outdoor conditions before transplanting them. To harden off chili plant seedlings, start by placing them outdoors in a sheltered location for a few hours each day, gradually increasing the amount of time they spend outdoors over a period of 1-2 weeks. Protect them from direct sunlight, wind, and frost.
Q: How do I know when my chili plant seedlings or cuttings are ready to be transplanted?
A: Chili plant seedlings are ready to be transplanted when they have developed several sets of true leaves and have a strong root system. Stem cuttings are ready to be transplanted when they have developed roots that are at least 1 inch long. Gently remove the seedlings or cuttings from their containers and transplant them into larger pots or directly into the garden.
Q: Can I use the same method for all types of chili peppers?
A: Generally, yes. The basic principles of seed starting and stem cutting apply to most chili pepper varieties. However, some varieties may be more challenging to propagate than others. Experimentation is key! Some super hots might require a bit more warmth and humidity during germination.
Q: What if my chili plant propagation attempt fails?
A: Don’t be discouraged! Propagation isn’t always successful on the first try. Analyze what might have gone wrong (too much/little water, light, etc.) and try again. Each attempt is a learning experience.

Leave a Comment