
Growing bean sprouts from peanuts might sound like something out of a science fiction novel, but trust me, it’s a surprisingly simple and rewarding DIY project you can tackle right in your kitchen! Forget those expensive trips to the grocery store for fresh sprouts; with a handful of peanuts and a little patience, you can cultivate your own crunchy, nutritious sprouts.
Sprouts have been a staple in Asian cuisine for centuries, valued not only for their delicate flavor but also for their impressive nutritional punch. From ancient medicinal practices to modern-day health trends, sprouts have consistently held a place of honor. But why buy them when you can easily create your own little indoor garden?
Let’s be honest, we all crave fresh, healthy ingredients, but sometimes life gets in the way. This is where the magic of growing bean sprouts from peanuts comes in. It’s a fantastic way to add a burst of freshness to your meals, even when you’re short on time or space. Plus, it’s a fun and educational activity for the whole family! Imagine the satisfaction of watching those tiny sprouts emerge, knowing you nurtured them from humble peanuts. So, ditch the store-bought sprouts and let’s embark on this exciting DIY adventure together!
Erdnuss-Sprossen ziehen: Ein DIY-Guide für Anfänger
Hey Leute! Habt ihr schon mal daran gedacht, Erdnuss-Sprossen zu ziehen? Klingt verrückt, oder? Aber es ist super einfach, macht Spaß und ist eine tolle Möglichkeit, eure eigenen frischen, knackigen Sprossen zu Hause zu züchten. Erdnuss-Sprossen sind nicht nur lecker, sondern auch vollgepackt mit Nährstoffen. Sie sind reich an Proteinen, Vitaminen und Mineralien. Also, lasst uns loslegen!
Was du brauchst:
* Rohe, ungesalzene Erdnüsse (mit Haut!) – Achtet darauf, dass sie nicht geröstet oder behandelt sind. Bio ist immer eine gute Wahl!
* Ein sauberes Glasgefäß (z.B. ein Einmachglas)
* Ein Stück Gaze, ein feinmaschiges Sieb oder ein Sprossendeckel
* Ein Gummiband oder eine Schnur
* Sauberes Wasser (am besten gefiltert)
* Ein dunkler, kühler Ort (z.B. ein Küchenschrank)
Warum rohe Erdnüsse mit Haut?
Die Haut der Erdnüsse enthält wichtige Nährstoffe und hilft, die Keimung zu fördern. Geröstete oder gesalzene Erdnüsse keimen nicht, da der Röstprozess die Keimfähigkeit zerstört und das Salz die Keimung hemmt.
Schritt-für-Schritt-Anleitung:
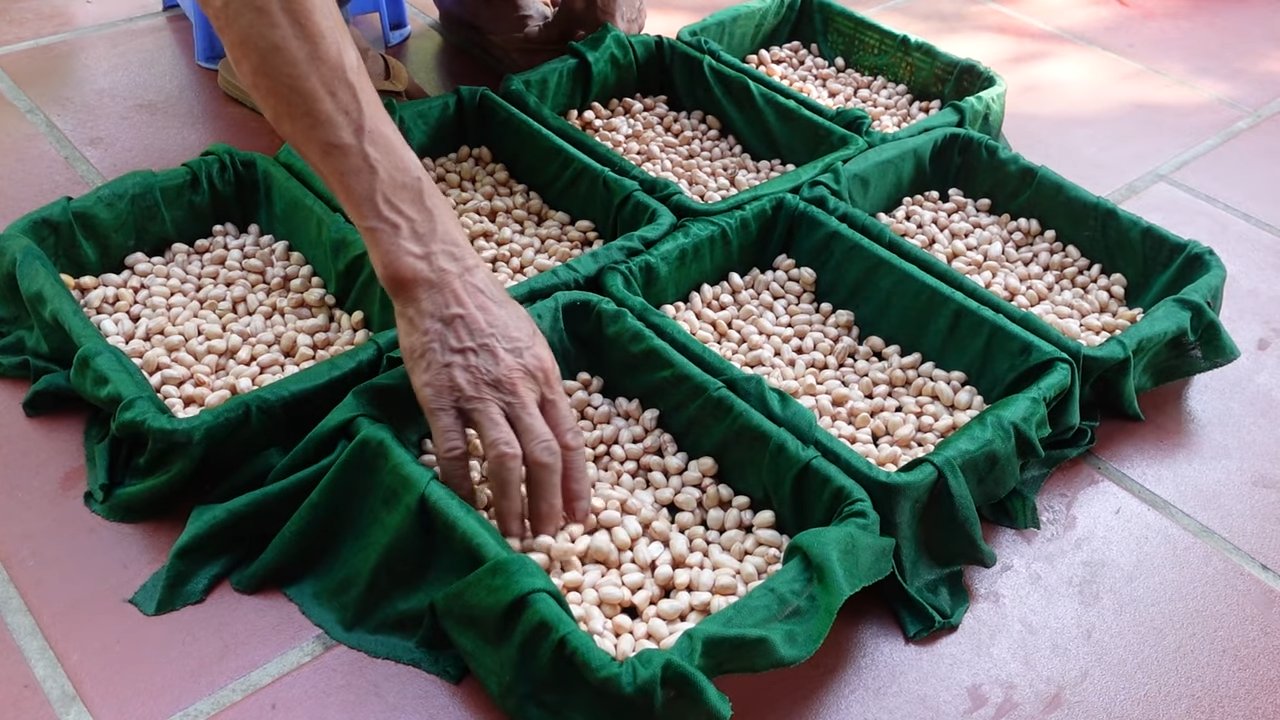
1. Erdnüsse vorbereiten:
* Zuerst müsst ihr die Erdnüsse gründlich waschen. Gebt sie in ein Sieb und spült sie unter fließendem Wasser ab, um Staub und Schmutz zu entfernen.
* Sortiert beschädigte oder verfärbte Erdnüsse aus. Nur die gesunden Erdnüsse werden keimen.
* Gebt die gewaschenen Erdnüsse in euer sauberes Glasgefäß.
2. Einweichen:
* Füllt das Glas mit reichlich sauberem Wasser, so dass die Erdnüsse vollständig bedeckt sind.
* Lasst die Erdnüsse für 8-12 Stunden (oder über Nacht) einweichen. Dieser Schritt ist wichtig, da er die Keimung anregt. Die Erdnüsse nehmen Wasser auf und quellen auf.
* Ich persönlich lasse sie meistens über Nacht einweichen, das ist am einfachsten.
3. Abgießen und Spülen:
* Nach dem Einweichen gießt ihr das Wasser ab. Verwendet dazu die Gaze oder das Sieb, das ihr über die Öffnung des Glases spannt und mit einem Gummiband oder einer Schnur befestigt habt.
* Spült die Erdnüsse gründlich mit frischem Wasser. Dieser Schritt ist wichtig, um Bakterienwachstum zu verhindern.
4. Sprossen:
* Stellt das Glas schräg in eine Schüssel oder einen Abtropfständer, so dass überschüssiges Wasser ablaufen kann. Das ist wichtig, damit die Erdnüsse nicht im Wasser liegen und schimmeln.
* Stellt das Glas an einen dunklen, kühlen Ort. Direkte Sonneneinstrahlung ist nicht gut für die Sprossen. Ein Küchenschrank oder eine Speisekammer sind ideal.
* Spült die Erdnüsse 2-3 Mal täglich mit frischem Wasser. Achtet darauf, dass ihr das Wasser jedes Mal gründlich abgießt.
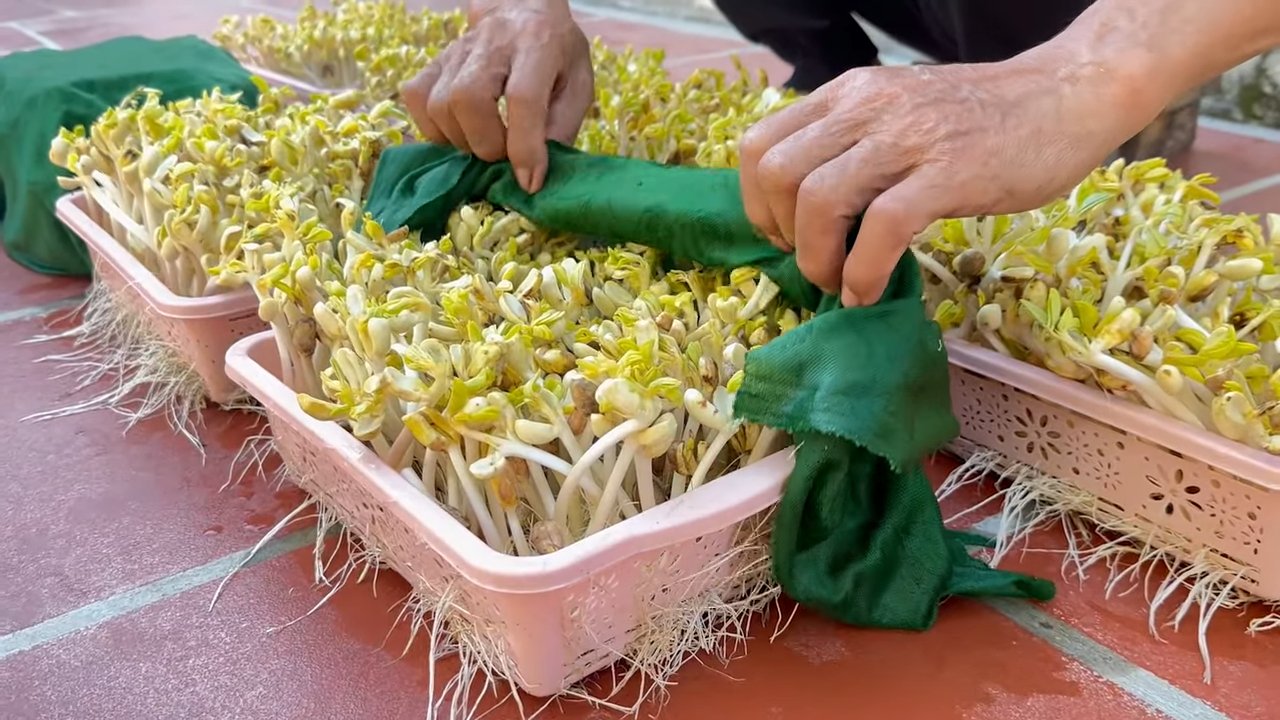
5. Beobachten und Pflegen:
* Nach 2-3 Tagen solltet ihr die ersten kleinen Sprossen sehen.
* Spült die Sprossen weiterhin 2-3 Mal täglich und achtet darauf, dass sie nicht austrocknen.
* Die Sprossen sind fertig, wenn sie etwa 2-5 cm lang sind. Das dauert in der Regel 4-7 Tage.
6. Ernten und Genießen:
* Wenn die Sprossen die gewünschte Länge erreicht haben, könnt ihr sie ernten.
* Spült die Sprossen noch einmal gründlich ab.
* Entfernt eventuell die äußere Hülle der Erdnüsse, wenn ihr sie nicht mögt. Ich persönlich lasse sie dran, da sie viele Ballaststoffe enthält.
* Die Sprossen sind jetzt fertig zum Verzehr!
Tipps und Tricks für perfekte Erdnuss-Sprossen
* Die richtige Erdnuss: Achtet wirklich darauf, dass ihr rohe, ungesalzene Erdnüsse mit Haut verwendet. Das ist der Schlüssel zum Erfolg.
* Hygiene ist wichtig: Saubere Hände, saubere Gefäße und sauberes Wasser sind essentiell, um Schimmelbildung zu vermeiden.
* Regelmäßiges Spülen: Das Spülen ist das A und O. Es hält die Sprossen feucht und verhindert Bakterienwachstum.
* Dunkelheit: Sprossen mögen es dunkel. Stellt das Glas an einen Ort, wo es nicht direktem Sonnenlicht ausgesetzt ist.
* Belüftung: Sorgt für eine gute Belüftung, indem ihr das Glas schräg stellt und das Wasser gründlich abgießt.
* Geduld: Habt Geduld! Es dauert ein paar Tage, bis die Sprossen wachsen. Lasst euch nicht entmutigen, wenn es nicht sofort klappt.
* Geschmack: Erdnuss-Sprossen haben einen leicht nussigen, frischen Geschmack. Sie sind knackig und lecker.
Was tun, wenn etwas schief geht?
* Schimmelbildung: Wenn ihr Schimmel entdeckt, solltet ihr die betroffenen Sprossen sofort entfernen und die restlichen Sprossen gründlich spülen. Achtet darauf, dass ihr in Zukunft noch gründlicher spült und für eine bessere Belüftung sorgt. Wenn der Schimmelbefall zu stark ist, müsst ihr die Sprossen leider entsorgen.
* Keine Keimung: Wenn die Erdnüsse nach ein paar Tagen immer noch nicht keimen, kann es sein, dass sie nicht keimfähig sind. Versucht es mit einer anderen Charge Erdnüsse. Achtet auch darauf, dass ihr die Erdnüsse lange genug eingeweicht habt.
* Schleimige Sprossen: Schleimige Sprossen sind ein Zeichen für Bakterienwachstum. Spült die Sprossen gründlich ab und achtet darauf, dass ihr sie in Zukunft öfter spült.
Wie man Erdnuss-Sprossen verwendet
Erdnuss-Sprossen sind vielseitig einsetzbar. Hier sind ein paar Ideen:
* Salate: Gebt sie in eure Salate für einen knackigen Biss und zusätzlichen Nährwert.
* Sandwiches: Belegt eure Sandwiches mit Erdnuss-Sprossen für eine frische Note.
* Suppen: Streut sie über eure Suppen als Garnitur.
* Wok-Gerichte: Fügt sie euren Wok-Gerichten hinzu für einen nussigen Geschmack.
* Pur: Esst sie einfach pur als gesunden Snack.
Lagerung von Erdnuss-Sprossen
Erdnuss-Sprossen sind nicht sehr lange haltbar. Am besten verzehrt ihr sie innerhalb von 2-3 Tagen. Bewahrt sie im Kühlschrank in einem luftdichten Behälter auf. Spült sie vor dem Verzehr noch einmal gründlich ab.
Warum Erdnuss-Sprossen so gesund sind
Erdnuss-Sprossen sind eine wahre Nährstoffbombe. Sie enthalten:
* Proteine: Wichtig für den Muskelaufbau und die Zellerneuerung.
* Vitamine: Reich an Vitaminen B, C und E.
* Mineralien: Enthalten wichtige Mineralien wie Eisen, Magnesium und Zink.
* Ballaststoffe: Fördern die Verdauung und sorgen für ein langanhaltendes Sättigungsgefühl.
* Antioxidantien: Schützen die Zellen vor Schäden durch freie Radikale.
Fazit
Erdnuss-Sprossen selber zu ziehen ist ein tolles DIY-Projekt, das Spaß macht und euch mit frischen, gesunden Sprossen versorgt. Probiert es aus und lasst mich wissen, wie es euch gefallen hat! Ich bin sicher, ihr werdet begeistert sein! Viel Spaß beim Sprossen ziehen!
Conclusion
So, there you have it! Growing bean sprouts from peanuts isn’t just a fun experiment; it’s a genuinely rewarding way to add fresh, nutritious, and surprisingly delicious sprouts to your diet. Forget those bland, store-bought sprouts that have traveled miles and lost their vitality. With this simple DIY trick, you can cultivate your own miniature garden right in your kitchen, ensuring peak freshness and flavor.
Why is this a must-try? Because it’s economical, sustainable, and incredibly satisfying. You’re transforming humble peanuts – a pantry staple – into a vibrant source of vitamins, minerals, and enzymes. Plus, you’re reducing food waste and minimizing your environmental footprint. It’s a win-win!
But the benefits don’t stop there. The taste of peanut sprouts is unique – a delightful blend of nutty sweetness and refreshing crispness. They’re far more flavorful than traditional bean sprouts, adding a delightful crunch and depth to salads, sandwiches, stir-fries, and even as a garnish for soups.
Ready to take your peanut sprouting game to the next level? Consider these variations:
* **Spice it up:** Add a pinch of chili flakes to your sprouting water for a subtle kick.
* **Herb Infusion:** Introduce fresh herbs like cilantro or basil to the sprouting container for an aromatic twist.
* **Different Peanuts:** Experiment with different types of peanuts, such as Spanish peanuts or Virginia peanuts, to discover subtle variations in flavor and texture. Just ensure they are raw and unsalted.
* **Sprout Mix:** Combine peanut sprouts with other types of sprouts, like mung bean sprouts or alfalfa sprouts, for a diverse and nutritious sprout medley.
Don’t be intimidated by the process. It’s far simpler than you might think. With just a few basic supplies and a little patience, you’ll be enjoying your own homegrown peanut sprouts in no time. The key is to maintain consistent moisture and darkness during the initial sprouting phase.
We’re confident that once you try this DIY trick, you’ll be hooked. The satisfaction of watching those tiny sprouts emerge and flourish is truly remarkable. It’s a tangible connection to the natural world, right in your own home.
So, what are you waiting for? Grab a handful of raw, unsalted peanuts and embark on this exciting sprouting adventure. We encourage you to try this method of **growing bean sprouts from peanuts** and discover the joy of homegrown goodness.
And most importantly, we want to hear about your experience! Share your photos, tips, and variations in the comments below. Let’s build a community of peanut sprout enthusiasts and inspire others to embrace this simple yet transformative DIY project. Happy sprouting!
Frequently Asked Questions (FAQ)
What kind of peanuts should I use for sprouting?
The best peanuts for sprouting are raw, unsalted, and unroasted peanuts. Roasted or salted peanuts will not sprout. Look for peanuts that are specifically labeled as “raw” or “unprocessed.” Organic peanuts are also a great choice, as they are free from pesticides and other harmful chemicals. Avoid peanuts that have been treated with preservatives or additives, as these can inhibit sprouting.
How long does it take for peanut sprouts to grow?
Generally, peanut sprouts will be ready to harvest in about 3-5 days. The exact time will depend on the temperature and humidity of your environment. Warmer temperatures will speed up the sprouting process, while cooler temperatures will slow it down. You’ll know your sprouts are ready when they have developed a small root and a short stem with tiny leaves.
How do I keep the peanuts from molding during sprouting?
Mold growth is a common concern when sprouting any type of seed or bean. To prevent mold, it’s crucial to maintain good hygiene and ensure proper ventilation. Rinse the peanuts thoroughly with fresh water at least twice a day. This will help remove any bacteria or fungi that may be present. Also, make sure your sprouting container has adequate drainage to prevent water from pooling at the bottom. Avoid overcrowding the container, as this can restrict airflow and promote mold growth. If you notice any signs of mold, discard the affected peanuts immediately.
Can I eat the entire peanut sprout, including the peanut itself?
Yes, you can eat the entire peanut sprout, including the peanut itself. The peanut will become softer and more digestible during the sprouting process. However, some people may find the peanut skin to be slightly bitter. If you prefer, you can remove the skin before eating the sprout. The root, stem, and leaves of the sprout are all edible and nutritious.
How do I store peanut sprouts?
Peanut sprouts are best consumed fresh, but they can be stored in the refrigerator for up to 2-3 days. To store them, rinse them thoroughly and pat them dry with a clean towel. Place them in a sealed container or a plastic bag lined with a paper towel. The paper towel will help absorb excess moisture and prevent the sprouts from becoming soggy. Avoid storing them for longer than 3 days, as they will start to lose their freshness and nutritional value.
Are peanut sprouts safe to eat?
Peanut sprouts are generally safe to eat, but it’s important to take precautions to prevent foodborne illness. Always use clean water and utensils when sprouting. Rinse the peanuts thoroughly before and during the sprouting process. If you have any allergies to peanuts, avoid eating peanut sprouts. Pregnant women, young children, and people with weakened immune systems should exercise extra caution when consuming sprouts, as they are more susceptible to foodborne illness.
What are the nutritional benefits of peanut sprouts?
Peanut sprouts are a nutritional powerhouse, packed with vitamins, minerals, and enzymes. They are a good source of protein, fiber, and healthy fats. They also contain vitamins A, B, C, and E, as well as minerals like iron, calcium, and potassium. Sprouting increases the bioavailability of nutrients, making them easier for your body to absorb. Peanut sprouts are also a good source of antioxidants, which can help protect your cells from damage.
Can I grow peanut sprouts in soil?
While this guide focuses on sprouting peanuts without soil, you can certainly grow them in soil if you prefer. To grow peanut sprouts in soil, plant the raw peanuts in a well-draining potting mix. Keep the soil moist but not waterlogged. Place the container in a warm, dark location until the sprouts emerge. Once the sprouts appear, move the container to a sunny location.
My peanut sprouts are turning brown. What am I doing wrong?
Browning of peanut sprouts can be caused by several factors, including overwatering, lack of ventilation, or exposure to light. Make sure you are not overwatering the peanuts and that your sprouting container has adequate drainage. Ensure that the sprouts are getting enough air circulation. Also, keep the sprouts in a dark location during the initial sprouting phase. If the browning is only affecting a small portion of the sprouts, you can remove the affected areas. However, if the browning is widespread, it’s best to discard the entire batch.
Can I use a sprouting jar for growing peanut sprouts?
Yes, a sprouting jar is a great option for growing peanut sprouts. The mesh lid allows for easy rinsing and drainage, and the jar provides a controlled environment for sprouting. Follow the same instructions as outlined in the guide, using the sprouting jar instead of a container. Make sure to rinse the peanuts thoroughly at least twice a day and keep the jar in a dark location during the initial sprouting phase.
Leave a Comment