
Long Squash Harvest: Are you dreaming of overflowing baskets brimming with homegrown long squash, ready to be transformed into delicious meals? I know I am! But sometimes, despite our best efforts, that bountiful harvest feels just out of reach. Maybe your vines are sprawling, the flowers are blooming, but the squash themselves are… well, less than impressive. Don’t worry, you’re not alone!
For centuries, cultures around the globe have cultivated squash, relying on its versatility and nutritional value. From the ancient civilizations of the Americas to the bustling markets of Asia, squash has been a staple food source. But even with generations of knowledge, maximizing your long squash harvest can still present a challenge. That’s where a few clever DIY tricks and hacks come in handy.
This article is your ultimate guide to unlocking the secrets of a truly abundant long squash harvest. We’ll explore simple, effective techniques that you can implement right in your own backyard. Why struggle with meager yields when you can easily boost your production with these proven methods? I’m going to share my favorite tips and tricks, from optimizing pollination to protecting your precious fruits from pests, ensuring you enjoy a season filled with delicious, homegrown long squash. Let’s get started!
Lange Schlangenkürbisse ernten und haltbar machen: Mein DIY-Guide
Hallo liebe Gartenfreunde! Ich liebe es, meinen eigenen Garten zu bepflanzen und die Früchte meiner Arbeit zu ernten. Dieses Jahr habe ich mich an Schlangenkürbissen versucht, und die Ernte war unglaublich! Da ich so viele habe, möchte ich euch zeigen, wie ihr diese ungewöhnlichen Kürbisse ernten und haltbar machen könnt, damit ihr sie das ganze Jahr über genießen könnt.
Wann ist der richtige Zeitpunkt für die Ernte?
Der Zeitpunkt der Ernte ist entscheidend für den Geschmack und die Haltbarkeit eurer Schlangenkürbisse. Hier sind ein paar Anzeichen, auf die ihr achten solltet:
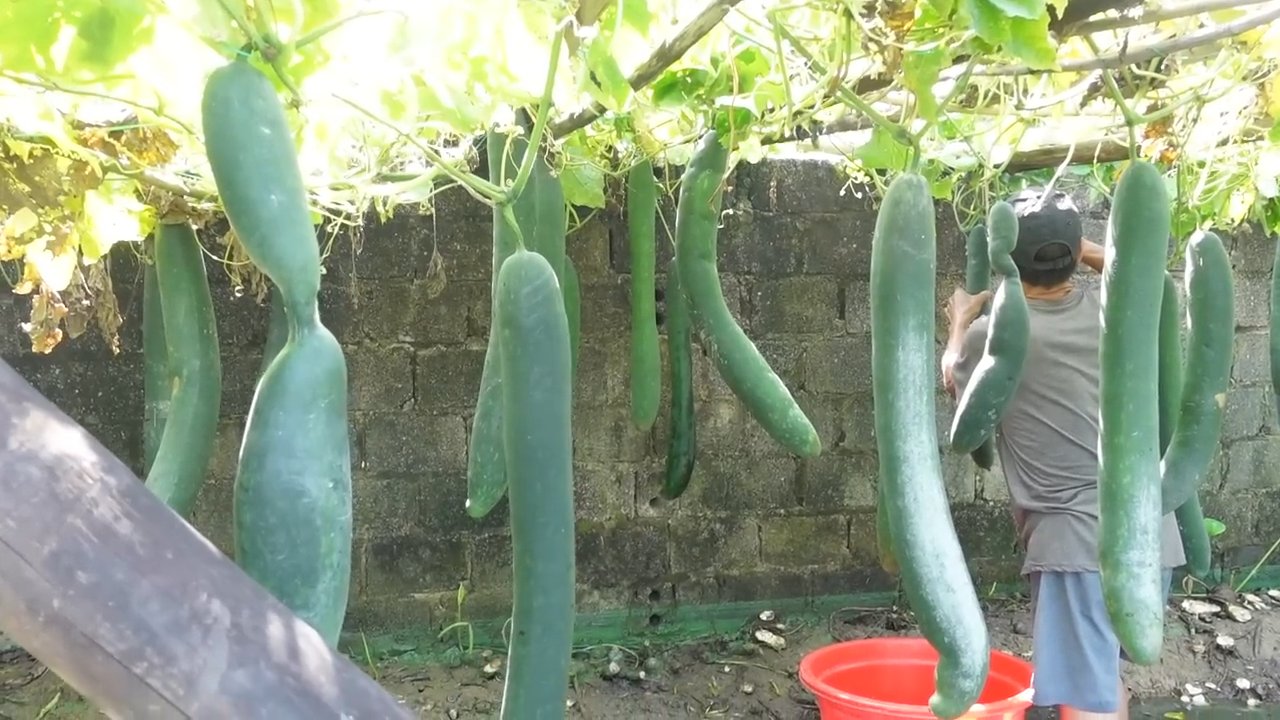
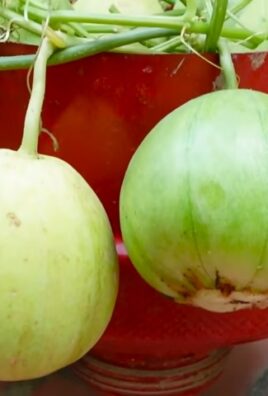
* Die Größe: Schlangenkürbisse können sehr lang werden, aber sie schmecken am besten, wenn sie noch relativ jung und zart sind. Ich ernte meine meistens, wenn sie zwischen 30 und 60 cm lang sind.
* Die Farbe: Die Schale sollte eine gleichmäßige, leuchtende Farbe haben, je nach Sorte. Vermeidet Kürbisse mit Flecken oder Verfärbungen.
* Die Schale: Die Schale sollte fest, aber nicht zu hart sein. Wenn ihr mit dem Fingernagel leicht in die Schale drücken könnt, ist der Kürbis reif.
* Der Stiel: Der Stiel sollte trocken und leicht verholzt sein. Wenn der Stiel noch grün und saftig ist, ist der Kürbis noch nicht reif.
Benötigte Materialien und Werkzeuge
Bevor wir loslegen, solltet ihr sicherstellen, dass ihr alles griffbereit habt. Hier ist eine Liste der Dinge, die ihr benötigt:
* Ein scharfes Messer oder eine Gartenschere
* Handschuhe (optional, aber empfehlenswert)
* Eine saubere Kiste oder ein Korb für die Ernte
* Ein feuchtes Tuch zum Reinigen der Kürbisse
* Für die Haltbarmachung (je nach Methode):
* Ein Gemüsehobel oder ein scharfes Messer
* Gefrierbeutel oder Behälter
* Ein Dörrgerät (optional)
* Einmachgläser und Einkochtopf (optional)
* Essig, Salz, Zucker und Gewürze (optional)
Die Ernte: Schritt für Schritt
Jetzt geht’s ans Eingemachte! Hier ist eine detaillierte Anleitung, wie ihr eure Schlangenkürbisse richtig erntet:
1. Vorbereitung: Zieht eure Handschuhe an (wenn ihr welche benutzt) und nehmt euer Messer oder eure Gartenschere zur Hand.
2. Den Kürbis auswählen: Sucht euch die reifsten Kürbisse aus, die die oben genannten Kriterien erfüllen.
3. Den Stiel durchtrennen: Schneidet den Stiel des Kürbisses mit einem sauberen Schnitt ab. Lasst dabei etwa 5-10 cm Stiel am Kürbis, um die Haltbarkeit zu verlängern.
4. Den Kürbis vorsichtig behandeln: Legt den Kürbis vorsichtig in eure Kiste oder euren Korb. Vermeidet es, die Kürbisse zu werfen oder fallen zu lassen, da dies zu Beschädigungen führen kann.
5. Reinigung: Wischt die Kürbisse mit einem feuchten Tuch ab, um Erde oder Schmutz zu entfernen.
6. Lagerung (kurzfristig): Wenn ihr die Kürbisse nicht sofort verarbeiten wollt, könnt ihr sie an einem kühlen, dunklen und trockenen Ort lagern. Sie halten sich so etwa 1-2 Wochen.
Haltbarmachung: Verschiedene Methoden
Da ich so viele Schlangenkürbisse habe, muss ich sie haltbar machen, damit ich sie nicht alle auf einmal essen muss. Hier sind ein paar Methoden, die ich ausprobiert habe und die gut funktionieren:
Einfrieren
Das Einfrieren ist eine einfache und schnelle Methode, um Schlangenkürbisse haltbar zu machen.
1. Vorbereitung: Wascht die Kürbisse gründlich und schneidet sie in Scheiben oder Würfel.
2. Blanchieren (optional): Blanchiert die Kürbisstücke für 2-3 Minuten in kochendem Wasser. Dies hilft, die Farbe und den Geschmack zu erhalten.
3. Abkühlen: Schreckt die Kürbisstücke in Eiswasser ab, um den Garprozess zu stoppen.
4. Trocknen: Tupft die Kürbisstücke mit einem Küchentuch trocken.
5. Einfrieren: Verteilt die Kürbisstücke in einer einzigen Schicht auf einem Backblech und friert sie für 1-2 Stunden vor. Dadurch verhindern ihr, dass sie zusammenkleben.
6. Verpacken: Füllt die vorgefrorenen Kürbisstücke in Gefrierbeutel oder Behälter. Drückt die Luft heraus und verschließt die Beutel gut.
7. Beschriften: Beschriftet die Beutel mit dem Datum und dem Inhalt.
8. Lagern: Lagert die Kürbisstücke im Gefrierschrank. Sie halten sich dort etwa 8-12 Monate.
Trocknen (Dörren)
Das Trocknen ist eine weitere gute Methode, um Schlangenkürbisse haltbar zu machen.
1. Vorbereitung: Wascht die Kürbisse gründlich und schneidet sie in dünne Scheiben.
2. Dörren: Legt die Kürbisscheiben auf die Gitter eures Dörrgeräts.
3. Trocknen: Trocknet die Kürbisscheiben bei einer Temperatur von etwa 50-60°C für 6-8 Stunden, oder bis sie trocken und lederartig sind.
4. Abkühlen: Lasst die Kürbisscheiben vollständig abkühlen.
5. Lagern: Lagert die getrockneten Kürbisscheiben in einem luftdichten Behälter an einem kühlen, dunklen und trockenen Ort. Sie halten sich dort mehrere Monate.
Einlegen (Sauer Einlegen)
Das Einlegen ist eine traditionelle Methode, um Gemüse haltbar zu machen. Ich liebe es, meine Schlangenkürbisse sauer einzulegen!
1. Vorbereitung: Wascht die Kürbisse gründlich und schneidet sie in Scheiben oder Würfel.
2. Einmachgläser vorbereiten: Sterilisiert eure Einmachgläser und Deckel.
3. Sud zubereiten: Mischt Essig, Wasser, Salz, Zucker und Gewürze nach eurem Geschmack in einem Topf. Ich verwende meistens Apfelessig, Wasser, Salz, Zucker, Senfsaat, Pfefferkörner und Lorbeerblätter.
4. Sud aufkochen: Bringt den Sud zum Kochen und lasst ihn ein paar Minuten köcheln.
5. Kürbisstücke einlegen: Füllt die Kürbisstücke in die Einmachgläser.
6. Sud übergießen: Übergießt die Kürbisstücke mit dem heißen Sud, so dass sie vollständig bedeckt sind. Lasst dabei etwa 1 cm Platz bis zum Rand des Glases.
7. Luftblasen entfernen: Entfernt eventuelle Luftblasen mit einem sauberen Messer oder einem Spatel.
8. Gläser verschließen: Verschließt die Gläser fest mit den Deckeln.
9. Einkochen: Stellt die Gläser in einen Einkochtopf und füllt ihn mit Wasser, so dass die Gläser etwa 2 cm hoch im Wasser stehen.
10. Einkochen: Kocht die Gläser für etwa 10-15 Minuten ein.
11. Abkühlen: Nehmt die Gläser aus dem Einkochtopf und lasst sie vollständig abkühlen.
12. Kontrolle: Überprüft, ob die Deckel fest verschlossen sind. Wenn sich die Deckel nach innen wölben, sind die Gläser richtig verschlossen.
13. Lagern: Lagert die eingelegten Kürbisse an einem kühlen, dunklen und trockenen Ort. Sie halten sich dort mehrere Monate.
Verwendungsmöglichkeiten für Schlangenkürbisse
Schlangenkürbisse sind vielseitig einsetzbar. Hier sind ein paar Ideen, wie ihr sie in eurer Küche verwenden könnt:
* Roh: Junge, zarte Schlangenkürbisse können roh in Salaten oder als Snack gegessen werden.
* Gegrillt: Schlangenkürbisse schme
Conclusion
So, there you have it! Mastering the art of long squash harvesting doesn’t have to be a daunting task. With a little know-how and the right techniques, you can ensure a bountiful and delicious harvest that will last you through the fall and winter months. This DIY trick, focusing on careful observation, proper cutting techniques, and optimal curing conditions, is a game-changer for any gardener looking to maximize their yield and the longevity of their squash.
Why is this a must-try? Because it’s about more than just picking a vegetable. It’s about understanding the plant’s life cycle, respecting its needs, and ultimately, enjoying the fruits (or rather, vegetables) of your labor for an extended period. Improper harvesting can lead to premature spoilage, leaving you with a disappointing and wasted crop. This method, however, empowers you to take control and ensure that your hard work translates into a pantry full of nutritious and flavorful long squash.
Don’t be afraid to experiment with variations! While we’ve outlined a general approach, every garden is unique. Perhaps you find that your specific variety of long squash benefits from a slightly longer curing period, or maybe your climate requires a different storage temperature. Feel free to adjust the techniques to suit your individual circumstances. For example, if you live in a particularly humid environment, ensure adequate ventilation during the curing process to prevent mold growth. You could even try different methods of cleaning the squash before curing, such as gently wiping them down with a diluted vinegar solution to further inhibit fungal growth. Another variation could involve experimenting with different storage locations. While a cool, dry basement is ideal, you might find that a well-ventilated garage or even a shaded outdoor shed works just as well, depending on your local climate.
We wholeheartedly encourage you to try this DIY trick for long squash harvesting. It’s a simple yet effective way to elevate your gardening game and enjoy the delicious rewards of your efforts. The satisfaction of harvesting a perfectly ripe, long-lasting squash is truly unparalleled.
But the learning doesn’t stop here! We want to hear about your experiences. Did you find this method helpful? Did you encounter any challenges? What variations did you try, and what were the results? Share your stories, tips, and tricks in the comments below. Let’s create a community of long squash enthusiasts who are passionate about growing, harvesting, and enjoying this versatile vegetable. Your insights could be invaluable to other gardeners who are just starting out. Together, we can unlock the full potential of our long squash harvests and savor the flavors of fall and winter for months to come. So, grab your gardening gloves, head out to your patch, and get ready to harvest like a pro! We can’t wait to hear about your success!
Frequently Asked Questions (FAQ)
What exactly is considered “long squash”?
Long squash is a broad category that includes varieties like butternut squash, spaghetti squash, Hubbard squash, and various types of pumpkins. The defining characteristic is their elongated shape, as opposed to round or squat squash varieties. The specific harvesting and curing techniques may vary slightly depending on the exact type of long squash you’re growing, but the general principles outlined in this article apply to most.
How do I know when my long squash is truly ripe and ready to harvest?
This is a crucial question! Don’t rely solely on the calendar. Look for these key indicators:
* **Hard rind:** The rind should be firm and resistant to scratching with your fingernail. If you can easily puncture the skin, the squash is not yet ripe.
* **Dull color:** The skin should have a deep, rich color that is characteristic of the variety. A glossy or shiny appearance often indicates that the squash is not fully mature.
* **Dried stem:** The stem connecting the squash to the vine should be dry, brown, and hardened. A green or pliable stem suggests that the squash is still drawing nutrients from the plant.
* **Sound test:** Give the squash a gentle tap. A ripe squash will sound hollow.
What’s the best way to cut the squash from the vine?
Use a sharp, clean knife or pruning shears. Leave at least 2-3 inches of stem attached to the squash. This stem acts as a barrier against bacteria and fungi, helping to prevent rot during storage. Avoid pulling or twisting the squash from the vine, as this can damage the stem and create an entry point for pathogens. Make a clean, angled cut to promote healing.
What if the stem breaks off during harvesting? Can I still cure and store the squash?
If the stem breaks off completely, the squash is more susceptible to rot and won’t store as long. However, you can still use it! Prioritize using squash with broken stems first. Inspect it carefully for any signs of damage or decay. If it looks healthy, use it within a week or two. You can also consider freezing the squash for longer-term storage.
What are the ideal conditions for curing long squash?
Curing is essential for hardening the rind and improving the storage life of your squash. Aim for these conditions:
* **Temperature:** 80-85°F (27-29°C) is ideal. This warmer temperature helps to dry out the squash and harden the skin.
* **Humidity:** Moderate humidity is best. Too much humidity can promote mold growth, while too little can cause the squash to dry out too quickly.
* **Ventilation:** Good air circulation is crucial to prevent moisture buildup.
* **Sunlight:** Indirect sunlight is beneficial. Avoid direct sunlight, which can scorch the squash.
A sunny porch or patio is often a good location for curing, but be sure to protect the squash from rain and excessive heat.
How long should I cure my long squash?
The curing time depends on the variety of squash and the environmental conditions. Generally, 10-14 days is sufficient. Check the squash regularly for any signs of spoilage. The rind should become noticeably harder and more resistant to scratching during the curing process.
What’s the best way to store long squash after curing?
After curing, store your long squash in a cool, dry, and well-ventilated place. A basement, root cellar, or unheated garage are all good options. The ideal storage temperature is 50-60°F (10-15°C). Avoid storing squash near apples or other fruits that release ethylene gas, as this can accelerate ripening and spoilage.
How long will long squash keep in storage?
With proper harvesting, curing, and storage, some varieties of long squash can last for several months. Butternut squash, for example, can often be stored for 2-3 months, while Hubbard squash can last even longer. Check your squash regularly for any signs of spoilage, such as soft spots, mold, or discoloration. Use any squash that shows signs of deterioration first.
Can I freeze long squash?
Yes, freezing is a great way to preserve long squash for longer-term storage. Cook the squash first, either by roasting, steaming, or boiling. Then, mash or puree the cooked squash and allow it to cool completely. Pack the cooled squash into freezer-safe containers or bags, leaving some headspace for expansion. Frozen squash can be stored for up to a year.
What are some creative ways to use my long squash harvest?
The possibilities are endless! Long squash is incredibly versatile and can be used in a wide variety of dishes. Here are just a few ideas:
* **Soups and stews:** Add roasted or pureed squash to soups and stews for a creamy texture and rich flavor.
* **Roasted vegetables:** Roast squash with other vegetables like onions, carrots, and potatoes for a delicious and healthy side dish.
* **Pies and desserts:** Use squash puree in pies, cakes, and muffins for a moist and flavorful treat.
* **Pasta sauces:** Add squash puree to pasta sauces for a creamy and nutritious boost.
* **Risotto:** Use roasted squash in risotto for a hearty and flavorful meal.
* **Stuffed squash:** Hollow out a squash and fill it with a savory mixture of rice, vegetables, and meat or beans.
Don’t be afraid to experiment and try new recipes! Long squash is a wonderful ingredient to work with, and you’re sure to find many ways to enjoy your harvest.
Leave a Comment