
Spinach growing in recycled bottles? Yes, you read that right! Forget sprawling gardens and back-breaking labor; we’re diving into the wonderful world of vertical gardening with a sustainable twist. Have you ever dreamed of fresh, vibrant spinach just steps from your kitchen, even if you only have a tiny balcony or patio? This DIY project makes that dream a reality, and it’s easier than you think!
The concept of growing food in containers, particularly vertically, isn’t new. Cultures around the globe have utilized ingenious methods for centuries to maximize space and resources. From the hanging gardens of Babylon (though debated, they represent the spirit of vertical cultivation) to the more recent practice of container gardening during wartime, the drive to grow our own food, no matter the circumstances, has always been strong.
But why spinach growing in recycled bottles? Well, let’s face it, we live in a world overflowing with plastic waste. This project offers a fantastic way to repurpose those bottles, reducing landfill waste while simultaneously providing you with delicious, nutritious spinach. Plus, it’s incredibly space-efficient, making it perfect for apartment dwellers or anyone with limited gardening space. I’m excited to share this simple, effective, and eco-friendly method that will have you harvesting fresh spinach in no time!
Spinat Anbauen in Recycelten Flaschen: Eine Schritt-für-Schritt Anleitung
Hallo liebe Gartenfreunde! Habt ihr Lust, euren eigenen Spinat anzubauen, aber wenig Platz? Oder wollt ihr einfach nur etwas Nachhaltiges tun? Dann seid ihr hier genau richtig! Ich zeige euch, wie ihr mit recycelten Plastikflaschen ganz einfach und kostengünstig Spinat anbauen könnt. Es ist ein super Projekt für Balkone, kleine Gärten oder sogar für drinnen!
Was ihr braucht:
* Recycelte Plastikflaschen: Am besten eignen sich große Wasser- oder Saftflaschen (1,5 – 2 Liter). Achtet darauf, dass sie sauber und unbeschädigt sind.
* Spinatsamen: Wählt eine Sorte, die für den Anbau im Topf geeignet ist. Es gibt viele verschiedene Sorten, also informiert euch am besten vorher.
* Erde: Gute Blumenerde oder Gemüseerde ist ideal. Ihr könnt auch eure eigene Erde mischen, z.B. aus Kompost, Gartenerde und Sand.
* Schere oder Messer: Zum Zuschneiden der Flaschen.
* Bohrer oder Nagel: Für die Drainagelöcher.
* Gießkanne oder Sprühflasche: Zum Bewässern.
* Optional: Kieselsteine oder Tonscherben für die Drainage.
* Optional: Etiketten und Stift zum Beschriften der Flaschen.
Vorbereitung der Flaschen:
1. Reinigung: Zuerst müsst ihr die Plastikflaschen gründlich reinigen. Entfernt alle Etiketten und spült sie mit warmem Wasser und Spülmittel aus. Achtet darauf, dass keine Spülmittelreste zurückbleiben.
2. Zuschneiden: Jetzt kommt der spaßige Teil! Ihr habt verschiedene Möglichkeiten, die Flaschen zuzuschneiden:
* Option 1: Horizontaler Schnitt: Schneidet die Flasche horizontal in der Mitte durch. Der obere Teil wird später umgedreht und in den unteren Teil gesteckt, so dass ein Mini-Gewächshaus entsteht. Diese Methode ist besonders gut für den Anfang, da sie die Keimung der Samen fördert.
* Option 2: Vertikaler Schnitt: Schneidet die Flasche vertikal auf einer Seite auf. So entsteht eine Art “Balkonkasten”. Diese Methode ist ideal, wenn ihr mehrere Pflanzen nebeneinander anbauen möchtet.
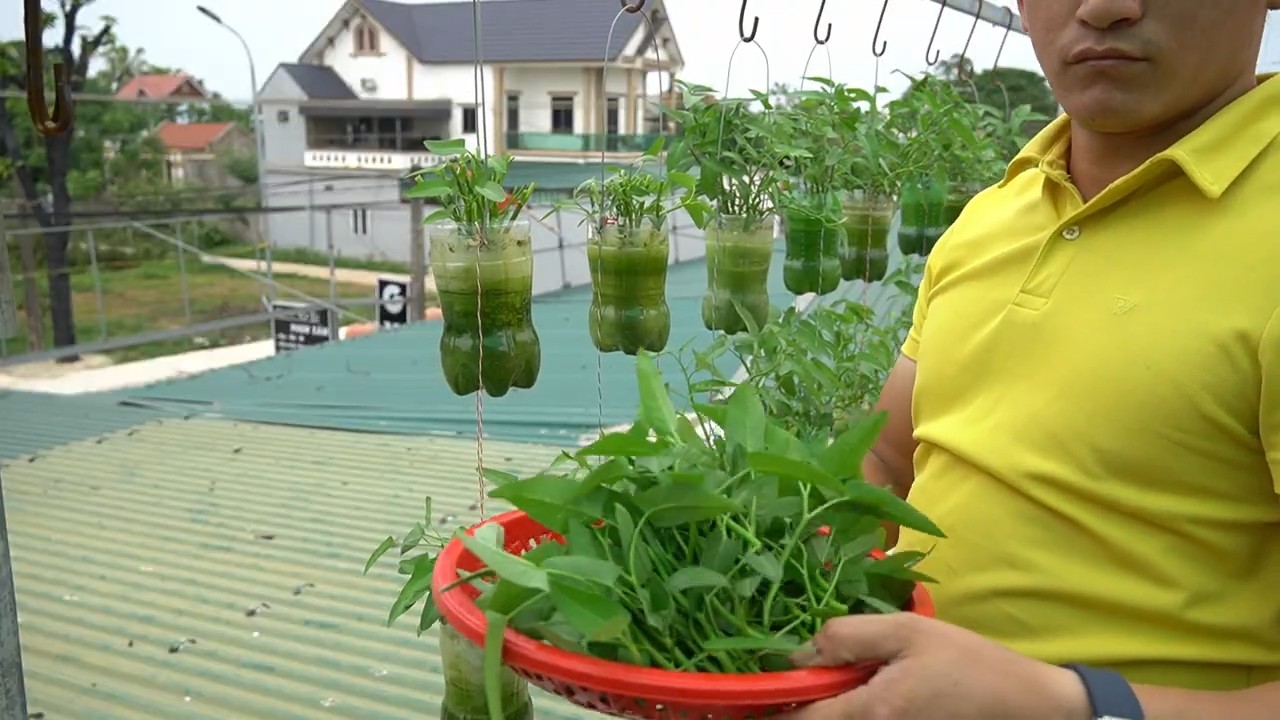
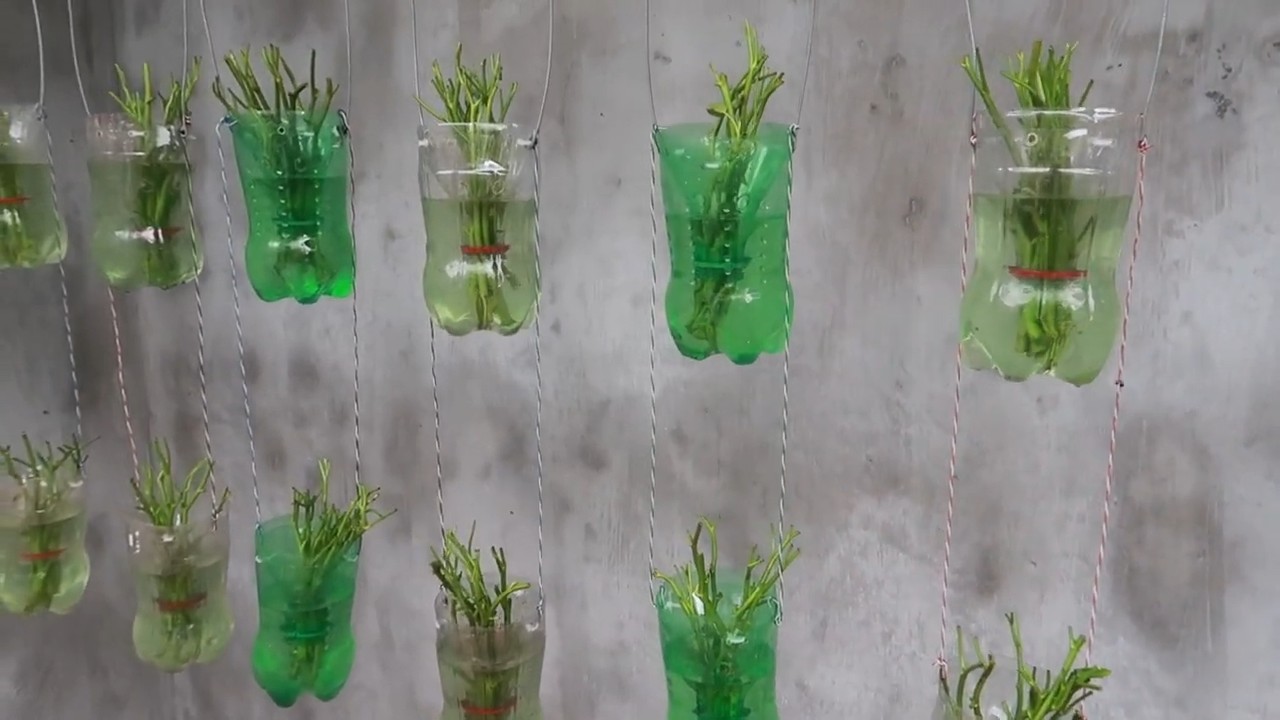
* Option 3: Mehrere Löcher: Schneidet große Löcher in die Seite der Flasche, um Platz für die Spinatpflanzen zu schaffen. Diese Methode ist gut, wenn ihr die Flasche aufhängen möchtet.
Ich persönlich bevorzuge die horizontale Schnittmethode für den Anfang, da sie die Feuchtigkeit gut hält und die Samen optimal keimen können. Aber probiert einfach aus, was euch am besten gefällt!
3. Drainagelöcher: Unabhängig davon, für welche Schnittmethode ihr euch entscheidet, müsst ihr unbedingt Drainagelöcher in den Boden der Flasche bohren oder stechen. Das ist wichtig, damit überschüssiges Wasser ablaufen kann und die Wurzeln nicht faulen. Macht am besten 4-5 Löcher mit einem Durchmesser von ca. 5 mm.
4. Optional: Drainage-Schicht: Um die Drainage zu verbessern, könnt ihr eine Schicht Kieselsteine oder Tonscherben auf den Boden der Flasche legen, bevor ihr die Erde einfüllt. Das verhindert, dass die Drainagelöcher verstopfen.
Aussaat des Spinats:
1. Erde einfüllen: Füllt die vorbereiteten Flaschen mit Erde. Lasst dabei ca. 2-3 cm Platz bis zum Rand. Drückt die Erde leicht an.
2. Samen aussäen: Verteilt die Spinatsamen gleichmäßig auf der Erde. Achtet darauf, dass sie nicht zu dicht liegen, da die Pflanzen sonst zu wenig Platz haben. Ein Abstand von ca. 2-3 cm zwischen den Samen ist ideal.
3. Mit Erde bedecken: Bedeckt die Samen mit einer dünnen Schicht Erde (ca. 0,5 cm).
4. Angießen: Gießt die Erde vorsichtig mit einer Gießkanne oder Sprühflasche an. Die Erde sollte feucht, aber nicht nass sein.
5. Mini-Gewächshaus (bei horizontalem Schnitt): Wenn ihr die horizontale Schnittmethode gewählt habt, könnt ihr den oberen Teil der Flasche umgedreht in den unteren Teil stecken. So entsteht ein Mini-Gewächshaus, das die Keimung der Samen beschleunigt.
Pflege des Spinats:
1. Standort: Stellt die Flaschen an einen hellen Standort, aber nicht in die pralle Sonne. Spinat mag es lieber halbschattig.
2. Bewässerung: Haltet die Erde feucht, aber nicht nass. Gießt regelmäßig, besonders an warmen Tagen. Vermeidet Staunässe.
3. Belüftung (bei Mini-Gewächshaus): Wenn ihr ein Mini-Gewächshaus verwendet, solltet ihr es regelmäßig lüften, um Schimmelbildung zu vermeiden. Nehmt den oberen Teil der Flasche einfach für ein paar Stunden ab.
4. Düngen: Spinat ist ein Starkzehrer. Düngt ihn regelmäßig mit einem organischen Dünger, z.B. Komposttee oder Brennnesseljauche.
5. Schutz vor Schädlingen: Achtet auf Schädlinge wie Blattläuse oder Schnecken. Bei Bedarf könnt ihr natürliche Schädlingsbekämpfungsmittel einsetzen.
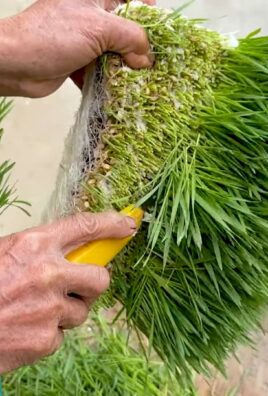
6. Ernte: Nach ca. 4-6 Wochen könnt ihr den ersten Spinat ernten. Schneidet die äußeren Blätter ab, damit die inneren Blätter weiterwachsen können.
Zusätzliche Tipps:
* Sortenwahl: Wählt eine Spinatsorte, die für den Anbau im Topf geeignet ist. Es gibt spezielle Sorten, die kompakter wachsen und weniger Platz benötigen.
* Mehrfache Aussaat: Um kontinuierlich Spinat ernten zu können, könnt ihr alle paar Wochen neue Samen aussäen.
* Beschriftung: Beschriftet die Flaschen mit dem Namen der Spinatsorte und dem Aussaatdatum. So behaltet ihr den Überblick.
* Kreativität: Seid kreativ bei der Gestaltung eurer Flaschen! Ihr könnt sie bemalen, bekleben oder mit anderen Materialien verzieren.
* Upcycling: Nutzt auch andere recycelte Materialien für den Anbau, z.B. Joghurtbecher oder Konservendosen.
Häufige Probleme und Lösungen:
* Samen keimen nicht: Die Erde ist zu trocken oder zu nass. Achtet auf eine gleichmäßige Feuchtigkeit. Die Temperatur ist zu niedrig. Spinat keimt am besten bei Temperaturen zwischen 15 und 20 Grad Celsius.
* Pflanzen wachsen langsam: Zu wenig Licht. Stellt die Flaschen an einen helleren Standort. Zu wenig Nährstoffe. Düngt regelmäßig.
* Blätter werden gelb: Zu viel Wasser. Reduziert die Bewässerung. Nährstoffmangel. Düngt mit einem stickstoffhaltigen Dünger.
* Schädlinge: Befall mit Blattläusen oder Schnecken. Setzt natürliche Schädlingsbekämpfungsmittel ein.
Ich hoffe, diese Anleitung hilft euch dabei, euren eigenen Spinat in recycelten Flaschen anzubauen. Es ist ein tolles Projekt, das Spaß macht und gleichzeitig etwas Gutes für die Umwelt tut. Viel Erfolg und guten Appetit!
Conclusion
So, there you have it! Transforming recycled bottles into thriving spinach gardens isn’t just a quirky DIY project; it’s a sustainable, space-saving, and surprisingly effective way to enjoy fresh, homegrown greens. We’ve walked you through the simple steps, highlighting the benefits of this eco-conscious approach to gardening. But why is this particular DIY trick a must-try?
Firstly, it’s incredibly accessible. You likely already have the primary ingredient – plastic bottles – readily available. This eliminates the need for expensive gardening equipment or large plots of land. Whether you live in a sprawling suburban home or a compact city apartment, you can cultivate your own little spinach oasis.
Secondly, it’s environmentally responsible. By repurposing plastic bottles, you’re actively reducing waste and contributing to a more sustainable lifestyle. You’re giving these materials a new lease on life, preventing them from ending up in landfills or polluting our oceans. This small act can have a significant impact when multiplied across communities.
Thirdly, it’s surprisingly productive. Spinach thrives in these controlled environments, often yielding a more abundant and healthier harvest than traditional gardening methods. The bottles provide excellent drainage and aeration, preventing root rot and promoting vigorous growth. Plus, the enclosed space can offer some protection from pests and harsh weather conditions.
But the possibilities don’t stop there! Feel free to experiment with different variations. Try painting the bottles to add a splash of color to your balcony or patio. Consider using different types of soil or adding organic fertilizers to boost your spinach’s growth. You could even create a vertical garden by hanging the bottles from a wall or fence, maximizing your space and creating a stunning visual display.
Don’t limit yourself to just spinach! This method works well for other leafy greens like lettuce, kale, and even herbs like basil and parsley. The key is to choose plants with shallow root systems that can thrive in the limited space.
We encourage you to embrace your inner gardener and give this DIY spinach growing project a try. It’s a rewarding experience that connects you with nature, promotes sustainability, and provides you with delicious, fresh produce.
And most importantly, we want to hear about your experiences! Share your photos, tips, and challenges in the comments below. Let’s create a community of bottle-gardening enthusiasts and inspire others to adopt this eco-friendly practice. What bottle sizes did you find worked best? Did you encounter any unexpected challenges? What varieties of spinach did you have the most success with? Your insights can help others succeed and further refine this innovative gardening technique. Let’s all learn together how to make the most of this fantastic spinach growing method.
Frequently Asked Questions (FAQ)
What type of plastic bottles are best for growing spinach?
Ideally, you should use PET (polyethylene terephthalate) bottles, which are commonly used for water and soda. These are generally considered food-safe and durable. Avoid using bottles that have contained harsh chemicals or cleaning products, as these could contaminate your spinach. Thoroughly wash and rinse the bottles before using them. The size of the bottle will depend on the variety of spinach you are growing. Smaller bottles are suitable for baby spinach, while larger bottles are better for more mature plants.
How do I ensure proper drainage in the bottles?
Drainage is crucial to prevent root rot. Make sure to drill or poke several drainage holes in the bottom of each bottle. You can also add a layer of gravel or small stones to the bottom of the bottle before adding the soil to further improve drainage. Monitor the soil moisture regularly and adjust your watering accordingly. If the soil feels soggy, you may need to add more drainage holes.
What type of soil should I use for growing spinach in bottles?
A well-draining potting mix is ideal for growing spinach in bottles. Avoid using garden soil, as it can be too heavy and compact, hindering drainage and aeration. You can also amend your potting mix with compost or other organic matter to provide additional nutrients to your spinach plants. Look for a potting mix specifically formulated for vegetables or herbs for best results.
How often should I water my spinach plants in bottles?
The frequency of watering will depend on several factors, including the weather, the size of the bottle, and the type of soil you are using. Generally, you should water your spinach plants when the top inch of soil feels dry to the touch. Avoid overwatering, as this can lead to root rot. During hot weather, you may need to water more frequently. Check the soil moisture daily and adjust your watering accordingly.
Where should I place my bottle garden for optimal spinach growth?
Spinach thrives in partial shade, especially during the hottest part of the day. Aim for a location that receives at least 4-6 hours of sunlight per day. If you live in a very hot climate, consider placing your bottle garden in a location that receives morning sun and afternoon shade. You can also use shade cloth to protect your spinach plants from excessive heat.
How do I fertilize my spinach plants in bottles?
Spinach is a relatively heavy feeder, so it’s important to provide it with adequate nutrients. You can use a liquid fertilizer specifically formulated for vegetables or herbs. Follow the instructions on the fertilizer label carefully. You can also amend your soil with compost or other organic matter to provide a slow-release source of nutrients. Avoid over-fertilizing, as this can burn the roots of your spinach plants.
How do I protect my spinach plants from pests and diseases?
Regularly inspect your spinach plants for signs of pests or diseases. Common pests that affect spinach include aphids, slugs, and snails. You can control these pests by handpicking them off the plants, using insecticidal soap, or applying diatomaceous earth. To prevent diseases, ensure good air circulation around your plants and avoid overwatering. Remove any infected leaves promptly to prevent the spread of disease.
How long does it take for spinach to grow in bottles?
Spinach is a relatively fast-growing crop. You can typically harvest your first leaves within 4-6 weeks of planting. Baby spinach can be harvested even sooner. Harvest the outer leaves as needed, allowing the inner leaves to continue to grow. This will extend your harvest period.
Can I grow spinach in bottles indoors?
Yes, you can grow spinach in bottles indoors, but you will need to provide adequate light. Place your bottle garden near a sunny window or use grow lights to supplement natural light. Ensure good air circulation around your plants to prevent diseases.
What are some other plants I can grow in recycled bottles?
Besides spinach, you can grow a variety of other plants in recycled bottles, including lettuce, kale, herbs (such as basil, parsley, and mint), strawberries, and even some smaller varieties of tomatoes and peppers. Choose plants with shallow root systems that can thrive in the limited space.
Leave a Comment