
Growing celery hydroponically might sound like something out of a futuristic farm, but trust me, it’s surprisingly simple and incredibly rewarding! Forget battling soil pests and unpredictable weather – with a little know-how, you can enjoy crisp, delicious celery grown right in your own home, year-round.
Hydroponics, the art of growing plants without soil, has ancient roots, dating back to the Hanging Gardens of Babylon and Aztec floating gardens. While those systems were complex, modern hydroponics, especially for home gardeners, is incredibly accessible. I remember the first time I saw a hydroponic setup; I was amazed by the clean, efficient way plants thrived. It felt like unlocking a secret to effortless gardening!
Why should you consider growing celery hydroponically? Well, for starters, it’s a fantastic way to bypass common celery-growing challenges. Celery can be a bit finicky in traditional gardens, demanding consistent moisture and nutrient-rich soil. Hydroponics eliminates these variables, giving you more control over your plant’s environment and leading to faster growth and higher yields. Plus, imagine the satisfaction of snipping fresh celery stalks for your salads and soups, knowing you nurtured them from seed to table, all without getting your hands dirty! This DIY guide will walk you through everything you need to know to successfully start growing celery hydroponically, even if you’re a complete beginner. Let’s get started!
Zellerie hydroponisch anbauen: Dein DIY-Leitfaden für den frischen Crunch
Hey Leute! Habt ihr Lust, euren eigenen knackigen Sellerie anzubauen, ohne euch mit Erde herumschlagen zu müssen? Dann seid ihr hier genau richtig! Ich zeige euch, wie ihr Sellerie hydroponisch anbauen könnt – ein super spannendes und lohnendes Projekt, das euch mit frischem Gemüse direkt aus eurem Wohnzimmer versorgt. Keine Sorge, es ist einfacher als es klingt!
Was du brauchst: Die Zutaten für deinen Hydroponik-Sellerie
Bevor wir loslegen, hier eine Liste mit allem, was du brauchst. Keine Panik, die meisten Sachen sind leicht zu bekommen oder hast du vielleicht schon zu Hause!
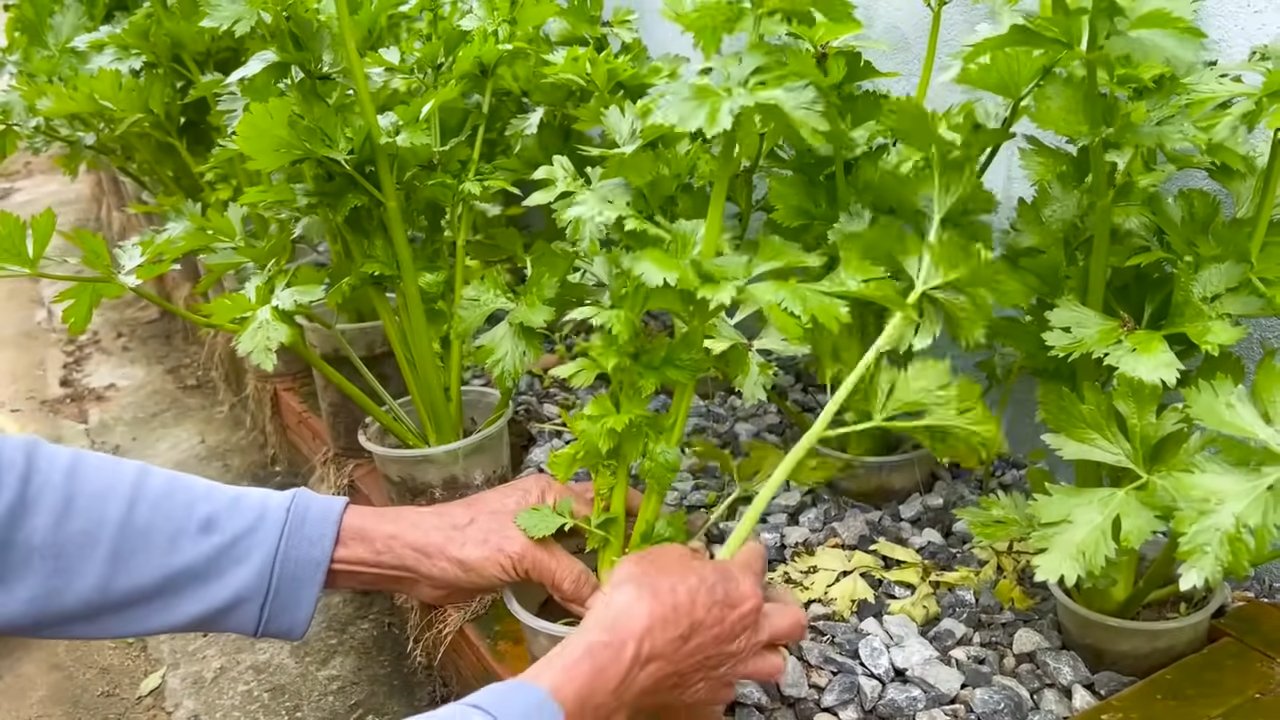
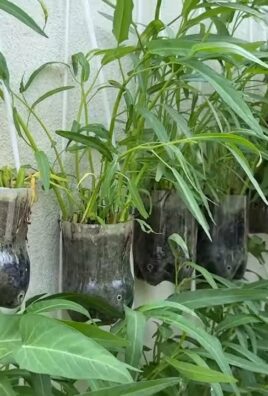
* Sellerie-Strunk: Am besten einen frischen, festen Strunk aus dem Supermarkt. Achte darauf, dass er noch einen gesunden Wurzelansatz hat.
* Behälter: Ein undurchsichtiger Behälter (z.B. eine dunkle Plastikbox oder ein Eimer) ist ideal. Er sollte groß genug sein, um den Sellerie-Strunk und das Wasser aufzunehmen.
* Hydroponische Nährlösung: Speziell für Blattgemüse geeignet. Gibt’s im Gartenfachhandel oder online.
* Wasser: Am besten gefiltertes oder abgestandenes Leitungswasser.
* Schere oder Messer: Zum Zuschneiden des Sellerie-Strunks.
* Pflanzkörbchen oder Netztopf: Um den Sellerie-Strunk zu stabilisieren.
* Hydroton-Tonkugeln oder Kokosfasersubstrat: Als Wachstumsmedium im Pflanzkörbchen.
* Luftpumpe und Luftstein (optional, aber empfohlen): Für eine bessere Sauerstoffversorgung der Wurzeln.
* pH-Messgerät (optional, aber hilfreich): Um den pH-Wert der Nährlösung zu überwachen.
* EC-Messgerät (optional, aber hilfreich): Um die Nährstoffkonzentration der Nährlösung zu überwachen.
* LED-Wachstumslampe (optional, aber empfohlen): Wenn du nicht genügend natürliches Licht hast.
Schritt-für-Schritt-Anleitung: So bringst du deinen Sellerie zum Sprießen
Okay, jetzt geht’s ans Eingemachte! Hier ist eine detaillierte Anleitung, wie du deinen Sellerie hydroponisch anbaust.
1. Den Sellerie-Strunk vorbereiten:
* Schneide den Sellerie-Strunk etwa 5-7 cm vom unteren Ende ab. Achte darauf, dass der Wurzelansatz intakt bleibt.
* Entferne die äußeren, welken oder beschädigten Stiele.
* Lass die inneren, jungen Stiele stehen. Sie werden später weiterwachsen.
2. Den Behälter vorbereiten:
* Reinige den Behälter gründlich mit Wasser und Seife. Spüle ihn gut aus, um alle Seifenreste zu entfernen.
* Wenn du eine Luftpumpe verwendest, bohre ein kleines Loch in den Deckel des Behälters, um den Luftschlauch durchzuführen.
3. Die Nährlösung anmischen:
* Befolge die Anweisungen auf der Verpackung der hydroponischen Nährlösung, um sie richtig anzumischen.
* Verwende gefiltertes oder abgestandenes Leitungswasser.
* Der pH-Wert der Nährlösung sollte idealerweise zwischen 6,0 und 6,5 liegen. Verwende ein pH-Messgerät, um den pH-Wert zu überprüfen und gegebenenfalls anzupassen.
* Die Nährstoffkonzentration (EC-Wert) sollte ebenfalls im empfohlenen Bereich liegen. Verwende ein EC-Messgerät, um den EC-Wert zu überprüfen und gegebenenfalls anzupassen.
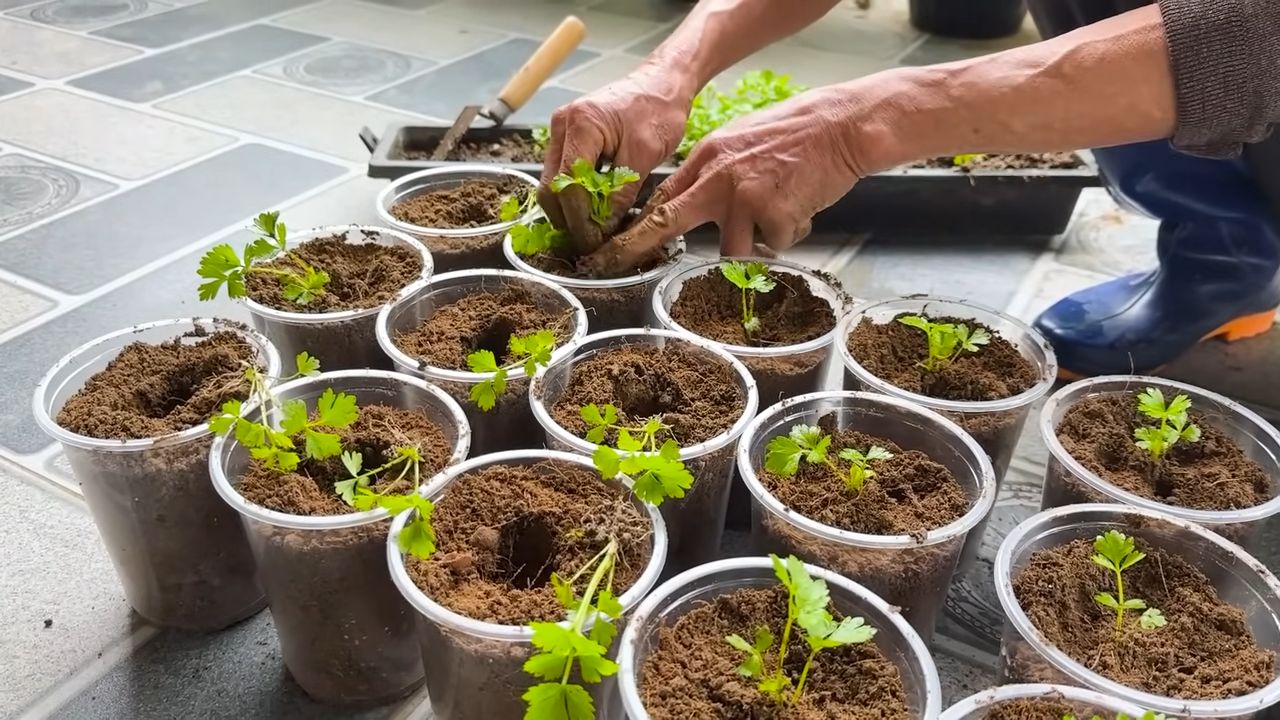
4. Den Sellerie-Strunk einsetzen:
* Fülle das Pflanzkörbchen oder den Netztopf mit Hydroton-Tonkugeln oder Kokosfasersubstrat.
* Setze den Sellerie-Strunk in das Pflanzkörbchen ein, sodass der Wurzelansatz nach unten zeigt.
* Achte darauf, dass der Strunk stabil im Pflanzkörbchen sitzt.
5. Das System zusammenbauen:
* Fülle den Behälter mit der vorbereiteten Nährlösung. Der Wasserstand sollte so hoch sein, dass der Boden des Pflanzkörbchens leicht in die Nährlösung eintaucht.
* Setze das Pflanzkörbchen mit dem Sellerie-Strunk in den Behälter ein.
* Wenn du eine Luftpumpe verwendest, platziere den Luftstein im Behälter und schließe die Luftpumpe an.
6. Den Sellerie pflegen:
* Stelle den Behälter an einen hellen Ort, aber vermeide direkte Sonneneinstrahlung. Wenn du nicht genügend natürliches Licht hast, verwende eine LED-Wachstumslampe.
* Wechsle die Nährlösung alle 1-2 Wochen aus.
* Überprüfe regelmäßig den pH-Wert und den EC-Wert der Nährlösung und passe sie gegebenenfalls an.
* Entferne regelmäßig abgestorbene Blätter oder Stiele.
Die ersten Wochen: Beobachten und Anpassen
Die ersten Wochen sind entscheidend. Beobachte deinen Sellerie genau und passe die Bedingungen gegebenenfalls an.
* Wurzelbildung: Innerhalb weniger Tage sollten sich neue Wurzeln bilden.
* Blattwachstum: Nach etwa einer Woche sollten die inneren Stiele beginnen, weiterzuwachsen.
* Licht: Achte darauf, dass der Sellerie genügend Licht bekommt. Wenn die Stiele blass und langgezogen aussehen, braucht er mehr Licht.
* Nährstoffe: Wenn die Blätter gelb werden, könnte das ein Zeichen für Nährstoffmangel sein. Überprüfe den EC-Wert der Nährlösung und passe ihn gegebenenfalls an.
* Algenbildung: Wenn sich Algen im Behälter bilden, reinige ihn gründlich und verwende einen undurchsichtigen Behälter, um das Licht zu reduzieren.
Erntezeit: Dein eigener frischer Sellerie
Nach einigen Wochen (ca. 4-6 Wochen) solltest du deinen eigenen frischen Sellerie ernten können!
* Ernte: Schneide die äußeren Stiele ab, wenn sie die gewünschte Größe erreicht haben. Die inneren Stiele werden weiterwachsen, sodass du über einen längeren Zeitraum ernten kannst.
* Genießen: Genieße deinen selbst angebauten Sellerie in Salaten, Suppen, Smoothies oder einfach pur als gesunden Snack!
Zusätzliche Tipps und Tricks für den hydroponischen Sellerieanbau
Hier sind noch ein paar zusätzliche Tipps, die dir helfen können, deinen hydroponischen Sellerieanbau zu optimieren:
* Belüftung: Eine gute Belüftung ist wichtig für die Gesundheit der Wurzeln. Die Luftpumpe und der Luftstein sorgen für eine ausreichende Sauerstoffversorgung.
* Temperatur: Die ideale Temperatur für den Sellerieanbau liegt zwischen 18 und 24 Grad Celsius.
* Schädlinge: Sellerie ist relativ resistent gegen Schädlinge, aber achte trotzdem auf Anzeichen von Befall. Bei Bedarf kannst du biologische Schädlingsbekämpfungsmittel verwenden.
* Sortenwahl: Es gibt verschiedene Selleriesorten, die sich für den hydroponischen Anbau eignen. Informiere dich, welche Sorte am besten zu deinen Bedürfnissen passt.
* Experimentieren: Hab keine Angst, zu experimentieren! Jeder hydroponische Anbau ist anders, und du wirst mit der Zeit lernen, was für deinen Sellerie am besten funktioniert.
Häufige Fehler vermeiden: So klappt’s garantiert
Damit dein hydroponischer Sellerieanbau ein voller Erfolg wird, solltest du diese häufigen Fehler vermeiden:
* Zu wenig Licht: Sellerie braucht viel Licht, um richtig zu wachsen. Stelle ihn an einen hellen Ort oder verwende eine LED-Wachstumslampe.
* Falsche Nährlösung: Verwende eine hydroponische Nährlösung, die speziell für Blattgemüse geeignet ist.
* Falscher pH-Wert: Der pH-Wert der Nährlösung sollte zwischen 6,0 und 6,5 liegen. Überprüfe ihn regelmäßig und passe ihn gegebenenfalls an.
* Überwässerung: Achte darauf, dass der Sellerie nicht
Conclusion
So, there you have it! Growing celery hydroponically isn’t just a quirky science experiment; it’s a genuinely rewarding way to enjoy fresh, crisp celery right from your own home, regardless of your garden size or climate. We’ve walked you through the process, highlighting the simplicity and efficiency of this method. Forget battling soil pests, inconsistent watering, and the long wait times associated with traditional gardening. Hydroponics offers a cleaner, faster, and often more productive alternative.
The benefits extend beyond mere convenience. Hydroponically grown celery often boasts a more intense flavor and a more tender texture compared to its soil-grown counterpart. Plus, you have complete control over the nutrients your plants receive, ensuring optimal growth and a healthier final product. Think of the possibilities! Imagine adding freshly harvested, vibrant green celery to your salads, soups, and smoothies, knowing exactly where it came from and how it was grown.
But the journey doesn’t end here. Feel free to experiment with different nutrient solutions to find the perfect balance for your celery. Try varying the lighting conditions to see how it affects growth rate and flavor. Consider adding companion plants to your hydroponic system, such as basil or parsley, to create a mini-ecosystem that benefits all your plants. You could even explore different hydroponic systems, from simple Kratky setups to more advanced deep water culture or nutrient film technique systems, as your experience grows.
Don’t be afraid to get creative! Perhaps you’ll discover a unique way to support the celery stalks as they grow tall, or maybe you’ll find a particular nutrient blend that yields exceptionally flavorful celery. The beauty of hydroponics lies in its adaptability and the opportunity for continuous learning and improvement.
We understand that venturing into the world of hydroponics can seem daunting at first, but we assure you that it’s far more accessible than you might think. With a little patience and attention to detail, you’ll be harvesting your own delicious celery in no time.
We wholeheartedly encourage you to give this DIY trick a try. Start small, learn as you go, and most importantly, have fun! And once you’ve experienced the joy of growing your own celery hydroponically, we’d love to hear about your experience. Share your tips, tricks, and triumphs in the comments below. Let’s build a community of hydroponic celery enthusiasts and inspire others to embrace this innovative and rewarding method of gardening. Your insights could be invaluable to someone just starting out. So, grab your seeds, gather your supplies, and get ready to embark on a flavorful adventure! Let’s grow some amazing celery together!
Frequently Asked Questions (FAQ)
What are the main advantages of growing celery hydroponically compared to traditional soil gardening?
Hydroponic celery cultivation offers several key advantages. Firstly, it eliminates soilborne diseases and pests, reducing the need for pesticides and herbicides. Secondly, it allows for precise control over nutrient delivery, resulting in faster growth and potentially higher yields. Thirdly, it conserves water, as the nutrient solution is recirculated within the system. Finally, it’s space-efficient, making it ideal for urban gardeners or those with limited outdoor space. You can grow celery hydroponically indoors, year-round, regardless of the weather conditions.
What type of hydroponic system is best for growing celery?
While celery can be grown in various hydroponic systems, the Kratky method and deep water culture (DWC) are particularly well-suited for beginners. The Kratky method is a passive system that requires minimal maintenance, as the plants draw nutrients from a reservoir without the need for pumps or aeration. DWC involves suspending the plant roots in a nutrient-rich solution that is aerated with an air pump and air stone. As you gain experience, you can explore other systems like nutrient film technique (NFT) or ebb and flow (flood and drain).
What kind of nutrient solution should I use for hydroponic celery?
A balanced hydroponic nutrient solution specifically formulated for leafy greens is recommended. Look for solutions that contain essential macronutrients like nitrogen (N), phosphorus (P), and potassium (K), as well as micronutrients like iron (Fe), manganese (Mn), and zinc (Zn). Follow the manufacturer’s instructions carefully when mixing the nutrient solution, and monitor the pH level regularly. The ideal pH range for celery is between 6.0 and 6.5. You can purchase pre-mixed nutrient solutions or create your own using individual nutrient salts.
How much light does hydroponic celery need?
Celery requires ample light to thrive. Aim for at least 12-16 hours of light per day. If you’re growing indoors, use grow lights to supplement natural sunlight. LED grow lights are energy-efficient and provide a full spectrum of light that is beneficial for plant growth. Position the lights close enough to the plants to provide adequate illumination, but not so close that they burn the leaves.
How often should I change the nutrient solution?
The frequency of nutrient solution changes depends on the size of your system and the growth rate of your plants. As a general rule, change the nutrient solution every 2-3 weeks. Regularly monitor the nutrient levels and pH of the solution, and adjust as needed. If the solution becomes cloudy or develops an unpleasant odor, it’s time for a change.
What are some common problems I might encounter when growing celery hydroponically, and how can I fix them?
Some common problems include nutrient deficiencies, algae growth, and root rot. Nutrient deficiencies can be identified by discoloration or stunted growth of the leaves. Adjust the nutrient solution accordingly. Algae growth can be prevented by keeping the nutrient solution covered and using opaque containers. Root rot is often caused by poor aeration or overwatering. Ensure that the roots have access to sufficient oxygen and avoid overwatering.
Can I grow celery from seed hydroponically, or should I start with seedlings?
You can grow celery from seed hydroponically, but it’s generally easier to start with seedlings. Celery seeds can be slow to germinate, and the seedlings are delicate. If you choose to start from seed, sow the seeds in a seed starting mix and transplant them to your hydroponic system once they have developed a few true leaves. Alternatively, you can purchase celery seedlings from a local nursery or garden center.
How long does it take to grow celery hydroponically?
The time it takes to grow celery hydroponically depends on various factors, including the variety of celery, the growing conditions, and the size of the seedlings. Generally, it takes about 80-100 days from seed to harvest. Starting with seedlings can shorten the growing time by a few weeks.
How do I harvest celery grown hydroponically?
You can harvest celery stalks individually as needed, or you can harvest the entire plant at once. To harvest individual stalks, simply cut them off at the base of the plant with a sharp knife. To harvest the entire plant, cut it off at the base of the roots.
Can I use tap water for my hydroponic system?
It’s generally recommended to use filtered or distilled water for your hydroponic system. Tap water may contain chlorine, chloramine, and other minerals that can be harmful to plants. If you must use tap water, let it sit out for 24 hours to allow the chlorine to evaporate. Test the pH of the water before adding it to your system and adjust as needed.
Leave a Comment