
Growing kale in soil bags is a game-changer for any gardener, whether you’re a seasoned pro or just starting out! Imagine harvesting fresh, vibrant kale right outside your door, even if you don’t have a traditional garden bed. Sounds amazing, right? Well, it’s totally achievable with this simple and effective DIY trick.
For centuries, humans have cultivated kale for its nutritional power and versatility. From ancient Roman dishes to modern-day smoothies, kale has proven its staying power. But let’s be honest, sometimes space is limited, or the soil in our yards just isn’t ideal. That’s where the magic of soil bag gardening comes in!
This DIY method is perfect for apartment dwellers, renters with limited space, or anyone who wants to control the growing environment for their kale. Plus, it’s incredibly budget-friendly! Forget expensive raised beds or complicated setups. With just a few supplies and a little know-how, you can be growing kale in soil bags and enjoying a bountiful harvest in no time. I’m excited to share this easy and rewarding technique with you, so let’s get started and unlock the secrets to homegrown kale success!
Kohl Anbauen in Pflanzsäcken: Eine Einfache DIY-Anleitung
Ich liebe es, frisches Gemüse direkt aus meinem Garten zu ernten, und Kohl ist da keine Ausnahme! Aber nicht jeder hat einen riesigen Garten, oder? Deshalb zeige ich euch heute, wie ihr Kohl ganz einfach in Pflanzsäcken anbauen könnt. Es ist super platzsparend, kostengünstig und funktioniert wirklich gut. Los geht’s!
Was du brauchst:
* Pflanzsäcke: Ich empfehle robuste Pflanzsäcke aus Stoff (Geotextil). Sie sind atmungsaktiv und sorgen für eine gute Drainage. Die Größe hängt davon ab, wie viele Kohlpflanzen du pro Sack anbauen möchtest. Für 2-3 Pflanzen pro Sack sind 40-60 Liter Volumen ideal.
* Hochwertige Pflanzerde: Verwende eine gut drainierende, nährstoffreiche Pflanzerde. Du kannst auch deine eigene Mischung aus Gartenerde, Kompost und Perlit herstellen.
* Kohlpflanzen: Du kannst entweder Kohlpflanzen im Gartencenter kaufen oder sie selbst aus Samen ziehen. Achte darauf, gesunde, kräftige Pflanzen auszuwählen.
* Langzeitdünger: Ein organischer Langzeitdünger versorgt deine Kohlpflanzen über einen längeren Zeitraum mit Nährstoffen.
* Gießkanne oder Gartenschlauch: Zum Bewässern deiner Pflanzen.
* Schere oder Messer: Zum Öffnen der Pflanzerde-Säcke.
* Optional: Mulch (z.B. Stroh oder Holzhackschnitzel) zur Feuchtigkeitsspeicherung und Unkrautbekämpfung.
Schritt-für-Schritt-Anleitung:
1. Vorbereitung der Pflanzsäcke:
* Suche dir einen sonnigen Standort für deine Pflanzsäcke aus. Kohl braucht mindestens 6 Stunden Sonne pro Tag.
* Lege die leeren Pflanzsäcke an den gewünschten Standort. Denk daran, dass sie nach dem Befüllen schwerer sind und sich nicht mehr so leicht bewegen lassen.
* Öffne die Pflanzerde-Säcke vorsichtig mit einer Schere oder einem Messer.
2. Befüllen der Pflanzsäcke:
* Fülle die Pflanzsäcke mit Pflanzerde, aber lasse oben etwa 5-10 cm Platz frei. Das erleichtert das Gießen.
* Mische den Langzeitdünger gemäß den Anweisungen auf der Verpackung unter die Erde.
* Drücke die Erde leicht an, aber nicht zu fest. Sie sollte locker und luftig bleiben.
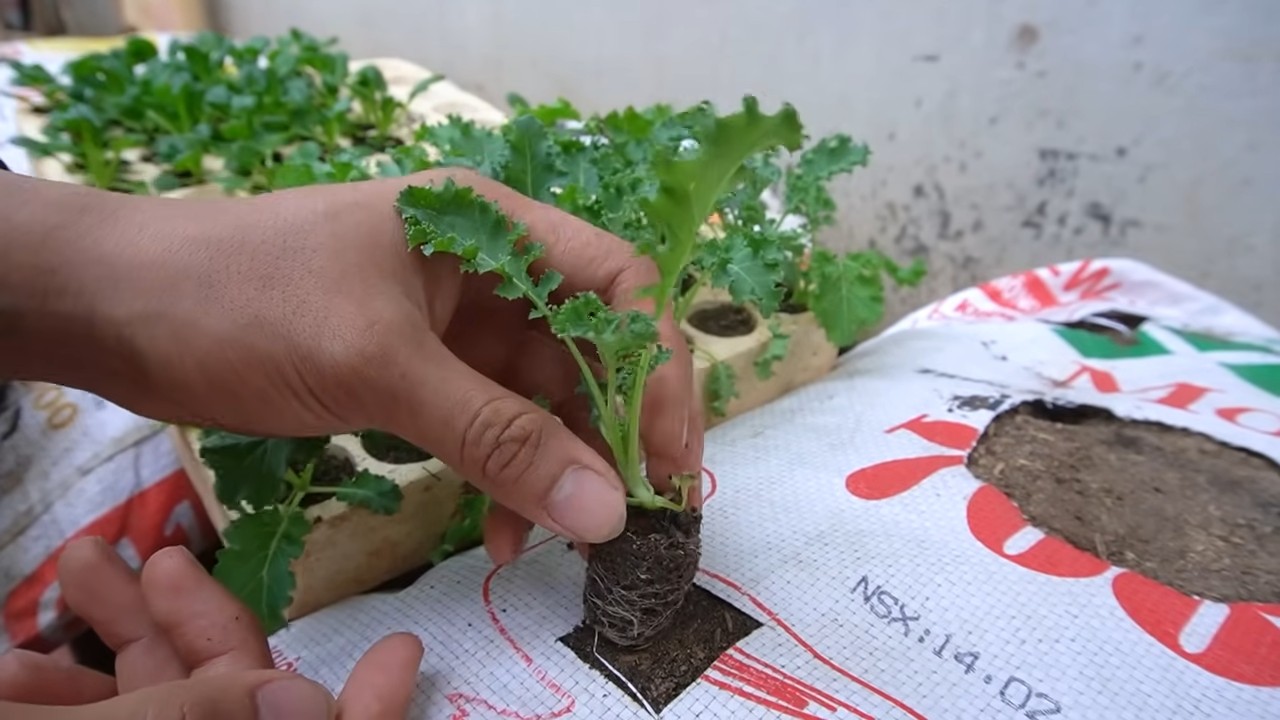
3. Pflanzen der Kohlpflanzen:
* Grabe mit den Händen kleine Löcher in die Erde, die groß genug sind, um die Wurzelballen der Kohlpflanzen aufzunehmen.
* Nimm die Kohlpflanzen vorsichtig aus ihren Töpfen und lockere die Wurzeln etwas auf.
* Setze die Kohlpflanzen in die Löcher und fülle die Löcher mit Erde auf. Die Oberseite des Wurzelballens sollte mit der Erdoberfläche abschließen.
* Drücke die Erde um die Pflanzen herum leicht an.
* Achte darauf, dass genügend Abstand zwischen den Pflanzen ist (ca. 30-40 cm), damit sie genügend Platz zum Wachsen haben.
4. Bewässerung:
* Gieße die Kohlpflanzen nach dem Einpflanzen gründlich an. Die Erde sollte gut durchfeuchtet sein.
* Achte darauf, dass die Erde immer feucht, aber nicht nass ist. Überwässerung kann zu Wurzelfäule führen.
* Gieße am besten früh morgens oder spät abends, um Verdunstung zu vermeiden.
5. Pflege:
* Düngen: Auch wenn du Langzeitdünger verwendet hast, kann es sinnvoll sein, die Kohlpflanzen während der Wachstumsperiode zusätzlich zu düngen. Verwende einen organischen Flüssigdünger gemäß den Anweisungen auf der Verpackung.
* Unkrautbekämpfung: Entferne regelmäßig Unkraut, das in den Pflanzsäcken wächst.
* Schutz vor Schädlingen: Kohl kann von verschiedenen Schädlingen befallen werden, z.B. Kohlweißlingen, Erdflöhen oder Blattläusen. Kontrolliere deine Pflanzen regelmäßig und bekämpfe Schädlinge bei Bedarf mit geeigneten Mitteln (z.B. biologischen Insektiziden).
* Mulchen: Eine Mulchschicht aus Stroh oder Holzhackschnitzeln hilft, die Feuchtigkeit im Boden zu halten, Unkraut zu unterdrücken und den Boden vor Temperaturschwankungen zu schützen.
* Stützen: Wenn deine Kohlpflanzen sehr groß werden, kann es sinnvoll sein, sie mit Stäben zu stützen, damit sie nicht umknicken.
Spezifische Tipps für den Anbau von Kohl in Pflanzsäcken:
* Drainage ist wichtig: Achte darauf, dass die Pflanzsäcke eine gute Drainage haben, damit sich kein Wasser staut. Du kannst z.B. eine Schicht Kies oder Blähton auf den Boden der Säcke legen.
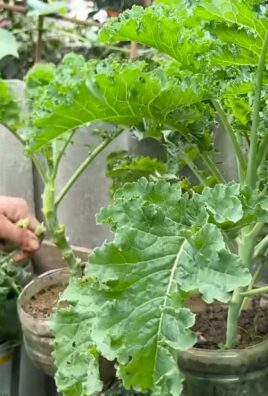
* Wähle die richtige Kohlsorte: Einige Kohlsorten sind besser für den Anbau in Pflanzsäcken geeignet als andere. Grünkohl, Palmkohl und Rosenkohl sind in der Regel eine gute Wahl.
* Regelmäßiges Gießen: Pflanzsäcke trocknen schneller aus als Beete im Garten. Gieße deine Kohlpflanzen daher regelmäßig, besonders an heißen Tagen.
* Ernte: Die Erntezeit hängt von der Kohlsorte ab. Grünkohl kann z.B. schon nach wenigen Wochen geerntet werden, während Rosenkohl länger braucht. Ernte die Blätter oder Röschen, sobald sie die gewünschte Größe erreicht haben.
Herausforderungen und Lösungen:
* Schädlinge: Wie bereits erwähnt, können Kohlpflanzen von verschiedenen Schädlingen befallen werden. Eine regelmäßige Kontrolle und der Einsatz von biologischen Insektiziden können helfen, das Problem in den Griff zu bekommen. Ich habe gute Erfahrungen mit Neemöl gemacht.
* Nährstoffmangel: Wenn deine Kohlpflanzen gelb werden oder schlecht wachsen, kann das ein Zeichen für Nährstoffmangel sein. Dünge sie dann mit einem organischen Flüssigdünger.
* Wurzelfäule: Wurzelfäule kann auftreten, wenn die Erde zu nass ist. Achte auf eine gute Drainage und gieße nicht zu viel.
* Sonnenbrand: An sehr heißen Tagen können die Blätter der Kohlpflanzen Sonnenbrand bekommen. Schütze sie dann mit einem Schattiernetz oder stelle die Pflanzsäcke an einen halbschattigen Standort.
Zusätzliche Tipps für den Erfolg:
* Bodenprobe: Wenn du unsicher bist, ob deine Pflanzerde die richtigen Nährstoffe enthält, kannst du eine Bodenprobe nehmen und sie in einem Labor analysieren lassen.
* Fruchtfolge: Baue Kohl nicht jedes Jahr am selben Standort an, um Krankheiten und Schädlingen vorzubeugen.
* Beobachtung: Beobachte deine Kohlpflanzen regelmäßig und achte auf Veränderungen. Je früher du Probleme erkennst, desto besser kannst du sie beheben.
Kohl ernten und genießen:
Die Ernte ist der Lohn für deine Mühe! Je nach Kohlsorte kannst du die Blätter oder Röschen ernten, sobald sie die gewünschte Größe erreicht haben. Grünkohl kann man z.B. nach und nach ernten, indem man die äußeren Blätter abzupft. Rosenkohl ist reif, wenn die Röschen fest und geschlossen sind.
Frischer Kohl schmeckt einfach köstlich! Du kannst ihn roh in Salaten verwenden, kochen, dünsten, braten oder in Suppen und Eintöpfen verarbeiten. Lass deiner Kreativität freien Lauf!
Ich hoffe, diese Anleitung hilft dir dabei, erfolgreich Kohl in Pflanzsäcken anzubauen. Es ist wirklich einfacher als du denkst! Viel Spaß beim Gärtnern!
Conclusion
So, there you have it! Growing kale in soil bags isn’t just a gardening hack; it’s a game-changer for anyone looking to enjoy fresh, homegrown greens with minimal effort and maximum yield. We’ve explored how this method bypasses many common gardening challenges, offering a convenient and efficient way to cultivate this nutritional powerhouse, even if you’re short on space or time.
The beauty of this DIY trick lies in its simplicity and adaptability. Whether you’re a seasoned gardener or a complete beginner, the process is straightforward and forgiving. The reduced weeding, improved drainage, and enhanced soil control all contribute to a healthier, more productive kale crop. Plus, the mobility of soil bags allows you to chase the sun or shelter your plants from harsh weather, giving you greater control over their growing environment.
But the benefits don’t stop there. Consider the variations you can explore! Try mixing different types of kale seeds in the same bag for a diverse harvest. Experiment with companion planting by adding herbs like rosemary or thyme to deter pests naturally. You could even use different types of soil mixes to see which one yields the best results in your specific climate. The possibilities are endless!
Why is this a must-try? Because it empowers you to grow your own healthy, delicious kale without the hassle of traditional gardening. It’s a sustainable, cost-effective, and incredibly rewarding way to connect with your food and enjoy the freshest possible ingredients. Imagine stepping outside your door and harvesting vibrant, nutrient-rich kale leaves for your salads, smoothies, or stir-fries. That’s the power of growing kale in soil bags.
We wholeheartedly encourage you to give this DIY trick a try. Don’t be intimidated by the prospect of gardening; this method is designed to be accessible and enjoyable for everyone. Gather your supplies, follow the steps outlined, and prepare to be amazed by the abundance you can create.
And most importantly, we want to hear about your experience! Share your successes, your challenges, and your creative variations in the comments below. Let’s build a community of kale-growing enthusiasts and learn from each other. Together, we can unlock the full potential of this simple yet powerful gardening technique. So, get your hands dirty, embrace the joy of growing, and discover the delicious rewards of growing kale in soil bags. Happy gardening!
Frequently Asked Questions (FAQs)
What type of soil should I use for growing kale in soil bags?
The best soil for growing kale in soil bags is a well-draining, nutrient-rich potting mix. Avoid using garden soil directly, as it can be too heavy and compact, hindering drainage and root development. Look for a potting mix that contains ingredients like peat moss, perlite, vermiculite, and compost. These components provide good aeration, water retention, and essential nutrients for healthy kale growth. You can also amend your potting mix with additional compost or aged manure to further boost its fertility. A slightly acidic to neutral pH (around 6.0 to 7.0) is ideal for kale.
How often should I water my kale plants in soil bags?
Watering frequency depends on several factors, including the weather, the size of the soil bag, and the stage of kale growth. Generally, you should water your kale plants when the top inch of soil feels dry to the touch. During hot, dry periods, you may need to water daily, while during cooler, wetter periods, you can reduce the frequency. Avoid overwatering, as this can lead to root rot. Ensure that the soil bag has adequate drainage holes to prevent waterlogging. A good rule of thumb is to water deeply and less frequently, allowing the soil to dry out slightly between waterings. Check the moisture level regularly and adjust your watering schedule accordingly.
How much sunlight does kale need when grown in soil bags?
Kale thrives in full sun, requiring at least 6 hours of direct sunlight per day. However, it can also tolerate partial shade, especially in hotter climates. When growing kale in soil bags, position them in a location that receives ample sunlight throughout the day. If you live in an area with intense summer heat, providing some afternoon shade can help prevent the leaves from scorching. If you’re growing kale indoors or in a shaded area, consider using grow lights to supplement the natural sunlight. Adequate sunlight is crucial for photosynthesis, which is essential for healthy kale growth and nutrient production.
What are some common pests and diseases that affect kale, and how can I prevent them when growing in soil bags?
Common pests that affect kale include aphids, cabbage worms, flea beetles, and slugs. Diseases include black rot, clubroot, and downy mildew. To prevent these issues when growing kale in soil bags, start with healthy, disease-free seeds or seedlings. Regularly inspect your plants for signs of pests or diseases. Handpick pests or use insecticidal soap or neem oil to control infestations. Cover your kale plants with row covers to prevent pests from reaching them. Ensure good air circulation to reduce the risk of fungal diseases. Rotate your crops each year to prevent soilborne diseases from building up. Remove any infected leaves or plants promptly to prevent the spread of disease. Proper watering and fertilization can also help strengthen your kale plants and make them more resistant to pests and diseases.
Can I grow different varieties of kale in the same soil bag?
Yes, you can grow different varieties of kale in the same soil bag, but it’s important to consider their growth habits and spacing requirements. Choose varieties that have similar maturity dates and growth rates to ensure that one doesn’t outcompete the others. Provide adequate spacing between plants to allow for proper air circulation and sunlight penetration. Consider the color and texture of different kale varieties to create a visually appealing and diverse harvest. Be mindful of potential cross-pollination if you plan to save seeds from your kale plants.
How do I fertilize kale grown in soil bags?
Kale is a heavy feeder and benefits from regular fertilization. Start by incorporating compost or aged manure into your potting mix before planting. During the growing season, fertilize your kale plants every 2-3 weeks with a balanced, water-soluble fertilizer or an organic fertilizer like fish emulsion or seaweed extract. Follow the instructions on the fertilizer package for proper application rates. Avoid over-fertilizing, as this can lead to excessive foliage growth and reduced nutrient uptake. You can also side-dress your kale plants with compost or aged manure throughout the growing season to provide a slow-release source of nutrients. Monitor your plants for signs of nutrient deficiencies, such as yellowing leaves or stunted growth, and adjust your fertilization schedule accordingly.
How long does it take for kale to mature when grown in soil bags?
The time it takes for kale to mature depends on the variety and growing conditions. Generally, kale can be harvested about 55-75 days after planting. Baby kale leaves can be harvested earlier, around 30-40 days after planting. Check the seed packet or plant tag for specific maturity dates. You can start harvesting kale leaves once they reach a usable size, typically around 6-8 inches long. Harvest the outer leaves first, allowing the inner leaves to continue growing. Regular harvesting encourages continued production.
Can I grow kale in soil bags during the winter?
Yes, you can grow kale in soil bags during the winter, especially in mild climates. Kale is a cold-hardy vegetable that can tolerate frost and even snow. In colder climates, you may need to provide some protection, such as covering the soil bags with a cold frame or greenhouse. Choose winter-hardy kale varieties like ‘Winterbor’ or ‘Red Russian’. Reduce watering and fertilization during the winter months, as growth will be slower. Harvest kale leaves as needed throughout the winter.
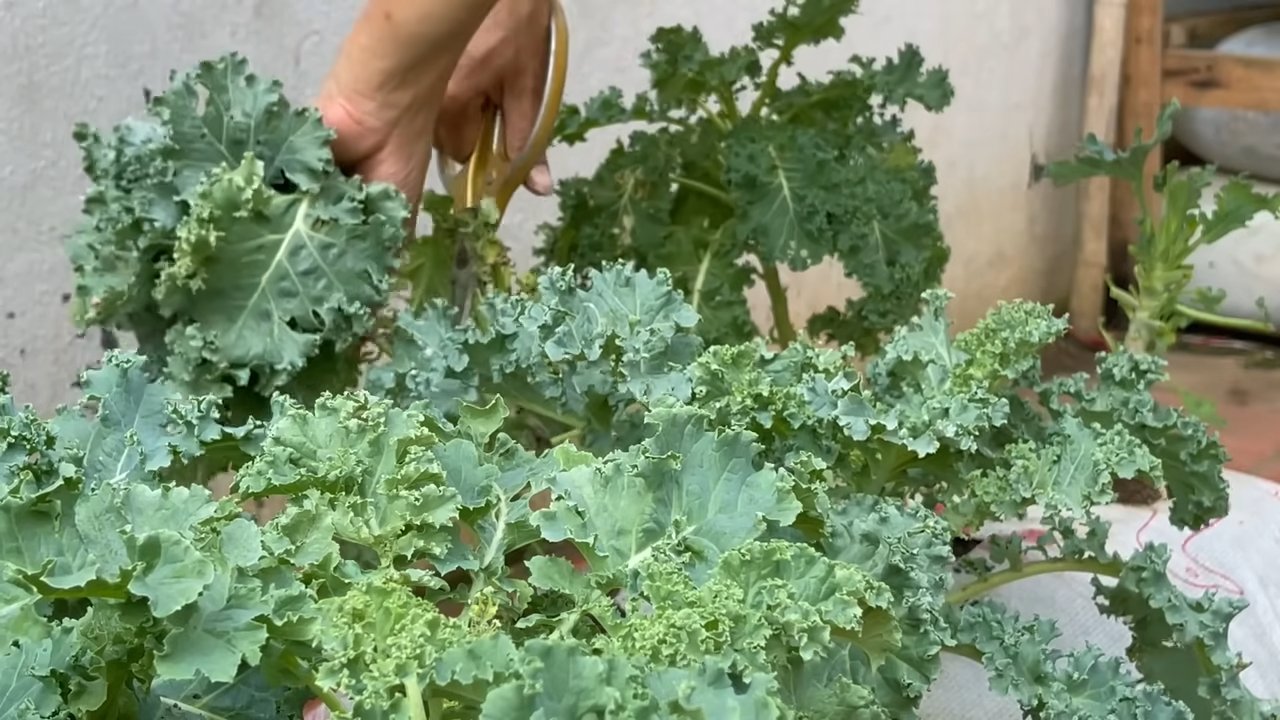
How do I harvest kale from soil bags?
Harvest kale by cutting the outer leaves with a sharp knife or scissors, leaving the inner leaves to continue growing. Start harvesting when the leaves are about 6-8 inches long. Avoid harvesting more than one-third of the plant at a time to ensure continued production. Regular harvesting encourages new growth. Wash the harvested kale leaves thoroughly before using them.
What are some creative ways to use kale grown in soil bags?
Kale is a versatile vegetable that can be used in a variety of dishes. Add it to salads, smoothies, soups, stews, stir-fries, and omelets. You can also bake kale chips or sauté kale with garlic and olive oil. Use kale as a substitute for spinach in your favorite recipes. Get creative and experiment with different ways to incorporate kale into your diet.

Leave a Comment