
Grow cantaloupe in grow bags? Absolutely! Imagine biting into a juicy, sweet cantaloupe you nurtured from seed, right on your patio or balcony. Sounds dreamy, doesn’t it? For centuries, humans have cultivated melons, with evidence suggesting cantaloupe originated in Africa and India, eventually gracing tables worldwide. But let’s be honest, not everyone has acres of farmland to dedicate to these sun-loving fruits. That’s where the magic of container gardening comes in!
This DIY guide is your ticket to cantaloupe success, even if you’re short on space. We’ll unlock the secrets to successfully grow cantaloupe in grow bags, transforming your small outdoor area into a thriving mini-melon patch. Many people struggle with growing cantaloupe because they think it requires a vast garden. But with the right techniques, grow bags provide the perfect environment for these delicious fruits to flourish. I’m here to show you how to overcome common challenges like limited space, soil quality, and proper support, ensuring you harvest a bountiful crop of homegrown cantaloupe. Get ready to roll up your sleeves and enjoy the sweet taste of success!
Wassermelonen-Wunder: Cantaloupe-Anbau im Pflanzsack – Dein DIY-Leitfaden
Hey Gartenfreunde! Habt ihr auch schon immer davon geträumt, saftige, süße Cantaloupe-Melonen direkt vor eurer Haustür zu ernten? Ich auch! Und wisst ihr was? Es ist einfacher als ihr denkt, besonders wenn ihr Pflanzsäcke verwendet. Pflanzsäcke sind super praktisch, weil sie mobil sind, eine gute Drainage bieten und sich perfekt für kleinere Gärten, Balkone oder Terrassen eignen. Lasst uns gemeinsam in dieses spannende Projekt eintauchen!
Was du brauchst: Deine Einkaufsliste für Cantaloupe-Glück
Bevor wir loslegen, hier eine Liste mit allem, was du für dein Cantaloupe-Pflanzsack-Abenteuer benötigst:
* Cantaloupe-Samen oder Jungpflanzen: Wähle eine Sorte, die gut in deiner Region wächst. Ich persönlich liebe die ‘Hales Best Jumbo’ für ihren süßen Geschmack und ihre Robustheit.
* Pflanzsäcke: Ich empfehle Pflanzsäcke mit einem Volumen von mindestens 50 Litern (besser noch 75 Liter). Sie sollten aus atmungsaktivem Material wie Filz oder Jute sein.
* Hochwertige Blumenerde: Eine gut drainierende Mischung ist entscheidend. Du kannst fertige Blumenerde kaufen oder sie selbst mischen (siehe unten).
* Kompost: Kompost ist Gold wert! Er versorgt deine Pflanzen mit Nährstoffen und verbessert die Bodenstruktur.
* Organischer Dünger: Ein Langzeitdünger ist ideal, um deine Cantaloupe-Pflanzen während der gesamten Saison zu unterstützen.
* Gartenschere: Für das Beschneiden der Ranken.
* Pflanzkelle: Zum Einpflanzen der Samen oder Jungpflanzen.
* Gießkanne oder Gartenschlauch: Zum Bewässern.
* Rankhilfe (optional): Cantaloupe-Pflanzen können ziemlich groß werden, daher kann eine Rankhilfe hilfreich sein, um die Früchte vom Boden fernzuhalten und die Luftzirkulation zu verbessern.
* Mulch (optional): Mulch hilft, die Feuchtigkeit im Boden zu halten und Unkraut zu unterdrücken. Stroh, Holzhackschnitzel oder Grasschnitt eignen sich gut.
Die Vorbereitung: Der Schlüssel zum Erfolg
Bevor wir mit dem Pflanzen beginnen, ist eine gute Vorbereitung das A und O.
1. Wähle den richtigen Standort: Cantaloupe-Melonen lieben die Sonne! Wähle einen Standort, der mindestens 6-8 Stunden direkte Sonneneinstrahlung pro Tag erhält.
2. Bereite die Pflanzsäcke vor: Stelle die Pflanzsäcke an den gewählten Standort. Fülle sie mit einer Mischung aus Blumenerde, Kompost und organischem Dünger. Ich mische meistens 2 Teile Blumenerde, 1 Teil Kompost und eine Handvoll Langzeitdünger pro Pflanzsack.
3. Bodenmischung optimieren (optional): Wenn du deine eigene Bodenmischung herstellen möchtest, kannst du folgende Zutaten verwenden:
* 2 Teile Gartenerde (wenn deine Gartenerde gut ist) oder Blumenerde
* 1 Teil Kompost
* 1 Teil Kokosfaser (zur Verbesserung der Drainage und Wasserspeicherung)
* Eine Handvoll organischen Dünger (z.B. Hornspäne oder Knochenmehl)
* Etwas Sand (wenn deine Erde sehr lehmig ist)
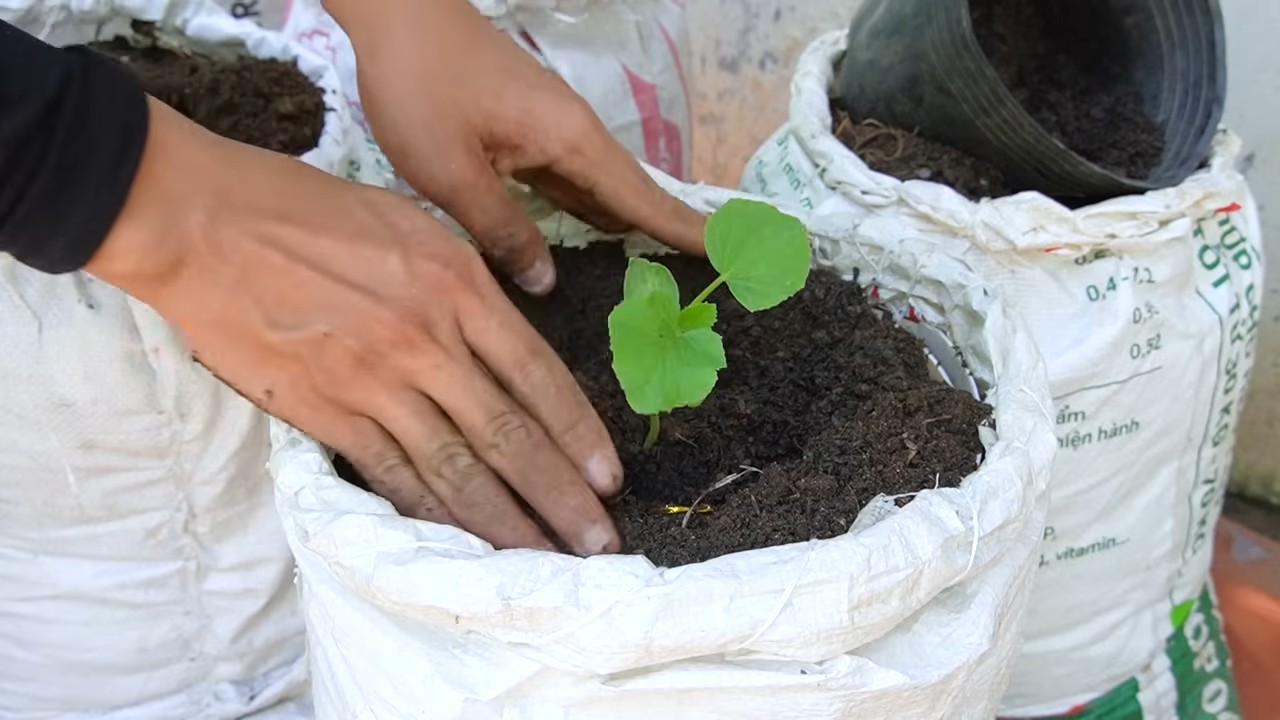
4. Samen vorziehen (optional): Um den Wachstumsprozess zu beschleunigen, kannst du die Cantaloupe-Samen 2-3 Wochen vor dem letzten Frost im Haus vorziehen. Säe die Samen in kleinen Töpfen mit Anzuchterde und halte sie feucht. Sobald die Sämlinge kräftig genug sind, kannst du sie in die Pflanzsäcke umpflanzen.
Die Pflanzung: Der Start ins Cantaloupe-Paradies
Jetzt kommt der spannende Teil: das Pflanzen!
1. Samen direkt säen: Wenn du die Samen direkt in die Pflanzsäcke säen möchtest, mache kleine Löcher (ca. 2-3 cm tief) im Abstand von etwa 30-45 cm. Lege 2-3 Samen in jedes Loch und bedecke sie mit Erde. Gieße die Erde vorsichtig an.
2. Jungpflanzen einpflanzen: Wenn du Jungpflanzen verwendest, grabe ein Loch, das etwas größer ist als der Wurzelballen der Pflanze. Setze die Pflanze vorsichtig in das Loch und fülle es mit Erde auf. Drücke die Erde leicht an und gieße die Pflanze gründlich.
3. Mulchen (optional): Verteile eine Schicht Mulch um die Pflanzen, um die Feuchtigkeit im Boden zu halten und Unkraut zu unterdrücken.
4. Rankhilfe installieren (optional): Wenn du eine Rankhilfe verwendest, installiere sie jetzt, bevor die Pflanzen zu groß werden.
Die Pflege: Damit deine Cantaloupe-Pflanzen gedeihen
Die richtige Pflege ist entscheidend für eine reiche Ernte.
1. Bewässerung: Cantaloupe-Melonen brauchen viel Wasser, besonders während der Fruchtbildung. Gieße die Pflanzen regelmäßig, aber vermeide Staunässe. Am besten gießt du früh am Morgen, damit die Blätter Zeit haben, abzutrocknen, bevor die Sonne aufgeht. Überprüfe die Feuchtigkeit der Erde regelmäßig, indem du deinen Finger etwa 2-3 cm tief in die Erde steckst. Wenn sich die Erde trocken anfühlt, ist es Zeit zum Gießen.
2. Düngung: Dünge die Pflanzen alle 2-3 Wochen mit einem organischen Flüssigdünger. Achte darauf, dass der Dünger reich an Kalium ist, da dies die Fruchtbildung fördert. Ich verwende gerne einen Tomatendünger, da dieser einen hohen Kaliumgehalt hat.
3. Beschneiden: Cantaloupe-Pflanzen können sehr wuchern. Beschneide die Ranken regelmäßig, um die Luftzirkulation zu verbessern und die Fruchtbildung zu fördern. Entferne auch alle gelben oder braunen Blätter. Ich schneide meistens die Seitentriebe ab, damit die Pflanze ihre Energie in die Haupttriebe und die Früchte steckt.
4. Bestäubung: Cantaloupe-Melonen sind auf die Bestäubung durch Bienen und andere Insekten angewiesen. Wenn du in einer Gegend mit wenig Insekten lebst, kannst du die Blüten von Hand bestäuben. Verwende dazu einen kleinen Pinsel, um den Pollen von den männlichen Blüten auf die weiblichen Blüten zu übertragen. Die weiblichen Blüten erkennst du an dem kleinen Fruchtansatz direkt unter der Blüte.
5. Schutz vor Schädlingen und Krankheiten: Überprüfe die Pflanzen regelmäßig auf Schädlinge und Krankheiten. Blattläuse, Spinnmilben und Mehltau können Probleme verursachen. Bei Bedarf kannst du organische Schädlingsbekämpfungsmittel oder Fungizide verwenden. Ich verwende gerne Neemöl, um Schädlinge abzuwehren.
Die Ernte: Der Lohn deiner Mühe
Nach etwa 70-90 Tagen (je nach Sorte) sind deine Cantaloupe-Melonen reif für die Ernte.
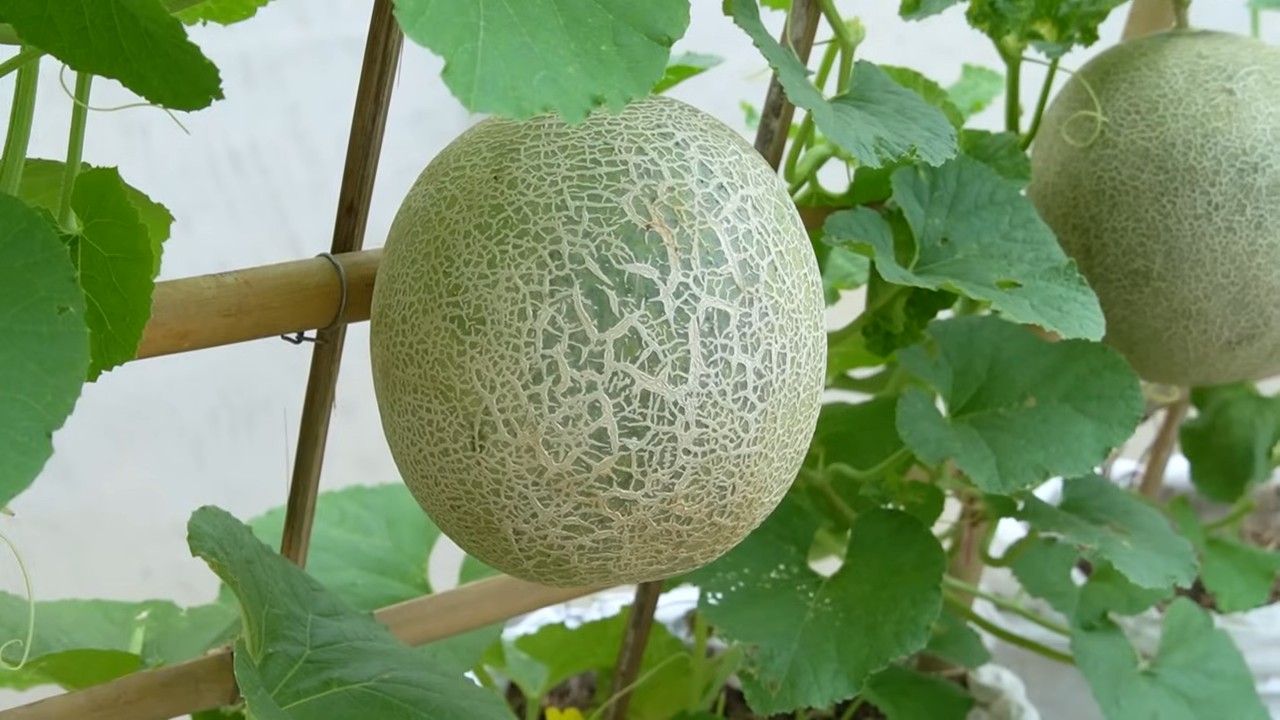
1. Reife erkennen: Eine reife Cantaloupe-Melone hat eine goldgelbe Farbe und einen süßen Duft. Der Stielansatz löst sich leicht von der Frucht, wenn du ihn leicht drehst.
2. Ernten: Schneide die Melone vorsichtig mit einer Gartenschere vom Stiel ab.
3. Genießen: Lass dir deine selbst gezogene Cantaloupe-Melone schmecken! Sie ist pur ein Genuss, aber auch in Salaten, Smoothies oder Desserts ein Highlight.
Zusätzliche Tipps für Cantaloupe-Profis
* Sortenwahl: Experimentiere mit verschiedenen Cantaloupe-Sorten, um herauszufinden, welche am besten in deinem Klima und Boden gedeihen.
* Bodenverbesserung: Verbessere die Bodenstruktur und den Nährstoffgehalt, indem du regelmäßig Kompost und organischen Dünger hinzufügst.
* Wassermanagement: Achte auf eine gleichmäßige Bewässerung, besonders während der Fruchtbildung.
* Schädlingsbekämpfung: Sei proaktiv bei der Schädlingsbekämpfung, um Schäden an den Pflanzen zu
Conclusion
So, there you have it! Growing cantaloupe in grow bags isn’t just a trend; it’s a game-changer for gardeners of all levels. From maximizing space to improving drainage and temperature control, the benefits are undeniable. If you’ve been hesitant to try growing cantaloupe due to limited space or challenging soil conditions, this method offers a practical and effective solution.
Why is this a must-try? Because it unlocks the potential for fresh, homegrown cantaloupe even in the most unlikely of places. Imagine biting into a juicy, sun-ripened cantaloupe that you nurtured from seed to fruit, all within the confines of a simple grow bag. The satisfaction is unparalleled. Plus, the improved air circulation and drainage inherent in grow bags significantly reduce the risk of common cantaloupe diseases, leading to healthier plants and a more abundant harvest.
But the advantages don’t stop there. Grow bags are incredibly versatile. You can easily move them around to chase the sun, protect them from unexpected frosts, or even bring them indoors during extreme weather. This flexibility gives you greater control over your growing environment and allows you to extend the growing season.
Looking for variations? Consider experimenting with different sizes of grow bags to accommodate various cantaloupe varieties. Smaller varieties, like Sugar Cube or Minnesota Midget, will thrive in smaller bags (around 10-15 gallons), while larger varieties, such as Hale’s Best Jumbo, will require larger bags (20 gallons or more). You can also try using different types of soil mixes. While a standard potting mix works well, amending it with compost or other organic matter will further enhance drainage and nutrient availability. Another exciting variation is to incorporate companion planting. Marigolds, for example, can help deter pests, while basil can improve the flavor of your cantaloupe.
Don’t be afraid to get creative with your support systems, too. While a simple trellis or stake will suffice for smaller plants, larger cantaloupe vines may require a more robust structure to prevent the fruit from weighing down the plant. Consider using a tomato cage or even building a custom trellis to provide ample support.
We wholeheartedly encourage you to give growing cantaloupe in grow bags a try. It’s a rewarding experience that will not only provide you with delicious, homegrown fruit but also deepen your connection to nature. The process is surprisingly simple, and the results are truly remarkable.
Once you’ve harvested your first cantaloupe, we’d love to hear about your experience! Share your tips, tricks, and photos with us in the comments below. Let’s build a community of grow bag cantaloupe enthusiasts and learn from each other’s successes (and even our failures!). Your insights could inspire others to embark on their own grow bag gardening journey. So, grab your grow bags, seeds, and soil, and get ready to enjoy the sweet taste of success! Remember, the key to successful cantaloupe growing lies in providing the right environment, and grow bags are an excellent tool to achieve just that. Happy gardening!
FAQ
What size grow bag is best for growing cantaloupe?
The ideal grow bag size depends on the cantaloupe variety you plan to grow. For smaller, bush-type varieties like Sugar Cube or Minnesota Midget, a 10-15 gallon grow bag is usually sufficient. However, for larger, vining varieties like Hale’s Best Jumbo or Athena, you’ll need a 20-gallon or even larger grow bag to accommodate their extensive root systems. Ensure the bag is deep enough (at least 12 inches) to allow for proper root development. A larger bag also provides more soil volume, which helps retain moisture and nutrients.
What type of soil should I use in my grow bag for cantaloupe?
A well-draining potting mix is essential for growing cantaloupe in grow bags. Avoid using garden soil, as it tends to compact and doesn’t provide adequate drainage. A good potting mix should consist of peat moss, perlite, and vermiculite. You can also amend the potting mix with compost or other organic matter to improve its fertility and water-holding capacity. Aim for a slightly acidic to neutral pH (around 6.0-7.0). Consider adding slow-release fertilizer granules to provide a steady supply of nutrients throughout the growing season.
How often should I water my cantaloupe plants in grow bags?
Watering frequency depends on several factors, including the weather, the size of the grow bag, and the stage of plant growth. Generally, you’ll need to water more frequently in hot, sunny weather than in cool, cloudy weather. Check the soil moisture regularly by sticking your finger about an inch into the soil. If the soil feels dry to the touch, it’s time to water. Water deeply until water drains out of the bottom of the bag. Avoid overwatering, as this can lead to root rot. During the fruiting stage, cantaloupe plants require more water to support fruit development.
Do I need to fertilize my cantaloupe plants in grow bags?
Yes, cantaloupe plants are heavy feeders and require regular fertilization, especially when grown in grow bags. Start with a balanced fertilizer (e.g., 10-10-10) at planting time. Once the plants start to flower, switch to a fertilizer that is higher in phosphorus and potassium to promote fruit development. Follow the instructions on the fertilizer label carefully. You can also supplement with liquid fertilizers or compost tea every few weeks. Avoid over-fertilizing, as this can lead to excessive vegetative growth and reduced fruit production.
How much sunlight do cantaloupe plants need in grow bags?
Cantaloupe plants need at least 6-8 hours of direct sunlight per day to thrive. Choose a location for your grow bags that receives plenty of sunlight throughout the day. If you live in a particularly hot climate, you may need to provide some afternoon shade to prevent the plants from overheating. Grow bags are advantageous because you can easily move them to follow the sun or provide shade as needed.
How do I support cantaloupe vines in grow bags?
Cantaloupe vines can become quite heavy, especially when loaded with fruit. Providing support is essential to prevent the vines from breaking or the fruit from rotting on the ground. You can use a trellis, stakes, or even a tomato cage to support the vines. Train the vines to grow up the support structure as they grow. For larger cantaloupe varieties, you may need to provide additional support for the fruit itself. You can use slings made from pantyhose or netting to cradle the fruit and prevent it from pulling on the vine.
How do I know when my cantaloupe is ripe?
Determining when a cantaloupe is ripe can be tricky, but there are a few telltale signs to look for. First, the skin color should change from green to a tan or yellowish hue. Second, the stem should easily slip from the vine with a gentle tug. Third, the cantaloupe should have a sweet, musky aroma. Finally, the blossom end (opposite the stem) should be slightly soft to the touch. Once you harvest your cantaloupe, allow it to ripen further at room temperature for a few days to develop its full flavor.
Are there any common pests or diseases that affect cantaloupe grown in grow bags?
While grow bags can help reduce the risk of some diseases, cantaloupe plants are still susceptible to certain pests and diseases. Common pests include aphids, squash bugs, and vine borers. Common diseases include powdery mildew, fusarium wilt, and gummy stem blight. Regularly inspect your plants for signs of pests or diseases. If you spot any problems, take action immediately. You can use organic pesticides or fungicides to control pests and diseases. Good air circulation and proper watering practices can also help prevent disease.
Can I grow cantaloupe in grow bags indoors?
While it’s possible to grow cantaloupe in grow bags indoors, it’s challenging. Cantaloupe plants require a lot of sunlight, which can be difficult to provide indoors. You’ll need to use high-intensity grow lights to supplement natural sunlight. You’ll also need to ensure adequate ventilation and humidity control. Indoor growing can be more susceptible to pests and diseases due to the enclosed environment. If you’re determined to grow cantaloupe indoors, choose a smaller, bush-type variety and provide it with the best possible growing conditions.
What are the benefits of using grow bags for cantaloupe compared to traditional gardening?
Grow bags offer several advantages over traditional gardening for cantaloupe:
* **Improved Drainage:** Grow bags allow for excellent drainage, preventing waterlogging and root rot.
* **Better Air Circulation:** The breathable fabric of grow bags promotes air circulation around the roots, leading to healthier plants.
* **Temperature Control:** Grow bags can help regulate soil temperature, keeping the roots cooler in hot weather and warmer in cool weather.
* **Space Saving:** Grow bags are ideal for small spaces, such as patios, balconies, and decks.
* **Portability:** Grow bags are easy to move around, allowing you to chase the sun or protect plants from extreme weather.
* **Reduced Soilborne Diseases:** Grow bags isolate the plants from soilborne diseases and pests.
* **Easy to Amend Soil:** You can easily amend the soil in grow bags to meet the specific needs of cantaloupe plants


Leave a Comment