
Double pepper yields? Yes, you read that right! Imagine harvesting twice the amount of vibrant, flavorful peppers from the same garden space. Sounds like a dream, doesn’t it? Well, it doesn’t have to be! For centuries, gardeners have sought ways to maximize their harvests, and the quest for abundant pepper crops is no different. From ancient Aztec chinampas (floating gardens) to modern-day hydroponics, the desire to coax more from the earth is deeply ingrained in our agricultural history.
Let’s face it, gardening can be a labor of love, and sometimes, despite our best efforts, the yields just aren’t what we hoped for. That’s where clever DIY tricks and hacks come in! I’m here to share some simple, yet effective, techniques that can help you achieve those coveted double pepper yields. Whether you’re a seasoned gardener or just starting out, these tips will empower you to get the most out of your pepper plants. Get ready to transform your pepper patch into a bountiful harvest haven!
Doppelte Paprika-Ernte: Mein DIY-Geheimnis für eine üppige Ernte
Hallo liebe Gartenfreunde! Ich freue mich riesig, euch heute mein persönliches DIY-Geheimnis für eine doppelte (oder sogar noch größere!) Paprika-Ernte zu verraten. Ich habe jahrelang experimentiert und bin zu einer Methode gekommen, die wirklich funktioniert. Es geht nicht nur um Glück, sondern um ein paar einfache Tricks, die jeder anwenden kann. Lasst uns gemeinsam in die Welt der Paprika-Maximierung eintauchen!
Was du brauchst:
* Paprikapflanzen: Offensichtlich! Wähle gesunde, kräftige Pflanzen aus. Achte auf Sorten, die für dein Klima geeignet sind.
* Hochwertige Erde: Paprika sind hungrig! Eine gute, nährstoffreiche Erde ist das A und O. Ich mische gerne Kompost, Wurmhumus und Kokosfaser.
* Große Töpfe oder ein gut vorbereitetes Beet: Paprika brauchen Platz zum Wachsen. Je größer der Topf, desto besser.
* Pflanzstäbe oder Rankgitter: Um die Pflanzen zu stützen, besonders wenn sie viele Früchte tragen.
* Flüssigdünger für Paprika: Ein spezieller Paprika-Dünger ist ideal, aber ein allgemeiner Gemüsedünger tut es auch.
* Gartenschere oder scharfes Messer: Für das Beschneiden und Ernten.
* Mulch: Um die Feuchtigkeit im Boden zu halten und Unkraut zu unterdrücken.
* Geduld und Liebe: Das Wichtigste! Paprika brauchen Zeit und Aufmerksamkeit.
Die Geheimnisse für eine doppelte Paprika-Ernte:
* Frühzeitige Aussaat und Anzucht: Starte früh! Je früher du deine Paprika vorziehst, desto länger ist die Wachstumsperiode.
* Optimale Standortwahl: Paprika lieben die Sonne! Wähle einen sonnigen Standort mit mindestens 6-8 Stunden direkter Sonneneinstrahlung pro Tag.
* Richtiges Gießen: Regelmäßig, aber nicht zu viel! Die Erde sollte feucht, aber nicht nass sein.
* Regelmäßiges Düngen: Paprika sind Starkzehrer! Dünge sie regelmäßig mit einem geeigneten Dünger.
* Beschneiden für mehr Ertrag: Das Beschneiden ist der Schlüssel! Es fördert die Verzweigung und somit mehr Blüten und Früchte.
* Bestäubungshilfe: Besonders im Gewächshaus kann es helfen, die Blüten zu bestäuben.
* Schutz vor Schädlingen und Krankheiten: Beobachte deine Pflanzen genau und handle schnell bei Problemen.
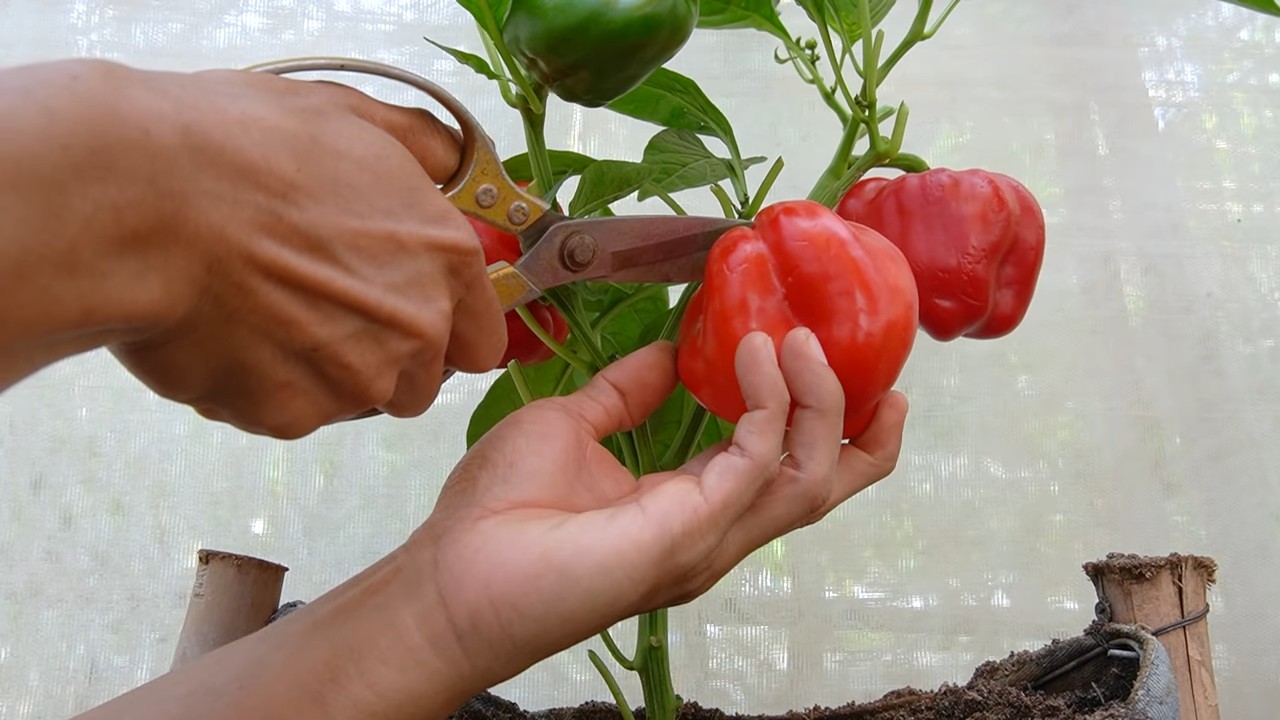
* Rechtzeitige Ernte: Ernte die Paprika, sobald sie reif sind, um die Pflanze zur Bildung neuer Früchte anzuregen.
Schritt-für-Schritt-Anleitung:
1. Aussaat und Anzucht:
1. Aussaat: Ich beginne meine Paprika-Aussaat in der Regel im Februar oder März. Fülle kleine Anzuchttöpfe mit Anzuchterde und säe 1-2 Samen pro Topf aus. Bedecke die Samen leicht mit Erde und gieße sie vorsichtig an.
2. Standort: Stelle die Töpfe an einen warmen und hellen Ort. Eine Heizmatte kann die Keimung beschleunigen.
3. Keimung: Die Keimung dauert in der Regel 1-2 Wochen. Halte die Erde feucht, aber nicht nass.
4. Pikieren: Sobald die Sämlinge ihre ersten richtigen Blätter haben, pikiere ich sie in größere Töpfe. Dabei achte ich darauf, die Wurzeln nicht zu beschädigen.
5. Abhärten: Bevor ich die Paprikapflanzen ins Freie pflanze, härte ich sie ab. Das bedeutet, dass ich sie tagsüber für einige Stunden nach draußen stelle und sie dann wieder reinhole. So gewöhnen sie sich langsam an die Sonne und den Wind.
2. Vorbereitung des Standorts:
1. Standortwahl: Wähle einen sonnigen Standort mit mindestens 6-8 Stunden direkter Sonneneinstrahlung pro Tag.
2. Bodenvorbereitung: Lockere den Boden gründlich auf und mische Kompost, Wurmhumus und Kokosfaser unter. Das verbessert die Drainage und die Nährstoffversorgung.
3. Töpfe: Wenn du Paprika in Töpfen anbaust, wähle große Töpfe mit einem Durchmesser von mindestens 30 cm.
4. Abstand: Achte auf einen ausreichenden Abstand zwischen den Pflanzen. Ich empfehle einen Abstand von 40-50 cm.
3. Das Auspflanzen:
1. Zeitpunkt: Warte, bis keine Frostgefahr mehr besteht, bevor du die Paprikapflanzen ins Freie pflanzt. In der Regel ist das Mitte Mai der Fall.
2. Pflanzen: Grabe ein Loch, das etwas größer ist als der Wurzelballen der Paprikapflanze. Setze die Pflanze vorsichtig hinein und fülle das Loch mit Erde auf. Drücke die Erde leicht an.
3. Gießen: Gieße die Paprikapflanzen nach dem Pflanzen gründlich an.
4. Mulchen: Bringe eine Schicht Mulch um die Pflanzen herum auf. Das hält die Feuchtigkeit im Boden und unterdrückt Unkraut.
4. Gießen und Düngen:
1. Gießen: Gieße die Paprikapflanzen regelmäßig, besonders während trockener Perioden. Die Erde sollte feucht, aber nicht nass sein. Vermeide es, die Blätter zu gießen, da dies Pilzkrankheiten fördern kann.
2. Düngen: Paprika sind Starkzehrer und benötigen regelmäßige Düngergaben. Ich dünge meine Paprikapflanzen alle 2-3 Wochen mit einem speziellen Paprika-Dünger oder einem allgemeinen Gemüsedünger. Achte auf die Dosierungsanleitung auf der Verpackung.
5. Das Beschneiden: Der Schlüssel zum Erfolg!
Das Beschneiden ist der wichtigste Schritt, um eine doppelte Paprika-Ernte zu erzielen. Es fördert die Verzweigung der Pflanze und somit die Bildung von mehr Blüten und Früchten.
1. Der erste Schnitt: Sobald die Paprikapflanze eine Höhe von etwa 20-30 cm erreicht hat, schneide ich den Haupttrieb oberhalb eines Blattknotens ab. Dadurch wird die Pflanze dazu angeregt, Seitentriebe zu bilden.
2. Die Seitentriebe: An den Seitentrieben bilden sich dann weitere Triebe. Ich lasse in der Regel 2-3 kräftige Seitentriebe stehen und entferne die restlichen.
3. Das Ausgeizen: Entferne regelmäßig die Geiztriebe, die sich in den Blattachseln bilden. Diese Triebe nehmen der Pflanze nur unnötig Kraft.
4. Das Entfernen von Blättern: Entferne die unteren Blätter, die den Boden berühren. Das verbessert die Belüftung und beugt Pilzkrankheiten vor.
5. Regelmäßiges Beschneiden: Beschneide die Paprikapflanze regelmäßig, um sie in Form zu halten und die Bildung neuer Blüten und Früchte anzuregen.
6. Bestäubungshilfe:
1. Im Freien: Im Freien werden Paprika in der Regel von Insekten bestäubt.
2. Im Gewächshaus: Im Gewächshaus kann es helfen, die Blüten selbst zu bestäuben. Dazu kannst du die Blüten vorsichtig schütteln oder mit einem Pinsel den Pollen von einer Blüte zur anderen übertragen.
7. Schutz vor Schädlingen und Krankheiten:
1. Beobachtung: Beobachte deine Paprikapflanzen regelmäßig auf Schädlinge und Krankheiten.
2. Schädlinge: Häufige Schädlinge an Paprika sind Blattläuse, Spinnmilben und Weiße Fliegen. Bekämpfe diese Schädlinge mit natürlichen Mitteln wie Neemöl oder Schmierseife.
3. Krankheiten: Häufige Krank

Conclusion
So, there you have it! Mastering the art of creating a double pepper yield in your garden is not just a pipe dream; it’s an achievable reality with a little know-how and a touch of patience. We’ve explored a simple yet effective technique that can significantly boost your pepper production, allowing you to enjoy a bountiful harvest of your favorite spicy or sweet varieties.
Why is this DIY trick a must-try? Because it empowers you to take control of your garden’s output. Instead of relying solely on chance or expensive fertilizers, you’re actively influencing the growth and productivity of your pepper plants. Imagine the satisfaction of harvesting twice the peppers from the same amount of space and effort! Think of the delicious salsas, flavorful stir-fries, and vibrant pickled peppers you can create with your increased yield. This method is also incredibly cost-effective, utilizing readily available materials and requiring minimal investment.
But the benefits extend beyond just quantity. By nurturing your plants with this technique, you’re also promoting healthier, more robust growth. Stronger plants are better equipped to resist pests and diseases, leading to a more sustainable and rewarding gardening experience. Plus, it’s a fantastic way to deepen your connection with nature and learn more about the fascinating world of plant biology.
Now, let’s talk about variations and suggestions. While the core technique remains the same, you can adapt it to suit your specific needs and preferences. For example, if you’re growing peppers in containers, ensure the pots are large enough to accommodate the increased root growth. You might also consider using a slow-release fertilizer to provide a steady supply of nutrients throughout the growing season. Experiment with different types of support structures, such as cages or stakes, to keep your heavily laden plants upright.
Another exciting variation is to try this technique with different pepper varieties. Some peppers, like bell peppers and jalapeños, may respond more favorably than others. Keep a record of your results to identify the most productive combinations for your garden. You can also adjust the timing of the pinching or pruning based on your local climate and growing conditions. Remember, gardening is all about experimentation and learning from your experiences.
We wholeheartedly encourage you to give this DIY trick a try. It’s a simple, effective, and rewarding way to maximize your pepper harvest. Don’t be afraid to get your hands dirty and embrace the challenge. And most importantly, share your experiences with us! We’d love to hear about your successes, your challenges, and any variations you’ve discovered. Post your photos and stories on our social media channels, or leave a comment below. Let’s build a community of passionate gardeners who are dedicated to growing the best peppers possible.
Remember, a thriving garden is a testament to your hard work and dedication. By implementing this technique, you’re not just increasing your pepper yield; you’re cultivating a deeper understanding of the natural world and reaping the rewards of your labor. So, go forth and grow! Your double pepper yield awaits!
Frequently Asked Questions (FAQ)
What exactly does “double pepper yield” mean?
Double pepper yield refers to the goal of producing significantly more peppers from each plant than you would typically expect under normal growing conditions. This DIY trick aims to achieve approximately twice the amount of peppers from each plant, maximizing your harvest and garden space. It’s about optimizing the plant’s energy and resources to focus on fruit production.
What types of peppers does this technique work best with?
While this technique can be applied to most pepper varieties, it tends to work exceptionally well with bell peppers, jalapeños, banana peppers, and other common garden peppers. Hotter varieties, like habaneros and scotch bonnets, may also benefit, but the results can vary depending on the specific cultivar and growing conditions. Experimentation is key to finding what works best in your garden.
When is the best time to start this technique?
The ideal time to begin this technique is when your pepper plants are young and actively growing, typically a few weeks after transplanting them into your garden or containers. Look for plants that have developed several sets of true leaves and are showing signs of vigorous growth. Avoid starting too late in the season, as the plants may not have enough time to fully benefit from the technique.
How often should I pinch or prune my pepper plants?
The frequency of pinching or pruning depends on the growth rate of your plants. Generally, you should aim to pinch off the first set of flower buds as soon as they appear. This encourages the plant to focus on vegetative growth and develop a stronger root system. After the initial pinching, you can prune any excessive foliage or suckers that are diverting energy away from fruit production. Monitor your plants regularly and adjust your pruning schedule as needed.
Will this technique work in containers as well as in the ground?
Yes, this technique can be successfully implemented in both container gardens and in-ground gardens. However, there are a few considerations to keep in mind when growing peppers in containers. First, ensure that your containers are large enough to accommodate the increased root growth that results from this technique. Second, use a high-quality potting mix that provides good drainage and aeration. Finally, be prepared to water and fertilize your plants more frequently, as container-grown plants tend to dry out and deplete nutrients more quickly than those grown in the ground.
What kind of fertilizer should I use?
A balanced fertilizer with an NPK ratio of 10-10-10 or 14-14-14 is a good starting point for pepper plants. However, as your plants begin to flower and produce fruit, you may want to switch to a fertilizer that is higher in phosphorus and potassium, such as 5-10-10 or 5-15-15. These nutrients are essential for fruit development and will help to ensure a bountiful harvest. You can also supplement with organic fertilizers like compost tea or fish emulsion.
What if I accidentally remove too much foliage?
Don’t panic! Pepper plants are surprisingly resilient and can usually recover from minor pruning mistakes. If you accidentally remove too much foliage, simply reduce the frequency of your pruning and allow the plant to recover. Avoid overwatering or over-fertilizing, as this can stress the plant further. With a little patience, your pepper plant should bounce back and continue to produce a healthy crop of peppers.
How long does it take to see results from this technique?
You should start to see noticeable results within a few weeks of implementing this technique. The plants will become bushier and more robust, and you’ll likely see an increase in the number of flower buds. However, it may take several weeks or even months to fully realize the benefits of this technique, depending on the variety of pepper you’re growing and the growing conditions in your area. Be patient and persistent, and you’ll be rewarded with a double pepper yield.
Are there any downsides to using this technique?
While this technique is generally safe and effective, there are a few potential downsides to be aware of. First, pinching or pruning your pepper plants can temporarily slow down their growth. This is because the plant is diverting energy away from vegetative growth and towards fruit production. Second, if you remove too much foliage, you can reduce the plant’s ability to photosynthesize, which can also slow down growth. Finally, if you live in an area with a short growing season, this technique may not be suitable, as it can delay the harvest.
What if my plants are already producing peppers? Is it too late to start?
Even if your plants are already producing peppers, it’s not necessarily too late to start. While the initial pinching is most effective early in the plant’s life, you can still benefit from pruning excessive foliage and suckers to redirect energy towards fruit production. However, be careful not to remove too many leaves at once, as this can stress the plant and reduce its yield. Focus on removing non-productive growth and maintaining good airflow around the plant. You might not achieve a full “double” yield, but you can still improve your harvest.

Leave a Comment