
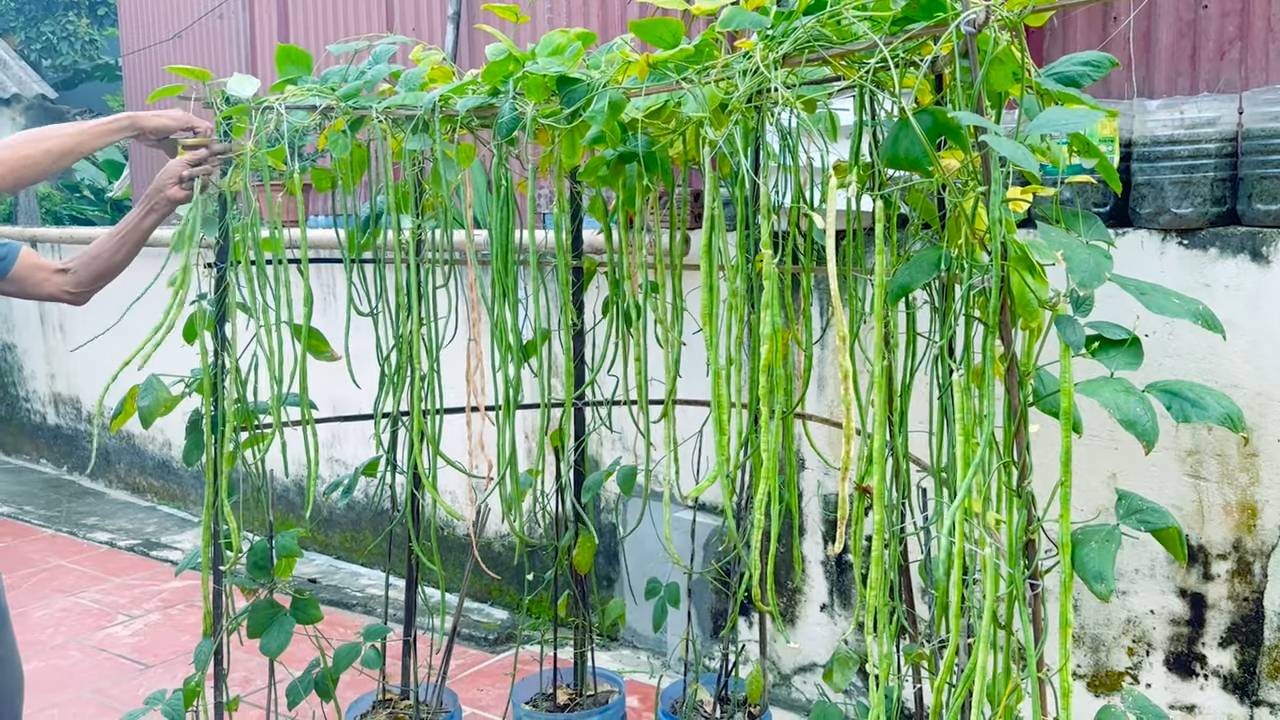
Cowpea garden at home – sounds like a dream, right? Imagine stepping outside your door and harvesting fresh, delicious cowpeas whenever you want! Forget those bland, store-bought beans; we’re talking about vibrant, flavorful cowpeas bursting with homegrown goodness. But maybe you’re thinking, “I don’t have a green thumb!” or “Gardening is too complicated!” Well, that’s where this DIY guide comes in. I’m here to show you that creating your own thriving cowpea garden at home is easier than you think, even if you’re a complete beginner.
Cowpeas, also known as black-eyed peas, have a rich history, dating back thousands of years in Africa and Asia. They’ve been a staple crop, providing vital nutrition and playing a significant role in various cultures. In the American South, they’re a symbol of good luck and prosperity, often eaten on New Year’s Day. But beyond their cultural significance, cowpeas are incredibly versatile and packed with protein and fiber, making them a fantastic addition to any diet.
Why should you embark on this DIY adventure? Because growing your own food is empowering! Not only will you enjoy the freshest, most flavorful cowpeas imaginable, but you’ll also save money, reduce your environmental impact, and experience the immense satisfaction of nurturing something from seed to harvest. Plus, with the simple tricks and hacks I’m about to share, you’ll be amazed at how easy it is to cultivate a bountiful cowpea garden at home, even in small spaces. So, let’s get our hands dirty and start growing!
Bohnengarten für Zuhause: Dein eigener Augenbohnen-Anbau
Hey Leute! Habt ihr Lust, eure eigenen Augenbohnen (auch Kuhbohnen genannt) zu Hause anzubauen? Es ist einfacher als ihr denkt und super befriedigend, wenn ihr eure selbst geernteten Bohnen auf dem Teller habt. Ich zeige euch, wie es geht!
Was du brauchst: Die Vorbereitung
Bevor wir loslegen, brauchen wir natürlich das richtige Equipment und die richtigen Materialien. Hier ist eine Liste, damit ihr alles griffbereit habt:
* Augenbohnensamen: Am besten Bio-Qualität, damit ihr sicher sein könnt, dass sie nicht behandelt wurden. Ihr findet sie in Gartencentern oder online.
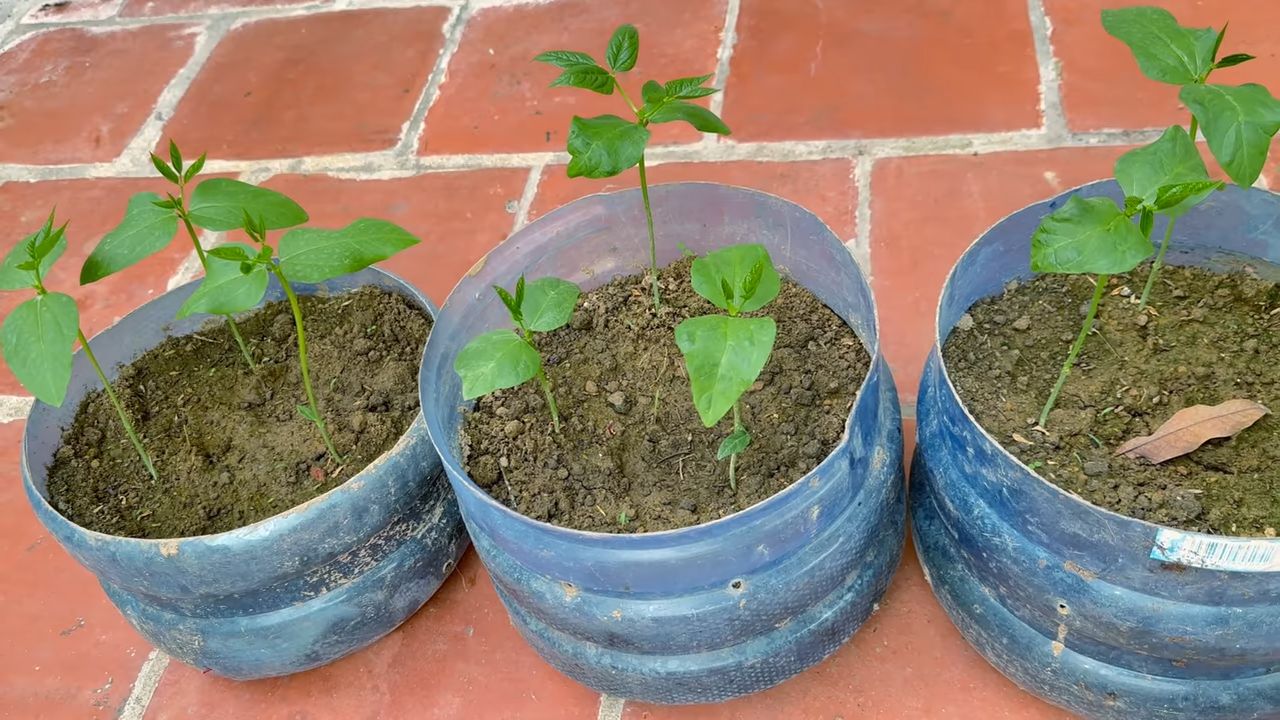
* Pflanzgefäße: Töpfe, Kübel oder sogar ein Hochbeet – Hauptsache, sie sind groß genug (mindestens 30 cm tief) und haben Abzugslöcher. Augenbohnen brauchen Platz für ihre Wurzeln.
* Erde: Eine gute, nährstoffreiche Blumenerde ist ideal. Ihr könnt auch Kompost untermischen, um die Erde noch weiter aufzuwerten.
* Rankhilfe: Augenbohnen sind Kletterpflanzen! Ihr braucht also etwas, woran sie hochwachsen können. Das können Bambusstäbe, ein Spalier oder ein Rankgitter sein.
* Gießkanne oder Gartenschlauch: Zum Bewässern, natürlich!
* Gartenschere: Für den späteren Zuschnitt.
* Optional: Mulch (z.B. Stroh oder Holzhackschnitzel) zum Abdecken der Erde. Das hält die Feuchtigkeit im Boden und unterdrückt Unkraut.
* Optional: Flüssigdünger für Gemüse (Bio-Qualität empfohlen).
Aussaat: Der Start in dein Bohnenabenteuer
Jetzt geht’s ans Eingemachte! Die Aussaat ist der erste Schritt zu eurer eigenen Augenbohnenernte.
1. Den richtigen Zeitpunkt wählen: Augenbohnen sind wärmeliebend. Wartet also, bis keine Frostgefahr mehr besteht. Das ist meistens ab Mitte Mai der Fall. Die Bodentemperatur sollte idealerweise über 15°C liegen.
2. Die Samen vorbereiten (optional): Um die Keimung zu beschleunigen, könnt ihr die Samen vor der Aussaat für einige Stunden in lauwarmem Wasser einweichen. Das macht die Samenschale weicher.
3. Die Töpfe vorbereiten: Füllt eure Pflanzgefäße mit Erde. Lasst oben etwa 2-3 cm Platz.
4. Die Samen aussäen: Macht mit dem Finger kleine Löcher in die Erde (etwa 2-3 cm tief). Legt in jedes Loch 2-3 Samen. Das erhöht die Wahrscheinlichkeit, dass mindestens ein Samen keimt.
5. Die Löcher schließen: Bedeckt die Samen mit Erde und drückt sie leicht an.
6. Gießen: Gießt die Erde vorsichtig an, sodass sie gut durchfeuchtet ist. Achtet darauf, dass ihr die Samen nicht wieder ausspült.
7. Der Standort: Stellt die Töpfe an einen sonnigen und warmen Ort. Augenbohnen lieben die Sonne!
Pflege: Damit deine Bohnen prächtig gedeihen
Nach der Aussaat ist vor der Pflege! Damit eure Augenbohnen gut wachsen und viele leckere Bohnen produzieren, müsst ihr sie regelmäßig pflegen.
1. Gießen: Augenbohnen brauchen regelmäßig Wasser, besonders während der Blütezeit und der Fruchtbildung. Die Erde sollte immer leicht feucht sein, aber nicht nass. Vermeidet Staunässe! Am besten gießt ihr morgens oder abends, wenn die Sonne nicht so stark scheint.
2. Düngen: Während der Wachstumsphase könnt ihr eure Augenbohnen regelmäßig mit Flüssigdünger düngen. Achtet darauf, dass der Dünger für Gemüse geeignet ist und die richtige Dosierung einhaltet. Ich verwende gerne Bio-Dünger, um die Umwelt zu schonen.
3. Rankhilfe anbringen: Sobald die Pflanzen etwas größer sind, brauchen sie eine Rankhilfe. Leitet die Triebe vorsichtig an der Rankhilfe entlang. Augenbohnen sind Kletterkünstler und finden ihren Weg nach oben!
4. Unkraut entfernen: Haltet die Erde um die Pflanzen herum unkrautfrei. Unkraut konkurriert mit den Augenbohnen um Nährstoffe und Wasser.
5. Mulchen (optional): Eine Mulchschicht hilft, die Feuchtigkeit im Boden zu halten und Unkraut zu unterdrücken. Außerdem schützt sie die Erde vor dem Austrocknen.
6. Schädlinge und Krankheiten: Achtet auf Schädlinge wie Blattläuse oder Schnecken. Bei Bedarf könnt ihr biologische Schädlingsbekämpfungsmittel einsetzen. Auch Pilzkrankheiten können auftreten, besonders bei feuchtem Wetter. Sorgt für eine gute Belüftung der Pflanzen, um das Risiko zu minimieren.
Ernte: Der Lohn deiner Mühe
Endlich! Der Moment, auf den ihr gewartet habt: die Ernte!
1. Den richtigen Zeitpunkt erkennen: Augenbohnen können geerntet werden, sobald die Hülsen prall gefüllt sind und sich leicht vom Stiel lösen lassen. Die Bohnen im Inneren sollten noch nicht ganz ausgereift sein.
2. Ernten: Schneidet die Hülsen mit einer Gartenschere ab. Zieht nicht an den Hülsen, da ihr sonst die Pflanze beschädigen könnt.
3. Regelmäßig ernten: Erntet die Bohnen regelmäßig, um die Pflanze zur weiteren Fruchtbildung anzuregen.
4. Die Bohnen zubereiten: Augenbohnen können frisch gekocht, gedünstet oder gebraten werden. Sie sind eine leckere Beilage zu vielen Gerichten. Ihr könnt sie auch einfrieren oder trocknen, um sie länger haltbar zu machen.
Zusätzliche Tipps und Tricks: Für noch mehr Erfolg
Hier sind noch ein paar zusätzliche Tipps, die euch helfen können, euren Augenbohnenanbau noch erfolgreicher zu gestalten:
* Sortenwahl: Es gibt verschiedene Sorten von Augenbohnen. Informiert euch, welche Sorte am besten für eure Region geeignet ist. Einige Sorten sind resistenter gegen Krankheiten oder Schädlinge.
* Fruchtfolge: Baut Augenbohnen nicht jedes Jahr am selben Standort an. Eine Fruchtfolge hilft, den Boden gesund zu halten und Krankheiten vorzubeugen.
* Bodenverbesserung: Wenn euer Boden sehr sandig oder lehmig ist, könnt ihr ihn mit Kompost oder anderer organischer Substanz verbessern. Das sorgt für eine bessere Drainage und Nährstoffversorgung.
* Selbstbestäubung: Augenbohnen sind Selbstbestäuber. Das bedeutet, dass sie keine Insekten zur Bestäubung benötigen. Ihr könnt die Pflanzen aber trotzdem unterstützen, indem ihr sie leicht schüttelt, um die Pollen zu verteilen.
* Samen gewinnen: Wenn ihr im nächsten Jahr wieder Augenbohnen anbauen wollt, könnt ihr einen Teil der Bohnen für die Samengewinnung aufbewahren. Lasst die Hülsen dafür an der Pflanze vollständig ausreifen und trocknen. Entnehmt dann die Samen und lagert sie an einem kühlen und trockenen Ort.
Häufige Probleme und Lösungen: Was tun, wenn’s nicht klappt?
Auch beim Augenbohnenanbau können Probleme auftreten. Hier sind einige häufige Probleme und wie ihr sie lösen könnt:
* Keimungsprobleme: Wenn die Samen nicht keimen, kann das verschiedene Ursachen haben. Die Samen könnten zu alt sein, die Bodentemperatur zu niedrig oder die Erde zu trocken oder zu nass. Achtet darauf, frische Samen zu verwenden, die Bodentemperatur zu überprüfen und die Erde richtig zu bewässern.
* Gelbe Blätter: Gelbe Blätter können ein Zeichen für Nährstoffmangel sein. Düngt die Pflanzen mit einem geeigneten Dünger. Auch Staunässe kann zu gelben Blättern führen.
* Blattläuse: Blattläuse sind häufige Schädlinge an Augenbohnen. Ihr könnt sie mit einem Wasserstrahl abspülen oder mit biologischen Schädlingsbekämpfungsmitteln bekämpfen.
* Schnecken: Schnecken können die Blätter und Hülsen der Augenbohnen anfressen. Sammelt die Schnecken ab oder verwendet Schneckenkorn.
* Pilzkrankheiten: Pilzkrankheiten können bei feuchtem Wetter auftreten. Sorgt für eine gute Belüftung der Pflanzen und entfernt befallene Bl
Conclusion
So, there you have it! Cultivating your own cowpea garden at home is not just a rewarding experience, it’s a gateway to fresh, delicious, and organically grown produce right at your fingertips. We’ve explored the simple yet effective methods to transform your backyard, balcony, or even a sunny windowsill into a thriving cowpea haven. From understanding the plant’s needs to mastering the art of sowing, nurturing, and harvesting, you’re now equipped with the knowledge to embark on this exciting gardening adventure.
Why is this DIY trick a must-try? Because it empowers you to take control of your food source, ensuring that what you and your family consume is free from harmful chemicals and pesticides. Imagine the satisfaction of serving a meal featuring cowpeas you’ve personally nurtured from seed to table. Beyond the health benefits, gardening is a therapeutic activity that connects you with nature, reduces stress, and fosters a sense of accomplishment. Plus, growing your own cowpeas is significantly more cost-effective than purchasing them from the store, especially if you consume them regularly.
But the journey doesn’t end here! Feel free to experiment with different varieties of cowpeas to discover your favorites. Try intercropping them with other vegetables like corn or okra to maximize space and create a symbiotic relationship in your garden. Consider using companion planting techniques, such as planting basil or marigolds nearby, to deter pests naturally. You can also explore different methods of supporting the vines, from simple bamboo stakes to elaborate trellises, adding a touch of creativity to your garden design. For those with limited space, dwarf or bush varieties of cowpeas are excellent choices for container gardening.
We’ve covered the basics, but the beauty of gardening lies in its adaptability. Observe your plants closely, learn from your experiences, and don’t be afraid to tweak the methods to suit your specific environment and preferences. Remember, every garden is unique, and the most valuable lessons are often learned through trial and error.
Now, it’s your turn to get your hands dirty and experience the joy of growing your own cowpeas. We wholeheartedly encourage you to give this DIY trick a try. Start small, be patient, and celebrate every milestone along the way. And most importantly, share your experiences with us! We’d love to hear about your successes, challenges, and any unique tips or tricks you discover along the way. Post photos of your thriving cowpea garden on social media using #HomegrownCowpeas and inspire others to join the movement. Let’s create a community of passionate gardeners who are committed to sustainable and healthy living. Your journey to a bountiful cowpea harvest starts now!
FAQ
Frequently Asked Questions About Growing Cowpeas at Home
1. What are cowpeas and why should I grow them?
Cowpeas, also known as black-eyed peas, are a type of legume that are packed with nutrients, including protein, fiber, iron, and folate. They are a versatile ingredient that can be used in a variety of dishes, from soups and stews to salads and side dishes. Growing your own cowpeas allows you to enjoy fresh, organically grown produce while also saving money and reducing your environmental impact. Plus, cowpeas are nitrogen-fixing plants, meaning they enrich the soil with nitrogen, benefiting other plants in your garden.
2. What is the best time to plant cowpeas?
Cowpeas are warm-season crops that thrive in temperatures between 65°F and 85°F (18°C and 29°C). The best time to plant them is after the last frost in spring, when the soil has warmed up to at least 60°F (15°C). In warmer climates, you can plant cowpeas multiple times throughout the growing season for a continuous harvest. Check your local weather forecast and planting calendar for specific recommendations based on your region.
3. What kind of soil do cowpeas need?
Cowpeas are relatively adaptable to different soil types, but they prefer well-drained soil with a pH between 6.0 and 7.0. Amend heavy clay soil with compost or other organic matter to improve drainage and aeration. Sandy soil can be improved by adding compost or peat moss to help retain moisture and nutrients. Before planting, it’s always a good idea to test your soil to determine its pH and nutrient levels.
4. How much sunlight do cowpeas need?
Cowpeas need at least 6-8 hours of direct sunlight per day to thrive. Choose a sunny location in your garden where they will receive ample sunlight throughout the day. If you’re growing cowpeas in containers, make sure to place them in a sunny spot on your balcony or patio.
5. How often should I water cowpeas?
Cowpeas need consistent moisture, especially during germination and flowering. Water them deeply whenever the top inch of soil feels dry to the touch. Avoid overwatering, as this can lead to root rot. During hot, dry weather, you may need to water them more frequently. Mulching around the plants can help retain moisture and suppress weeds.
6. Do cowpeas need fertilizer?
Cowpeas are nitrogen-fixing plants, so they don’t require a lot of nitrogen fertilizer. However, they can benefit from a balanced fertilizer that is rich in phosphorus and potassium. Apply a slow-release fertilizer at planting time, or side-dress with a liquid fertilizer every few weeks during the growing season. Avoid using fertilizers that are high in nitrogen, as this can promote excessive foliage growth at the expense of pod production.
7. What are some common pests and diseases that affect cowpeas?
Some common pests that can affect cowpeas include aphids, bean beetles, and spider mites. Diseases that can affect cowpeas include powdery mildew, root rot, and fusarium wilt. To prevent pest and disease problems, choose disease-resistant varieties, practice crop rotation, and keep your garden clean and free of debris. You can also use organic pest control methods, such as insecticidal soap or neem oil, to control pests.
8. How do I harvest cowpeas?
Cowpeas can be harvested at different stages of maturity, depending on how you want to use them. For fresh green cowpeas, harvest the pods when they are plump and tender, but before the beans inside have fully developed. For dried cowpeas, allow the pods to dry completely on the vine before harvesting. Once the pods are dry, shell the beans and store them in an airtight container in a cool, dry place.
9. Can I grow cowpeas in containers?
Yes, you can definitely grow cowpeas in containers, especially dwarf or bush varieties. Choose a large container with good drainage holes and fill it with a well-draining potting mix. Provide a trellis or other support for the vines to climb on. Water and fertilize regularly, and make sure the container receives at least 6-8 hours of direct sunlight per day.
10. How can I save seeds from my cowpea plants?
Saving seeds from your cowpea plants is a great way to ensure a continuous supply of seeds for future plantings. Allow the pods to dry completely on the vine before harvesting. Shell the beans and spread them out on a screen or tray to dry for a few more days. Once the seeds are completely dry, store them in an airtight container in a cool, dry place. Label the container with the variety and date of harvest.
Leave a Comment