
Grow garlic at home – it’s easier than you think, and I’m here to show you how! Forget those bland, imported cloves from the grocery store. Imagine the robust, pungent flavor of homegrown garlic elevating your dishes to a whole new level. Have you ever considered the satisfaction of harvesting your own food, knowing exactly where it came from and how it was grown?
Garlic has a rich history, dating back thousands of years. Ancient Egyptians revered it, feeding it to the pyramid builders for strength and stamina. In many cultures, garlic is believed to ward off evil spirits and promote good health. Beyond its mystical properties, garlic is a culinary staple worldwide, adding depth and complexity to countless recipes.
But why should you bother learning to grow garlic at home? Well, for starters, the taste is simply unmatched. Store-bought garlic often lacks the intensity and freshness of homegrown varieties. Plus, growing your own garlic is incredibly rewarding. It’s a sustainable way to add flavor to your meals, reduce your carbon footprint, and connect with nature. This DIY guide will provide you with simple, step-by-step instructions and clever hacks to ensure a bountiful harvest, even if you have limited space or gardening experience. Let’s get started and unlock the secrets to growing your own delicious garlic!
Knoblauch Anbauen: Dein DIY-Guide für eine reiche Ernte!
Hey Gartenfreunde! Habt ihr euch jemals gefragt, wie einfach es eigentlich ist, Knoblauch selbst anzubauen? Ich kann euch sagen, es ist super simpel und macht richtig Spaß! Und das Beste daran: Ihr habt immer frischen Knoblauch zur Hand, der viel aromatischer ist als der aus dem Supermarkt. In diesem Guide zeige ich euch Schritt für Schritt, wie ihr euren eigenen Knoblauch anbauen könnt – egal ob im Garten, auf dem Balkon oder sogar in Töpfen auf der Fensterbank. Los geht’s!
Was du brauchst: Die richtige Ausrüstung und Materialien
Bevor wir loslegen, sollten wir sicherstellen, dass wir alles parat haben. Hier ist eine Liste der Dinge, die du für dein Knoblauch-Anbau-Abenteuer benötigst:
* Knoblauchzehen: Das Wichtigste! Am besten Bio-Knoblauch aus dem Supermarkt oder noch besser von einem lokalen Bauernmarkt. Vermeide Knoblauch aus dem Supermarkt, der möglicherweise behandelt wurde, um das Keimen zu verhindern.
* Gartenwerkzeug: Eine kleine Schaufel oder Pflanzkelle, um Löcher zu graben.
* Gute Erde: Lockere, gut durchlässige Erde ist ideal. Du kannst Gartenerde mit Kompost oder Sand mischen, um die Drainage zu verbessern.
* Kompost oder organischer Dünger: Für einen guten Start und eine reiche Ernte.
* Gießkanne: Um deine Knoblauchpflanzen regelmäßig zu gießen.
* (Optional) Mulch: Stroh oder Laub, um den Boden feucht zu halten und Unkraut zu unterdrücken.
* (Optional) Töpfe: Wenn du keinen Garten hast, kannst du Knoblauch auch in Töpfen anbauen. Achte darauf, dass die Töpfe groß genug sind (mindestens 20 cm Durchmesser) und Abzugslöcher haben.
Die Vorbereitung: Der Schlüssel zum Erfolg
Die richtige Vorbereitung ist das A und O für eine erfolgreiche Knoblauchernte. Hier sind ein paar wichtige Punkte, die du beachten solltest:
* Die richtige Zeit: Knoblauch wird idealerweise im Herbst gepflanzt (September bis November). Die Zehen haben dann genügend Zeit, Wurzeln zu bilden, bevor der Winter kommt. In Regionen mit sehr kalten Wintern kann man auch im Frühjahr pflanzen, aber die Ernte wird dann etwas kleiner ausfallen.
* Der richtige Standort: Knoblauch liebt die Sonne! Wähle einen sonnigen Standort mit mindestens 6 Stunden Sonnenlicht pro Tag.
* Die richtige Erde: Knoblauch braucht lockere, gut durchlässige Erde. Wenn deine Erde sehr lehmig ist, solltest du sie mit Kompost oder Sand verbessern.
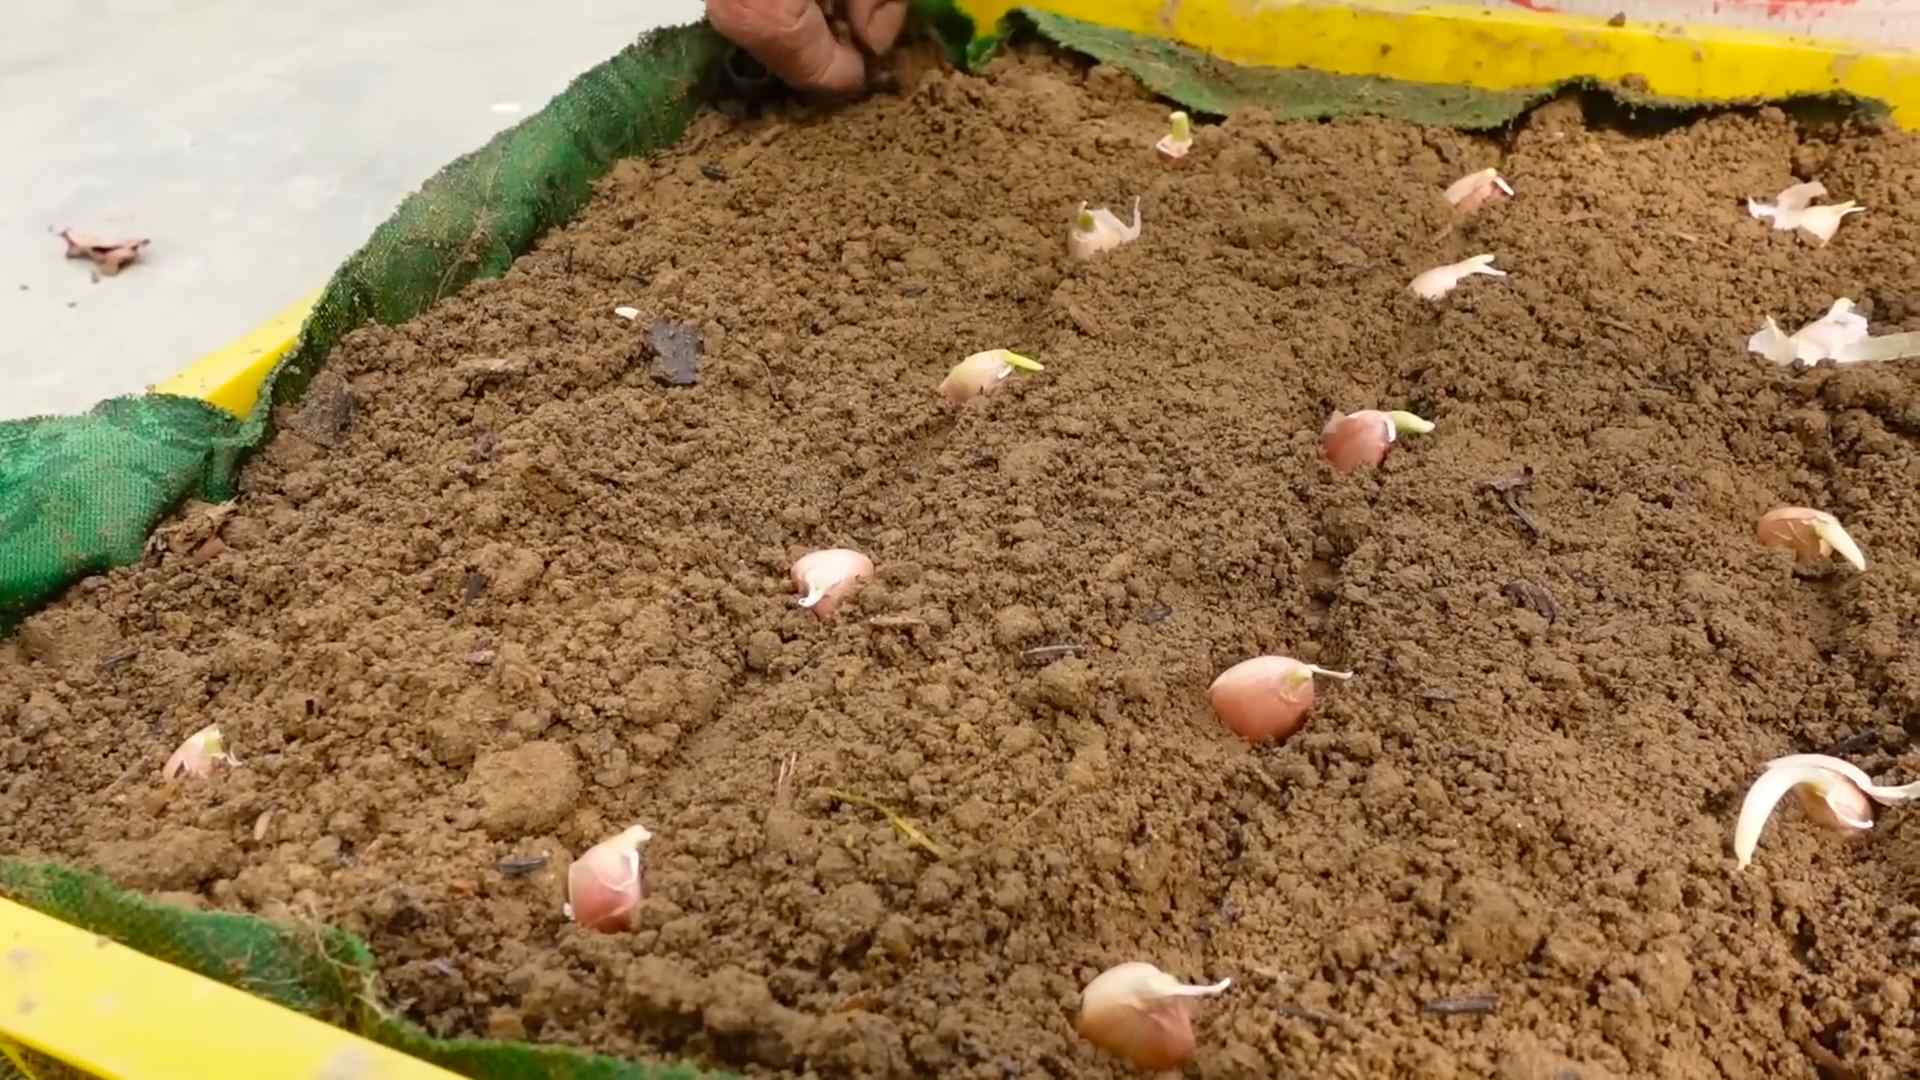
* Die Knoblauchzehen vorbereiten: Trenne die Knoblauchzehen vorsichtig voneinander. Wähle die größten und gesündesten Zehen aus, da diese die besten Pflanzen hervorbringen. Die äußere Schale der Zehen sollte intakt sein.
Schritt-für-Schritt-Anleitung: Knoblauch pflanzen wie ein Profi
Jetzt geht’s ans Eingemachte! Hier ist eine detaillierte Anleitung, wie du deine Knoblauchzehen richtig pflanzt:
1. Den Boden vorbereiten: Lockere den Boden mit einer Schaufel oder Gartenkralle auf. Entferne Unkraut und Steine. Arbeite Kompost oder organischen Dünger in den Boden ein, um ihn mit Nährstoffen anzureichern.
2. Löcher graben: Grabe Löcher im Abstand von etwa 15 cm zueinander. Die Löcher sollten etwa 5-8 cm tief sein. Wenn du mehrere Reihen pflanzt, lasse zwischen den Reihen etwa 20-30 cm Platz.
3. Die Knoblauchzehen pflanzen: Setze die Knoblauchzehen mit der spitzen Seite nach oben in die Löcher. Drücke sie leicht an.
4. Die Löcher füllen: Fülle die Löcher mit Erde und drücke sie leicht an.
5. Gießen: Gieße die frisch gepflanzten Knoblauchzehen gründlich.
6. Mulchen (optional): Bedecke den Boden mit einer Schicht Mulch (Stroh oder Laub). Das hilft, den Boden feucht zu halten, Unkraut zu unterdrücken und die Knoblauchzehen vor Frost zu schützen.
Die Pflege: So wächst dein Knoblauch prächtig
Nach dem Pflanzen ist vor der Pflege! Hier sind ein paar Tipps, wie du deinen Knoblauch gesund und glücklich hältst:
* Gießen: Gieße deine Knoblauchpflanzen regelmäßig, besonders in trockenen Perioden. Der Boden sollte immer leicht feucht sein, aber nicht nass.
* Unkraut jäten: Halte den Bereich um deine Knoblauchpflanzen frei von Unkraut. Unkraut konkurriert mit dem Knoblauch um Nährstoffe und Wasser.
* Düngen: Dünge deine Knoblauchpflanzen im Frühjahr mit einem organischen Dünger. Das gibt ihnen einen zusätzlichen Wachstumsschub.
* Schädlinge und Krankheiten: Knoblauch ist relativ resistent gegen Schädlinge und Krankheiten. Achte aber trotzdem auf Anzeichen von Problemen, wie z.B. gelbe Blätter oder Befall mit Schädlingen. Bei Bedarf kannst du biologische Schädlingsbekämpfungsmittel einsetzen.
Die Ernte: Der Lohn deiner Mühe
Nach etwa 8-9 Monaten ist es endlich soweit: Die Erntezeit ist gekommen! Hier sind ein paar Anzeichen, dass dein Knoblauch reif ist:
* Die Blätter beginnen, gelb zu werden und umzuknicken.
* Die Knoblauchknollen sind groß und prall.
So erntest du deinen Knoblauch richtig:
1. Vorsichtig ausgraben: Lockere den Boden um die Knoblauchknollen mit einer Grabegabel oder Schaufel auf. Ziehe die Knoblauchknollen vorsichtig aus dem Boden.
2. Reinigen: Entferne überschüssige Erde von den Knoblauchknollen.
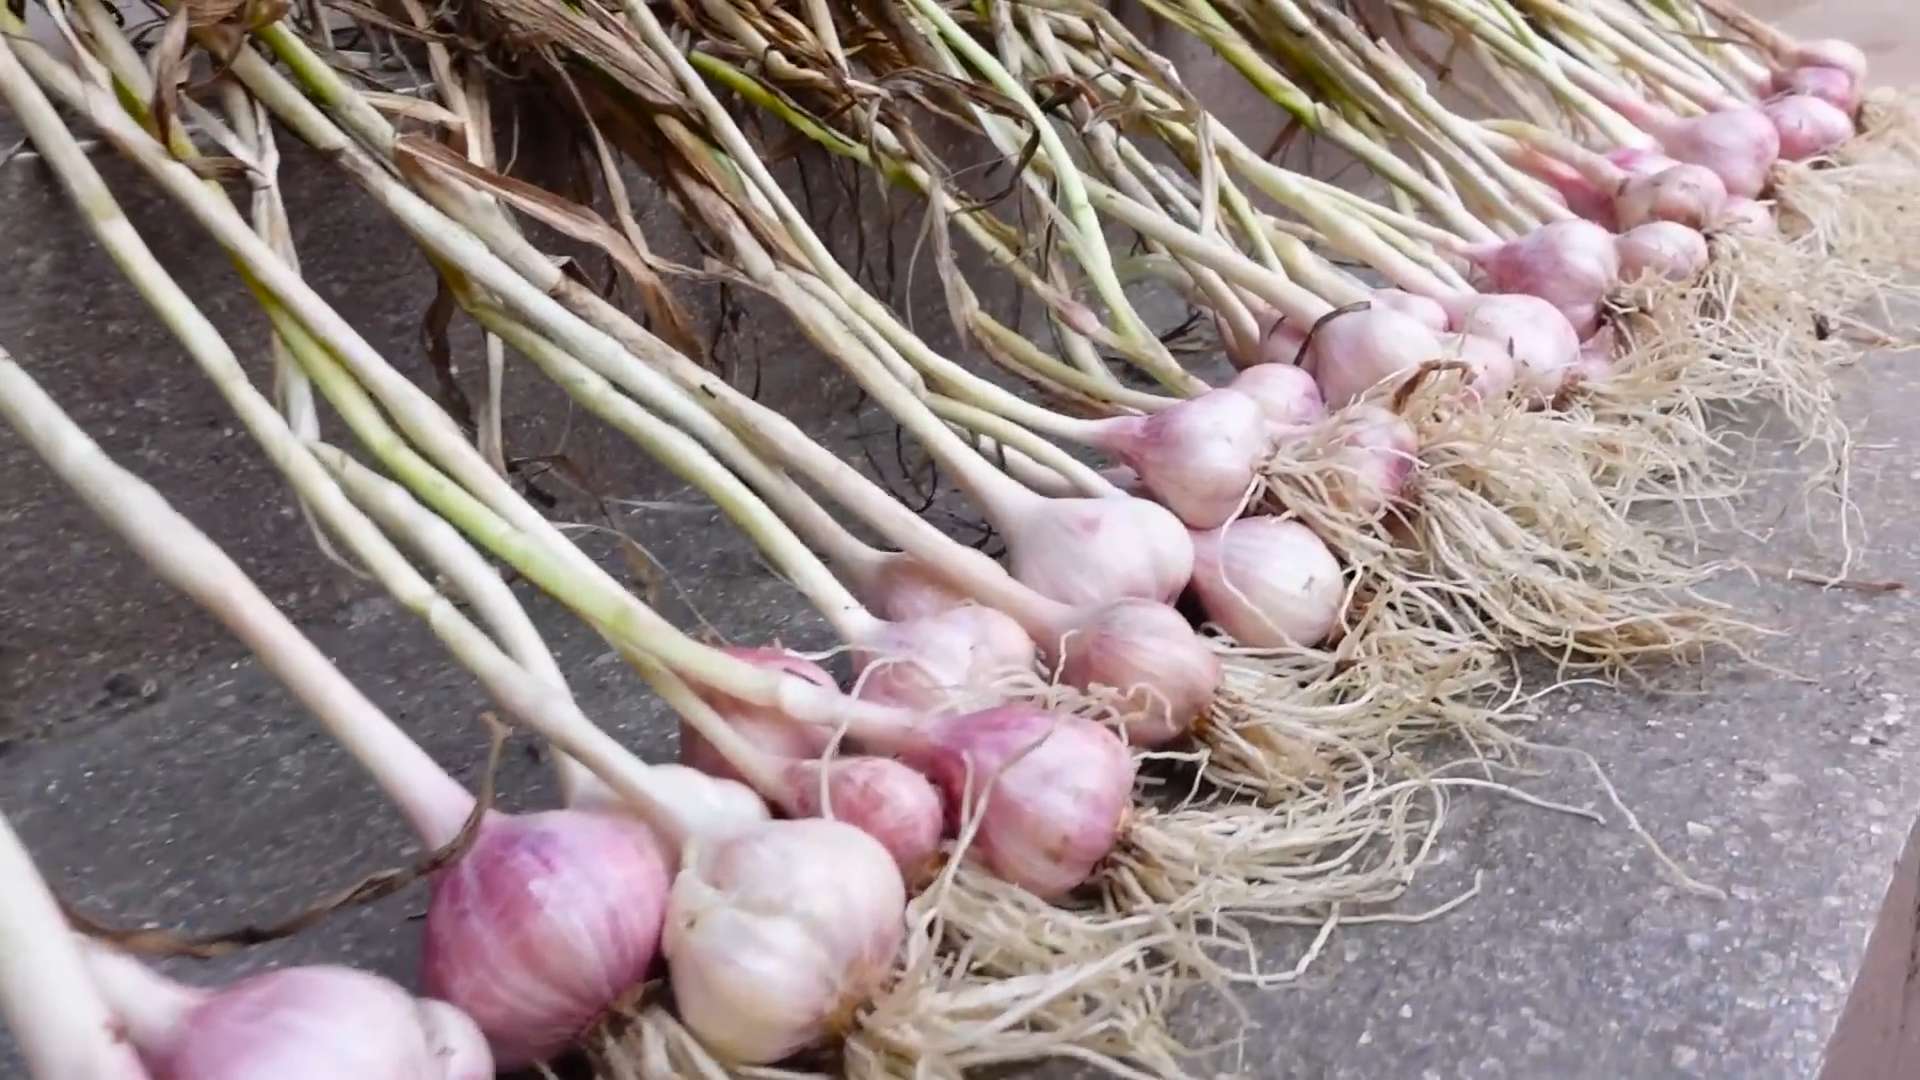
3. Trocknen: Binde die Knoblauchpflanzen zu Bündeln zusammen und hänge sie an einem trockenen, luftigen Ort auf, um sie zu trocknen. Das Trocknen dauert etwa 2-3 Wochen.
4. Lagern: Schneide nach dem Trocknen die Blätter und Wurzeln ab. Lagere die Knoblauchknollen an einem kühlen, trockenen und dunklen Ort. So halten sie sich mehrere Monate.
Knoblauch im Topf anbauen: Auch ohne Garten möglich!
Kein Garten? Kein Problem! Knoblauch lässt sich auch wunderbar in Töpfen auf dem Balkon oder der Fensterbank anbauen. Hier sind ein paar Tipps für den Anbau im Topf:
* Der richtige Topf: Wähle einen Topf mit einem Durchmesser von mindestens 20 cm und Abzugslöchern.
* Die richtige Erde: Verwende eine hochwertige Blumenerde mit guter Drainage.
* Die Pflanzung: Pflanze die Knoblauchzehen wie oben beschrieben in den Topf.
* Die Pflege: Gieße die Knoblauchpflanzen regelmäßig und dünge sie im Frühjahr.
* Der Standort: Stelle den Topf an einen sonnigen Standort.
Sortenvielfalt: Welcher Knoblauch ist der richtige für dich?
Es gibt verschiedene Knoblauchsorten, die sich in Geschmack, Größe und Lagerfähigkeit unterscheiden. Hier sind ein paar beliebte Sorten:
* ‘German Extra Hardy’: Eine robuste Sorte mit einem kräftigen Geschmack.
* ‘Music’: Eine beliebte Sorte mit großen Knollen und einem milden Geschmack.
* ‘Spanish Roja’: Eine aromatische Sorte mit einem würzigen Geschmack.
* ‘Elephant Garlic’: Eigentlich kein echter Knoblauch, sondern eine Lauchsorte. Die Knollen sind riesig und haben einen milden Geschmack.
Probiere verschiedene Sorten aus, um deinen Favoriten zu finden!
Häufige Fehler vermeiden: Tipps und Tricks für eine erfolgreiche Ernte
Auch beim Knoblauch-Anbau können Fehler passieren. Hier sind ein paar Tipps, wie du sie vermeidest:
* Falsche Pflanzzeit: Knoblauch sollte idealerweise im Herbst gepflanzt werden.
* Schlechte Erde: Knoblauch braucht lockere, gut durchlässige Erde.
* Zu wenig Sonne: Kn
Conclusion
So, there you have it! Growing garlic at home isn’t just a gardening project; it’s an investment in flavor, freshness, and a deeper connection to the food you eat. Forget those bland, pre-packaged cloves from the supermarket. Imagine the robust, pungent aroma of freshly harvested garlic filling your kitchen, ready to elevate your culinary creations. This simple DIY trick empowers you to bypass the grocery store and cultivate your own supply of this essential ingredient.
Why is this a must-try? Because it’s incredibly rewarding. From planting a single clove to witnessing the emergence of vibrant green shoots, the entire process is a testament to the magic of nature. Plus, homegrown garlic boasts a superior flavor profile compared to commercially grown varieties. The taste is bolder, more complex, and undeniably fresher. You’ll notice the difference immediately in your sauces, stir-fries, and roasted vegetables.
But the benefits extend beyond just taste. Growing your own garlic allows you to control the entire process, ensuring that your crop is free from harmful pesticides and herbicides. You can choose organic methods and nurture your plants with natural fertilizers, resulting in a healthier and more sustainable harvest. It’s a win-win for you and the environment.
Looking for variations? Consider experimenting with different garlic varieties. There are hardneck and softneck types, each with its own unique flavor and characteristics. Hardneck varieties, like Rocambole and Porcelain, are known for their intense flavor and produce scapes (edible flower stalks) that can be used in pesto or stir-fries. Softneck varieties, like Artichoke and Silverskin, are milder in flavor and store well for longer periods. Try planting a mix of varieties to discover your favorites.
Another variation is to explore different planting methods. While the guide focuses on planting in the ground, you can also grow garlic in containers. This is a great option if you have limited space or live in an apartment. Just be sure to choose a large container with good drainage and use a high-quality potting mix.
Don’t be intimidated if you’ve never gardened before. Growing garlic is surprisingly easy, even for beginners. With a little patience and attention, you can enjoy a bountiful harvest of fresh, flavorful garlic.
We wholeheartedly encourage you to give this DIY trick a try. It’s a fun, educational, and ultimately delicious experience. Once you taste the difference between homegrown and store-bought garlic, you’ll never go back.
And most importantly, we want to hear about your experience! Share your photos, tips, and stories in the comments below. Let us know what varieties you’re growing, what challenges you’ve faced, and what successes you’ve achieved. Together, we can create a community of garlic growers and inspire others to embrace the joys of homegrown food. So, grab some garlic cloves, get your hands dirty, and start growing your own delicious garlic today!
Frequently Asked Questions (FAQ)
Q: What is the best time of year to plant garlic?
A: The ideal time to plant garlic is in the fall, typically 4-6 weeks before the ground freezes. This allows the cloves to establish roots before winter sets in. In colder climates, this is usually around October or November. In warmer climates, you can plant later, around November or December. Planting in the fall ensures that the garlic gets the necessary cold period (vernalization) to develop large bulbs. Spring planting is possible, but the bulbs will likely be smaller.
Q: What kind of soil is best for growing garlic?
A: Garlic thrives in well-drained, fertile soil that is rich in organic matter. Amend your soil with compost or well-rotted manure before planting to improve drainage and fertility. The soil should be loose and loamy, allowing the roots to easily penetrate. Avoid heavy clay soils, as they can retain too much moisture and lead to rot. A slightly acidic to neutral soil pH (around 6.0 to 7.0) is ideal.
Q: How deep and how far apart should I plant the garlic cloves?
A: Plant garlic cloves about 2 inches deep, with the pointed end facing up. Space the cloves about 6-8 inches apart in rows that are 12-18 inches apart. This spacing allows for adequate air circulation and prevents overcrowding. If you are planting in containers, you can plant the cloves closer together, but make sure they have enough room to develop.
Q: How much sunlight does garlic need?
A: Garlic needs at least 6 hours of direct sunlight per day to thrive. Choose a planting location that receives full sun for optimal growth. If you are growing garlic in containers, make sure to place them in a sunny spot. Insufficient sunlight can result in smaller bulbs and reduced yields.
Q: How often should I water garlic?
A: Water garlic regularly, especially during dry periods. Keep the soil consistently moist, but avoid overwatering, which can lead to rot. Water deeply when the top inch of soil feels dry to the touch. Reduce watering as the bulbs mature and the leaves begin to yellow.
Q: How do I fertilize garlic?
A: Garlic is a heavy feeder and benefits from regular fertilization. Apply a balanced fertilizer in the spring, when the plants are actively growing. You can also side-dress with compost or well-rotted manure. Avoid using fertilizers that are high in nitrogen, as this can promote leafy growth at the expense of bulb development.
Q: What are garlic scapes, and what do I do with them?
A: Garlic scapes are the flower stalks that grow from hardneck garlic varieties. They should be removed in the spring to encourage bulb development. Cutting off the scapes redirects the plant’s energy towards growing larger bulbs. The scapes themselves are edible and can be used in a variety of dishes, such as pesto, stir-fries, and soups. They have a mild garlic flavor and a slightly crunchy texture.
Q: How do I know when the garlic is ready to harvest?
A: Garlic is typically ready to harvest in mid-summer, when the leaves begin to yellow and fall over. The bottom leaves will turn brown, while the upper leaves may still be green. Gently dig up a bulb to check its size and maturity. If the bulb is well-formed and the cloves are plump, it’s time to harvest.
Q: How do I cure garlic after harvesting?
A: Curing garlic is essential for long-term storage. After harvesting, gently brush off any excess soil and leave the bulbs to dry in a well-ventilated area for 2-3 weeks. You can hang the bulbs in bunches or spread them out on a screen. The leaves and roots should dry completely during the curing process. Once cured, trim the roots and leaves and store the garlic in a cool, dry, and dark place.
Q: What are some common pests and diseases that affect garlic?
A: Common pests that affect garlic include aphids, thrips, and nematodes. Diseases include white rot, bulb rot, and downy mildew. Practice good garden hygiene to prevent pest and disease problems. Rotate your crops regularly, avoid overwatering, and remove any infected plants promptly. You can also use organic pest control methods, such as insecticidal soap or neem oil.
Q: Can I grow garlic in containers?
A: Yes, you can grow garlic in containers. Choose a large container with good drainage and use a high-quality potting mix. Plant the cloves about 2 inches deep and 4-6 inches apart. Water regularly and fertilize as needed. Place the container in a sunny location that receives at least 6 hours of direct sunlight per day. Container-grown garlic may not produce bulbs as large as those grown in the ground, but it’s still a great option for those with limited space.
Q: How do I store garlic for long-term use?
A: Properly cured garlic can be stored for several months. Store the bulbs in a cool, dry, and dark place with good ventilation. A temperature between 60-70°F (15-21°C) is ideal. Avoid storing garlic in the refrigerator, as this can cause it to sprout. You can also braid the garlic bulbs together and hang them in a cool, dry place.

Leave a Comment