
Grow Asparagus in Backyard: Imagine stepping into your backyard and harvesting fresh, tender asparagus spears, ready to be steamed, grilled, or tossed into a vibrant spring salad. Sounds dreamy, right? Well, it doesn’t have to be just a dream! For centuries, asparagus has been a prized vegetable, enjoyed by ancient Romans and Greeks for its delicate flavor and purported medicinal properties. Today, you can bring this culinary treasure to your own home with a little know-how and some simple DIY techniques.
But why should you bother to grow asparagus in your backyard? Let’s face it, store-bought asparagus can be expensive and often lacks the freshness and flavor of homegrown. Plus, there’s something incredibly satisfying about nurturing a plant from the ground up and enjoying the fruits (or, in this case, vegetables!) of your labor. This article is packed with easy-to-follow tips and tricks to help you successfully cultivate asparagus, even if you’re a complete beginner. We’ll cover everything from choosing the right variety and preparing your soil to harvesting your first delicious spears. Get ready to transform your backyard into an asparagus haven!
Spargel im eigenen Garten anbauen: Eine Schritt-für-Schritt-Anleitung
Hallo Gartenfreunde! Habt ihr euch jemals gefragt, wie es wäre, euren eigenen frischen Spargel direkt im Garten zu ernten? Ich kann euch sagen, es ist fantastisch! Der Geschmack von frisch geerntetem Spargel ist unvergleichlich. Und das Beste daran: Es ist gar nicht so schwer, wie man vielleicht denkt. In diesem Artikel zeige ich euch, wie ihr euren eigenen Spargel anbauen könnt – von der Vorbereitung des Bodens bis zur ersten Ernte. Lasst uns loslegen!
Warum Spargel selbst anbauen?
Bevor wir ins Detail gehen, lasst mich euch kurz erklären, warum ich so begeistert vom Spargelanbau bin:
* Frische: Nichts geht über den Geschmack von frisch geerntetem Spargel. Er ist knackiger und aromatischer als der, den man im Supermarkt kauft.
* Qualität: Ihr habt die Kontrolle über die Anbaumethoden und könnt sicherstellen, dass euer Spargel ohne schädliche Pestizide wächst.
* Nachhaltigkeit: Ihr reduziert Transportwege und unterstützt eine nachhaltige Lebensweise.
* Ersparnis: Spargel kann teuer sein, besonders in der Spargelsaison. Mit einem eigenen Spargelbeet könnt ihr langfristig Geld sparen.
* Befriedigung: Es ist einfach ein tolles Gefühl, etwas selbst anzubauen und zu ernten.
Die richtige Spargelsorte wählen
Die Wahl der richtigen Spargelsorte ist entscheidend für den Erfolg eures Spargelprojekts. Es gibt verschiedene Sorten, die sich in Geschmack, Ertrag und Widerstandsfähigkeit unterscheiden. Hier sind einige beliebte Sorten:
* ‘Huchels Leistung’: Eine sehr ertragreiche Sorte mit gutem Geschmack. Sie ist robust und widerstandsfähig gegen Krankheiten.
* ‘Gijnlim’: Eine frühe Sorte, die sich gut für den Anbau in kühleren Regionen eignet.
* ‘Backlim’: Eine weitere frühe Sorte mit hohem Ertrag und guter Qualität.
* ‘Ramires’: Eine mittelfrühe Sorte mit einem milden, süßen Geschmack.
Informiert euch am besten in eurer Gärtnerei, welche Sorte für eure Region und eure Bodenverhältnisse am besten geeignet ist.
Die Vorbereitung: Der Schlüssel zum Erfolg
Die Vorbereitung des Bodens ist das A und O für ein erfolgreiches Spargelbeet. Spargel ist eine mehrjährige Pflanze, die viele Jahre am selben Standort bleibt. Daher ist es wichtig, dass der Boden optimal vorbereitet ist.
Der richtige Standort
Spargel liebt die Sonne! Wählt einen sonnigen Standort in eurem Garten, der mindestens sechs Stunden Sonne pro Tag bekommt. Der Boden sollte gut durchlässig sein, da Spargel keine Staunässe verträgt.
Die Bodenbeschaffenheit
Spargel bevorzugt einen sandigen Lehmboden mit einem pH-Wert zwischen 6,5 und 7,5. Wenn euer Boden zu schwer oder zu sandig ist, könnt ihr ihn mit Kompost, Sand oder anderen Bodenverbesserern anreichern.
Bodenverbesserung
1. Bodenanalyse: Beginnt mit einer Bodenanalyse, um den pH-Wert und die Nährstoffzusammensetzung eures Bodens zu bestimmen. Ihr könnt ein Bodentest-Kit in eurer Gärtnerei kaufen oder eine Probe an ein Labor schicken.
2. Boden lockern: Lockert den Boden gründlich auf, am besten mit einer Grabegabel oder einem Spaten. Entfernt alle Steine, Wurzeln und Unkräuter.
3. Kompost einarbeiten: Arbeitet großzügig Kompost in den Boden ein. Kompost verbessert die Bodenstruktur, speichert Feuchtigkeit und versorgt den Spargel mit wichtigen Nährstoffen. Ich empfehle, etwa 10-15 Liter Kompost pro Quadratmeter einzuarbeiten.
4. Sand hinzufügen: Wenn euer Boden zu schwer ist, könnt ihr Sand hinzufügen, um die Durchlässigkeit zu verbessern.
5. Kalken: Wenn euer Boden zu sauer ist (pH-Wert unter 6,5), könnt ihr Kalk hinzufügen, um den pH-Wert zu erhöhen. Beachtet die Anweisungen auf der Kalkverpackung.
6. Düngen: Düngt den Boden mit einem organischen Dünger, der reich an Phosphor und Kalium ist. Diese Nährstoffe fördern das Wurzelwachstum und die Spargelproduktion.
Das Pflanzen des Spargels
Es gibt zwei Möglichkeiten, Spargel anzubauen: aus Samen oder aus Spargelpflanzen (auch Spargelspargel genannt). Ich empfehle, Spargelpflanzen zu verwenden, da sie schneller Ertrag bringen.
Der richtige Zeitpunkt
Der beste Zeitpunkt zum Pflanzen von Spargelpflanzen ist im Frühjahr (April/Mai) oder im Herbst (September/Oktober).
Die Pflanzmethode
1. Graben ausheben: Grabt einen Graben mit einer Tiefe von etwa 20-25 cm und einer Breite von etwa 30 cm.
2. Hügel formen: Formt in der Mitte des Grabens einen kleinen Hügel aus Erde.
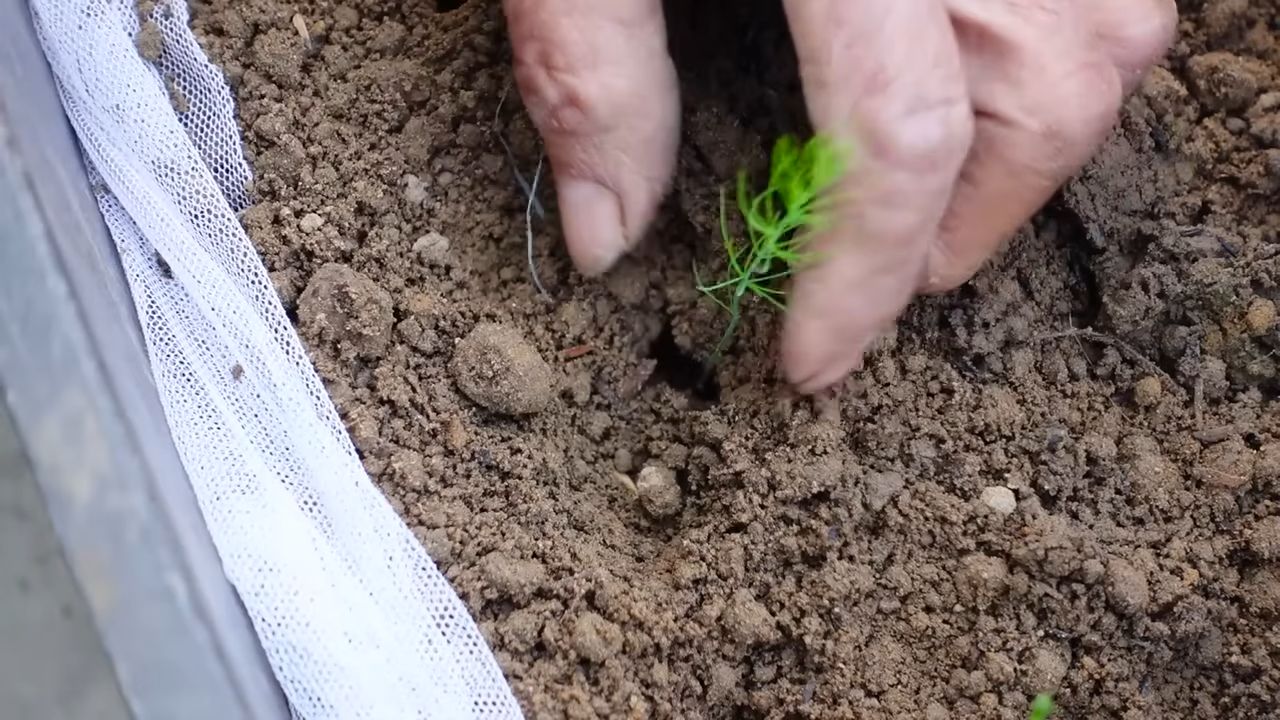
3. Pflanzen platzieren: Setzt die Spargelpflanzen auf die Hügel, so dass die Wurzeln nach unten hängen. Achtet darauf, dass die Pflanzen etwa 30-40 cm voneinander entfernt sind.
4. Mit Erde bedecken: Bedeckt die Wurzeln mit Erde, so dass die Knospen (die kleinen Spitzen, aus denen der Spargel wächst) etwa 5-10 cm unter der Erdoberfläche liegen.
5. Angießen: Gießt die Pflanzen gründlich an.
Abstand halten
Der Abstand zwischen den Reihen sollte etwa 1,5 Meter betragen. Dies ermöglicht eine gute Luftzirkulation und erleichtert die Ernte.
Die Pflege des Spargelbeets
Nach dem Pflanzen ist es wichtig, das Spargelbeet gut zu pflegen, um ein gesundes Wachstum und einen hohen Ertrag zu gewährleisten.
Gießen
Gießt den Spargel regelmäßig, besonders in trockenen Perioden. Achtet darauf, dass der Boden nicht austrocknet, aber auch nicht zu nass ist.
Unkrautbekämpfung
Haltet das Spargelbeet unkrautfrei. Unkraut konkurriert mit dem Spargel um Nährstoffe und Wasser. Ihr könnt Unkraut von Hand jäten oder einen organischen Mulch verwenden, um das Unkrautwachstum zu unterdrücken.
Düngen
Düngt den Spargel im Frühjahr und im Sommer mit einem organischen Dünger. Ich verwende gerne Kompost oder Hornspäne.
Mulchen
Mulcht das Spargelbeet mit Stroh, Holzhackschnitzeln oder anderem organischen Material. Mulch hilft, Feuchtigkeit im Boden zu halten, Unkraut zu unterdrücken und den Boden zu düngen.
Pflanzenschutz
Spargel kann von verschiedenen Schädlingen und Krankheiten befallen werden. Achtet auf Anzeichen von Befall und behandelt die Pflanzen gegebenenfalls mit einem geeigneten Pflanzenschutzmittel. Ich bevorzuge biologische Pflanzenschutzmittel.
Die Ernte: Endlich Spargel!
Die Ernte ist der aufregendste Teil des Spargelanbaus! Aber Geduld ist gefragt: Im ersten Jahr nach dem Pflanzen solltet ihr den Spargel noch nicht ernten, damit die Pflanzen kräftig wachsen können. Im zweiten Jahr könnt ihr einige wenige Stangen ernten, aber lasst die meisten stehen. Ab dem dritten Jahr könnt ihr dann richtig loslegen.
Der richtige Zeitpunkt
Die Spargelsaison beginnt in der Regel im April und endet am Johannistag (24. Juni). Nach diesem Datum sollten die Pflanzen in Ruhe wachsen und Kraft für das nächste Jahr sammeln.
Die Erntemethode
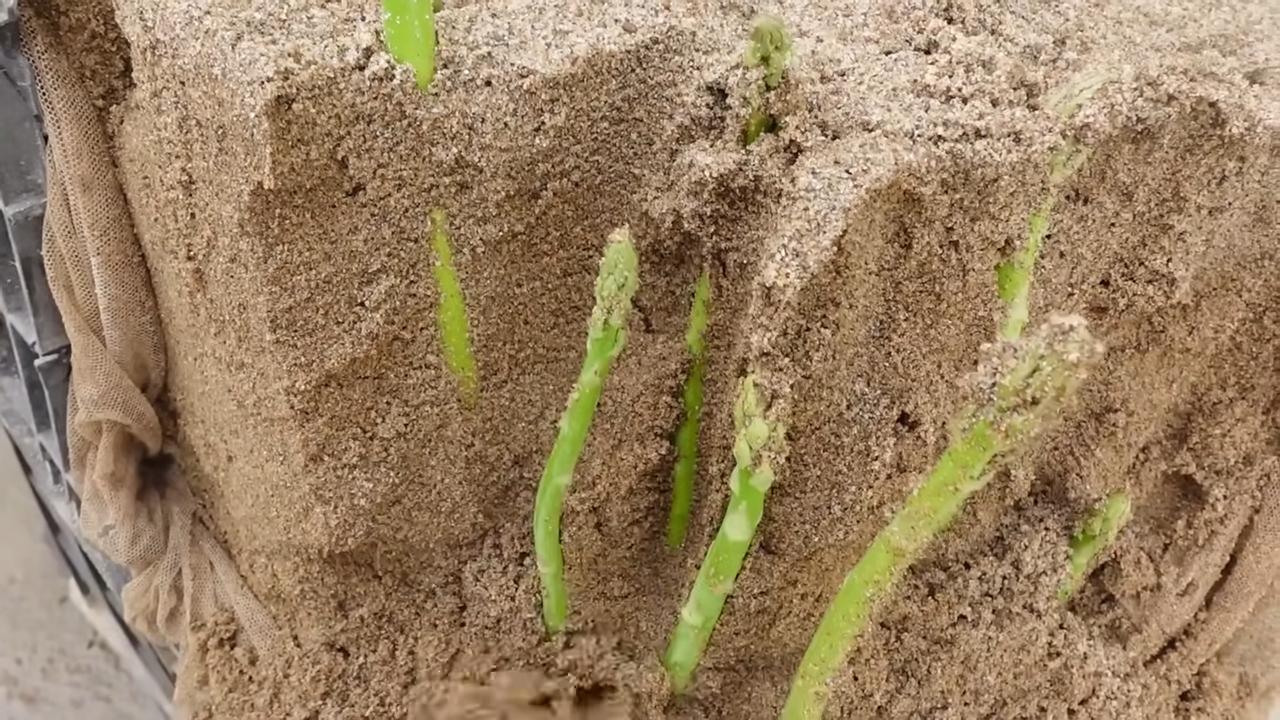
1. Spargel freilegen: Legt den Spargel vorsichtig mit einem Spargelmesser oder einem scharfen Messer frei.
2. Spargel stechen: Stecht den Spargel etwa 2-3 cm unter der Erdoberfläche ab.
3. Spargel säubern: Säubert den Spargel von Erde und Sand.
Tipps für die Ernte
* Erntet den Spargel am besten am Morgen, wenn er noch kühl und knackig ist.
* Erntet nur die Stangen, die mindestens 20 cm lang sind und einen Durchmesser von etwa 1-2 cm haben.
* Lasst die dünnen
Conclusion
So, there you have it! Growing asparagus in your backyard isn’t just a gardening project; it’s an investment in years of delicious, fresh harvests. Forget those limp, expensive spears from the grocery store. Imagine stepping outside your back door and snipping vibrant, tender asparagus whenever you crave it. This DIY trick transforms your garden into a source of culinary delight, offering a flavor and freshness that store-bought asparagus simply can’t match.
But why is this a must-try? Beyond the superior taste, growing your own asparagus is incredibly rewarding. It connects you to the natural world, provides a sense of accomplishment, and offers a sustainable way to enjoy this springtime delicacy. Plus, asparagus is a perennial, meaning once established, your patch will produce for 15-20 years! That’s a significant return on your initial effort.
Consider these variations to personalize your asparagus patch. Experiment with different varieties like ‘Jersey Knight’ for high yields or ‘Purple Passion’ for a sweeter flavor and striking color. Companion planting can also enhance your asparagus’s growth. Try planting tomatoes, parsley, or basil nearby to deter pests and improve soil health. You can even create a raised bed for better drainage if your soil is heavy clay. Another option is to interplant with early spring flowers like daffodils or tulips for a beautiful and productive garden bed.
Don’t be intimidated by the initial setup. While it requires patience, the long-term benefits are well worth the effort. Remember to choose a sunny location, prepare the soil thoroughly, and be patient during the first few years as your asparagus plants establish themselves. Proper watering and fertilization are key to a thriving patch.
We wholeheartedly encourage you to try growing asparagus in your backyard. It’s a project that will bring you joy, fresh produce, and a deeper appreciation for the wonders of nature. Once you’ve tasted homegrown asparagus, you’ll never go back to the store-bought variety.
We’re eager to hear about your experiences! Share your tips, successes, and challenges in the comments below. Let’s build a community of asparagus enthusiasts and learn from each other. What variety did you choose? What challenges did you face, and how did you overcome them? Your insights could help other aspiring gardeners embark on their own asparagus-growing journey. So, grab your gardening gloves, prepare your soil, and get ready to enjoy the unparalleled flavor of homegrown asparagus! Let the growing begin!
Frequently Asked Questions (FAQ)
What is the best time of year to plant asparagus?
The best time to plant asparagus is typically in the spring, after the last frost, or in the fall, about six to eight weeks before the ground freezes. Spring planting allows the crowns to establish themselves during the growing season, while fall planting gives them a head start before the winter dormancy. Consider your local climate and growing conditions when deciding the optimal planting time. Spring planting is generally recommended for colder climates.
How much space does asparagus need to grow?
Asparagus plants need ample space to thrive. It’s recommended to plant asparagus crowns about 12-18 inches apart within rows, with rows spaced 4-5 feet apart. This spacing allows for adequate air circulation, sunlight penetration, and root development. Overcrowding can lead to reduced yields and increased susceptibility to diseases. Remember that asparagus is a perennial crop, so plan for its long-term growth when determining spacing.
What type of soil is best for growing asparagus?
Asparagus prefers well-drained, sandy loam soil with a pH between 6.5 and 7.5. Good drainage is crucial to prevent root rot. Amend heavy clay soils with compost, aged manure, or other organic matter to improve drainage and aeration. Conduct a soil test to determine the pH level and nutrient content, and adjust accordingly. Asparagus also benefits from soil rich in organic matter, which provides essential nutrients and improves water retention.
How long does it take for asparagus to produce a harvest?
Patience is key when growing asparagus. It typically takes 2-3 years after planting crowns before you can begin harvesting spears. During the first year, allow the plants to establish a strong root system. In the second year, you can harvest a few spears for a short period (about 2 weeks). By the third year, you can enjoy a more substantial harvest for 6-8 weeks. Resist the urge to harvest too early, as this can weaken the plants and reduce future yields.
How do I harvest asparagus spears?
Harvest asparagus spears when they are about 6-8 inches tall and the tips are still tightly closed. Use a sharp knife or asparagus knife to cut the spears at or slightly below the soil surface. Avoid damaging the crown or nearby spears. Harvest spears regularly during the harvest season to encourage continued production. As the season progresses, the spears will become thinner and less tender, signaling the end of the harvest period.
How often should I water asparagus?
Asparagus needs consistent moisture, especially during the growing season. Water deeply and regularly, especially during dry spells. Aim to keep the soil consistently moist but not waterlogged. Avoid overhead watering, as this can promote fungal diseases. Mulching around the plants can help retain moisture and suppress weeds. Reduce watering in the fall as the plants prepare for dormancy.
What are some common pests and diseases that affect asparagus?
Asparagus beetles are a common pest that can damage spears and foliage. Handpicking beetles and larvae, using insecticidal soap, or introducing beneficial insects can help control infestations. Asparagus rust is a fungal disease that can cause orange pustules on the foliage. Ensure good air circulation, avoid overhead watering, and use resistant varieties to prevent rust. Fusarium wilt is another fungal disease that can cause yellowing and wilting of the plants. Improve soil drainage and avoid planting asparagus in areas with a history of Fusarium wilt.
How do I fertilize asparagus?
Asparagus benefits from regular fertilization. Apply a balanced fertilizer (e.g., 10-10-10) in early spring before the spears emerge. You can also side-dress with compost or aged manure. Avoid over-fertilizing, as this can lead to excessive foliage growth at the expense of spear production. Conduct a soil test to determine the specific nutrient needs of your soil and adjust fertilization accordingly.
How do I prepare asparagus for winter?
In the fall, after the foliage has turned yellow or brown, cut it back to the ground. This helps prevent diseases from overwintering. Apply a layer of mulch around the plants to protect the crowns from freezing temperatures. Avoid disturbing the soil around the crowns during the winter. In colder climates, you may need to provide additional winter protection, such as covering the plants with straw or burlap.
Can I grow asparagus in containers?
Yes, you can grow asparagus in containers, but it requires a large container (at least 18 inches in diameter and depth) and well-draining potting mix. Choose a sunny location and water regularly. Container-grown asparagus may not produce as abundantly as plants grown in the ground, but it’s a viable option for gardeners with limited space. Be sure to fertilize regularly and provide adequate support for the foliage.
Leave a Comment