
Grow peanuts in foam box? Absolutely! I know it sounds a little unconventional, but trust me, this DIY trick can unlock a whole new level of gardening fun, especially if you’re short on space or dealing with challenging soil conditions. For centuries, peanuts have been a staple crop, not just for their delicious taste but also for their ability to enrich the soil – a practice deeply rooted in agricultural traditions across the globe.
But let’s face it, not everyone has a sprawling farm to dedicate to peanut cultivation. That’s where this ingenious foam box method comes in! Imagine harvesting your own homegrown peanuts, right from your balcony or patio. No more relying solely on store-bought options! This DIY project is perfect for urban gardeners, beginners, or anyone looking for a unique and rewarding gardening experience. Plus, it’s a fantastic way to recycle those foam boxes that often end up in landfills.
Why do you need this trick? Because it’s simple, effective, and incredibly satisfying. We’ll walk you through each step, from preparing the foam box to nurturing your peanut plants, ensuring you have a bountiful harvest. Get ready to grow peanuts in foam box and impress your friends and family with your green thumb!

Erdnüsse im Styroporbehälter anbauen: Eine einfache DIY-Anleitung
Hallo liebe Gartenfreunde! Habt ihr schon mal darüber nachgedacht, eure eigenen Erdnüsse anzubauen? Es ist einfacher, als ihr vielleicht denkt, und mit einem Styroporbehälter könnt ihr sogar auf dem Balkon oder der Terrasse eine kleine Erdnussplantage starten. Ich zeige euch, wie es geht!
Was ihr braucht:
* Einen Styroporbehälter (ca. 40x60x30 cm ist eine gute Größe)
* Erde (am besten eine Mischung aus Gartenerde, Kompost und Sand)
* Erdnüsse (roh, ungesalzen und ungeröstet – am besten aus dem Bioladen oder Gartencenter)
* Wasser
* Einen Bohrer oder Schraubenzieher
* Optional: Dünger (organisch oder mineralisch)
* Optional: Mulch (Stroh, Heu oder Grasschnitt)
Warum ein Styroporbehälter?
Styroporbehälter haben einige Vorteile für den Anbau von Erdnüssen:
* Isolierung: Sie schützen die Wurzeln vor extremen Temperaturen, sowohl vor Hitze als auch vor Kälte.
* Leichtgewicht: Auch mit Erde gefüllt sind sie noch relativ leicht zu transportieren.
* Drainage: Sie lassen sich leicht mit Löchern versehen, um Staunässe zu vermeiden.
* Wiederverwendung: Oft fallen sie als Verpackungsmaterial an und können so sinnvoll wiederverwendet werden.
Schritt-für-Schritt-Anleitung:
1. Vorbereitung des Styroporbehälters
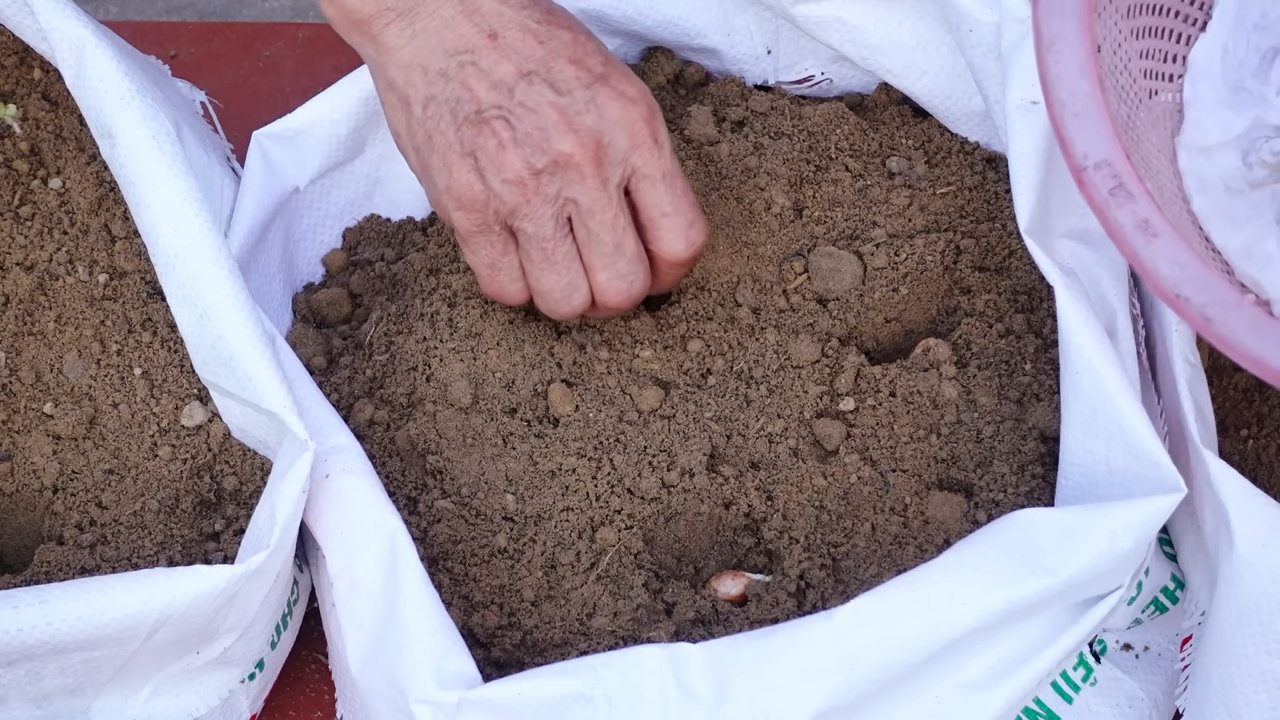
1. Löcher bohren: Nehmt euren Bohrer oder Schraubenzieher und bohrt mehrere Löcher in den Boden des Styroporbehälters. Diese Löcher sind wichtig für die Drainage, damit das Wasser ablaufen kann und die Wurzeln nicht faulen. Ich empfehle, etwa 5-6 Löcher gleichmäßig über den Boden zu verteilen. Achtet darauf, dass die Löcher nicht zu groß sind, damit die Erde nicht herausfällt.
2. Reinigung (optional): Wenn der Behälter gebraucht ist, spült ihn kurz mit Wasser aus, um eventuelle Rückstände zu entfernen.
2. Die richtige Erde
1. Die Mischung macht’s: Erdnüsse bevorzugen einen lockeren, gut durchlässigen Boden. Eine Mischung aus Gartenerde, Kompost und Sand ist ideal. Der Kompost liefert Nährstoffe, der Sand sorgt für eine gute Drainage und die Gartenerde gibt der Mischung Struktur.
2. Mischungsverhältnis: Ich verwende meistens ein Verhältnis von 1:1:1 (Gartenerde:Kompost:Sand). Ihr könnt das aber je nach eurer Gartenerde anpassen. Wenn eure Gartenerde sehr lehmig ist, solltet ihr mehr Sand hinzufügen.
3. Befüllen des Behälters: Füllt den Styroporbehälter mit der Erdmischung. Lasst etwa 5-10 cm Platz bis zum Rand, damit ihr später noch gießen könnt, ohne dass die Erde überschwappt.
3. Erdnüsse vorbereiten und pflanzen
1. Erdnüsse auswählen: Achtet darauf, dass ihr rohe, ungesalzene und ungeröstete Erdnüsse verwendet. Geröstete Erdnüsse keimen nicht. Am besten kauft ihr Bio-Erdnüsse, da diese oft unbehandelt sind.
2. Einweichen (optional): Um die Keimung zu beschleunigen, könnt ihr die Erdnüsse vor dem Pflanzen für 24 Stunden in lauwarmes Wasser legen. Das weicht die Schale auf und erleichtert das Keimen.
3. Pflanzen: Steckt die Erdnüsse etwa 2-3 cm tief in die Erde. Ich pflanze meistens 5-6 Erdnüsse pro Behälter, mit einem Abstand von etwa 10-15 cm zueinander.
4. Gießen: Gießt die Erde nach dem Pflanzen gut an. Die Erde sollte feucht, aber nicht nass sein.
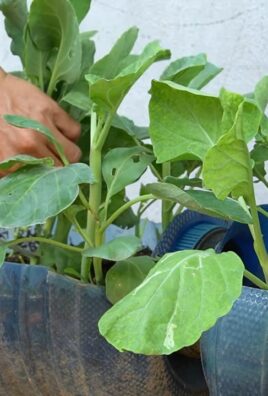
4. Pflege der Erdnusspflanzen
1. Standort: Erdnüsse lieben die Sonne! Stellt den Styroporbehälter an einen sonnigen Standort, an dem die Pflanzen mindestens 6 Stunden Sonne pro Tag bekommen.
2. Gießen: Gießt die Erdnusspflanzen regelmäßig, besonders während der Blütezeit und der Fruchtbildung. Die Erde sollte immer leicht feucht sein, aber Staunässe solltet ihr vermeiden.
3. Düngen (optional): Wenn ihr möchtet, könnt ihr die Erdnusspflanzen während der Wachstumsphase düngen. Verwendet am besten einen organischen Dünger oder einen speziellen Dünger für Hülsenfrüchte. Achtet darauf, die Dosierungsanleitung auf der Verpackung zu beachten.
4. Häufeln: Sobald die Erdnusspflanzen blühen, bilden sie sogenannte “Pegs” aus. Das sind kleine Stiele, die sich in die Erde bohren und dort die Erdnüsse bilden. Um die Fruchtbildung zu fördern, solltet ihr die Pflanzen regelmäßig mit Erde anhäufeln. Das bedeutet, dass ihr Erde um die Basis der Pflanzen herum auftragt, damit die “Pegs” leichter in die Erde eindringen können.
5. Mulchen (optional): Eine Mulchschicht aus Stroh, Heu oder Grasschnitt kann helfen, die Feuchtigkeit im Boden zu halten und Unkraut zu unterdrücken.
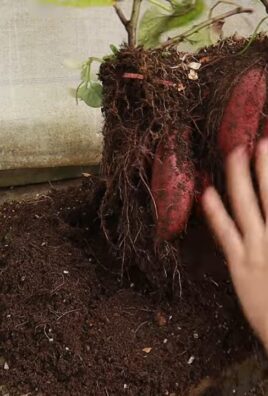
5. Erntezeit!
1. Wann ernten? Die Erntezeit für Erdnüsse ist normalerweise im Herbst, etwa 4-5 Monate nach der Aussaat. Ihr erkennt, dass die Erdnüsse reif sind, wenn die Blätter gelb werden und die Pflanzen anfangen zu welken.
2. Ernten: Zieht die Pflanzen vorsichtig aus der Erde. Die Erdnüsse sollten an den Wurzeln hängen.
3. Reinigen: Schüttelt die Erde von den Erdnüssen ab und spült sie gegebenenfalls mit Wasser ab.
4. Trocknen: Legt die Erdnüsse zum Trocknen an einen warmen, trockenen und gut belüfteten Ort. Das kann zum Beispiel auf einem Tablett in der Sonne oder in einem Dörrautomaten sein. Die Erdnüsse sollten vollständig getrocknet sein, bevor ihr sie lagert, um Schimmelbildung zu vermeiden. Das Trocknen kann mehrere Tage bis Wochen dauern.
5. Lagern: Lagert die getrockneten Erdnüsse an einem kühlen, trockenen und dunklen Ort. In einem luftdichten Behälter halten sie sich mehrere Monate.
Zusätzliche Tipps und Tricks:
* Schädlinge: Erdnusspflanzen können von Blattläusen oder Schnecken befallen werden. Kontrolliert die Pflanzen regelmäßig und entfernt Schädlinge gegebenenfalls von Hand oder mit einem geeigneten Pflanzenschutzmittel.
* Krankheiten: Achten Sie auf Anzeichen von Krankheiten wie Mehltau oder Blattflecken. Entfernen Sie befallene Blätter, um die Ausbreitung der Krankheit zu verhindern.
* Sortenwahl: Es gibt verschiedene Erdnusssorten. Informiert euch vor dem Pflanzen, welche Sorte für euer Klima und eure Anbaubedingungen am besten geeignet ist.
* Klima: Erdnüsse sind wärmeliebend. In kälteren Regionen kann es sinnvoll sein, die Pflanzen in einem Gewächshaus oder Frühbeet vorzuziehen.
* Geduld: Der Anbau von Erdnüssen erfordert etwas Geduld. Es dauert einige Monate, bis die Pflanzen Früchte tragen. Aber die Mühe lohnt sich!
Ich hoffe, diese Anleitung hilft euch dabei, eure eigenen Erdnüsse im Styroporbehälter anzubauen. Es ist ein tolles Projekt für Gartenanfänger und eine schöne Möglichkeit, frische, selbst angebaute Erdnüsse zu genießen. Viel Spaß beim Gärtnern!
Conclusion
So, there you have it! Growing peanuts in a foam box is not just a quirky gardening experiment; it’s a surprisingly effective and rewarding way to cultivate your own delicious, homegrown snacks. We’ve walked you through the process, from preparing your foam box to harvesting your bounty, and hopefully, you’re now brimming with confidence to give it a try.
Why is this DIY trick a must-try? Because it offers a controlled environment, especially beneficial for those with limited space or less-than-ideal soil conditions. The foam box acts as a mini-greenhouse, retaining warmth and moisture, which are crucial for peanut development. Plus, it’s a fantastic way to recycle those foam boxes that often end up in landfills. You’re not just growing peanuts; you’re contributing to a more sustainable lifestyle.
But the benefits don’t stop there. Imagine the satisfaction of cracking open your own homegrown peanuts, knowing exactly where they came from and how they were grown. Think of the bragging rights you’ll have among your gardening friends! And let’s not forget the educational aspect – it’s a wonderful project to involve children in, teaching them about plant life cycles and the importance of sustainable practices.
Now, let’s talk about variations. While we’ve focused on a basic setup, feel free to experiment! You could try different peanut varieties to see which thrives best in your local climate. Consider adding companion plants like marigolds to deter pests naturally. You can also adjust the size of your foam box depending on the space you have available and the number of peanut plants you want to grow.
For those looking to maximize their yield, consider using a slightly larger foam box and spacing the plants further apart. This will allow each plant to receive more sunlight and nutrients, leading to larger and more abundant peanut production. You can also experiment with different soil amendments to improve drainage and nutrient availability.
Another variation is to use a self-watering system. This can be particularly helpful if you live in a hot climate or tend to forget to water your plants regularly. You can easily create a self-watering system by placing a reservoir of water at the bottom of the foam box and using a wicking material to draw water up to the soil.
Remember, gardening is all about experimentation and learning. Don’t be afraid to try new things and see what works best for you. The most important thing is to have fun and enjoy the process.
We are confident that you will find that growing peanuts in a foam box is a fun and rewarding experience. It’s a great way to get your hands dirty, connect with nature, and enjoy the fruits (or rather, nuts) of your labor.
So, what are you waiting for? Gather your supplies, prepare your foam box, and get ready to embark on your peanut-growing adventure! We encourage you to try this DIY trick and share your experiences with us. Let us know what worked well, what challenges you faced, and any tips you have for fellow peanut enthusiasts. Share your photos and stories on social media using #FoamBoxPeanuts and let’s create a community of foam box peanut growers! We can’t wait to see your peanut-growing success stories!
Frequently Asked Questions (FAQ)
1. What type of peanuts are best for growing in a foam box?
Generally, Virginia or Valencia peanut varieties are recommended for home gardens due to their larger size and ease of harvesting. However, Spanish peanuts are also a good option, especially if you prefer smaller, sweeter peanuts. Consider your local climate and growing season when selecting your peanut variety. Research which varieties thrive in your area for the best results. You can often find this information from local nurseries or agricultural extension offices.
2. How often should I water my peanut plants in a foam box?
Peanut plants need consistent moisture, especially during flowering and pod development. Water deeply whenever the top inch of soil feels dry to the touch. Avoid overwatering, as this can lead to root rot. The frequency of watering will depend on factors such as the weather, the size of your foam box, and the type of soil you’re using. In hot, dry weather, you may need to water daily, while in cooler, wetter weather, you may only need to water every few days. Monitor the soil moisture regularly and adjust your watering schedule accordingly.
3. What kind of soil is best for growing peanuts in a foam box?
Peanuts prefer well-draining, sandy loam soil. Avoid heavy clay soils, as they can become waterlogged and hinder peanut development. You can amend your soil with compost or other organic matter to improve drainage and fertility. A slightly acidic soil pH (around 6.0 to 6.5) is ideal. You can test your soil pH using a soil testing kit and amend it with lime or sulfur as needed.
4. How long does it take to grow peanuts in a foam box?
Peanuts typically take 120-150 days to mature from planting to harvest. The exact time will depend on the peanut variety, the climate, and the growing conditions. Be patient and monitor your plants closely for signs of maturity.
5. How do I know when my peanuts are ready to harvest?
The best way to determine if your peanuts are ready to harvest is to dig up a test plant and check the pods. The pods should be plump and full, and the inside of the shell should be dark brown. The leaves of the plant may also start to yellow and die back. If the pods are still small and the inside of the shell is white, they are not ready to harvest.
6. Can I reuse the soil from my foam box for future peanut crops?
It’s generally not recommended to reuse the soil from your foam box for future peanut crops, as it may contain pests or diseases that could affect your new plants. However, you can reuse the soil for other plants that are not susceptible to the same pests or diseases. Alternatively, you can sterilize the soil by baking it in the oven or solarizing it in the sun.
7. What are some common pests and diseases that affect peanut plants?
Common pests that affect peanut plants include aphids, spider mites, and leafhoppers. Common diseases include leaf spot, root rot, and peanut rust. You can prevent pests and diseases by practicing good sanitation, providing adequate drainage, and using organic pest control methods.
8. Can I grow peanuts in a foam box indoors?
While it’s possible to grow peanuts in a foam box indoors, it can be challenging. Peanut plants need plenty of sunlight, so you’ll need to provide supplemental lighting if you’re growing them indoors. You’ll also need to ensure that the plants are properly pollinated, which may require hand-pollination.
9. How do I cure my peanuts after harvesting them?
After harvesting your peanuts, you’ll need to cure them to prevent mold and improve their flavor. To cure your peanuts, spread them out in a single layer in a well-ventilated area and allow them to dry for several weeks. You can also hang the entire plant upside down to dry. Once the peanuts are dry, you can store them in an airtight container in a cool, dry place.
10. Can I roast my homegrown peanuts?
Absolutely! Roasting your homegrown peanuts is a delicious way to enjoy the fruits of your labor. Simply spread the peanuts out on a baking sheet and roast them in a preheated oven at 350 degrees Fahrenheit for 15-20 minutes, or until they are golden brown and fragrant. Be sure to stir them occasionally to ensure even roasting. Let them cool completely before enjoying. You can also add salt or other seasonings to your peanuts before roasting for added flavor.

Leave a Comment