
Grow Asparagus at Home? Absolutely! Imagine stepping into your backyard and harvesting fresh, tender asparagus spears, ready to be steamed, grilled, or tossed into a vibrant spring salad. Forget those pricey supermarket bundles – with a little know-how, you can cultivate your own asparagus patch and enjoy this delectable vegetable for years to come.
Asparagus has been enjoyed for centuries, with evidence suggesting its cultivation dates back to ancient Greece and Rome. The Romans even believed it possessed medicinal properties! Today, this perennial vegetable is prized for its unique flavor and nutritional benefits. But let’s be honest, buying it regularly can put a dent in your grocery budget.
That’s where this DIY guide comes in. I’m going to share simple, effective tricks and tips to help you successfully grow asparagus at home, even if you’re a complete beginner. We’ll cover everything from choosing the right variety and preparing your soil to planting techniques and ongoing care. Say goodbye to expensive store-bought asparagus and hello to a bountiful harvest right in your own backyard! This is a game changer for your garden and your wallet!
Growing Asparagus: A Beginner’s Guide to a Bountiful Harvest
Asparagus! Just the word conjures up images of spring, fresh flavors, and healthy eating. And guess what? You don’t need a sprawling farm to enjoy homegrown asparagus. I’m going to walk you through everything you need to know to successfully grow asparagus right in your own backyard (or even in containers!). It might seem daunting at first, but trust me, with a little patience and the right techniques, you’ll be harvesting delicious spears for years to come.
Choosing Your Asparagus Variety
Before we get our hands dirty, let’s talk about asparagus varieties. This is important because different varieties have different characteristics, like disease resistance and spear size.
* Jersey Knight: This is a popular choice for beginners because it’s a male hybrid, meaning it produces very few seeds. This translates to more energy going into spear production. It’s also known for being disease-resistant and high-yielding. I highly recommend this one!
* Jersey Giant: Another male hybrid, similar to Jersey Knight but with slightly larger spears.
* Mary Washington: An older variety that’s still widely grown. It’s reliable and produces good-quality spears, but it’s more susceptible to disease than the Jersey hybrids.
* Purple Passion: If you want something a little different, try Purple Passion. It has a sweeter flavor and a beautiful purple color that turns green when cooked.
Preparing Your Asparagus Bed
Asparagus is a perennial, meaning it will come back year after year. So, choosing the right location and preparing the soil properly is crucial. Think of it as building a long-term home for your asparagus plants.
* Sunlight: Asparagus needs at least 6-8 hours of sunlight per day. Choose a spot in your garden that gets plenty of sunshine.
* Soil: Asparagus thrives in well-drained soil that’s rich in organic matter. Avoid heavy clay soils, as they can become waterlogged and cause the roots to rot.
* Drainage: Good drainage is essential. If your soil is heavy, amend it with compost, well-rotted manure, or other organic matter to improve drainage.
* pH: Asparagus prefers a soil pH of 6.5 to 7.5. You can test your soil pH with a soil testing kit, which you can find at most garden centers. If your soil is too acidic, you can add lime to raise the pH.
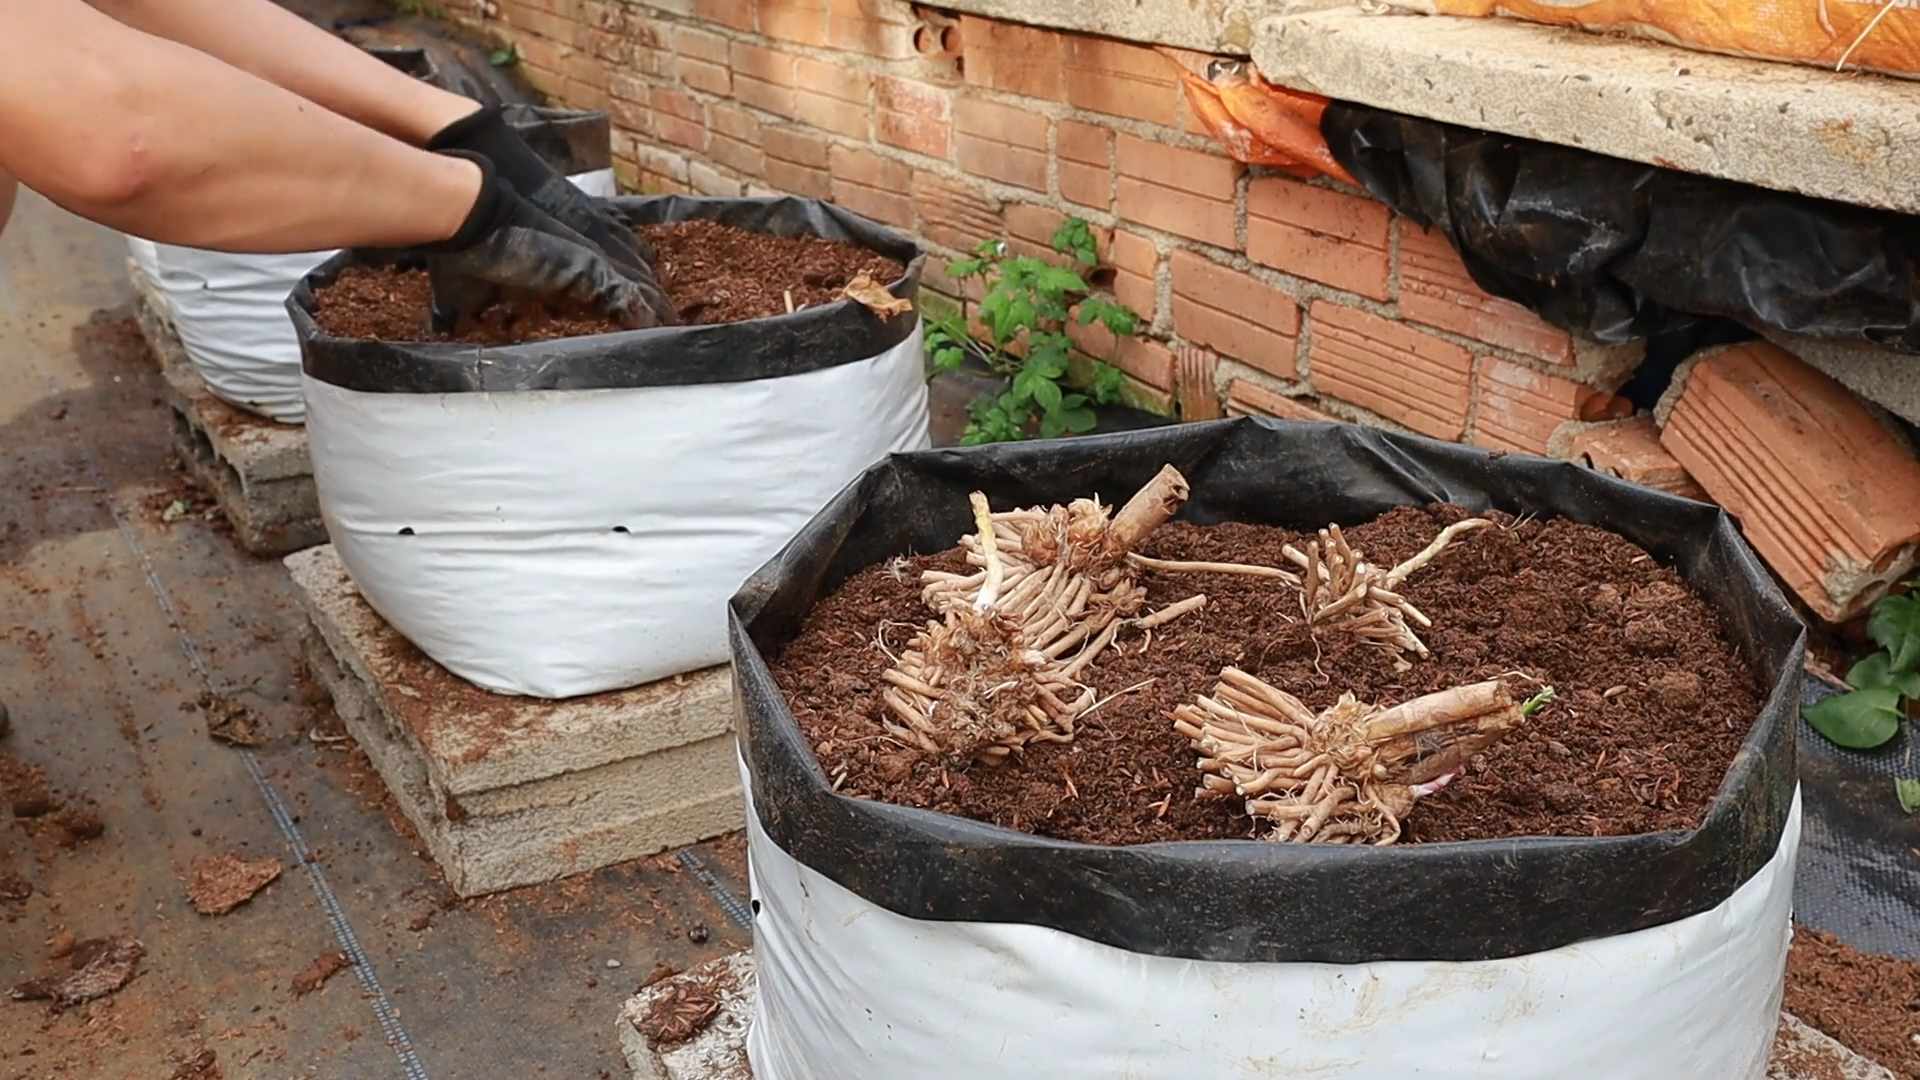
Planting Asparagus Crowns
Now for the fun part – planting! You’ll be planting asparagus crowns, which are essentially the root systems of young asparagus plants.
1. Timing: The best time to plant asparagus crowns is in early spring, as soon as the soil can be worked.
2. Digging the Trench: Dig a trench that’s about 12 inches wide and 6-8 inches deep. The length of the trench will depend on how many crowns you’re planting.
3. Spacing: Space the crowns about 12-18 inches apart in the trench.
4. Mounding the Soil: Create a small mound of soil in the bottom of the trench for each crown.
5. Placing the Crowns: Place the crown on top of the mound, spreading the roots out around it like a spider.
6. Covering the Crowns: Cover the crowns with about 2 inches of soil.
7. Watering: Water the newly planted crowns thoroughly.
Caring for Your Asparagus Plants
Asparagus plants need regular care to thrive. Here’s what you need to do:
* Watering: Water your asparagus plants regularly, especially during dry periods. Aim to keep the soil consistently moist, but not waterlogged.
* Weeding: Keep the asparagus bed free of weeds. Weeds compete with the asparagus plants for nutrients and water. Hand-pulling weeds is the best option, as herbicides can damage the asparagus plants.
* Fertilizing: Fertilize your asparagus plants in early spring with a balanced fertilizer, such as 10-10-10. You can also side-dress the plants with compost or well-rotted manure.
* Mulching: Apply a layer of mulch around the asparagus plants to help retain moisture, suppress weeds, and regulate soil temperature. Organic mulches, such as straw, wood chips, or shredded leaves, are best.
* Fern Care: As the asparagus plants grow, they will produce ferns. These ferns are essential for the plant’s health, as they help to store energy for the following year’s spear production. Allow the ferns to grow and mature throughout the summer. In late fall or early winter, after the ferns have turned brown, you can cut them back to the ground.
Harvesting Your Asparagus
Patience is key when it comes to harvesting asparagus. You’ll need to wait at least two years after planting before you can start harvesting spears. This allows the plants to establish a strong root system.
1. First Harvest (Year 3): In the third year, you can harvest spears for a short period, about 2-3 weeks.
2. Subsequent Harvests (Year 4 and Beyond): In subsequent years, you can harvest spears for a longer period, about 6-8 weeks.
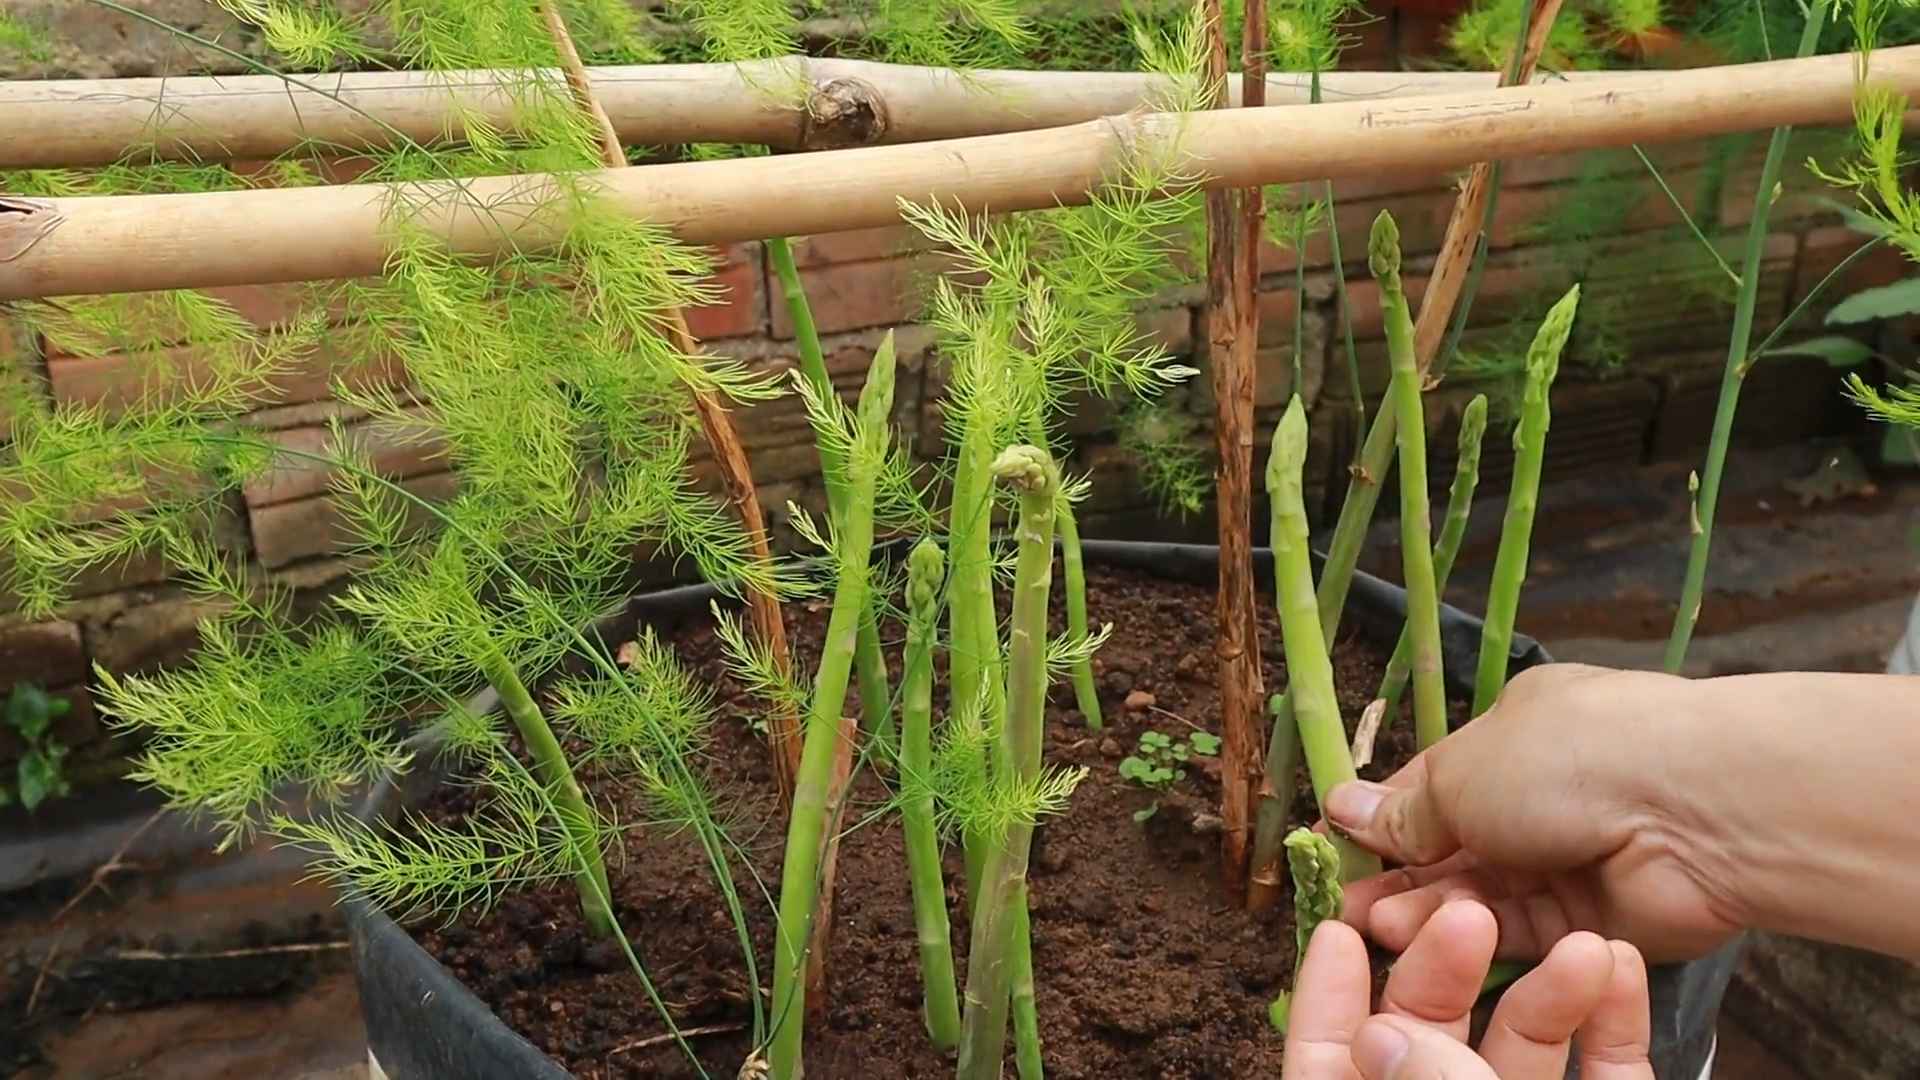
3. Harvesting Technique: To harvest asparagus spears, snap them off at ground level. The spears should be about 6-8 inches tall.
4. Harvesting Frequency: Harvest spears every day or every other day during the harvest season.
5. Stopping the Harvest: Stop harvesting spears when the spears become thin and spindly. This indicates that the plants are starting to run out of energy.
Asparagus! Just the word conjures up images of spring, fresh flavors, and healthy eating. And guess what? You don’t need a sprawling farm to enjoy homegrown asparagus. I’m going to walk you through everything you need to know to successfully grow asparagus right in your own backyard (or even in containers!). It might seem daunting at first, but trust me, with a little patience and the right techniques, you’ll be harvesting delicious spears for years to come.
Choosing Your Asparagus Variety
Before we get our hands dirty, let’s talk about asparagus varieties. This is important because different varieties have different characteristics, like disease resistance and spear size.
* Jersey Knight: This is a popular choice for beginners because it’s a male hybrid, meaning it produces very few seeds. This translates to more energy going into spear production. It’s also known for being disease-resistant and high-yielding. I highly recommend this one!
* Jersey Giant: Another male hybrid, similar to Jersey Knight but with slightly larger spears.
* Mary Washington: An older variety that’s still widely grown. It’s reliable and produces good-quality spears, but it’s more susceptible to disease than the Jersey hybrids.
* Purple Passion: If you want something a little different, try Purple Passion. It has a sweeter flavor and a beautiful purple color that turns green when cooked.
Preparing Your Asparagus Bed
Asparagus is a perennial, meaning it will come back year after year. So, choosing the right location and preparing the soil properly is crucial. Think of it as building a long-term home for your asparagus plants.
* Sunlight: Asparagus needs at least 6-8 hours of sunlight per day. Choose a spot in your garden that gets plenty of sunshine.
* Soil: Asparagus thrives in well-drained soil that’s rich in organic matter. Avoid heavy clay soils, as they can become waterlogged and cause the roots to rot.
* Drainage: Good drainage is essential. If your soil is heavy, amend it with compost, well-rotted manure, or other organic matter to improve drainage.
* pH: Asparagus prefers a soil pH of 6.5 to 7.5. You can test your soil pH with a soil testing kit, which you can find at most garden centers. If your soil is too acidic, you can add lime to raise the pH.
Planting Asparagus Crowns
Now for the fun part – planting! You’ll be planting asparagus crowns, which are essentially the root systems of young asparagus plants.
1. Timing: The best time to plant asparagus crowns is in early spring, as soon as the soil can be worked.
2. Digging the Trench: Dig a trench that’s about 12 inches wide and 6-8 inches deep. The length of the trench will depend on how many crowns you’re planting.
3. Spacing: Space the crowns about 12-18 inches apart in the trench.
4. Mounding the Soil: Create a small mound of soil in the bottom of the trench for each crown.
5. Placing the Crowns: Place the crown on top of the mound, spreading the roots out around it like a spider.
6. Covering the Crowns: Cover the crowns with about 2 inches of soil.
7. Watering: Water the newly planted crowns thoroughly.
Caring for Your Asparagus Plants
Asparagus plants need regular care to thrive. Here’s what you need to do:
* Watering: Water your asparagus plants regularly, especially during dry periods. Aim to keep the soil consistently moist, but not waterlogged.
* Weeding: Keep the asparagus bed free of weeds. Weeds compete with the asparagus plants for nutrients and water. Hand-pulling weeds is the best option, as herbicides can damage the asparagus plants.
* Fertilizing: Fertilize your asparagus plants in early spring with a balanced fertilizer, such as 10-10-10. You can also side-dress the plants with compost or well-rotted manure.
* Mulching: Apply a layer of mulch around the asparagus plants to help retain moisture, suppress weeds, and regulate soil temperature. Organic mulches, such as straw, wood chips, or shredded leaves, are best.
* Fern Care: As the asparagus plants grow, they will produce ferns. These ferns are essential for the plant’s health, as they help to store energy for the following year’s spear production. Allow the ferns to grow and mature throughout the summer. In late fall or early winter, after the ferns have turned brown, you can cut them back to the ground.
Harvesting Your Asparagus
Patience is key when it comes to harvesting asparagus. You’ll need to wait at least two years after planting before you can start harvesting spears. This allows the plants to establish a strong root system.
1. First Harvest (Year 3): In the third year, you can harvest spears for a short period, about 2-3 weeks.
2. Subsequent Harvests (Year 4 and Beyond): In subsequent years, you can harvest spears for a longer period, about 6-8 weeks.
3. Harvesting Technique: To harvest asparagus spears, snap them off at ground level. The spears should be about 6-8 inches tall.
4. Harvesting Frequency: Harvest spears every day or every other day during the harvest season.
5. Stopping the Harvest: Stop harvesting spears when the spears become thin and spindly. This indicates that the plants are starting to run out of energy.
Dealing with Asparagus Pests and Diseases
Asparagus is generally a hardy plant, but it can be susceptible to certain pests and diseases. Here are some common problems and how to deal with them:
* Asparagus Beetles: These beetles can damage the spears and ferns. Hand-picking the beetles is the best way to control them. You can also use insecticidal soap or neem oil.
* Asparagus Rust: This fungal disease can cause orange or brown pustules on the ferns. To prevent asparagus rust, choose disease-resistant varieties and provide good air circulation. If you see signs of rust, remove and destroy the affected ferns.
* Crown Rot: This fungal disease can cause the crowns to rot. To prevent crown rot, plant asparagus in well-drained soil and avoid overwatering.
Growing Asparagus in Containers
If you don’t have a garden, you can still grow asparagus in containers. Here’s what you need to do:
1. Choose a Large Container: Select a container that’s at least 18 inches in diameter and 18 inches deep.
2. Use a Well-Draining Potting Mix: Use a high-quality potting mix that’s well-draining.
3. Planting: Plant the asparagus crowns as described above, spacing them about 12 inches apart in the container.
4. Watering and Fertilizing: Water and fertilize the asparagus plants regularly.
5. Overwintering: In cold climates, you’ll need to protect the asparagus plants from freezing temperatures. You can move the containers to a sheltered location, such as a garage or shed, or you can wrap the containers with burlap or blankets.
Extending the Harvest
Want to enjoy asparagus for even longer? Here are a few tips:
* Succession Planting: Plant different varieties of asparagus that mature at different times.
* Cold Frames: Use cold frames to protect the asparagus plants from frost and extend the growing season.
* Forcing Asparagus: You can force asparagus to produce spears earlier in the spring by covering the plants with black plastic or a dark-colored tarp.
Enjoying Your Homegrown Asparagus
After all your hard work, it’s time to enjoy the fruits (or rather, vegetables) of your labor! Freshly harvested asparagus is incredibly delicious. Here are a few ideas for how to prepare it:
* Steamed: Steaming asparagus is a quick and easy way to cook it.
* Roasted: Roasting asparagus brings out its natural sweetness.
* Grilled: Grilled asparagus has a smoky flavor that’s perfect for summer barbecues.
* Sautéed: Sautéed asparagus is a versatile side dish that can be paired with a variety of meals.
* In Salads: Add asparagus to salads for a boost of flavor and nutrients.
* In Soups: Asparagus can be added to soups for a creamy and delicious flavor.
Asparagus Recipes to Try
Here are a couple of my favorite asparagus recipes:
Roasted Asparagus with Parmesan Cheese
Ingredients:
* 1 pound asparagus
Conclusion
So, there you have it! Growing asparagus at home isn’t just a gardening project; it’s an investment in years of delicious, fresh harvests. Forget those limp, overpriced spears at the grocery store. Imagine stepping into your backyard and snipping vibrant, tender asparagus whenever the craving strikes. This DIY trick, while requiring patience upfront, pays dividends in flavor, cost savings, and the sheer satisfaction of nurturing your own food.
Why is this a must-try? Because fresh asparagus, straight from the garden, is an entirely different experience. The flavor is sweeter, the texture is crisper, and the nutritional value is at its peak. Plus, you control everything – no pesticides, no questionable farming practices, just pure, homegrown goodness. You’re also contributing to a more sustainable lifestyle by reducing your reliance on commercially grown produce and its associated transportation costs.
But the benefits extend beyond the culinary. Gardening is therapeutic. It’s a chance to connect with nature, de-stress, and get some gentle exercise. Watching your asparagus ferns unfurl and grow is a rewarding experience in itself.
Don’t be intimidated by the initial time commitment. Think of it as planting a legacy. Asparagus beds can last for decades, providing you and your family with a consistent supply of this delectable vegetable.
Ready to take your asparagus game to the next level? Consider these variations:
* Companion Planting: Enhance your asparagus bed by planting companion plants like tomatoes, basil, or parsley. These can help deter pests and improve the overall health of your asparagus.
* Different Varieties: Explore different asparagus varieties to find your favorite flavor profile. ‘Jersey Knight’ is a popular choice for its high yield and disease resistance, while ‘Purple Passion’ offers a unique color and sweeter taste.
* Raised Beds: If you have poor soil or limited space, consider growing asparagus in raised beds. This allows you to control the soil composition and drainage, creating an ideal environment for your plants.
* Succession Planting: Plant new crowns each year for the first few years to ensure a continuous harvest as your older plants mature.
We wholeheartedly encourage you to try this DIY trick and experience the joy of growing asparagus at home. It’s a rewarding journey that will transform your meals and your connection to the natural world.
Once you’ve embarked on your asparagus-growing adventure, we want to hear about it! Share your experiences, tips, and photos in the comments below. Let’s build a community of home asparagus growers and learn from each other. What challenges did you face? What successes did you celebrate? What are your favorite ways to prepare your homegrown asparagus? Your insights could inspire others to take the plunge and discover the magic of growing their own food. Let’s cultivate a greener, more delicious future, one asparagus spear at a time!
FAQ
What is the best time of year to plant asparagus crowns?
The ideal time to plant asparagus crowns is in early spring, as soon as the ground can be worked. This allows the crowns to establish themselves before the heat of summer arrives. In warmer climates, late fall planting is also an option. Avoid planting during periods of extreme heat or cold.
How much space does an asparagus plant need?
Asparagus plants need ample space to spread their roots. Plant crowns 12-18 inches apart in rows that are 4-5 feet apart. This spacing allows for proper air circulation and sunlight penetration, which are essential for healthy growth. Overcrowding can lead to reduced yields and increased susceptibility to disease.
How long does it take for asparagus to produce a harvest?
Patience is key when growing asparagus. It typically takes 2-3 years after planting crowns before you can begin harvesting. During the first year, allow the plants to establish a strong root system. In the second year, you can harvest a few spears for a short period (about 2 weeks). By the third year, you can enjoy a full harvest that lasts for 6-8 weeks.
What kind of soil is best for growing asparagus?
Asparagus thrives in well-drained, fertile soil with a pH of 6.5-7.5. Amend heavy clay soil with compost and other organic matter to improve drainage. Sandy soil should also be amended with organic matter to improve water retention. A soil test can help you determine the pH and nutrient levels of your soil and make necessary adjustments.
How often should I water asparagus plants?
Asparagus plants need consistent moisture, especially during the growing season. Water deeply and regularly, especially during dry spells. Avoid overwatering, which can lead to root rot. A layer of mulch around the plants can help retain moisture and suppress weeds.
What are common asparagus pests and diseases?
Asparagus beetles are a common pest that can damage the spears and ferns. Handpicking the beetles or using insecticidal soap can help control infestations. Asparagus rust is a fungal disease that can cause orange pustules on the ferns. Ensure good air circulation and avoid overhead watering to prevent rust.
How do I harvest asparagus spears?
Harvest asparagus spears when they are 6-8 inches tall and about as thick as your finger. Use a sharp knife to cut the spears at ground level. Avoid damaging the surrounding crowns. Harvest spears regularly during the harvest season to encourage continued production.
How do I care for asparagus ferns after the harvest season?
After the harvest season, allow the asparagus ferns to grow and mature. These ferns will provide energy to the crowns for the following year’s growth. Fertilize the plants with a balanced fertilizer in late summer or early fall. Cut the ferns back to the ground in late fall or early winter after they have turned brown.
Can I grow asparagus in containers?
Yes, you can grow asparagus in containers, but it requires a large container (at least 20 gallons) with good drainage. Use a high-quality potting mix and provide regular watering and fertilization. Container-grown asparagus may not be as productive as plants grown in the ground, but it’s a good option for those with limited space.
How long will my asparagus bed last?
With proper care, an asparagus bed can last for 15-20 years or even longer. Regular fertilization, weed control, and pest management are essential for maintaining a healthy and productive asparagus bed.

Leave a Comment