
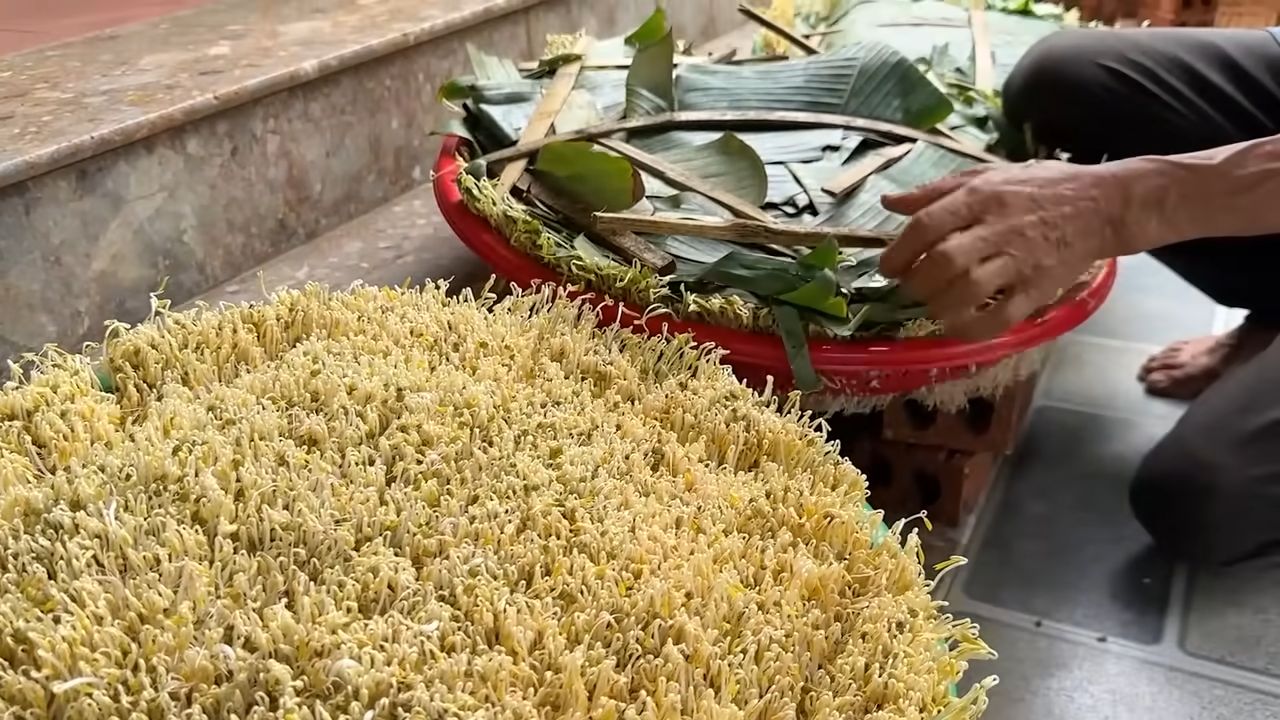
Harvest bean sprouts like a pro and unlock a world of fresh, crunchy goodness right in your own kitchen! Forget those bland, store-bought sprouts – I’m going to show you how to cultivate your own vibrant, flavorful sprouts with just a few simple steps.
Sprouting has a rich history, dating back thousands of years to ancient China, where it was valued for its nutritional benefits and ability to provide fresh food during lean times. Today, this practice is experiencing a resurgence as people seek sustainable and healthy ways to supplement their diets. But let’s be honest, the idea of growing your own food can sometimes feel intimidating, right?
That’s where this DIY guide comes in! I’m going to break down the process of how to harvest bean sprouts into easy-to-follow instructions, so you can enjoy a continuous supply of these nutritional powerhouses. Why should you bother? Because homegrown sprouts are not only fresher and tastier, but they’re also packed with vitamins, minerals, and enzymes that can boost your overall health. Plus, it’s incredibly satisfying to nurture something from seed to sprout, knowing exactly what went into it. Say goodbye to questionable supermarket sprouts and hello to a thriving, delicious addition to your meals!
Sprossen selber ziehen: Eine einfache Anleitung für zu Hause
Hallo liebe DIY-Freunde! Ich liebe frische Sprossen. Sie sind knackig, gesund und peppen jedes Gericht auf. Und das Beste: Man kann sie super einfach selbst ziehen! Ich zeige euch heute, wie ihr mit minimalem Aufwand eure eigene kleine Sprossenfarm zu Hause starten könnt. Keine Angst, es ist wirklich kinderleicht!
Was du brauchst:
* Sprossengläser: Spezielle Sprossengläser mit Siebdeckel sind ideal, aber ein normales Einmachglas mit einem Stück Mulltuch oder einem feinmaschigen Sieb, das du mit einem Gummiband befestigst, tut es auch.
* Sprossensamen: Achte darauf, dass du spezielle Sprossensamen kaufst, die für den Verzehr geeignet sind. Im Supermarkt oder Bioladen gibt es eine große Auswahl: Alfalfa, Radieschen, Brokkoli, Mungbohnen, Linsen, Kresse und viele mehr.
* Wasser: Am besten gefiltertes Wasser oder abgekochtes, abgekühltes Wasser.
* Ein dunkler, kühler Ort: Ein Küchenschrank oder eine dunkle Ecke in der Küche sind perfekt.
* Geduld: Sprossen brauchen ein paar Tage, um zu wachsen. Aber das Warten lohnt sich!
Die richtige Vorbereitung:
Bevor wir loslegen, ist es wichtig, die Samen richtig vorzubereiten. Das hilft ihnen, schneller zu keimen und beugt Schimmelbildung vor.
1. Samen auswählen: Wähle die Sprossensamen deiner Wahl aus. Ich persönlich mag eine Mischung aus Alfalfa und Radieschen, weil sie so schön knackig sind.
2. Samenmenge bestimmen: Die Menge der Samen hängt von der Größe deines Sprossenglases ab. Als Faustregel gilt: Bedecke den Boden des Glases mit einer dünnen Schicht Samen. Sie quellen noch auf, also nicht zu viel nehmen!
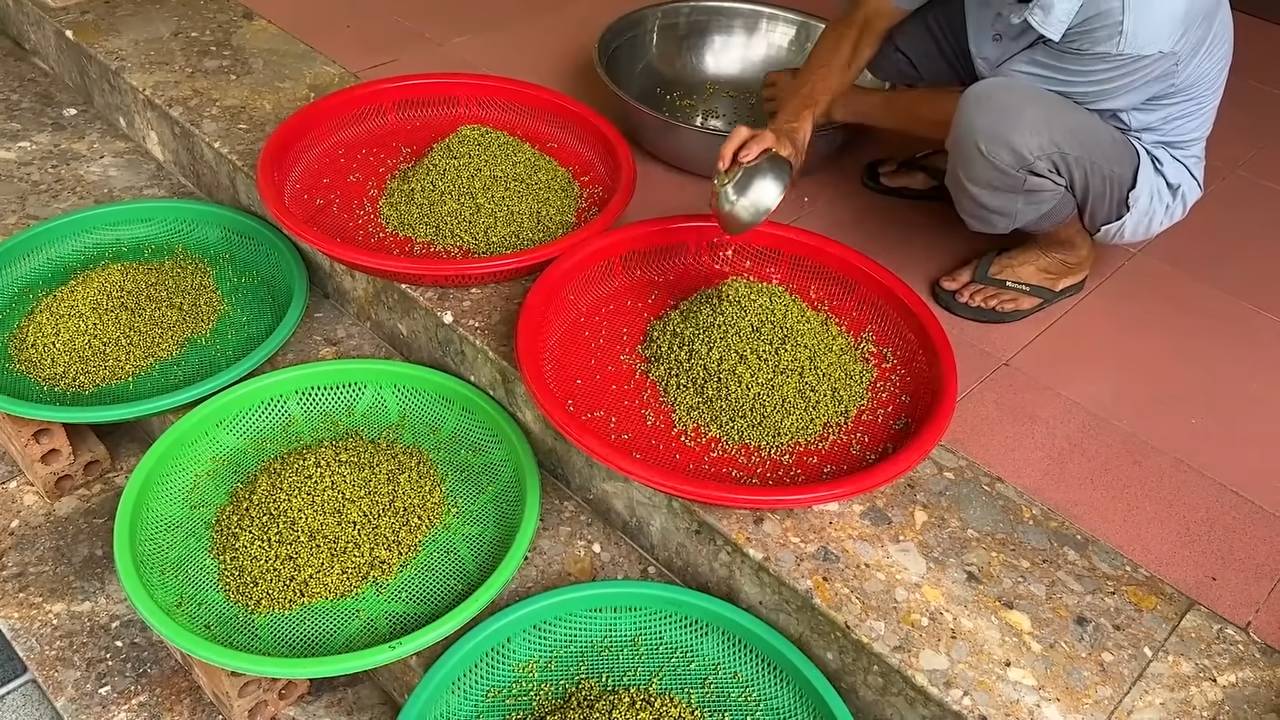
3. Samen einweichen: Gib die Samen in eine Schüssel und bedecke sie mit reichlich Wasser. Die Einweichzeit variiert je nach Samensorte. Alfalfa und Radieschen brauchen etwa 6-8 Stunden, Mungbohnen und Linsen 12-24 Stunden. Lies am besten die Anweisungen auf der Samenpackung.
4. Wasser abgießen: Nach der Einweichzeit gieße das Wasser ab und spüle die Samen gründlich mit frischem Wasser ab.
Sprossen ziehen – Schritt für Schritt:
Jetzt kommt der spannende Teil: Das eigentliche Sprossen ziehen!
1. Samen ins Sprossenglas geben: Gib die eingeweichten und abgespülten Samen in dein Sprossenglas. Verteile sie gleichmäßig am Boden.
2. Glas abdecken: Verschließe das Glas mit dem Siebdeckel oder dem Mulltuch.
3. Glas positionieren: Stelle das Glas schräg in eine Schüssel oder einen Abtropfständer. So kann überschüssiges Wasser ablaufen und die Sprossen bekommen genug Luft.
4. Regelmäßig spülen: Das ist das A und O! Spüle die Sprossen 2-3 Mal täglich mit frischem Wasser. Das verhindert Schimmelbildung und hält die Sprossen feucht. Einfach Wasser durch das Sieb laufen lassen und das Glas gut schütteln, damit alle Samen benetzt werden.
5. Dunkel lagern: Stelle das Sprossenglas an einen dunklen, kühlen Ort. Licht hemmt die Keimung.
6. Warten und beobachten: Nach ein paar Tagen wirst du sehen, wie die ersten kleinen Sprossen sprießen. Je nach Samensorte dauert es 3-7 Tage, bis die Sprossen erntereif sind.
7. Grün werden lassen (optional): Wenn die Sprossen fast fertig sind, kannst du sie für ein paar Stunden ans Licht stellen. Dadurch bilden sie Chlorophyll und werden schön grün. Aber Vorsicht: Nicht zu lange, sonst werden sie bitter.
Herausforderungen und Lösungen:
Manchmal läuft es nicht ganz glatt. Hier sind ein paar häufige Probleme und wie du sie lösen kannst:
* Schimmelbildung: Schimmel entsteht meist durch mangelnde Hygiene oder zu wenig Belüftung. Achte darauf, die Sprossen regelmäßig zu spülen und das Glas gut zu belüften. Wenn du Schimmel entdeckst, solltest du die betroffenen Sprossen entsorgen und das Glas gründlich reinigen.
* Faule Geruch: Ein fauler Geruch deutet ebenfalls auf Schimmelbildung oder Fäulnis hin. Ursache ist meist zu viel Feuchtigkeit. Achte darauf, dass das Wasser gut ablaufen kann und die Sprossen nicht im Wasser stehen.
* Ungleichmäßige Keimung: Manchmal keimen nicht alle Samen gleichzeitig. Das ist normal. Achte darauf, dass die Samen gleichmäßig verteilt sind und ausreichend Feuchtigkeit bekommen.
Die Ernte:
Wenn die Sprossen die gewünschte Größe erreicht haben, ist es Zeit für die Ernte!
1. Sprossen spülen: Spüle die Sprossen noch einmal gründlich mit frischem Wasser ab.
2. Abtropfen lassen: Lasse die Sprossen gut abtropfen.
3. Lagern: Bewahre die Sprossen in einem luftdichten Behälter im Kühlschrank auf. Dort halten sie sich etwa 3-5 Tage.
Verwendungsmöglichkeiten:
Sprossen sind unglaublich vielseitig! Du kannst sie roh in Salaten, Sandwiches oder Wraps verwenden. Sie schmecken auch toll in Suppen, Currys oder als Topping für dein Müsli. Ich liebe es, sie einfach so zu knabbern!
Spezielle Sprossenarten und ihre Besonderheiten:
Hier sind ein paar meiner Lieblingssprossen und ein paar Tipps für ihre Anzucht:
* Alfalfa: Alfalfa-Sprossen sind mild und knackig. Sie sind reich an Vitaminen und Mineralstoffen. Einweichzeit: 6-8 Stunden.
* Radieschen: Radieschen-Sprossen haben einen leicht scharfen Geschmack. Sie sind reich an Vitamin C. Einweichzeit: 6-8 Stunden.
* Brokkoli: Brokkoli-Sprossen sind reich an Sulforaphan, einem Stoff, der als krebsvorbeugend gilt. Einweichzeit: 6-8 Stunden.
* Mungbohnen: Mungbohnen-Sprossen sind knackig und haben einen leicht süßlichen Geschmack. Sie sind reich an Proteinen. Einweichzeit: 12-24 Stunden.
* Linsen: Linsen-Sprossen sind reich an Eisen und Proteinen. Sie haben einen leicht nussigen Geschmack. Einweichzeit: 12-24 Stunden.
* Kresse: Kresse-Sprossen sind scharf und würzig. Sie sind reich an Vitamin C. Kresse kann auch auf einem Teller mit feuchter Watte gezogen werden.
Reinigung des Sprossenglases:
Nach jeder Ernte solltest du das Sprossenglas gründlich reinigen, um Schimmelbildung vorzubeugen.
1. Glas leeren: Entferne alle Reste von Sprossen und Samen.
2. Glas spülen: Spüle das Glas mit heißem Wasser und Spülmittel aus.
3. Glas desinfizieren: Um sicherzugehen, dass alle Keime abgetötet werden, kannst du das Glas mit Essigwasser (1 Teil Essig, 1 Teil Wasser) ausspülen.
4. Glas trocknen: Lasse das Glas gut trocknen, bevor du es wieder verwendest.
Weitere Tipps und Tricks:
* Abwechslung: Probiere verschiedene Samensorten aus, um deinen persönlichen Favoriten zu finden.
* Hygiene: Achte auf Sauberkeit, um Schimmelbildung vorzubeugen.
* Geduld: Sprossen brauchen Zeit, um zu wachsen. Sei geduldig und lass dich nicht entmutigen, wenn es nicht gleich beim ersten Mal klappt.
* Experimentieren: Du kannst auch Sprossenmischungen selbst zusammenstellen.
* Sprossen als Geschenk: Selbst gezogene Sprossen sind ein tolles und persönliches Geschenk.
Ich hoffe, diese Anleitung hat dir geholfen, deine eigene kleine Sprossenfarm zu starten. Viel Spaß beim Sprossen ziehen und guten Appetit!
Conclusion
So, there you have it! Harvesting your own bean sprouts at home is not only incredibly easy and cost-effective, but it also guarantees you the freshest, most flavorful sprouts imaginable. Forget those limp, sad-looking sprouts from the grocery store – with just a few simple steps, you can cultivate a vibrant, crunchy bounty right in your own kitchen.
This DIY trick is a must-try for several reasons. First and foremost, you have complete control over the growing environment. This means you can ensure your sprouts are free from harmful chemicals and pesticides, giving you peace of mind about what you’re eating. Secondly, the taste difference is remarkable. Homegrown sprouts are noticeably fresher and more flavorful than their store-bought counterparts. They add a delightful crunch and subtle sweetness to salads, sandwiches, stir-fries, and so much more. Finally, it’s an incredibly rewarding experience. Watching those tiny seeds transform into edible sprouts is a miniature miracle, and it’s a fantastic way to connect with your food.
Looking to experiment? Consider trying different types of beans! Mung beans are the classic choice, but you can also use adzuki beans, lentils, or even radish seeds for a spicier kick. You can also adjust the sprouting time to achieve your desired sprout length and crunchiness. Some people prefer shorter sprouts with a more delicate flavor, while others prefer longer, more robust sprouts. Don’t be afraid to play around and find what works best for you.
Another variation to consider is the sprouting method itself. While we’ve focused on the jar method, you can also use a sprouting tray or even a specialized sprouting machine. Each method has its own advantages and disadvantages, so research and choose the one that best suits your needs and preferences.
We wholeheartedly encourage you to give this DIY trick a try. It’s a simple, satisfying, and delicious way to add fresh, healthy sprouts to your diet. Plus, it’s a great conversation starter! Imagine telling your friends and family that you grew those delicious sprouts yourself.
Once you’ve tried harvesting your own bean sprouts, we’d love to hear about your experience! Share your tips, tricks, and favorite ways to use your homegrown sprouts in the comments below. Let’s build a community of sprout enthusiasts and inspire others to embrace the joy of homegrown goodness. Happy sprouting!
Frequently Asked Questions (FAQ)
What types of beans are best for sprouting?
The most popular and readily available bean for sprouting is the mung bean. However, you can also successfully sprout adzuki beans, lentils, chickpeas, and even some types of peas. Each bean will have a slightly different flavor and texture, so experiment to find your favorites. Avoid sprouting kidney beans, as they contain toxins that are only deactivated through thorough cooking. Always use beans specifically intended for sprouting, as they are more likely to germinate successfully and are less likely to have been treated with chemicals.
How long does it take to harvest bean sprouts?
The sprouting process typically takes between 3 to 5 days, depending on the type of bean, the temperature, and the humidity. Mung beans, for example, usually sprout within 3 to 4 days. You’ll know they’re ready to harvest when they have reached your desired length and have developed small roots and leaves. Keep an eye on them and rinse them regularly to prevent them from drying out or becoming moldy.
What if my bean sprouts start to smell bad?
A foul odor is a sign that your sprouts have become contaminated with bacteria or mold. This can happen if they are not rinsed frequently enough or if the sprouting environment is too warm and humid. If you notice a bad smell, discard the sprouts immediately and thoroughly clean your sprouting container before attempting another batch. To prevent this, ensure you rinse your sprouts at least twice a day with fresh, cool water and provide adequate ventilation.
How do I store harvested bean sprouts?
Once you’ve harvested your bean sprouts, rinse them thoroughly and pat them dry with a clean towel or paper towels. Store them in an airtight container in the refrigerator. They should last for up to a week, but they are best consumed within a few days for optimal freshness and flavor. Check them regularly for any signs of spoilage, such as a slimy texture or a bad smell.
Can I eat the bean sprout roots?
Yes, the roots of bean sprouts are perfectly edible. They are a natural part of the sprouting process and contribute to the overall texture and flavor of the sprouts. Some people prefer to trim the roots before eating, but this is purely a matter of personal preference.
Why are my bean sprouts not sprouting?
There are several reasons why your bean sprouts might not be sprouting. First, make sure you are using beans specifically intended for sprouting. Old or damaged beans may not germinate properly. Second, ensure that the beans are getting enough moisture. They should be soaked initially and then rinsed regularly throughout the sprouting process. Third, the temperature may be too cold. Bean sprouts prefer a warm environment, ideally between 70 and 80 degrees Fahrenheit. Finally, make sure the beans are not exposed to direct sunlight, as this can inhibit germination.
Is it safe to eat raw bean sprouts?
While homegrown bean sprouts are generally safe to eat raw, there is always a small risk of bacterial contamination. To minimize this risk, it’s crucial to start with clean beans, use clean water, and rinse the sprouts thoroughly and frequently. If you are concerned about food safety, you can lightly cook the sprouts before eating them. Steaming or stir-frying them for a few minutes will kill any harmful bacteria without significantly affecting their flavor or texture. Pregnant women, young children, and people with weakened immune systems should exercise extra caution and consider cooking their bean sprouts before consumption.
Can I sprout other seeds besides beans?
Yes, you can sprout a wide variety of seeds, including alfalfa, broccoli, radish, and sunflower seeds. Each seed will have its own unique flavor and nutritional profile. The sprouting process is generally the same for most seeds, but the sprouting time may vary. Research the specific requirements for each type of seed before you begin.
What are the nutritional benefits of eating bean sprouts?
Bean sprouts are a nutritional powerhouse, packed with vitamins, minerals, and antioxidants. They are a good source of vitamin C, vitamin K, folate, and fiber. They are also low in calories and fat, making them a healthy addition to any diet. Eating bean sprouts can help boost your immune system, improve digestion, and protect against chronic diseases.
How do I prevent mold from growing on my bean sprouts?
Preventing mold growth is crucial for successful sprouting. The key is to maintain a clean and well-ventilated environment. Rinse your sprouts thoroughly at least twice a day with fresh, cool water. Ensure that the water drains completely after each rinse. Avoid overcrowding the sprouting container, as this can restrict airflow. If you live in a humid climate, consider using a fan to improve ventilation. If you notice any signs of mold, discard the entire batch of sprouts immediately.

Leave a Comment