
Grow Sweet Potatoes Beginners, and unlock a world of homegrown goodness! Have you ever dreamt of harvesting your own vibrant, sweet, and nutritious sweet potatoes right from your backyard? I know I have! For centuries, sweet potatoes have been a staple in diets across the globe, from their origins in Central and South America to becoming a beloved comfort food in many cultures. Their rich history is as captivating as their delicious flavor.
But let’s be honest, the idea of growing them can seem a little daunting, especially if you’re just starting out. That’s where this DIY guide comes in! I’m here to show you that growing sweet potatoes, even as a beginner, is totally achievable and incredibly rewarding. Imagine the satisfaction of digging up your own harvest, knowing exactly where your food came from and the love you put into it.
This article is packed with easy-to-follow tricks and hacks that will transform your garden into a sweet potato haven. We’ll cover everything from choosing the right varieties to nurturing your plants for a bountiful harvest. So, grab your gardening gloves, and let’s embark on this exciting journey to grow sweet potatoes beginners style! You’ll be amazed at how simple and fun it can be.
Growing Zucchini Year-Round: My DIY Greenhouse Hack
Okay, zucchini lovers, let’s talk about a dream: fresh zucchini bread, zucchini noodles, and grilled zucchini all year long! It sounds impossible, right? Well, I’m here to tell you it’s not! I’ve been experimenting with growing zucchini year-round, and I’ve developed a DIY greenhouse hack that’s surprisingly effective. It’s not rocket science, but it does require a little planning and effort. But trust me, the reward of fresh zucchini in the dead of winter is totally worth it.
Understanding the Challenge: Zucchini’s Needs
Before we dive into the DIY greenhouse, let’s quickly recap what zucchini needs to thrive. This will help us understand why a greenhouse is necessary in colder climates and how to optimize our setup.
* **Sunlight:** Zucchini are sun-worshippers. They need at least 6-8 hours of direct sunlight per day. This is a major challenge in winter, even in sunny locations.
* **Warmth:** Zucchini are frost-sensitive. They prefer temperatures between 65°F and 85°F (18°C and 29°C). Anything below 55°F (13°C) can stunt their growth, and frost will kill them.
* **Water:** Zucchini need consistent moisture, but they don’t like soggy soil. Good drainage is crucial.
* **Pollination:** Zucchini are pollinated by insects, primarily bees. In a closed greenhouse environment, we’ll need to hand-pollinate.
* **Space:** Zucchini plants get big! They need plenty of room to spread out.
Building Your Mini DIY Greenhouse
This is where the fun begins! We’re going to create a small, manageable greenhouse that will provide the warmth and protection our zucchini needs. I’m going to describe the setup I use, but feel free to adapt it based on your available space and resources.
**Materials You’ll Need:**
* **Clear Plastic Sheeting:** Heavy-duty polyethylene plastic (6 mil or thicker) is ideal. You can find this at most hardware stores. The size will depend on the dimensions of your frame.
* **PVC Pipes (or Wood):** For the frame of your greenhouse. I prefer PVC because it’s lightweight, durable, and easy to work with. You’ll need enough to create a rectangular frame and supporting arches.
* **PVC Connectors (if using PVC):** Elbows, tees, and crosses to connect the PVC pipes.
* **Zip Ties or Clamps:** To secure the plastic sheeting to the frame.
* **Duct Tape:** For reinforcing seams and patching any tears in the plastic.
* **Scissors or Utility Knife:** For cutting the plastic sheeting.
* **Measuring Tape:** To ensure accurate measurements.
* **Seed Starting Trays or Small Pots:** For starting your zucchini seeds indoors.
* **Potting Mix:** A well-draining potting mix for your seedlings.
* **Grow Lights (Optional but Recommended):** To supplement sunlight, especially during winter months.
* **Small Heater (Optional):** For extra warmth during extremely cold periods. A seedling heat mat can also work well.
* **Thermometer:** To monitor the temperature inside the greenhouse.
* **Humidifier (Optional):** To maintain optimal humidity levels.
* **Small Fan (Optional):** To circulate air and prevent mold growth.
**Step-by-Step Instructions:**
1. **Plan Your Greenhouse Size:** Before you start cutting anything, decide how big you want your greenhouse to be. Consider the space you have available and the number of zucchini plants you want to grow. I recommend a minimum size of 4 feet wide, 6 feet long, and 4 feet high for a few plants.
2. **Build the Frame:**
* **Cutting the PVC:** Measure and cut the PVC pipes according to your planned dimensions. You’ll need pieces for the base frame (four sides), the vertical supports (four corners), and the arched supports.
* **Assembling the Base:** Connect the PVC pipes for the base frame using the appropriate connectors (elbows).
* **Adding Vertical Supports:** Attach the vertical supports to the corners of the base frame using connectors (tees).
* **Creating the Arches:** Bend the remaining PVC pipes into arches and attach them to the vertical supports using connectors (crosses or tees, depending on your design). You can use a pipe bender for a smoother curve, or gently bend the PVC by hand. Space the arches evenly along the length of the frame.
* Securing the Frame: Make sure all connections are secure. You can use PVC cement for a more permanent bond, but it’s not strictly necessary.
3. **Covering the Frame with Plastic:**
* **Measuring the Plastic:** Measure the frame carefully and cut the plastic sheeting to size, leaving a little extra for overlap.
* Attaching the Plastic:** Drape the plastic sheeting over the frame, ensuring it covers all sides. Secure the plastic to the frame using zip ties or clamps. Start at the top and work your way down, pulling the plastic taut as you go.
* Creating a Door:** Cut an opening in the plastic for a door. You can create a simple flap that can be rolled up and secured with Velcro or ties.
* Sealing the Seams:** Use duct tape to reinforce the seams and seal any gaps in the plastic. This will help to retain heat and humidity.
4. **Setting Up the Interior:**
* Positioning the Greenhouse:** Place your greenhouse in a location that receives maximum sunlight.
* Adding Grow Lights (Optional): If you’re growing zucchini during the winter months, grow lights are highly recommended. Position them above the plants to provide supplemental light. I use LED grow lights because they are energy-efficient and don’t produce excessive heat.
* Installing a Heater (Optional): If you live in a very cold climate, you may need to add a small heater to maintain a consistent temperature inside the greenhouse. A seedling heat mat placed under the pots can also provide warmth.
* Adding a Thermometer:** Place a thermometer inside the greenhouse to monitor the temperature. This will help you to adjust the heating and ventilation as needed.
* Setting Up Ventilation:** Ventilation is crucial to prevent overheating and mold growth. You can create vents by cutting small openings in the plastic and covering them with mesh to keep out insects. A small fan can also help to circulate air.
* Adding a Humidifier (Optional): Zucchini prefer a humid environment. If the air inside the greenhouse is too dry, you can add a small humidifier.
Starting Your Zucchini Seeds Indoors
While you’re building your greenhouse, you can start your zucchini seeds indoors. This will give them a head start and ensure they’re ready to transplant when the greenhouse is ready.
**Steps for Starting Seeds:**
1. **Fill Seed Starting Trays or Pots:** Fill your seed starting trays or small pots with a well-draining potting mix.
2. **Sow the Seeds:** Plant the zucchini seeds about 1 inch deep in the potting mix.
3. **Water Gently:** Water the seeds gently to moisten the soil.
4. **Provide Warmth:** Place the trays or pots in a warm location, such as on a heat mat or near a sunny window.
5. **Keep the Soil Moist:** Keep the soil consistently moist, but not soggy.
6. **Provide Light:** Once the seedlings emerge, provide them with plenty of light. If you don’t have enough natural light, use grow lights.
7. **Harden Off the Seedlings:** Before transplanting the seedlings into the greenhouse, you’ll need to harden them off. This means gradually exposing them to outdoor conditions over a period of a week or two. Start by placing them outside for a few hours each day, gradually increasing the amount of time they spend outdoors.
Transplanting and Caring for Your Zucchini Plants
Once your seedlings have developed a few sets of true leaves and the weather inside the greenhouse is consistently warm enough, you can transplant them into larger pots or directly into the ground (if you have a raised bed inside the greenhouse).
**Transplanting Tips:**
1. **Choose a Sunny Location:** Select a sunny spot inside the greenhouse for your zucchini plants.
2. **Prepare the Soil:** If you’re planting directly into the ground, amend the soil with compost or other organic matter to improve drainage and fertility.
3. **Dig a Hole:** Dig a hole that’s large enough to accommodate the root ball of the seedling.
4. **Gently Remove the Seedling:** Gently remove the seedling from its pot, being careful not to damage the roots.
5. **Place the Seedling in the Hole:** Place the seedling in the hole and backfill with soil.
6. **Water Thoroughly:** Water the seedling thoroughly after transplanting.
**Ongoing Care:**
1. **Water Regularly:** Water your zucchini plants regularly, especially during hot weather.
Conclusion
So, there you have it! Growing sweet potatoes, even for beginners, doesn’t have to be an intimidating task. This simple DIY trick, focusing on sprouting slips from your existing sweet potatoes, opens up a world of possibilities for fresh, homegrown produce right in your backyard or even on your balcony. Forget relying solely on store-bought starts; this method empowers you to take control of your sweet potato journey from the very beginning.
Why is this a must-try? Because it’s economical, sustainable, and incredibly rewarding. Imagine the satisfaction of harvesting sweet potatoes that you nurtured from a single, humble root. Plus, you’ll know exactly what went into growing them, ensuring they’re free from unwanted chemicals and pesticides. This DIY approach is also a fantastic way to connect with nature and learn more about the life cycle of plants.
But the fun doesn’t stop there! Feel free to experiment with different varieties of sweet potatoes. Try sprouting slips from Beauregard, Japanese, or even purple sweet potatoes to discover your favorite flavor and texture. You can also adjust the growing conditions to see how they impact the size and yield of your harvest. Some gardeners have success using raised beds, while others prefer growing sweet potatoes directly in the ground. Container gardening is also a viable option, especially for those with limited space. Just be sure to choose a large container to accommodate the sprawling vines and developing tubers.
Consider adding organic matter to your soil to boost nutrient levels and improve drainage. A well-draining soil is crucial for preventing rot and ensuring healthy sweet potato growth. You can also experiment with different mulching techniques to retain moisture and suppress weeds. Straw, hay, or even shredded leaves can work wonders.
Don’t be afraid to get creative with your sweet potato growing setup. You can even build a simple trellis to support the vines and keep them off the ground. This can help improve air circulation and reduce the risk of fungal diseases.
We wholeheartedly encourage you to give this DIY trick a try. It’s a simple, effective, and enjoyable way to grow your own delicious sweet potatoes. And once you’ve harvested your bounty, the culinary possibilities are endless! From classic sweet potato fries and pies to savory stews and salads, these versatile tubers can be incorporated into a wide range of dishes.
Most importantly, we want to hear about your experiences! Share your successes, your challenges, and any tips or tricks you discover along the way. Post photos of your sweet potato slips, your growing plants, and your final harvest on social media using relevant hashtags. Let’s build a community of sweet potato enthusiasts and inspire others to embrace the joy of homegrown produce. So, grab a sweet potato, get your hands dirty, and start growing! You’ll be amazed at what you can achieve. Remember, **growing sweet potatoes** is an adventure, and we’re excited to be a part of yours.
Frequently Asked Questions (FAQ)
What kind of sweet potato should I use to grow slips?
You can use any variety of sweet potato you like! However, it’s best to use organic sweet potatoes to avoid any potential growth inhibitors that may be present in conventionally grown produce. Look for firm, unblemished sweet potatoes at your local grocery store or farmers market. Experiment with different varieties to find your favorite!
How long does it take for sweet potato slips to grow?
The time it takes for slips to grow can vary depending on the temperature and humidity. Generally, you can expect to see sprouts emerging within 2-4 weeks. Keep the sweet potato consistently moist and in a warm location to encourage faster growth. Once the slips are about 6-8 inches long, they’re ready to be transplanted.
Can I grow sweet potatoes in containers?
Yes, you can absolutely grow sweet potatoes in containers! Choose a large container, at least 20 gallons in size, to provide ample space for the tubers to develop. Make sure the container has drainage holes to prevent waterlogging. Use a well-draining potting mix and provide plenty of sunlight. Container-grown sweet potatoes may not produce as large of a harvest as those grown in the ground, but it’s still a great option for those with limited space.
What kind of soil is best for growing sweet potatoes?
Sweet potatoes prefer well-draining, sandy loam soil. Avoid heavy clay soils, as they can become waterlogged and lead to rot. Amend your soil with organic matter, such as compost or aged manure, to improve drainage and fertility. A slightly acidic soil pH of 6.0-6.5 is ideal.
How often should I water my sweet potato plants?
Water your sweet potato plants regularly, especially during dry periods. Keep the soil consistently moist, but avoid overwatering, which can lead to root rot. Water deeply and less frequently, rather than shallowly and more often. Mulching around the plants can help retain moisture and reduce the need for watering.
When is the best time to plant sweet potato slips?
The best time to plant sweet potato slips is after the last frost, when the soil has warmed up to at least 60°F (15°C). In most regions, this is typically in late spring or early summer. Planting too early can result in stunted growth or even death of the slips.
How do I harvest sweet potatoes?
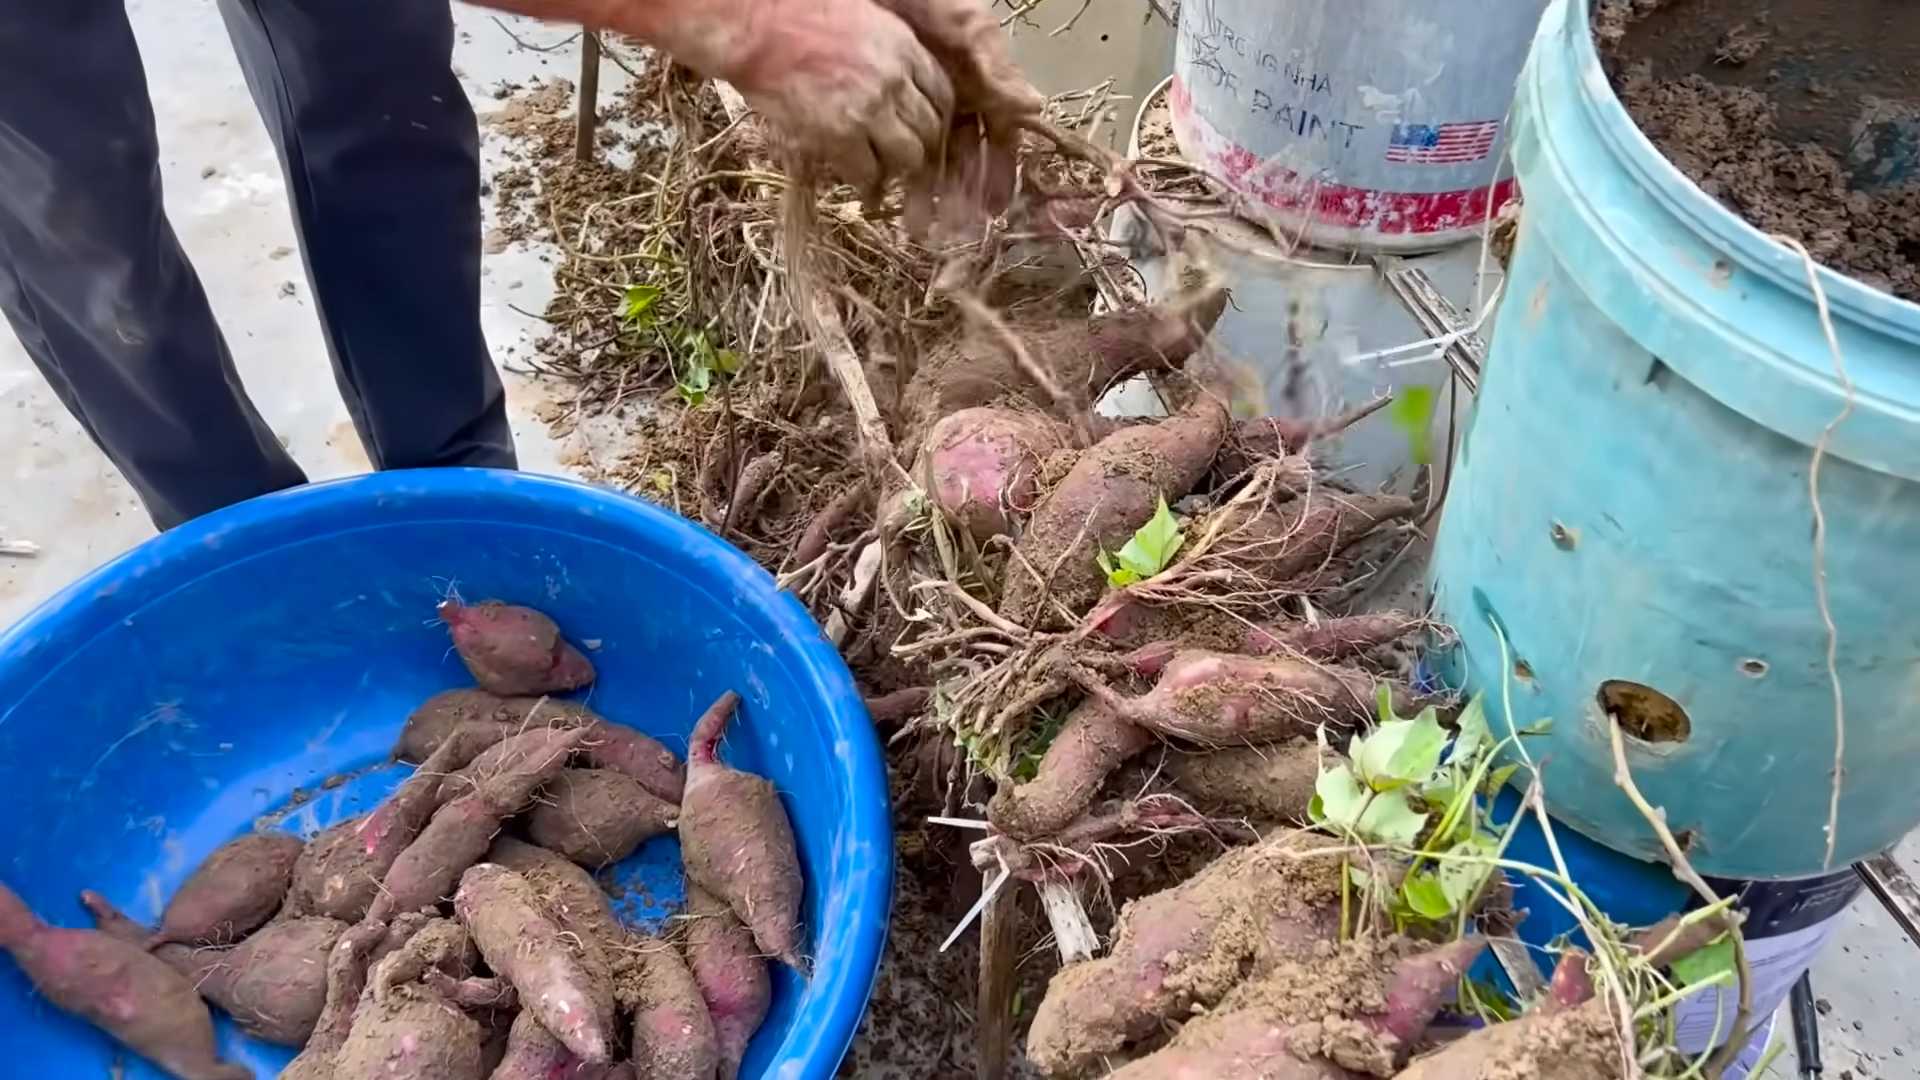
Sweet potatoes are typically ready to harvest about 90-120 days after planting. The leaves will start to turn yellow and the vines may begin to die back. Use a garden fork to carefully loosen the soil around the plants and gently lift the sweet potatoes out of the ground. Avoid damaging the tubers during harvest.
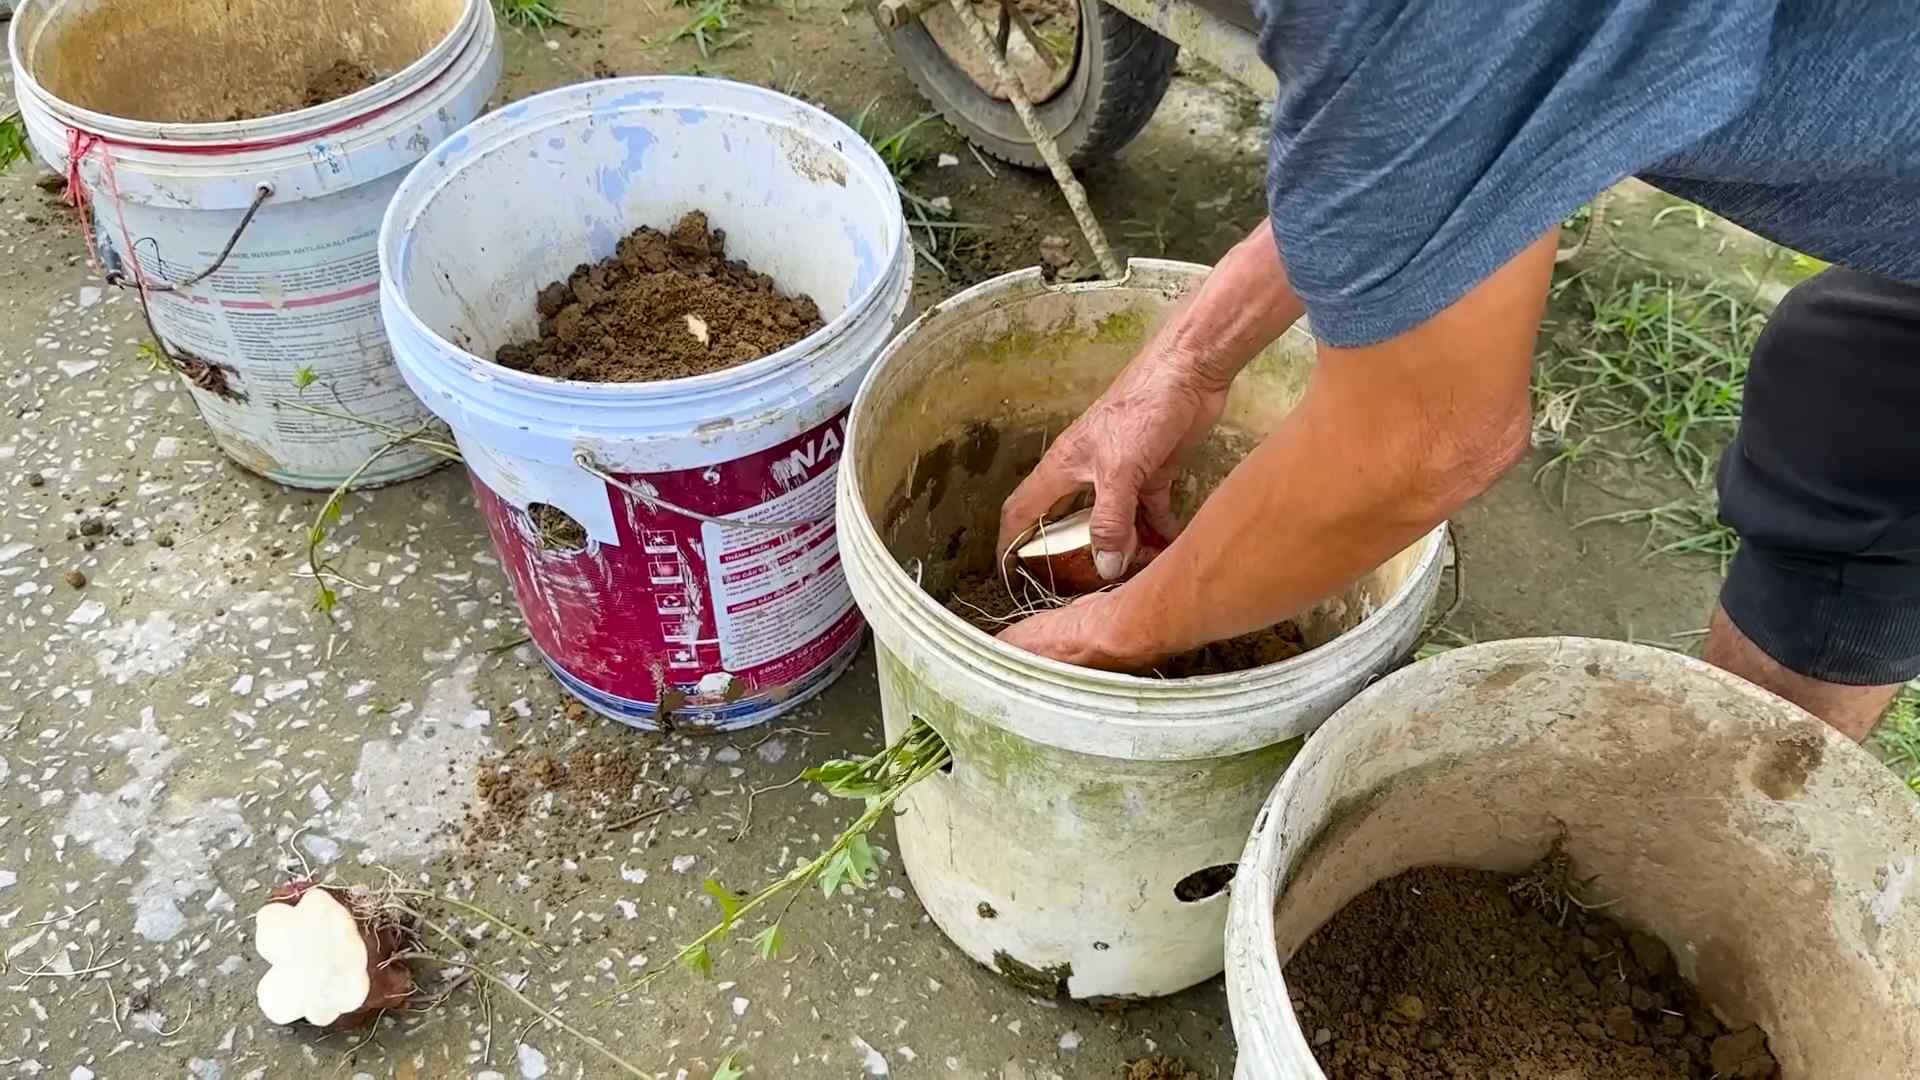
How do I cure sweet potatoes after harvesting?
Curing sweet potatoes is essential for developing their sweetness and improving their storage life. After harvesting, gently brush off any excess soil and allow the sweet potatoes to dry in a warm, humid place (80-85°F or 27-29°C) for about 7-10 days. This process allows the skins to harden and any minor cuts or bruises to heal.
How should I store sweet potatoes?
After curing, store sweet potatoes in a cool, dry, and well-ventilated place (55-60°F or 13-16°C). Avoid storing them in the refrigerator, as this can cause them to develop a hard core and lose their flavor. Properly cured and stored sweet potatoes can last for several months.
What are some common pests and diseases that affect sweet potatoes?
Some common pests that can affect sweet potatoes include sweet potato weevils, flea beetles, and aphids. Diseases include stem rot, black rot, and scurf. Practice good garden hygiene, such as removing plant debris and rotating crops, to prevent pest and disease problems. You can also use organic pest control methods, such as insecticidal soap or neem oil, to manage infestations.
Can I eat the sweet potato leaves?
Yes, sweet potato leaves are edible and nutritious! They can be cooked and eaten like spinach or other leafy greens. Choose young, tender leaves for the best flavor and texture. Sweet potato leaves are a good source of vitamins A and C, as well as fiber and antioxidants.
What if my sweet potato slips don’t develop roots?
Sometimes, sweet potato slips may not develop roots readily. To encourage root growth, try placing the slips in a glass of water, ensuring that only the bottom portion of the stem is submerged. Change the water every few days. You can also add a rooting hormone to the water to stimulate root development. Be patient, as it may take a few weeks for roots to appear.
Is it better to grow sweet potatoes from slips or directly from the sweet potato?
Growing sweet potatoes from slips is generally more successful than planting the whole sweet potato directly in the ground. Slips are essentially baby plants that are already rooted and ready to grow. Planting the whole sweet potato can lead to rot and may not result in as many plants.
How do I know if my sweet potatoes are getting enough sunlight?
Sweet potatoes need at least 6-8 hours of direct sunlight per day to thrive. If your plants are not getting enough sunlight, they may become leggy and produce fewer tubers. Move your plants to a sunnier location or supplement with artificial light if necessary.
What are some creative ways to use my homegrown sweet potatoes?
The possibilities are endless! You can make classic sweet potato fries, pies, and casseroles. You can also roast them, grill them, or add them to soups, stews, and salads. Sweet potatoes can even be used to make sweet potato bread, muffins, and pancakes. Get creative and experiment with different recipes to discover your favorite ways to enjoy your homegrown sweet potatoes!

Leave a Comment