
Growing Celery on Rocks? Sounds a little crazy, right? But trust me, this simple DIY trick is about to revolutionize your kitchen garden! Forget sprawling vegetable patches and endless weeding – we’re bringing the farm to your windowsill with this ingenious method. For centuries, resourceful gardeners have sought ways to maximize yields with minimal space, and this technique taps into that very spirit.
Think of it: fresh, crisp celery, ready to snip and add to your soups, salads, or even just to munch on with peanut butter, all grown from scraps you’d normally toss in the compost. It’s not just about convenience; it’s about sustainability and reducing food waste. In a world increasingly conscious of its environmental footprint, learning how to regrow vegetables from scraps is a powerful and rewarding skill. Plus, it’s incredibly satisfying to watch something new sprout from what was once considered garbage!
This method of growing celery on rocks is perfect for apartment dwellers, busy professionals, or anyone who wants to enjoy fresh produce without the commitment of a full-blown garden. I’m going to show you how easy it is to transform those leftover celery stalks into a thriving, edible plant. Get ready to impress your friends and family with your newfound green thumb – let’s get started!
Growing Celery from Kitchen Scraps: A Fun and Easy DIY Project
Hey there, fellow plant enthusiasts! Ever wondered if you could regrow your favorite veggies from kitchen scraps? Well, I’m here to tell you that you absolutely can! Today, we’re diving into the wonderful world of regrowing celery from its base. It’s a super simple project, perfect for beginners, and a fantastic way to reduce food waste. Plus, it’s incredibly rewarding to watch something you’d normally toss in the compost bin spring back to life. So, grab your celery, and let’s get started!
What You’ll Need
Before we jump into the steps, let’s gather our supplies. This project is pretty low-maintenance, so you probably already have most of these items at home:
* A celery stalk (with the base intact): Look for a healthy-looking stalk with a firm base. The fresher, the better!
* A shallow dish or bowl: Something that can hold water and the celery base comfortably.
* Water: Tap water is perfectly fine.
* A sunny windowsill or well-lit area: Celery needs sunlight to thrive.
* Potting soil: Once the roots develop, we’ll need soil to transplant our celery.
* A pot or container: Choose a pot that’s at least 6 inches in diameter to give the celery room to grow.
* Optional: Rooting hormone (this can help speed up the rooting process, but it’s not essential).
The Regrowing Process: From Scrap to Stalk
Okay, now for the fun part! We’re going to take that celery base and coax it into growing new stalks. Here’s how:
1. Prepare the Celery Base:
* Carefully cut off the celery stalks about 2 inches from the base. You can use these stalks for cooking, salads, or snacking!
* Don’t discard the base! This is where the magic happens.
* Remove any loose or damaged outer stalks from the base. This will help prevent rot.
2. Place the Base in Water:
* Fill your shallow dish or bowl with about an inch of water.
* Place the celery base, cut-side up, in the water. Make sure the bottom of the base is submerged, but the top is exposed.
* If you’re using rooting hormone, you can dip the cut end of the base in the hormone powder before placing it in the water.
3. Find a Sunny Spot:
* Place the dish with the celery base on a sunny windowsill or in a well-lit area. Celery needs at least 6 hours of sunlight per day to grow properly.
* If you don’t have a sunny windowsill, you can use a grow light.
4. Change the Water Regularly:
* This is crucial! Change the water every 1-2 days to prevent bacteria growth and keep the water fresh.
* This also helps provide the celery with fresh nutrients.
5. Observe and Wait:
* Be patient! It usually takes about 5-7 days for roots to start appearing.
* You should also see small leaves starting to sprout from the center of the base.
* Keep the water level consistent and continue changing it regularly.
Transplanting Your Celery to Soil
Once your celery base has developed a good root system (about 2-3 inches long) and has some new leaves, it’s time to transplant it to soil. This will give it the nutrients it needs to grow into a full-sized celery plant.
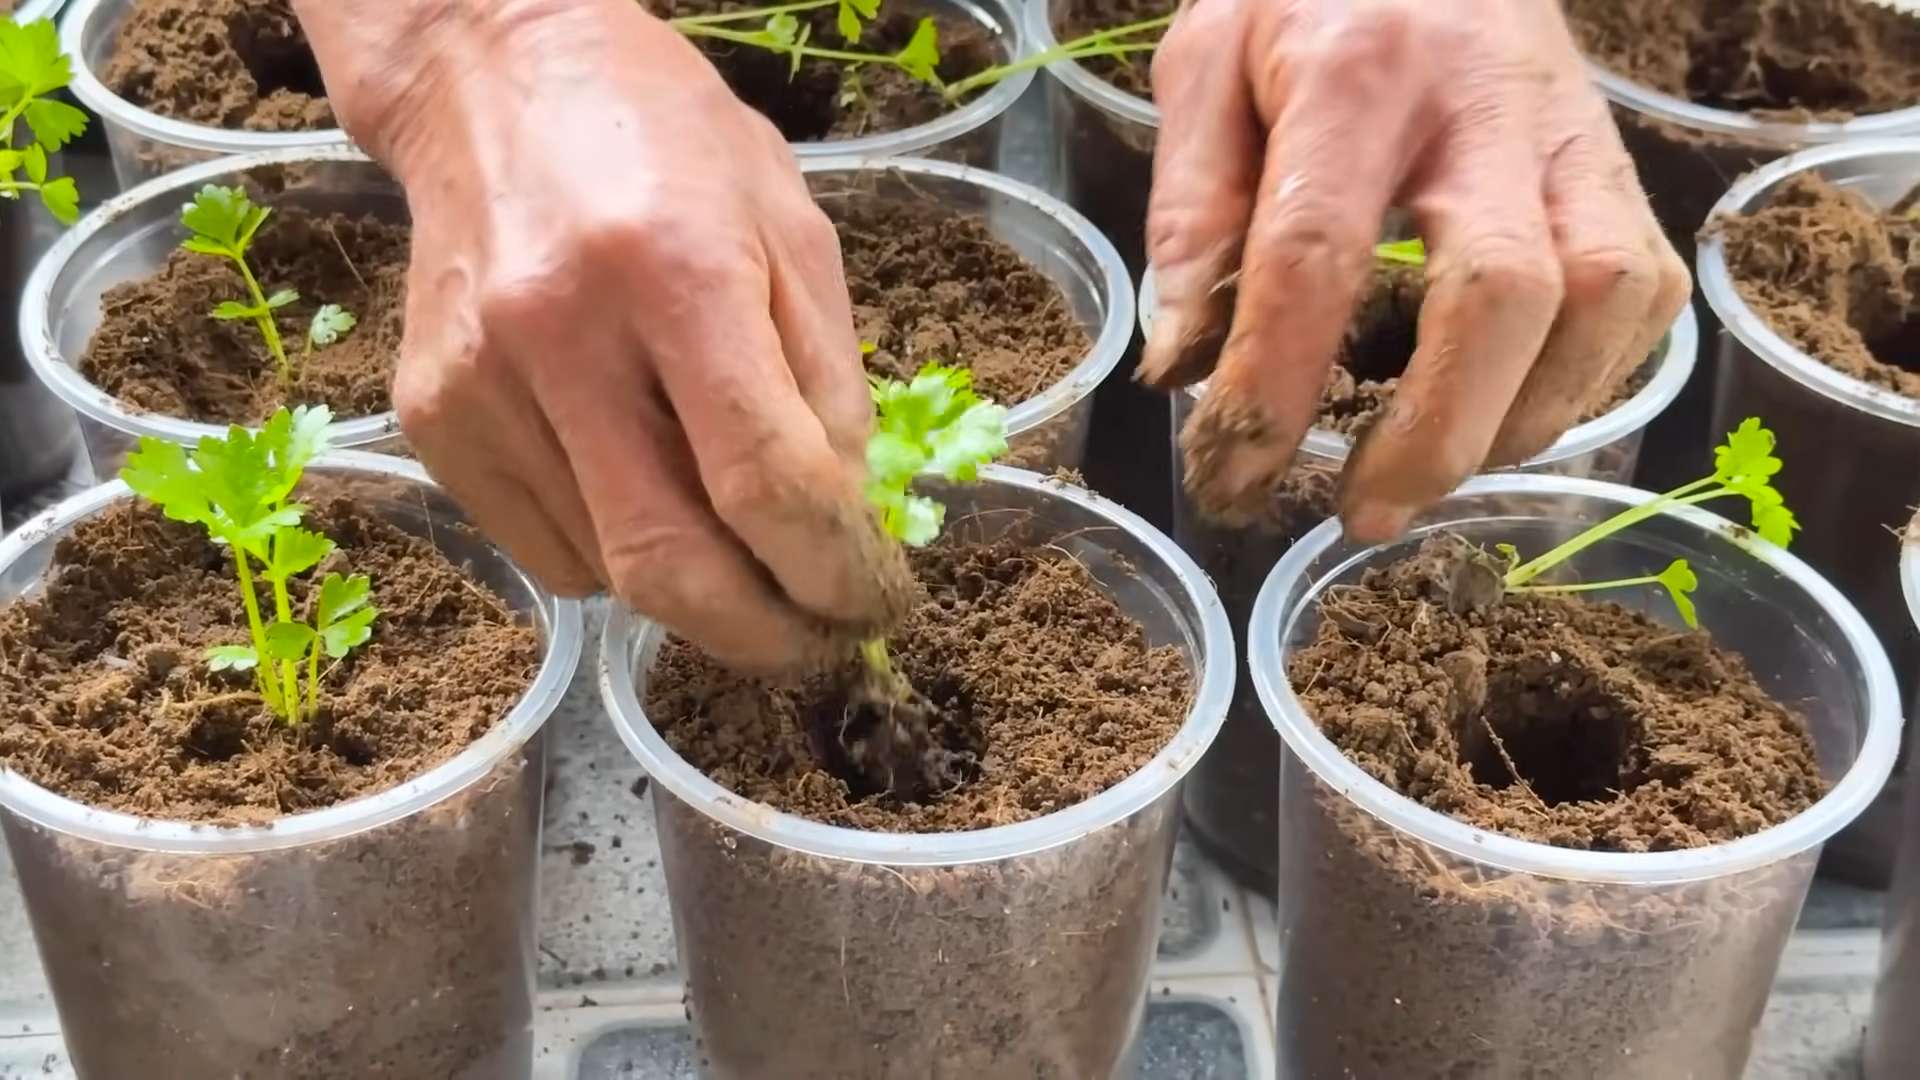
1. Prepare the Pot:
* Fill your pot or container with good-quality potting soil.
* Make a hole in the center of the soil that’s large enough to accommodate the celery base and its roots.
2. Carefully Remove the Celery Base:
* Gently remove the celery base from the water.
* Be careful not to damage the roots.
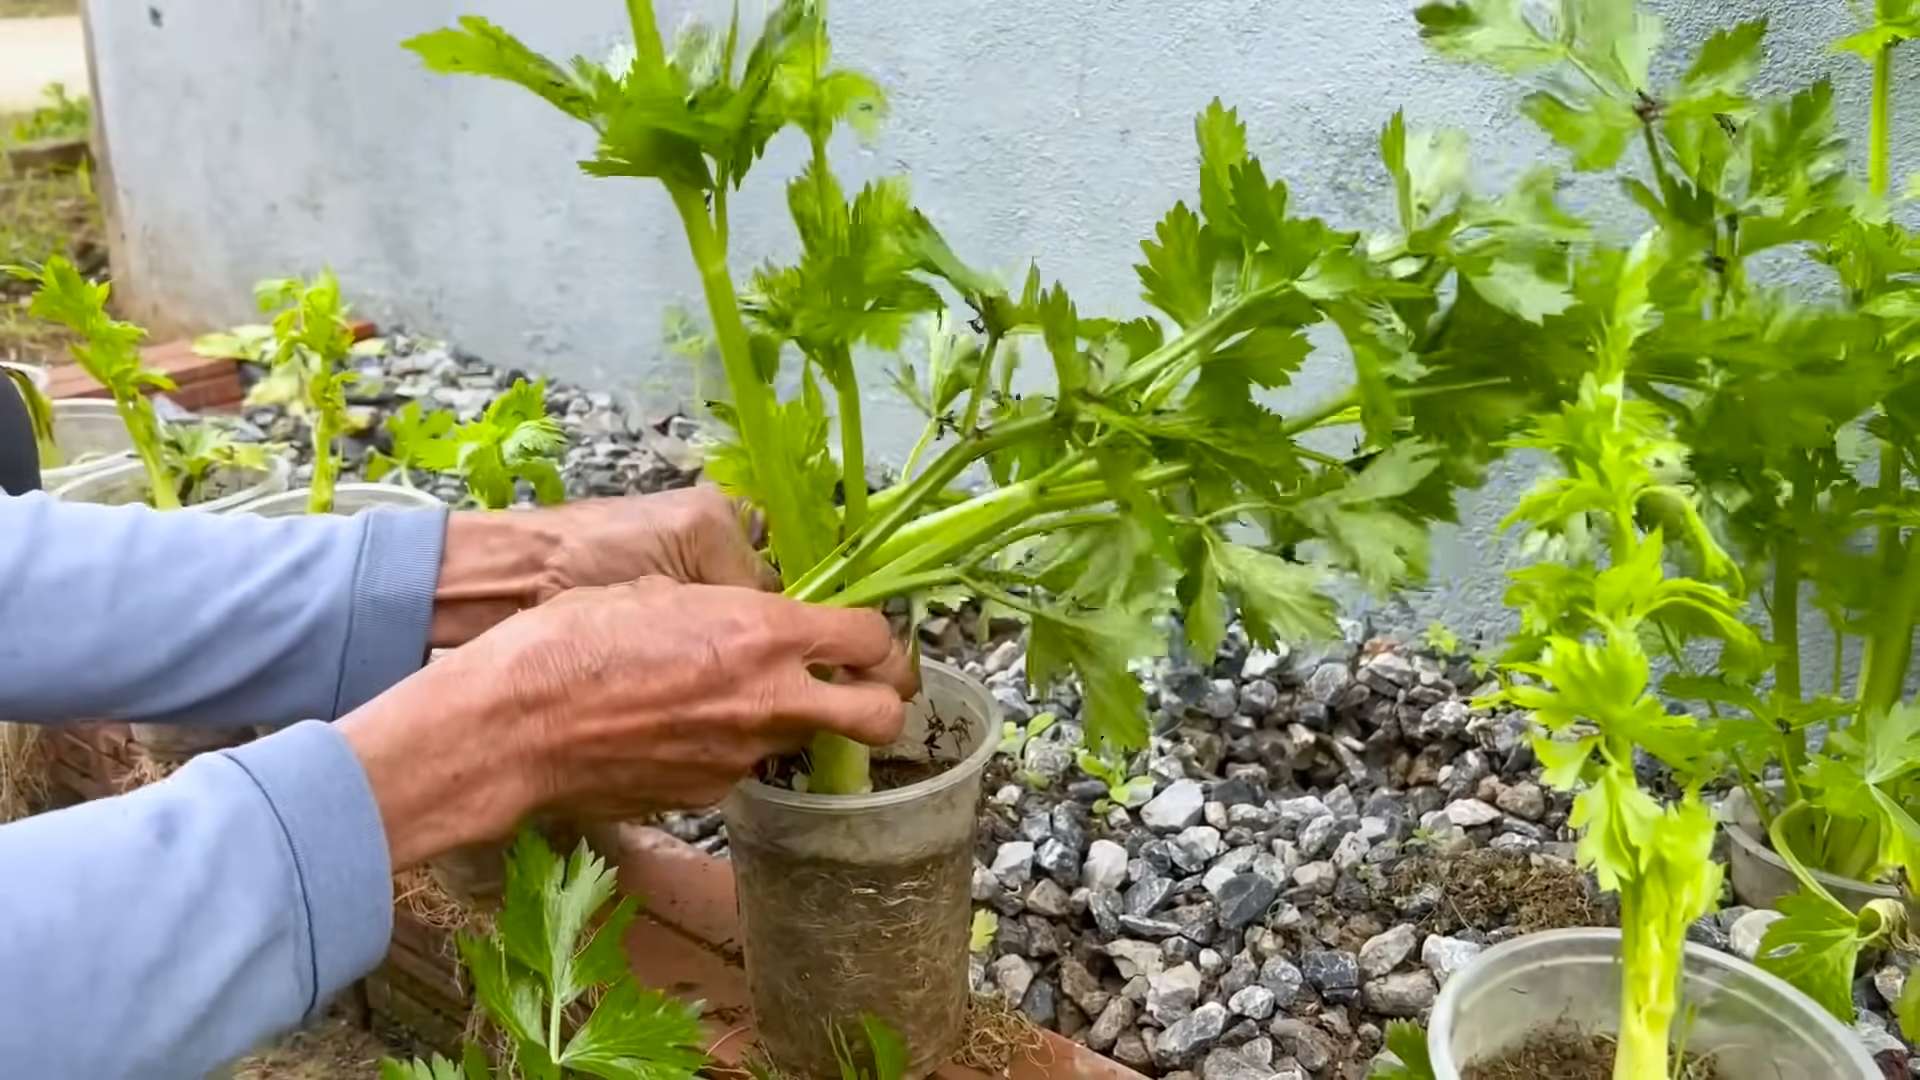
3. Plant the Celery:
* Place the celery base in the hole you made in the soil.
* Make sure the top of the base is slightly above the soil level.
* Gently fill in the hole with soil, pressing lightly around the base to secure it.
4. Water Thoroughly:
* Water the soil thoroughly until water drains out of the bottom of the pot.
* This will help settle the soil and ensure the roots are properly hydrated.
5. Find a Sunny Spot (Again!):
* Place the pot in a sunny location or under a grow light.
Caring for Your Regrown Celery
Now that your celery is planted in soil, it’s important to provide it with the proper care to ensure it thrives. Here are a few tips:
* Watering: Water your celery regularly, keeping the soil consistently moist but not waterlogged. Check the soil moisture by sticking your finger into the soil. If the top inch feels dry, it’s time to water.
* Fertilizing: Celery is a heavy feeder, so it benefits from regular fertilization. Use a balanced liquid fertilizer every 2-3 weeks. Follow the instructions on the fertilizer package.
* Sunlight: Celery needs at least 6 hours of sunlight per day. If you don’t have enough natural sunlight, use a grow light.
* Pest Control: Keep an eye out for pests like aphids and spider mites. If you notice any pests, treat them with insecticidal soap or neem oil.
* Harvesting: You can start harvesting your celery stalks when they reach a desired size. Simply cut off the outer stalks as needed, leaving the inner stalks to continue growing.
Troubleshooting Tips
Sometimes, things don’t go exactly as planned. Here are a few common problems you might encounter and how to fix them:
* Celery base is rotting: This is usually caused by bacteria growth in the water. Make sure you’re changing the water every 1-2 days. You can also add a drop of hydrogen peroxide to the water to help prevent bacteria growth.
* No roots are growing: This could be due to a few factors. Make sure the celery base is fresh and healthy. Also, ensure it’s getting enough sunlight and that you’re changing the water regularly. You can also try using rooting hormone to stimulate root growth.
* Leaves are turning yellow: This could be a sign of overwatering or underwatering. Check the soil moisture and adjust your watering accordingly. Yellowing leaves can also indicate a nutrient deficiency, so try fertilizing your celery.
* Celery is not growing tall: Celery needs plenty of sunlight and nutrients to grow tall. Make sure it’s getting enough sunlight and that you’re fertilizing it regularly.
Why This Works: The Science Behind Regrowing Celery
You might be wondering, how does this actually work? Well, celery, like many plants, has the ability to regenerate from its base. The base contains dormant buds that, when exposed to water and sunlight, can sprout new roots and leaves. This is a form of asexual reproduction, where a new plant is grown from a part of the parent plant. It’s a pretty amazing process, and it’s a testament to the resilience of nature.
Beyond Celery: Other Veggies You Can Regrow
Once you’ve mastered regrowing celery, you can try your hand at regrowing other vegetables from kitchen scraps. Some popular options include:
* Lettuce: Similar to celery, you can regrow lettuce from its base.
* Green Onions: Place the white bulb with roots in water, and they’ll regrow.
* Garlic: Plant a clove in soil, and it will sprout into a new garlic plant.
* Ginger: Plant a piece of ginger root in soil, and it will grow into a ginger plant.
* Potatoes: Plant a potato with “eyes” in soil, and it will grow into a potato plant.
Regrowing vegetables from kitchen scraps is a fun, easy, and sustainable way to grow your own food. It’s also a great way to reduce food waste and save money. So, give it a try, and see what you can grow! Happy gardening!
Conclusion
So, there you have it! Growing celery on rocks isn’t just a quirky gardening experiment; it’s a fantastic way to reduce food waste, enjoy fresh celery more often, and add a touch of green to your kitchen. It’s a simple, satisfying project that yields tangible results. Think about it: instead of tossing those celery ends into the compost bin, you’re giving them a second life, transforming them into crisp, flavorful stalks.
This method is particularly appealing because it requires minimal effort and resources. You don’t need a sprawling garden, specialized equipment, or even a green thumb. Just a celery base, some water, a sunny spot, and a little patience. The visual appeal of watching the celery regrow is an added bonus, making it a great conversation starter and a fun project for kids.
But the benefits extend beyond mere convenience and aesthetics. By regrowing your own celery, you’re actively participating in a more sustainable lifestyle. You’re reducing your reliance on commercially grown produce, minimizing your carbon footprint, and taking control of your food source. Plus, homegrown celery often boasts a more intense flavor than store-bought varieties, adding a delightful zest to your salads, soups, and snacks.
Don’t be afraid to experiment with variations! Try using different types of celery to see which ones regrow best. You can also experiment with different containers, from simple glass jars to decorative planters. Consider adding a diluted liquid fertilizer to the water every few weeks to boost growth. And if you’re feeling adventurous, try transplanting your regrown celery into a pot of soil for even more robust growth.
The key to success with this DIY trick is consistency. Remember to change the water regularly to prevent mold and bacteria growth. Provide ample sunlight, and be patient. Celery growth can be slow, but the reward of fresh, homegrown celery is well worth the wait.
We wholeheartedly encourage you to give this simple yet rewarding project a try. It’s a fantastic way to connect with nature, reduce waste, and enjoy the delicious flavor of fresh celery. Once you’ve experienced the satisfaction of growing your own celery from scraps, you’ll never look at a celery base the same way again.
So, grab a celery stalk, find a sunny spot, and get ready to embark on your own celery-growing adventure. And don’t forget to share your experiences with us! We’d love to see your regrown celery and hear about your tips and tricks. Share your photos and stories on social media using #CeleryOnRocks and let’s inspire others to embrace this sustainable and rewarding practice. Let’s all enjoy the fruits (or vegetables!) of our labor and celebrate the magic of regrowing celery at home. This is a great way to learn about growing celery on rocks.
Frequently Asked Questions (FAQ)
What kind of celery works best for regrowing?
Generally, any type of celery you buy from the grocery store will work for regrowing. However, some varieties might be more vigorous than others. Organic celery is often a good choice, as it hasn’t been treated with chemicals that could inhibit growth. The key is to ensure that the base of the celery stalk, where the roots will emerge, is intact and healthy. Avoid celery that is wilted, discolored, or shows signs of rot.
How long does it take for celery to regrow?
The time it takes for celery to regrow can vary depending on several factors, including the variety of celery, the amount of sunlight it receives, and the temperature. Typically, you’ll start to see new growth within a few days to a week. It can take several weeks to a few months to grow a substantial amount of celery. Be patient and consistent with watering and providing sunlight, and you’ll eventually be rewarded with fresh, homegrown celery.
How much sunlight does regrowing celery need?
Celery thrives in bright, indirect sunlight. Avoid placing your celery in direct sunlight, especially during the hottest part of the day, as this can scorch the leaves. A spot near a sunny window that receives several hours of indirect sunlight each day is ideal. If you don’t have a sunny window, you can supplement with a grow light.
How often should I change the water?
It’s crucial to change the water regularly to prevent the growth of mold and bacteria, which can inhibit celery growth and potentially harm your health. Change the water every one to two days. When you change the water, gently rinse the celery base to remove any accumulated debris.
Can I transplant the regrown celery into soil?
Yes, absolutely! Once your celery has developed a good root system and has grown several inches tall, you can transplant it into a pot of soil or directly into your garden. Choose a pot that is at least 6 inches in diameter and fill it with well-draining potting mix. When transplanting, be careful not to damage the roots. Water thoroughly after transplanting and continue to provide ample sunlight and regular watering.
What kind of soil is best for growing celery?
Celery prefers rich, well-draining soil that is high in organic matter. A good potting mix for celery should contain a blend of peat moss, perlite, and vermiculite. You can also amend your soil with compost or other organic materials to improve its fertility and drainage.
How often should I water the celery once it’s in soil?
Celery needs consistent moisture to thrive. Water your celery regularly, keeping the soil consistently moist but not waterlogged. Check the soil moisture level daily and water when the top inch of soil feels dry to the touch. Avoid letting the soil dry out completely, as this can stress the plant and inhibit growth.
Can I use fertilizer to help the celery grow?
Yes, you can use a diluted liquid fertilizer to boost celery growth. Choose a balanced fertilizer that is formulated for vegetables. Dilute the fertilizer according to the package instructions and apply it every few weeks. Avoid over-fertilizing, as this can burn the roots and damage the plant.
What are some common problems when regrowing celery and how can I fix them?
Some common problems when regrowing celery include:
* **Rotting:** This is usually caused by stagnant water. Change the water more frequently and ensure good air circulation.
* **Yellowing leaves:** This can be caused by insufficient sunlight or nutrient deficiencies. Move the celery to a sunnier location and consider adding a diluted liquid fertilizer.
* **Slow growth:** This can be caused by a variety of factors, including insufficient sunlight, nutrient deficiencies, or improper watering. Ensure that your celery is receiving ample sunlight, is being watered properly, and is receiving adequate nutrients.
Is regrown celery as nutritious as store-bought celery?
While the exact nutritional content may vary depending on growing conditions, regrown celery is generally just as nutritious as store-bought celery. It contains vitamins, minerals, and antioxidants that are beneficial for your health. Plus, you have the added benefit of knowing exactly where your celery came from and how it was grown.
Leave a Comment