
Balcony Chili Growing: Imagine stepping onto your balcony and plucking a fiery red chili pepper, ready to spice up your dinner! Sounds amazing, right? For centuries, chili peppers have added zest to cuisines around the world, originating in South America and spreading like wildfire (pun intended!) thanks to their vibrant flavors and versatility. But you don’t need acres of land to enjoy fresh, homegrown chilies.
I’m here to tell you that even with limited space, you can cultivate a thriving chili garden right on your balcony. This DIY guide is packed with simple, effective tricks and hacks to help you succeed. Forget expensive store-bought chilies that lack that fresh, vibrant kick. With a little know-how, you can enjoy a continuous supply of your favorite peppers, tailored to your preferred level of heat.
Whether you’re a seasoned gardener or a complete beginner, this article will equip you with the knowledge and confidence to master balcony chili growing. We’ll cover everything from choosing the right varieties for container gardening to optimizing sunlight and watering techniques. Get ready to transform your balcony into a mini chili farm and impress your friends and family with your homegrown harvest!
Growing Chili Peppers on Your Balcony: A Spicy DIY Guide
Hey there, fellow spice enthusiasts! Ever dreamt of having a fiery little chili garden right outside your door? Well, you’ve come to the right place! I’m going to walk you through everything you need to know to successfully grow chili peppers on your balcony, even if you’re a complete beginner. Get ready to add some serious heat to your meals with your own homegrown chilies!
Choosing the Right Chili Variety
First things first, let’s talk chili varieties. Not all chilies are created equal, and some are definitely better suited for balcony life than others. Here’s what I consider when choosing my chili plants:
* Size: Balconies usually have limited space, so opt for compact or bush-type chili varieties. Think about how much space you realistically have.
* Heat Level: Do you prefer a mild kick or a scorching inferno? Choose varieties that match your spice tolerance.
* Growing Conditions: Consider your balcony’s sunlight exposure. Some chilies thrive in full sun, while others prefer partial shade.
* Days to Maturity: This tells you how long it will take from planting to harvest. Shorter maturity times mean you’ll be enjoying your chilies sooner!
Some of my personal favorites for balcony growing include:
* Jalapeño: A classic, versatile chili with a moderate heat level.
* Serrano: A bit hotter than jalapeños, perfect for adding a kick to salsas and sauces.
* Thai Chili: Small but mighty, these chilies pack a serious punch and are great for Asian-inspired dishes.
* Habanero: For the brave souls who love extreme heat! Be warned, these are seriously spicy.
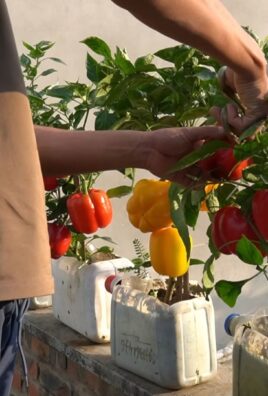
* Bell Peppers: Okay, not technically chilies, but they grow well alongside them and add a sweet contrast.
Gathering Your Supplies
Alright, now that you’ve chosen your chili varieties, let’s gather the necessary supplies. Here’s a checklist to get you started:
* Chili Seeds or Seedlings: You can start from seeds or buy established seedlings from a nursery. Seedlings are quicker, but starting from seed is more rewarding (in my opinion!).
* Pots or Containers: Choose pots that are at least 12 inches in diameter and have drainage holes. Terra cotta pots are great because they allow the soil to breathe.
* Potting Mix: Use a high-quality potting mix specifically formulated for vegetables. Avoid using garden soil, as it can become compacted in containers.
* Fertilizer: A balanced fertilizer (e.g., 10-10-10) or a fertilizer specifically for tomatoes and peppers will provide the necessary nutrients.
* Watering Can or Hose: For regular watering.
* Gardening Gloves: To protect your hands.
* Trowel or Small Shovel: For planting and transplanting.
* Plant Labels: To keep track of your chili varieties.
* Optional:
* Plant Stakes or Cages: To support taller chili plants.
* Mulch: To help retain moisture and suppress weeds.
* Spray Bottle: For misting seedlings.
Planting Your Chili Peppers
Now for the fun part – planting! Whether you’re starting from seeds or seedlings, the process is pretty straightforward.
Starting from Seeds:
1. Sow the Seeds: Fill small seed trays or pots with seed-starting mix. Moisten the mix and sow the chili seeds about ¼ inch deep. I usually plant 2-3 seeds per cell to increase my chances of germination.
2. Provide Warmth and Moisture: Cover the seed trays with a plastic dome or wrap them in plastic wrap to create a humid environment. Place them in a warm location (around 70-80°F) or use a heat mat. Keep the soil consistently moist but not waterlogged.
3. Wait for Germination: Chili seeds can take anywhere from 7 to 21 days to germinate, so be patient. Once the seedlings emerge, remove the plastic cover and provide them with plenty of light.
4. Thin the Seedlings: Once the seedlings have a few sets of true leaves, thin them out by snipping off the weaker seedlings at the soil line. Leave only the strongest seedling in each cell.
5. Harden Off the Seedlings: Before transplanting the seedlings outdoors, you need to harden them off. This means gradually exposing them to outdoor conditions over a period of 7-10 days. Start by placing them in a sheltered spot for a few hours each day, gradually increasing the amount of time they spend outdoors.
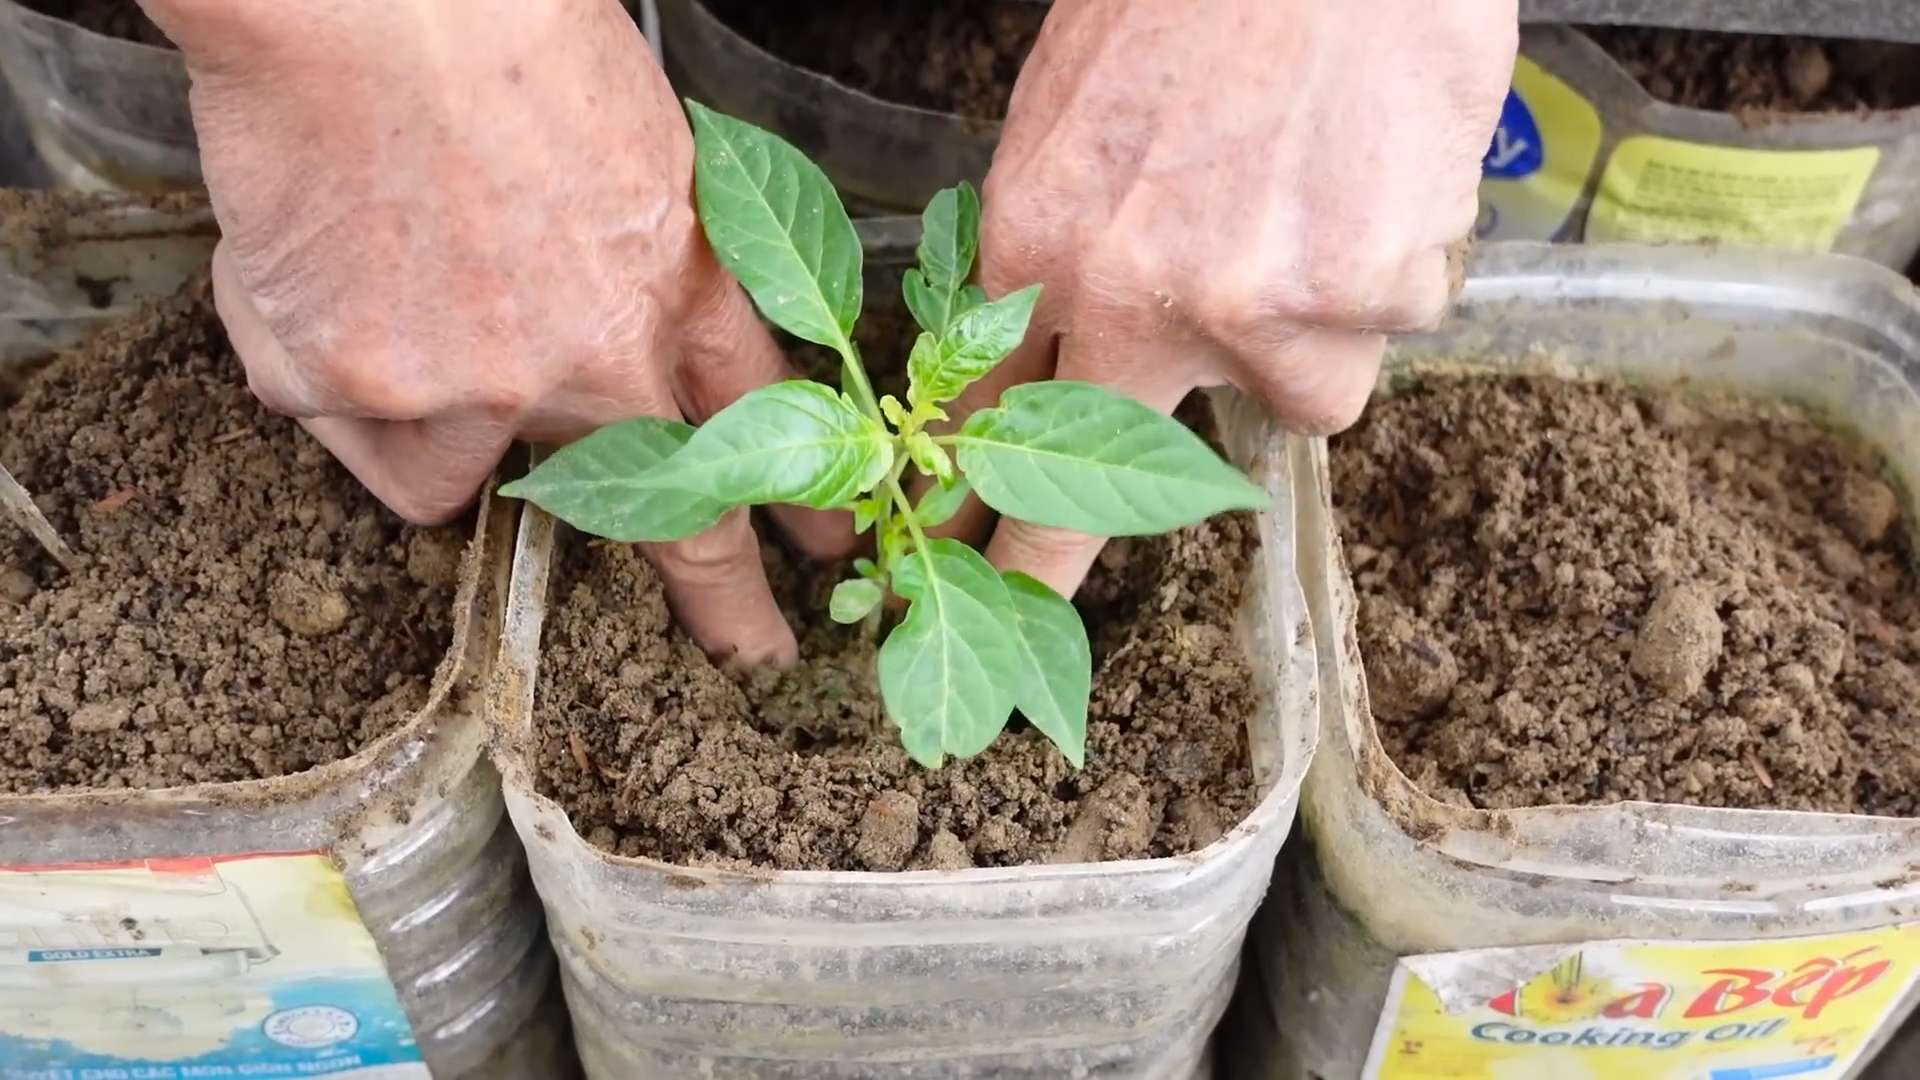
Transplanting Seedlings:
1. Prepare the Pots: Fill your chosen pots with potting mix, leaving about an inch of space at the top.
2. Remove the Seedlings: Gently remove the seedlings from their containers, being careful not to damage the roots. If the roots are tightly bound, gently loosen them with your fingers.
3. Plant the Seedlings: Dig a hole in the potting mix that is large enough to accommodate the root ball. Place the seedling in the hole and backfill with potting mix. Gently firm the soil around the base of the plant.
4. Water Thoroughly: Water the newly planted seedlings thoroughly to help them settle in.
Caring for Your Chili Plants
Once your chili plants are in their pots, it’s time to provide them with the care they need to thrive.
1. Sunlight: Chili peppers need at least 6-8 hours of sunlight per day. Place your pots in a sunny spot on your balcony. If your balcony doesn’t get enough sunlight, you may need to supplement with grow lights.
2. Watering: Water your chili plants regularly, especially during hot, dry weather. The soil should be consistently moist but not waterlogged. Check the soil moisture by sticking your finger into the soil. If the top inch feels dry, it’s time to water.
3. Fertilizing: Feed your chili plants with a balanced fertilizer every 2-3 weeks. Follow the instructions on the fertilizer package. You can also use a fertilizer specifically formulated for tomatoes and peppers.
4. Pruning: Pruning can help to encourage bushier growth and increase fruit production. Pinch off the tips of the branches to encourage side shoots to develop. Remove any yellowing or dead leaves.
5. Pest and Disease Control: Keep an eye out for pests such as aphids, spider mites, and whiteflies. If you notice any pests, you can try spraying them with insecticidal soap or neem oil. Chili plants can also be susceptible to diseases such as powdery mildew and blossom end rot. Ensure good air circulation and avoid overwatering to prevent these problems.
6. Support: As your chili plants grow, they may need support to prevent them from falling over. Use plant stakes or cages to provide support.
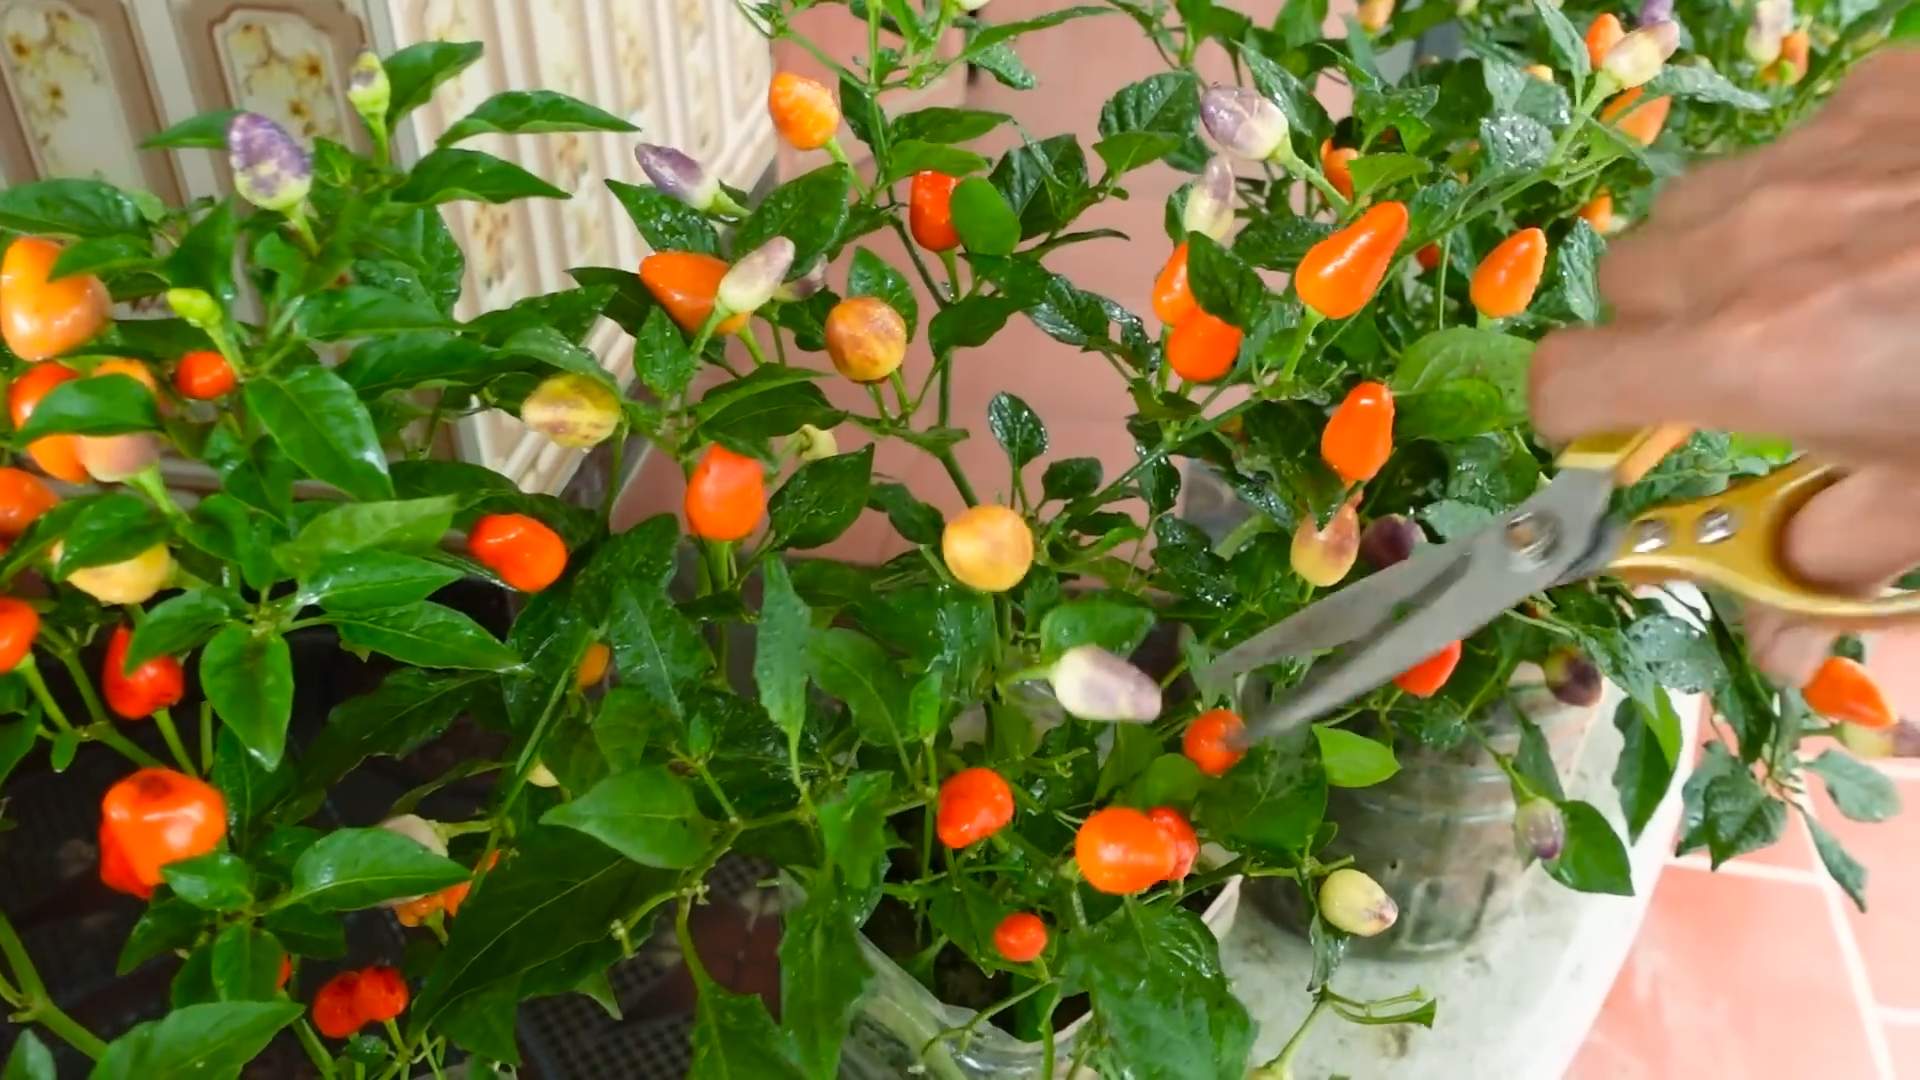
Harvesting Your Chili Peppers
The moment you’ve been waiting for – harvesting your chilies! The time to harvest will depend on the variety of chili you’re growing.
* Color: Most chilies will change color as they ripen, from green to red, yellow, or orange.
* Firmness: The chilies should be firm to the touch.
* Size: The chilies should be the size specified for the variety you’re growing.
To harvest your chilies, simply snip them off the plant with a pair of scissors or pruning shears. Be careful not to damage the plant.
Troubleshooting Common Problems
Even with the best care, you may encounter some problems while growing chili peppers on your balcony. Here are some common issues and how to address them:
* Yellowing Leaves: This can be caused by overwatering, underwatering, nutrient deficiencies, or pests. Check the soil moisture and adjust your watering accordingly. Fertilize your plants with a balanced fertilizer. Inspect your plants for pests and treat them accordingly.
* Blossom End Rot: This is a condition where the bottom of the chili peppers turns black and rotten. It is caused by a calcium deficiency. Ensure that your soil has adequate calcium levels.
* Lack of Fruit: This can be caused by insufficient sunlight, poor pollination, or extreme temperatures. Make sure your plants are getting enough sunlight. You can hand-pollinate the flowers by gently shaking the plant or using a small paintbrush to transfer pollen from one flower to another.
* Pests: Aphids, spider mites, and whiteflies are common pests that can infest chili plants. Spray your plants with insecticidal soap or neem oil to control these pests.
Enjoying Your Harvest
Congratulations! You’ve successfully grown chili peppers on your balcony. Now it’s time to enjoy the fruits (or should I say, chilies?) of your labor. Use your homegrown chilies to add some heat to your favorite dishes, make your own hot sauce, or even
Conclusion
So, there you have it! Growing your own chilies on your balcony isn’t just a fun project; it’s a gateway to fresher, more flavorful meals and a deeper connection with your food. We’ve walked you through the essentials, from selecting the right varieties to nurturing your plants for a bountiful harvest. The beauty of this DIY trick lies in its simplicity and adaptability. Even if you’re a complete beginner, you can successfully cultivate a thriving chili garden in a small space.
Why is this a must-try? Because nothing beats the satisfaction of plucking a ripe chili pepper from your own plant, knowing exactly where it came from and how it was grown. The taste is undeniably superior to store-bought chilies, bursting with vibrant flavors that will elevate your culinary creations. Plus, you’ll have a constant supply of fresh chilies right at your fingertips, ready to add a kick to your favorite dishes.
But the benefits extend beyond just taste. Balcony chili growing is also an incredibly rewarding hobby. It’s a chance to connect with nature, learn about plant life, and enjoy the therapeutic benefits of gardening. Watching your chili plants grow and flourish is a truly fulfilling experience.
Don’t be afraid to experiment! Try different chili varieties to discover your favorites. Jalapeños, habaneros, Thai chilies – the possibilities are endless. You can also explore different growing techniques, such as companion planting or using different types of soil. Consider adding herbs like basil or oregano to your balcony garden to complement your chilies.
For a milder flavor, try removing the seeds and membranes from your chilies before using them. If you prefer a hotter kick, leave them in. You can also dry your chilies for long-term storage or make your own chili powder. The options are truly limitless.
We encourage you to embrace this DIY trick and embark on your own balcony chili growing adventure. It’s easier than you think, and the rewards are well worth the effort. Imagine the delicious meals you’ll create, the compliments you’ll receive, and the satisfaction you’ll feel knowing you grew your own chilies.
So, grab some seeds, find a sunny spot on your balcony, and get started today! We’re confident that you’ll be amazed by the results. And most importantly, don’t forget to share your experience with us! We’d love to hear about your successes, challenges, and favorite chili recipes. Share your photos and stories on social media using #BalconyChiliGrowing, and let’s inspire others to join the fun. Happy growing!
Frequently Asked Questions (FAQ)
What are the best chili varieties to grow on a balcony?
The best chili varieties for balcony growing are those that are compact and productive. Some excellent choices include:
* **Jalapeños:** These are relatively easy to grow and produce a good yield of moderately spicy peppers.
* **Thai Chilies:** These small, fiery chilies are perfect for adding a kick to Asian-inspired dishes. They thrive in containers and are quite prolific.
* **Serrano Peppers:** Similar to jalapeños but with a bit more heat, serranos are another great option for balcony gardens.
* **Habaneros:** If you’re a fan of intense heat, habaneros are a must-try. However, be aware that they can be more challenging to grow than other varieties.
* **Cayenne Peppers:** These long, thin peppers are perfect for drying and making chili powder. They’re also relatively easy to grow in containers.
* **Bell Peppers:** While technically not chilies, bell peppers are a great addition to any balcony garden and can be grown alongside your chili plants.
Consider the size of your balcony and the amount of sunlight it receives when choosing your chili varieties. Some varieties are more compact than others and may be better suited for smaller spaces.
How much sunlight do chili plants need?
Chili plants need at least 6-8 hours of direct sunlight per day to thrive. If your balcony doesn’t receive enough sunlight, you may need to supplement with grow lights. Place your chili plants in the sunniest spot on your balcony and rotate them regularly to ensure that all sides receive adequate sunlight.
What type of soil is best for growing chilies in containers?
Use a well-draining potting mix specifically formulated for containers. Avoid using garden soil, as it can become compacted in containers and doesn’t drain well. A good potting mix will provide the necessary nutrients and drainage for your chili plants to thrive. You can also amend your potting mix with compost or other organic matter to improve its fertility.
How often should I water my chili plants?
Water your chili plants regularly, especially during hot, dry weather. The frequency of watering will depend on the size of your containers, the type of soil you’re using, and the weather conditions. Check the soil moisture regularly by sticking your finger into the soil. If the top inch of soil is dry, it’s time to water. Avoid overwatering, as this can lead to root rot.
Do I need to fertilize my chili plants?
Yes, chili plants benefit from regular fertilization. Use a balanced fertilizer specifically formulated for vegetables or flowering plants. Follow the instructions on the fertilizer package for application rates and frequency. You can also use organic fertilizers, such as compost tea or fish emulsion.
How do I protect my chili plants from pests and diseases?
Inspect your chili plants regularly for pests and diseases. Common pests include aphids, spider mites, and whiteflies. You can control these pests with insecticidal soap or neem oil. Diseases can be prevented by providing good air circulation and avoiding overwatering. If you notice any signs of disease, remove the affected leaves or plants immediately.
When should I harvest my chilies?
Harvest your chilies when they have reached their mature color and size. The color will vary depending on the variety. For example, jalapeños are typically harvested when they are dark green, while habaneros are harvested when they are orange or red. Use scissors or pruning shears to cut the chilies from the plant, leaving a small stem attached.
Can I grow chilies indoors?
Yes, you can grow chilies indoors, but you’ll need to provide them with adequate light and warmth. Place your chili plants near a sunny window or use grow lights to supplement the natural light. You’ll also need to ensure that the temperature is warm enough, ideally between 70-80°F.
How do I dry my chilies?
There are several ways to dry chilies. One method is to string them together and hang them in a warm, dry place. Another method is to use a dehydrator. You can also dry chilies in the oven on a low temperature. Once the chilies are completely dry, store them in an airtight container in a cool, dark place.
What can I do with my harvested chilies?
The possibilities are endless! You can use your harvested chilies fresh in your favorite dishes, dry them for long-term storage, make chili powder, or create your own hot sauce. You can also pickle them, freeze them, or give them away to friends and family.

Leave a Comment