
Growing Red Cabbage might seem daunting, but trust me, it’s a rewarding experience that brings vibrant color and delicious flavor right to your backyard! Have you ever imagined harvesting your own deep purple heads of cabbage, ready to be transformed into tangy slaws or hearty braised dishes? This isn’t just about gardening; it’s about connecting with a tradition that stretches back centuries.
Cabbage, in its various forms, has been a staple food for cultures around the world, from ancient Rome to medieval Europe. Red cabbage, with its striking hue, adds a touch of elegance to any garden and plate. But beyond its beauty, growing your own red cabbage offers a fantastic way to ensure you’re eating fresh, organic produce, free from harmful pesticides.
In today’s world, where we’re increasingly conscious of what we consume, knowing exactly where your food comes from is invaluable. Plus, let’s be honest, store-bought cabbage can sometimes be a bit… bland. By learning a few simple DIY tricks, you can unlock the full potential of growing red cabbage, resulting in heads that are bursting with flavor and packed with nutrients. I’m here to guide you through the process, sharing easy-to-follow steps and insider tips that will have you harvesting beautiful red cabbage in no time. Let’s get started!
Growing Red Cabbage: A Beginner’s Guide to a Vibrant Harvest
Okay, so you want to grow red cabbage? Awesome! It’s not as intimidating as it looks, and the payoff – that gorgeous, crunchy, slightly peppery cabbage – is totally worth it. I’ve grown red cabbage for years, and I’m going to walk you through everything you need to know, from seed to slaw.
Choosing the Right Variety
First things first, let’s talk varieties. Red cabbage isn’t just red cabbage; there are different types that mature at different rates and have slightly different flavors. Here are a few popular choices:
* ‘Red Acre’: This is a classic, reliable variety. It matures relatively quickly (around 75-85 days) and produces medium-sized, round heads. It’s a great all-around choice.
* ‘Ruby Perfection’: As the name suggests, this one’s known for its deep red color and uniform heads. It takes a bit longer to mature (around 85-95 days), but it’s worth the wait.
* ‘Red Express’: If you’re impatient (like me sometimes!), this is the variety for you. It matures in just 65-70 days, making it one of the fastest-growing red cabbages. The heads are smaller, but the flavor is still fantastic.
* ‘Langedijker Dauer’: For long storage, this is your go-to. It matures in about 100 days and produces very dense heads that store well into winter.
Consider your climate, growing season length, and desired use when choosing a variety. I usually go with ‘Red Acre’ because it’s dependable and matures in a reasonable amount of time.
Starting Your Cabbage: Seeds or Transplants?
You have two options here: starting from seed or buying transplants (small, already-started plants) from a nursery. Both have their pros and cons.
* Starting from Seed: This is the more economical option, and it gives you more control over the entire process. However, it requires more time and effort. You’ll need to start your seeds indoors about 6-8 weeks before the last expected frost in your area.
* Buying Transplants: This is the easier option, especially for beginners. You can skip the seed-starting process and get a head start on the growing season. However, transplants can be more expensive, and you’re limited to the varieties that the nursery carries.
I usually start my red cabbage from seed because I enjoy the process and it saves me money. But if you’re short on time or space, transplants are a perfectly fine option.
Starting Seeds Indoors (If You Choose That Route)
Okay, let’s get those seeds started! Here’s what you’ll need:
* Seed starting trays or small pots
* Seed starting mix (a light, sterile soil mix)
* Watering can or spray bottle
* Grow lights (optional, but highly recommended)
* Heat mat (optional, but helpful for germination)
Here’s the step-by-step:
1. Fill your seed starting trays or pots with seed starting mix. Gently press down on the soil to remove any air pockets.
2. Sow the seeds about 1/4 inch deep. I usually plant 2-3 seeds per cell or pot, just in case some don’t germinate.
3. Water gently. You want the soil to be moist but not soggy. A spray bottle works well for this.
4. Place the trays or pots on a heat mat (if using) and under grow lights (if using). The ideal temperature for germination is around 70-75°F (21-24°C).
5. Keep the soil consistently moist. Check the soil daily and water as needed.
6. Once the seedlings emerge (usually within 5-10 days), remove the heat mat and keep the grow lights on for 14-16 hours per day. If you don’t have grow lights, place the seedlings in a sunny window, but be sure to rotate them regularly to prevent them from becoming leggy.
7. Thin the seedlings to one per cell or pot. Choose the strongest, healthiest-looking seedling and snip off the others at the soil line.
8. Harden off the seedlings before transplanting them outdoors. This means gradually exposing them to outdoor conditions over a period of 7-10 days. Start by placing them outside for a few hours each day, gradually increasing the amount of time they spend outdoors. Protect them from direct sunlight and strong winds.
Preparing the Garden Bed
Red cabbage needs a sunny spot with well-drained soil. It also prefers slightly acidic soil (pH 6.0-7.0). Here’s how to prepare your garden bed:
1. Choose a location that gets at least 6 hours of sunlight per day.
2. Test your soil pH. You can buy a soil testing kit at most garden centers. If your soil is too alkaline, you can amend it with sulfur or peat moss.
3. Amend the soil with compost or other organic matter. This will improve drainage, fertility, and water retention. I usually add a generous layer of compost to my garden bed before planting.
4. Till or dig the soil to a depth of at least 12 inches. This will loosen the soil and make it easier for the cabbage roots to grow.
5. Rake the soil smooth and remove any rocks or debris.
Transplanting Your Cabbage
Once your seedlings are hardened off (or you’ve purchased transplants), it’s time to transplant them into the garden.
1. Choose a cloudy day or plant in the late afternoon to avoid stressing the plants.
2. Space the plants 18-24 inches apart. This will give them enough room to grow and prevent overcrowding.
3. Dig a hole that is slightly larger than the root ball of the seedling or transplant.
4. Gently remove the seedling or transplant from its container. Be careful not to damage the roots.
5. Place the seedling or transplant in the hole and backfill with soil.
6. Water thoroughly.
7. Mulch around the plants with straw, wood chips, or other organic mulch. This will help to retain moisture, suppress weeds, and regulate soil temperature.
Caring for Your Cabbage
Red cabbage is relatively easy to care for, but here are a few things to keep in mind:
* Water regularly. Cabbage needs consistent moisture, especially during hot, dry weather. Aim for about 1 inch of water per week.
* Fertilize regularly. Cabbage is a heavy feeder, so it needs regular fertilization. I usually use a balanced organic fertilizer every 2-3 weeks.
* Control pests and diseases. Cabbage is susceptible to a few pests and diseases, such as cabbage worms, aphids, and clubroot. Inspect your plants regularly and take action if you see any problems. I prefer to use organic pest control methods, such as insecticidal soap or neem oil.
* Weed regularly. Weeds can compete with cabbage for nutrients and water, so it’s important to keep your garden bed weed-free.
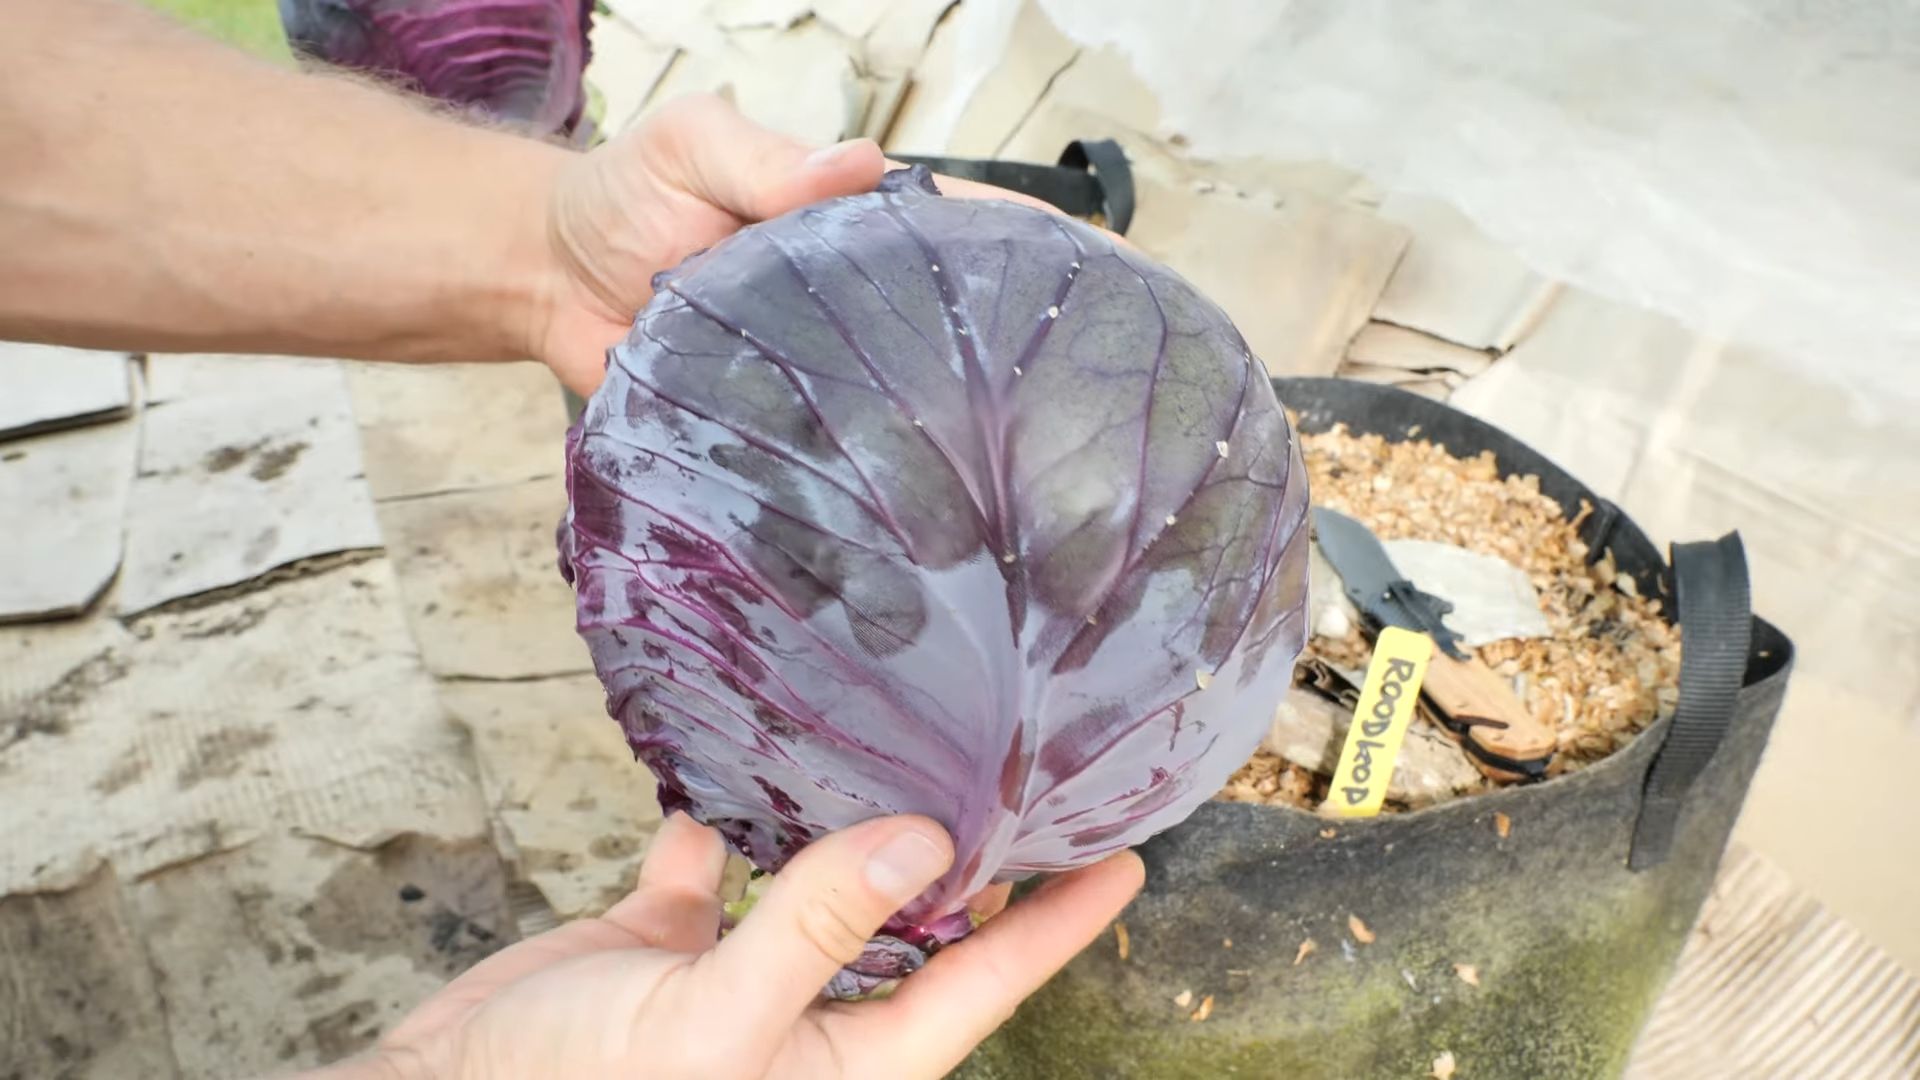
Harvesting Your Cabbage
Red cabbage is usually ready to harvest about 70-100 days after planting, depending on the variety. The heads should be firm and dense.
1. Cut the head from the plant with a sharp knife. Leave a few outer leaves on the plant, as they can help to protect the head during storage.
2. Store the cabbage in a cool, dry place. Red cabbage can be stored in the refrigerator for several weeks. For longer storage, you can store it in a root cellar or other cool, dark place.
Troubleshooting Common Problems
Even with the best care, you might encounter a few problems while growing red cabbage. Here are some common issues and how to deal with them:
* Cabbage Worms: These little green caterpillars can decimate your cabbage plants. Look for small holes in the leaves and green droppings. Handpicking them off is effective for small infestations. For larger infestations, use Bacillus thuringiensis (Bt), a natural bacteria that kills caterpillars.
* Aphids: These tiny insects suck the sap from plants, causing them to weaken and distort. Spray them with insecticidal soap or neem oil. You can also try attracting beneficial insects, such as ladybugs, which prey on aphids.
* Clubroot: This fungal disease causes the roots of cabbage plants to swell and become distorted. It can stunt growth and even kill the plants. The best way to prevent clubroot is to practice crop rotation and avoid planting cabbage in the same spot year after year. You can also amend the soil with lime to raise the pH, as clubroot is more common in acidic soils.
* Splitting Heads: This can happen when

Conclusion
So, there you have it! Growing red cabbage at home, while it might seem daunting at first, is actually a remarkably rewarding experience. It’s not just about saving money (though that’s certainly a perk!), it’s about connecting with your food, understanding the growing process, and enjoying the unparalleled flavor of freshly harvested, homegrown vegetables. Forget the bland, often chemically treated red cabbage from the supermarket; imagine vibrant, crisp leaves bursting with earthy sweetness, ready to be transformed into delicious slaws, braised dishes, or even fermented delights.
This DIY approach to growing red cabbage empowers you to control every aspect of its cultivation, from the soil composition to the pest control methods. You can ensure your cabbage is grown organically, free from harmful pesticides and herbicides, providing you and your family with a healthier and more sustainable food source. Plus, the satisfaction of nurturing a tiny seedling into a beautiful, robust head of red cabbage is truly unmatched.
But the benefits don’t stop there. Growing your own red cabbage opens up a world of culinary possibilities. Experiment with different varieties, each offering unique flavor profiles and textures. Try growing ‘Red Acre’ for its compact size and early maturity, or ‘Ruby Ball’ for its stunning deep red color and excellent storage capabilities. You can even explore heirloom varieties like ‘Mammoth Red Rock’ for a taste of history.
And don’t limit yourself to just the head of the cabbage! The outer leaves, often discarded in stores, are perfectly edible and packed with nutrients. Use them in soups, stews, or even as wraps for your favorite fillings. The possibilities are endless!
Consider companion planting to further enhance your red cabbage growing experience. Marigolds can deter pests, while dill attracts beneficial insects. Interplanting with clover can help fix nitrogen in the soil, providing your cabbage with a natural fertilizer boost.
We highly encourage you to give this DIY trick a try. Start small, perhaps with just a few seedlings, and gradually expand your growing area as you gain confidence. Don’t be afraid to experiment and learn from your mistakes. Gardening is a journey, not a destination, and every season brings new opportunities for growth and discovery.
Most importantly, we want to hear about your experiences! Share your photos, tips, and challenges in the comments below. Let’s build a community of red cabbage enthusiasts and inspire others to embrace the joys of homegrown food. What variety did you choose? What challenges did you face, and how did you overcome them? Your insights could be invaluable to other aspiring gardeners. So, grab your gardening gloves, prepare your soil, and get ready to embark on a rewarding adventure of growing your own delicious and nutritious red cabbage! Remember, the best red cabbage is the one you grow yourself!
Frequently Asked Questions (FAQ)
What is the best time of year to plant red cabbage?
The ideal time to plant red cabbage depends on your climate. In general, red cabbage is a cool-season crop, meaning it thrives in temperatures between 60°F and 70°F (15°C and 21°C). For spring harvests, start seeds indoors 6-8 weeks before the last expected frost. Transplant seedlings outdoors 2-3 weeks before the last frost. For fall harvests, direct sow seeds or transplant seedlings in mid-summer, allowing ample time for the cabbage to mature before the first frost. Check your local extension office for specific planting dates in your region.
How much sunlight does red cabbage need?
Red cabbage requires at least 6 hours of direct sunlight per day to thrive. Insufficient sunlight can result in smaller heads and leggy growth. Choose a planting location that receives full sun throughout the day. If you live in a particularly hot climate, providing some afternoon shade can help prevent the leaves from scorching.
What type of soil is best for growing red cabbage?
Red cabbage prefers well-drained, fertile soil that is rich in organic matter. The ideal soil pH is between 6.0 and 7.0. Before planting, amend the soil with compost, aged manure, or other organic materials to improve drainage and fertility. Consider conducting a soil test to determine the nutrient levels and pH of your soil and adjust accordingly.
How often should I water my red cabbage plants?
Red cabbage needs consistent moisture to develop large, healthy heads. Water deeply and regularly, especially during dry periods. Aim to keep the soil consistently moist but not waterlogged. Mulching around the plants can help retain moisture and suppress weeds. Check the soil moisture regularly by sticking your finger an inch or two into the soil. If it feels dry, it’s time to water.
What are some common pests and diseases that affect red cabbage?
Red cabbage can be susceptible to various pests and diseases, including cabbage worms, aphids, flea beetles, clubroot, and black rot. Regularly inspect your plants for signs of infestation or disease. Use organic pest control methods, such as handpicking pests, using insecticidal soap, or applying Bacillus thuringiensis (Bt) for cabbage worms. To prevent diseases, practice crop rotation, ensure good drainage, and avoid overcrowding plants.
How do I know when my red cabbage is ready to harvest?
Red cabbage is typically ready to harvest when the head is firm and solid. The size of the head will vary depending on the variety, but generally, a mature head will be about 6-8 inches in diameter. Gently squeeze the head; if it feels firm and dense, it’s likely ready to harvest. Use a sharp knife to cut the head from the stem, leaving a few outer leaves attached.
Can I grow red cabbage in containers?
Yes, red cabbage can be successfully grown in containers, provided you choose a large enough container (at least 12 inches in diameter) and use a well-draining potting mix. Ensure the container has drainage holes to prevent waterlogging. Container-grown cabbage may require more frequent watering and fertilization than those grown in the ground.
How do I store red cabbage after harvesting?
Red cabbage can be stored for several weeks in a cool, dry place, such as a refrigerator or root cellar. Wrap the head in plastic wrap or store it in a perforated plastic bag to prevent it from drying out. Avoid storing red cabbage near fruits like apples and pears, as they release ethylene gas, which can cause the cabbage to spoil more quickly.
Can I save seeds from my red cabbage plants?
Saving seeds from red cabbage is possible, but it requires allowing the plant to overwinter and produce flowers in its second year. Red cabbage is a biennial, meaning it completes its life cycle in two years. If you want to save seeds, select healthy, disease-free plants and allow them to overwinter in a protected location. In the spring, the plants will produce flowers, which will eventually develop into seed pods. Allow the seed pods to dry on the plant before harvesting the seeds. Be aware that red cabbage can cross-pollinate with other members of the Brassica family, so if you’re growing multiple varieties, you may not get true-to-type seeds.
What are some creative ways to use homegrown red cabbage?
Beyond the traditional coleslaw, homegrown red cabbage can be used in a variety of creative dishes. Try shredding it and adding it to salads for a pop of color and crunch. Braise it with apples and onions for a sweet and savory side dish. Ferment it into sauerkraut or kimchi for a probiotic-rich treat. Use the leaves as wraps for your favorite fillings. Add it to soups and stews for added flavor and nutrients. The possibilities are endless!
Leave a Comment