
Swiss Chard Indoor Gardening: Ever dreamt of having a vibrant, leafy green garden right inside your home, even when the weather outside is frightful? I know I have! Forget those sad, wilted supermarket greens – imagine stepping into your kitchen and harvesting fresh, colorful Swiss chard whenever you need it. This isn’t just a pipe dream; it’s totally achievable with a few simple tricks and a little DIY spirit!
For centuries, cultivating edible plants indoors has been a practice rooted in necessity and ingenuity. From ancient Roman orangeries to Victorian-era conservatories, people have sought ways to bring the bounty of nature inside. Today, with limited space and a growing desire for fresh, sustainable food, indoor gardening is experiencing a major resurgence. And trust me, you don’t need a sprawling greenhouse to get in on the action.
Why should you try Swiss Chard Indoor Gardening? Well, beyond the sheer joy of growing your own food, it offers a fantastic way to boost your health with nutrient-rich greens, reduce your carbon footprint, and add a touch of natural beauty to your living space. Plus, let’s be honest, who wouldn’t want to impress their friends with their green thumb? This article is packed with easy-to-follow DIY tips and tricks that will have you harvesting your own Swiss chard in no time. So, grab your gardening gloves, and let’s get started!
Growing Swiss Chard Indoors: A Beginner’s Guide
Hey there, fellow plant enthusiasts! Ever thought about growing your own vibrant, nutritious Swiss chard right in your home? It’s totally doable, and I’m here to walk you through the entire process. Forget relying solely on grocery stores – let’s bring the garden indoors! Swiss chard is surprisingly easy to grow indoors, and the colorful stems and leaves will brighten up your space while providing you with fresh greens.
What You’ll Need
Before we dive in, let’s gather our supplies. This is a crucial step to ensure a smooth and successful gardening experience. Here’s a comprehensive list:
* **Swiss Chard Seeds:** Choose a variety you like! ‘Bright Lights’ is a popular choice for its colorful stems, but ‘Fordhook Giant’ is a reliable classic.
* **Pots or Containers:** Opt for pots that are at least 6-8 inches deep and wide. Good drainage is essential, so make sure they have drainage holes.
* **Potting Mix:** Use a high-quality, well-draining potting mix. Avoid garden soil, as it can compact and hinder drainage in containers.
* **Grow Lights (Optional but Recommended):** While Swiss chard can tolerate some shade, it thrives with ample light. If you don’t have a sunny windowsill, grow lights are a great investment.
* **Watering Can or Spray Bottle:** For gentle and even watering.
* **Fertilizer (Optional):** A balanced liquid fertilizer can help boost growth, especially after the seedlings have established.
* **Seed Starting Tray (Optional):** If you prefer to start your seeds indoors before transplanting.
* **Small Trowel or Spoon:** For handling seedlings and potting mix.
Getting Started: Planting Your Swiss Chard
Now for the fun part – planting! I’ll break it down into easy-to-follow steps.
1. **Soaking the Seeds (Optional but Recommended):** Soaking your Swiss chard seeds in water for 2-4 hours before planting can help speed up germination. Just place them in a small bowl of water and let them sit.
2. **Preparing Your Pots:** Fill your chosen pots with the potting mix, leaving about an inch of space at the top. Gently pat down the soil to remove any large air pockets.
3. **Sowing the Seeds:** Sow the seeds about ½ inch deep and 1 inch apart. You can plant 2-3 seeds per pot and thin them out later if needed.
4. **Covering the Seeds:** Lightly cover the seeds with more potting mix.
5. **Watering:** Gently water the soil until it’s moist but not soggy. A spray bottle is ideal for this step to avoid disturbing the seeds.
6. **Creating a Humid Environment (Optional):** To help with germination, you can cover the pots with plastic wrap or a clear plastic bag. This will create a humid environment. Just make sure to remove the covering once the seedlings emerge to prevent fungal growth.
7. **Finding the Right Spot:** Place the pots in a warm location with plenty of light. A south-facing windowsill is ideal, but if you don’t have one, use grow lights.
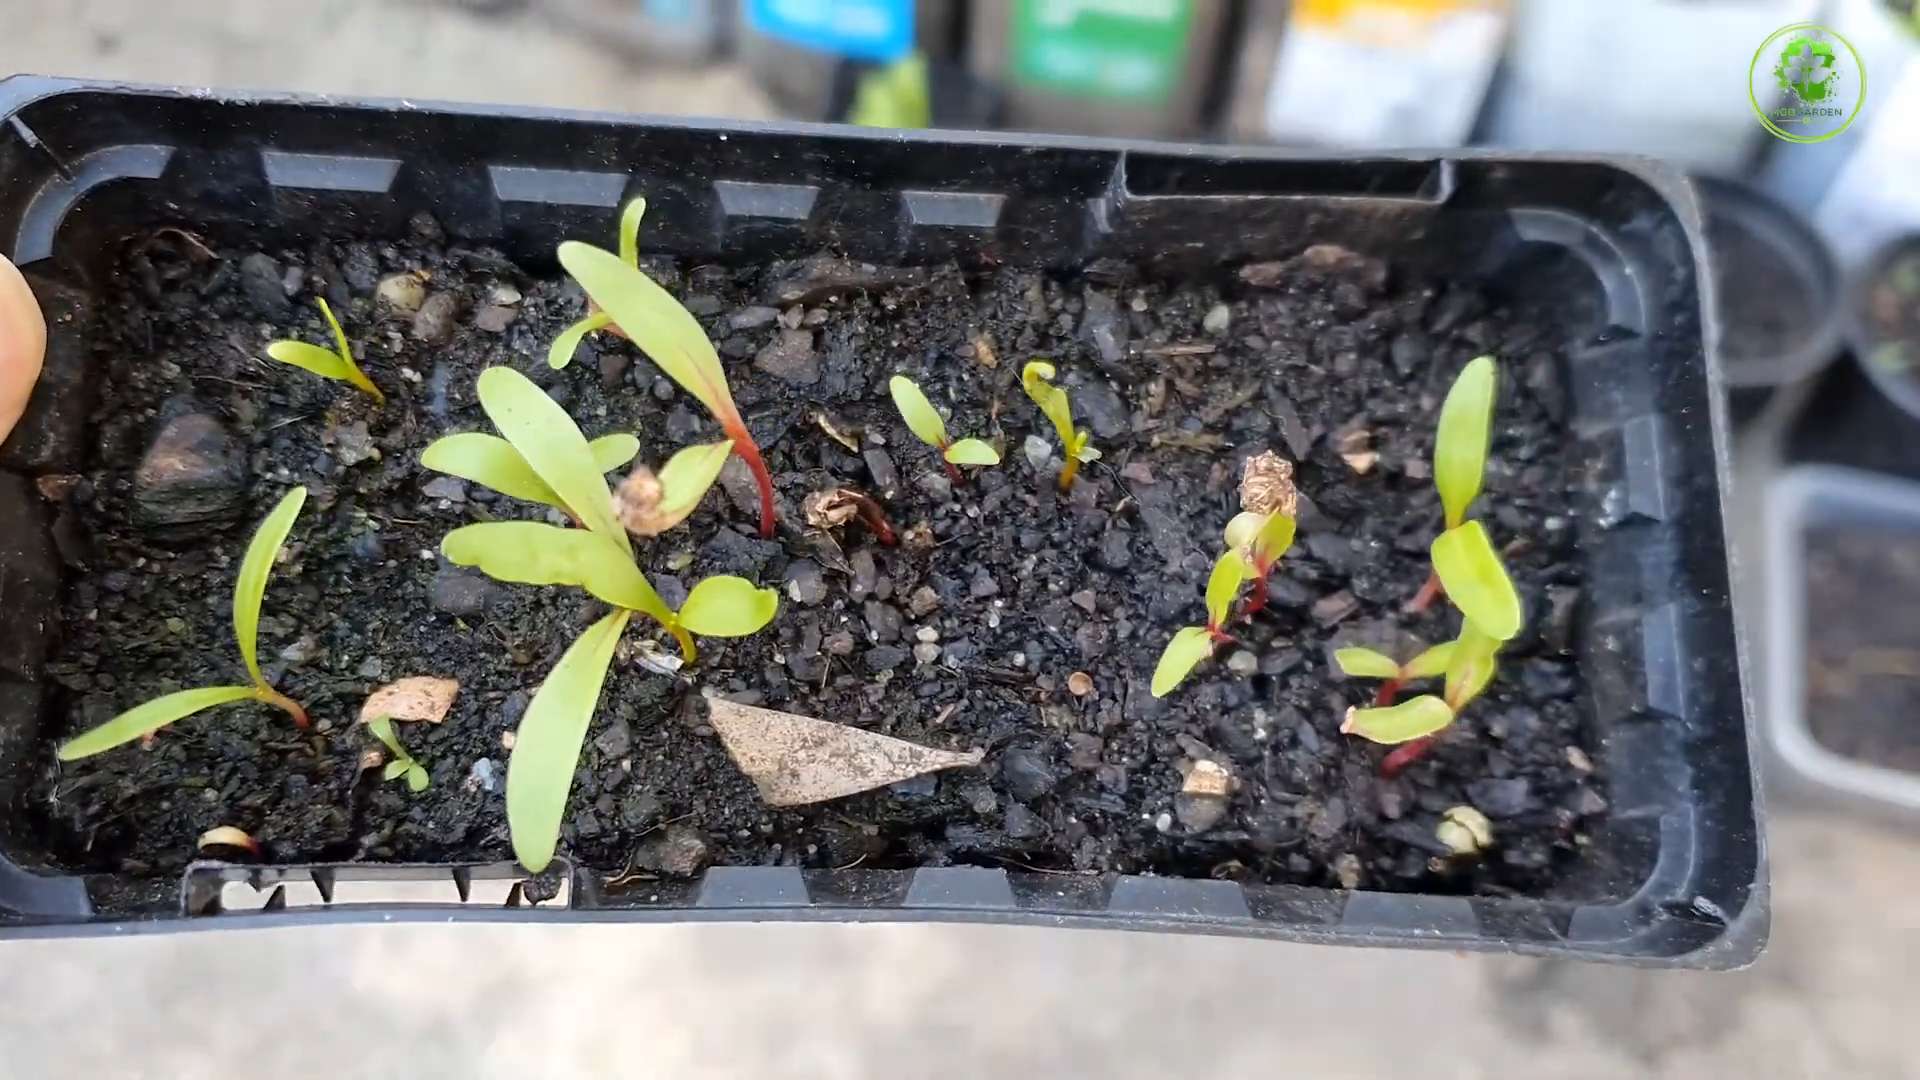
Germination and Early Growth
This is where the magic happens! Keep a close eye on your seeds, and soon you’ll see tiny sprouts emerging.
1. **Germination Time:** Swiss chard seeds typically germinate in 5-10 days. Be patient!
2. **Removing the Covering (If Used):** Once the seedlings emerge, remove the plastic wrap or bag to allow for proper air circulation.
3. **Thinning Seedlings (If Necessary):** If you planted multiple seeds per pot and all of them sprouted, you’ll need to thin them out. Choose the strongest seedling in each pot and gently snip off the others at the soil level. This will give the remaining seedling enough space and nutrients to thrive.
4. **Watering Regularly:** Keep the soil consistently moist, but not waterlogged. Check the soil moisture by sticking your finger about an inch deep. If it feels dry, it’s time to water.
5. **Providing Adequate Light:** Ensure your seedlings are getting at least 6-8 hours of light per day. If you’re using grow lights, position them a few inches above the plants.
Caring for Your Swiss Chard
Now that your Swiss chard is growing, it’s time to provide the care it needs to flourish.
1. **Watering:** Water deeply whenever the top inch of soil feels dry. Avoid overwatering, as this can lead to root rot.
2. **Fertilizing (Optional):** If you want to give your Swiss chard a boost, fertilize it every 2-3 weeks with a balanced liquid fertilizer diluted to half strength. Follow the instructions on the fertilizer packaging.
3. **Providing Support (If Needed):** As your Swiss chard grows taller, it may need some support to prevent the stems from bending or breaking. You can use small stakes or tomato cages to provide support.
4. **Pest Control:** Keep an eye out for pests such as aphids, spider mites, and whiteflies. If you spot any pests, you can try spraying them with insecticidal soap or neem oil.
5. **Temperature:** Swiss chard prefers temperatures between 60-75°F (15-24°C). Avoid exposing your plants to extreme temperatures.
6. **Air Circulation:** Good air circulation is important to prevent fungal diseases. Make sure your plants are not overcrowded and that there is adequate airflow around them.
Harvesting Your Swiss Chard
The best part! Harvesting your own homegrown Swiss chard is incredibly rewarding.
1. **When to Harvest:** You can start harvesting Swiss chard leaves when they are about 6 inches long.
2. **How to Harvest:** Use a sharp knife or scissors to cut the outer leaves near the base of the plant. Leave the inner leaves to continue growing. This is known as the “cut and come again” method, which allows you to harvest repeatedly from the same plant.
3. **Harvesting Regularly:** Harvesting regularly encourages the plant to produce more leaves.
4. **Storing Your Harvest:** Freshly harvested Swiss chard can be stored in the refrigerator for up to a week. Wrap the leaves in a damp paper towel and place them in a plastic bag.
Troubleshooting
Even with the best care, you might encounter some challenges. Here are a few common issues and how to address them:
* **Yellowing Leaves:** This could be a sign of overwatering, underwatering, or nutrient deficiency. Check the soil moisture and adjust your watering accordingly. If the problem persists, try fertilizing your plants.
* **Leggy Growth:** This indicates that your plants are not getting enough light. Move them to a sunnier location or use grow lights.
* **Pest Infestation:** As mentioned earlier, keep an eye out for pests and treat them promptly with insecticidal soap or neem oil.
* **Slow Growth:** This could be due to a variety of factors, including insufficient light, poor soil, or nutrient deficiency. Make sure your plants are getting enough light, water, and nutrients.
Choosing the Right Swiss Chard Variety
The variety of Swiss chard you choose can impact its appearance, taste, and growth habits. Here are a few popular options:
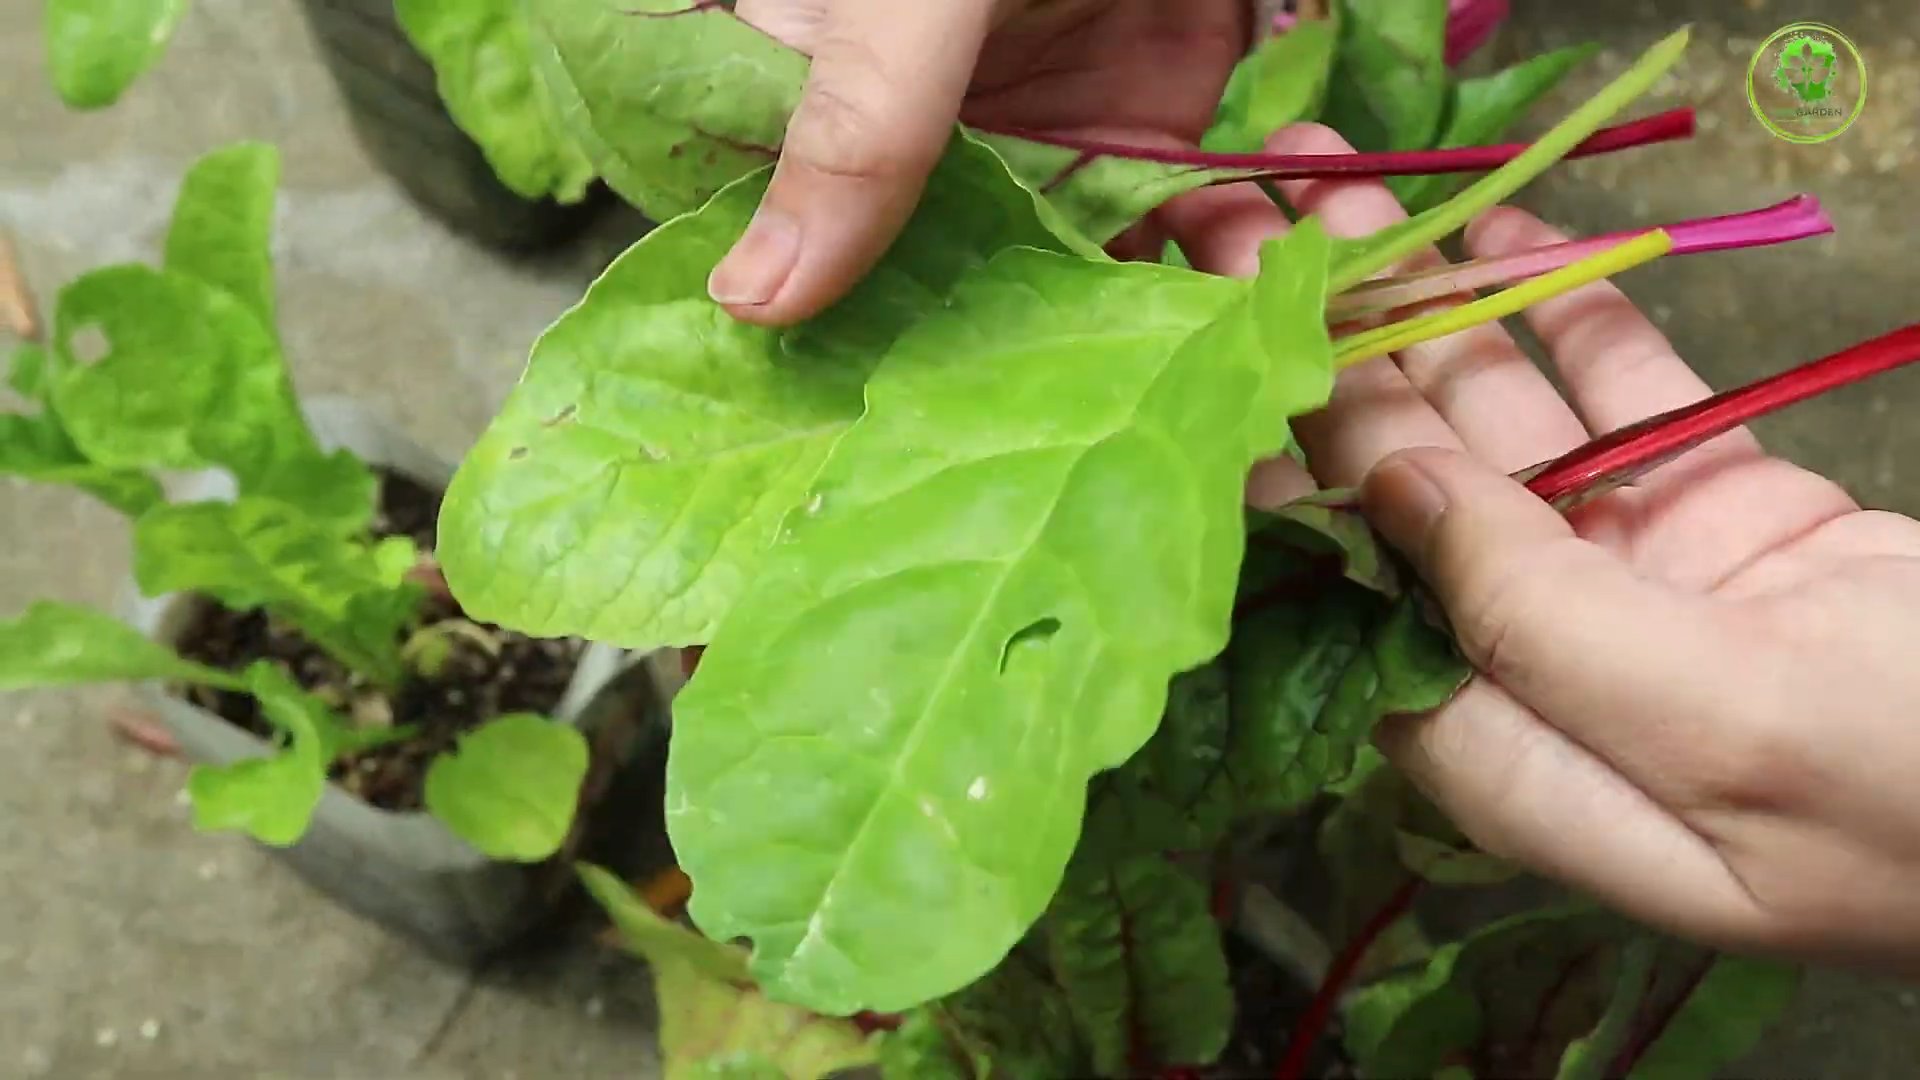
* **’Bright Lights’:** This variety is known for its colorful stems, which come in shades of red, yellow, orange, and pink. It’s a visually stunning addition to any garden or indoor space.
* **’Fordhook Giant’:** This is a classic variety with large, dark green leaves and white stems. It’s known for its reliable growth and excellent flavor.
* **’Lucullus’:** This variety has crinkled, light green leaves and thick, white stems. It’s known for its tender texture and mild flavor.
* **’Ruby Red’:** As the name suggests, this variety has vibrant red stems and dark green leaves. It’s a beautiful and flavorful option.
Extending the Harvest
Want to keep enjoying fresh Swiss chard for as long as possible? Here are a few tips:
* **Succession Planting:** Sow new seeds every few weeks to ensure a continuous supply of Swiss chard.
* **Overwintering:** In mild climates, you can overwinter your Swiss chard plants by protecting them from frost. Cover them with a layer of mulch or move them to a sheltered location.
* **Saving Seeds:** If you want to save seeds from your Swiss chard plants, allow a few plants to bolt (produce flowers and seeds). Once the seeds are dry, you can collect them and store them in a cool, dry place.
Swiss Chard in the Kitchen
Now that you’re harvesting your own Swiss chard, let’s talk about how to use it in the kitchen! Swiss chard is a versatile vegetable that can be used in a variety of dishes.
* **Sautéed:** Sautéed Swiss chard is a simple and delicious side dish. Just sauté the leaves and stems with
Conclusion
So, there you have it! Cultivating your own Swiss chard indoors is not only achievable, but it’s also a remarkably rewarding experience. Forget those wilting, overpriced greens at the grocery store. With a little effort and this simple DIY trick, you can have a constant supply of fresh, vibrant Swiss chard right at your fingertips.
Why is this a must-try? Because it puts you in control. You control the quality, the freshness, and even the variety. Imagine the satisfaction of harvesting leaves for a delicious salad or stir-fry, knowing they were grown with your own two hands, free from harmful pesticides and bursting with flavor. Plus, it’s a fantastic way to add a touch of green to your indoor space, especially during the colder months when outdoor gardening is limited.
But the beauty of this DIY project lies in its adaptability. Feel free to experiment with different varieties of Swiss chard. ‘Bright Lights’ with its rainbow of stems is a visual delight, while ‘Fordhook Giant’ offers robust, dark green leaves. You can also adjust the size of your containers to suit your available space. A small pot on a windowsill can provide a steady supply for one person, while a larger container can feed a whole family.
Consider adding companion plants to your Swiss chard container, such as basil or marigolds. These not only enhance the aesthetic appeal but can also help deter pests naturally. You could even try succession planting, sowing new seeds every few weeks to ensure a continuous harvest throughout the year.
The key to success is consistent care. Remember to provide adequate light, water regularly, and fertilize occasionally. Don’t be afraid to experiment and adjust your approach based on your specific growing conditions.
We wholeheartedly encourage you to give this DIY Swiss chard indoor gardening trick a try. It’s a fun, educational, and ultimately delicious way to connect with your food and bring a little bit of nature indoors. And most importantly, it’s a fantastic way to enjoy fresh, healthy Swiss chard whenever you desire.
Once you’ve experienced the joy of harvesting your own homegrown Swiss chard, we’d love to hear about it! Share your experiences, tips, and photos in the comments below. Let’s build a community of indoor gardeners and inspire others to embrace the joys of growing their own food. What are you waiting for? Get your seeds, pots, and soil ready, and let the indoor gardening adventure begin!
Frequently Asked Questions (FAQ)
What is the best variety of Swiss chard to grow indoors?
While most Swiss chard varieties can be grown indoors, some are better suited than others. ‘Bright Lights’ is a popular choice due to its colorful stems and compact size, making it ideal for smaller spaces. ‘Fordhook Giant’ is another excellent option, known for its large, dark green leaves and robust growth. ‘Lucullus’ is also a good choice, offering tender, mild-flavored leaves. Ultimately, the best variety depends on your personal preferences and available space. Experiment with a few different types to see which one thrives best in your indoor environment.
How much light does Swiss chard need when grown indoors?
Swiss chard requires at least 6 hours of direct sunlight per day to thrive. If you don’t have a sunny windowsill, you can supplement with artificial grow lights. Fluorescent or LED grow lights are excellent options, providing the necessary spectrum of light for healthy growth. Position the lights a few inches above the plants and keep them on for 12-16 hours per day. Insufficient light can lead to leggy growth and reduced yields.
What type of soil is best for growing Swiss chard indoors?
Swiss chard prefers well-draining, nutrient-rich soil. A good potting mix specifically formulated for vegetables is ideal. You can also create your own mix by combining equal parts of potting soil, compost, and perlite or vermiculite. The compost provides essential nutrients, while the perlite or vermiculite improves drainage and aeration. Avoid using garden soil, as it can be too heavy and may contain pests or diseases.
How often should I water my indoor Swiss chard?
Water your Swiss chard regularly, keeping the soil consistently moist but not waterlogged. Check the soil moisture by sticking your finger about an inch deep. If it feels dry, it’s time to water. Water deeply, allowing the excess water to drain out of the bottom of the pot. Avoid overwatering, as this can lead to root rot. The frequency of watering will depend on factors such as temperature, humidity, and pot size.
Do I need to fertilize my indoor Swiss chard?
Yes, Swiss chard benefits from regular fertilization. Use a balanced liquid fertilizer diluted to half strength every 2-3 weeks. Look for a fertilizer with an NPK ratio (nitrogen, phosphorus, potassium) of around 10-10-10. You can also use organic fertilizers such as compost tea or fish emulsion. Avoid over-fertilizing, as this can burn the roots.
How do I harvest Swiss chard leaves?
You can begin harvesting Swiss chard leaves when they are about 6 inches long. Harvest the outer leaves first, leaving the inner leaves to continue growing. Cut the leaves at the base of the stem with a sharp knife or scissors. Regular harvesting encourages continued production.
What are some common pests and diseases that affect indoor Swiss chard?
Common pests that can affect indoor Swiss chard include aphids, spider mites, and whiteflies. These pests can be controlled with insecticidal soap or neem oil. Diseases are less common indoors, but powdery mildew can sometimes occur. Ensure good air circulation and avoid overwatering to prevent fungal diseases.
Can I grow Swiss chard from seed indoors?
Yes, you can easily grow Swiss chard from seed indoors. Start seeds in small pots or seed trays filled with potting mix. Keep the soil moist and warm (around 70-75°F). Seeds typically germinate in 5-10 days. Once the seedlings have a few true leaves, transplant them into larger pots.
How long does it take to grow Swiss chard indoors?
Swiss chard typically takes about 50-60 days to mature from seed to harvest. However, you can start harvesting leaves earlier, as soon as they are large enough to use.
Can I grow Swiss chard indoors year-round?
Yes, with proper care and adequate light, you can grow Swiss chard indoors year-round. Provide consistent light, water, and fertilizer, and you’ll be able to enjoy fresh Swiss chard whenever you desire.

Leave a Comment