
Growing Kale at Home can seem daunting, but trust me, it’s easier than you think! Have you ever dreamed of stepping into your backyard and harvesting fresh, vibrant kale for a healthy smoothie or a delicious salad? Well, dream no more! This guide is packed with simple DIY tricks and hacks that will transform your garden into a kale-growing haven, even if you’re a complete beginner.
Kale, a nutritional powerhouse, has been cultivated for over 2,000 years, with roots tracing back to the eastern Mediterranean. It was a staple food in ancient Rome and has since become a beloved vegetable worldwide. But beyond its rich history, growing your own kale offers so many benefits. Think about it: no more trips to the grocery store for overpriced, wilted greens! You’ll have a constant supply of fresh, organic kale right at your fingertips.
In today’s world, where healthy eating is more important than ever, having access to fresh, nutrient-rich food is a game-changer. Plus, growing kale at home is incredibly rewarding. There’s nothing quite like the satisfaction of nurturing a plant from seed to harvest. So, let’s dive in and discover the secrets to successful kale cultivation. I’m excited to share these easy-to-follow tips and tricks that will have you enjoying homegrown kale in no time!
Growing Kale at Home: A Beginner’s Guide
Hey there, fellow garden enthusiasts! I’m so excited to share my experience with growing kale at home. It’s surprisingly easy, incredibly rewarding, and you’ll have a constant supply of this superfood right at your fingertips. I’ve learned a few tricks along the way, and I’m happy to guide you through the process, from seed to salad!
Why Grow Kale?
Before we dive in, let’s talk about why kale is such a fantastic addition to your garden. Besides being packed with vitamins and nutrients, kale is incredibly versatile in the kitchen. You can add it to smoothies, salads, soups, stir-fries – the possibilities are endless! Plus, it’s a relatively low-maintenance plant, making it perfect for beginner gardeners.
Choosing Your Kale Variety
There are so many different types of kale to choose from, each with its own unique flavor and texture. Here are a few popular options:
* **Curly Kale:** This is the most common type, with tightly curled leaves and a slightly bitter taste.
* **Lacinato Kale (Dinosaur Kale):** Also known as Tuscan kale, this variety has long, dark green leaves with a slightly sweeter flavor.
* **Red Russian Kale:** This kale has flat, fringed leaves with a reddish-purple hue and a mild, slightly sweet taste.
* **Redbor Kale:** This variety is known for its vibrant purple color and frilly leaves. It’s a great ornamental plant as well as a delicious vegetable.
I personally love growing Lacinato kale because of its tender leaves and mild flavor, but feel free to experiment and find your favorite!
Getting Started: Seeds vs. Seedlings
You have two options when starting your kale garden: you can either start from seeds or purchase seedlings from a local nursery. Both methods have their pros and cons:
* **Starting from Seeds:** This is the more economical option, and it gives you more control over the entire growing process. However, it requires a bit more time and effort.
* **Buying Seedlings:** This is the faster and easier option, as you’re essentially skipping the germination stage. However, it can be more expensive, and you may have fewer variety choices.
I usually start my kale from seeds indoors, especially if I want to get a head start on the growing season. But if you’re short on time or space, buying seedlings is a perfectly fine option.
Starting Kale from Seeds (My Preferred Method)
If you’re like me and enjoy the satisfaction of watching your plants grow from tiny seeds, here’s how to start kale from seeds indoors:
Materials You’ll Need:
* Kale seeds (of your chosen variety)
* Seed starting trays or small pots
* Seed starting mix (a light, well-draining soil mix)
* Spray bottle filled with water
* Grow lights (optional, but highly recommended)
* Heat mat (optional, but helps with germination)
Step-by-Step Instructions:
1. **Prepare Your Seed Starting Trays:** Fill your seed starting trays or small pots with seed starting mix. Gently press down on the soil to remove any air pockets.
2. **Sow the Seeds:** Sow 2-3 kale seeds per cell or pot, about ¼ inch deep.
3. **Water Gently:** Use a spray bottle to gently water the soil until it’s evenly moist. Avoid overwatering, as this can lead to damping off (a fungal disease that can kill seedlings).
4. **Provide Warmth and Light:** Place your seed starting trays on a heat mat (if using) and under grow lights. If you don’t have grow lights, you can place them near a sunny window, but be sure to rotate them regularly to prevent them from becoming leggy.
5. **Keep the Soil Moist:** Check the soil moisture daily and water as needed to keep it consistently moist but not soggy.
6. **Germination:** Kale seeds typically germinate in 5-10 days.
7. **Thin the Seedlings:** Once the seedlings have emerged and have their first true leaves (the second set of leaves), thin them to one seedling per cell or pot. Choose the strongest, healthiest-looking seedling and gently snip off the others at the soil line.
8. **Harden Off the Seedlings:** Before transplanting your kale seedlings outdoors, you’ll need to harden them off. This process gradually acclimates them to the outdoor environment. Start by placing the seedlings outdoors in a sheltered location for a few hours each day, gradually increasing the amount of time they spend outdoors over the course of a week or two.
Transplanting Kale Seedlings Outdoors
Once your kale seedlings are about 4-6 inches tall and have been hardened off, they’re ready to be transplanted into your garden.
Choosing the Right Location:
Kale prefers a sunny location with well-drained soil. Aim for at least 6 hours of sunlight per day. Before planting, amend the soil with compost or other organic matter to improve its fertility and drainage.
Step-by-Step Instructions:
1. **Prepare the Planting Holes:** Dig holes that are slightly larger than the root balls of your kale seedlings. Space the holes about 12-18 inches apart.
2. **Gently Remove the Seedlings:** Carefully remove the kale seedlings from their cells or pots, being careful not to damage the roots.
3. **Plant the Seedlings:** Place the seedlings in the planting holes and gently backfill with soil. Make sure the top of the root ball is level with the surrounding soil.
4. **Water Thoroughly:** Water the newly transplanted seedlings thoroughly to help them settle in.
5. **Mulch Around the Plants:** Apply a layer of mulch around the base of the plants to help retain moisture, suppress weeds, and regulate soil temperature. I like to use straw or shredded leaves.
Caring for Your Kale Plants
Once your kale plants are established, they’re relatively easy to care for. Here are a few tips to keep them healthy and productive:
* **Watering:** Water your kale plants regularly, especially during dry periods. Aim to keep the soil consistently moist but not waterlogged.
* **Fertilizing:** Kale is a heavy feeder, so it benefits from regular fertilization. You can use a balanced organic fertilizer or side-dress with compost every few weeks.
* **Pest Control:** Kale can be susceptible to pests like aphids, cabbage worms, and flea beetles. Inspect your plants regularly and take action if you notice any signs of infestation. You can use organic pest control methods like insecticidal soap or neem oil. I also like to handpick any cabbage worms I find.
* **Weed Control:** Keep the area around your kale plants free of weeds, as they can compete for nutrients and water.
* **Succession Planting:** To ensure a continuous harvest of kale throughout the growing season, consider succession planting. This involves planting new kale seeds or seedlings every few weeks.
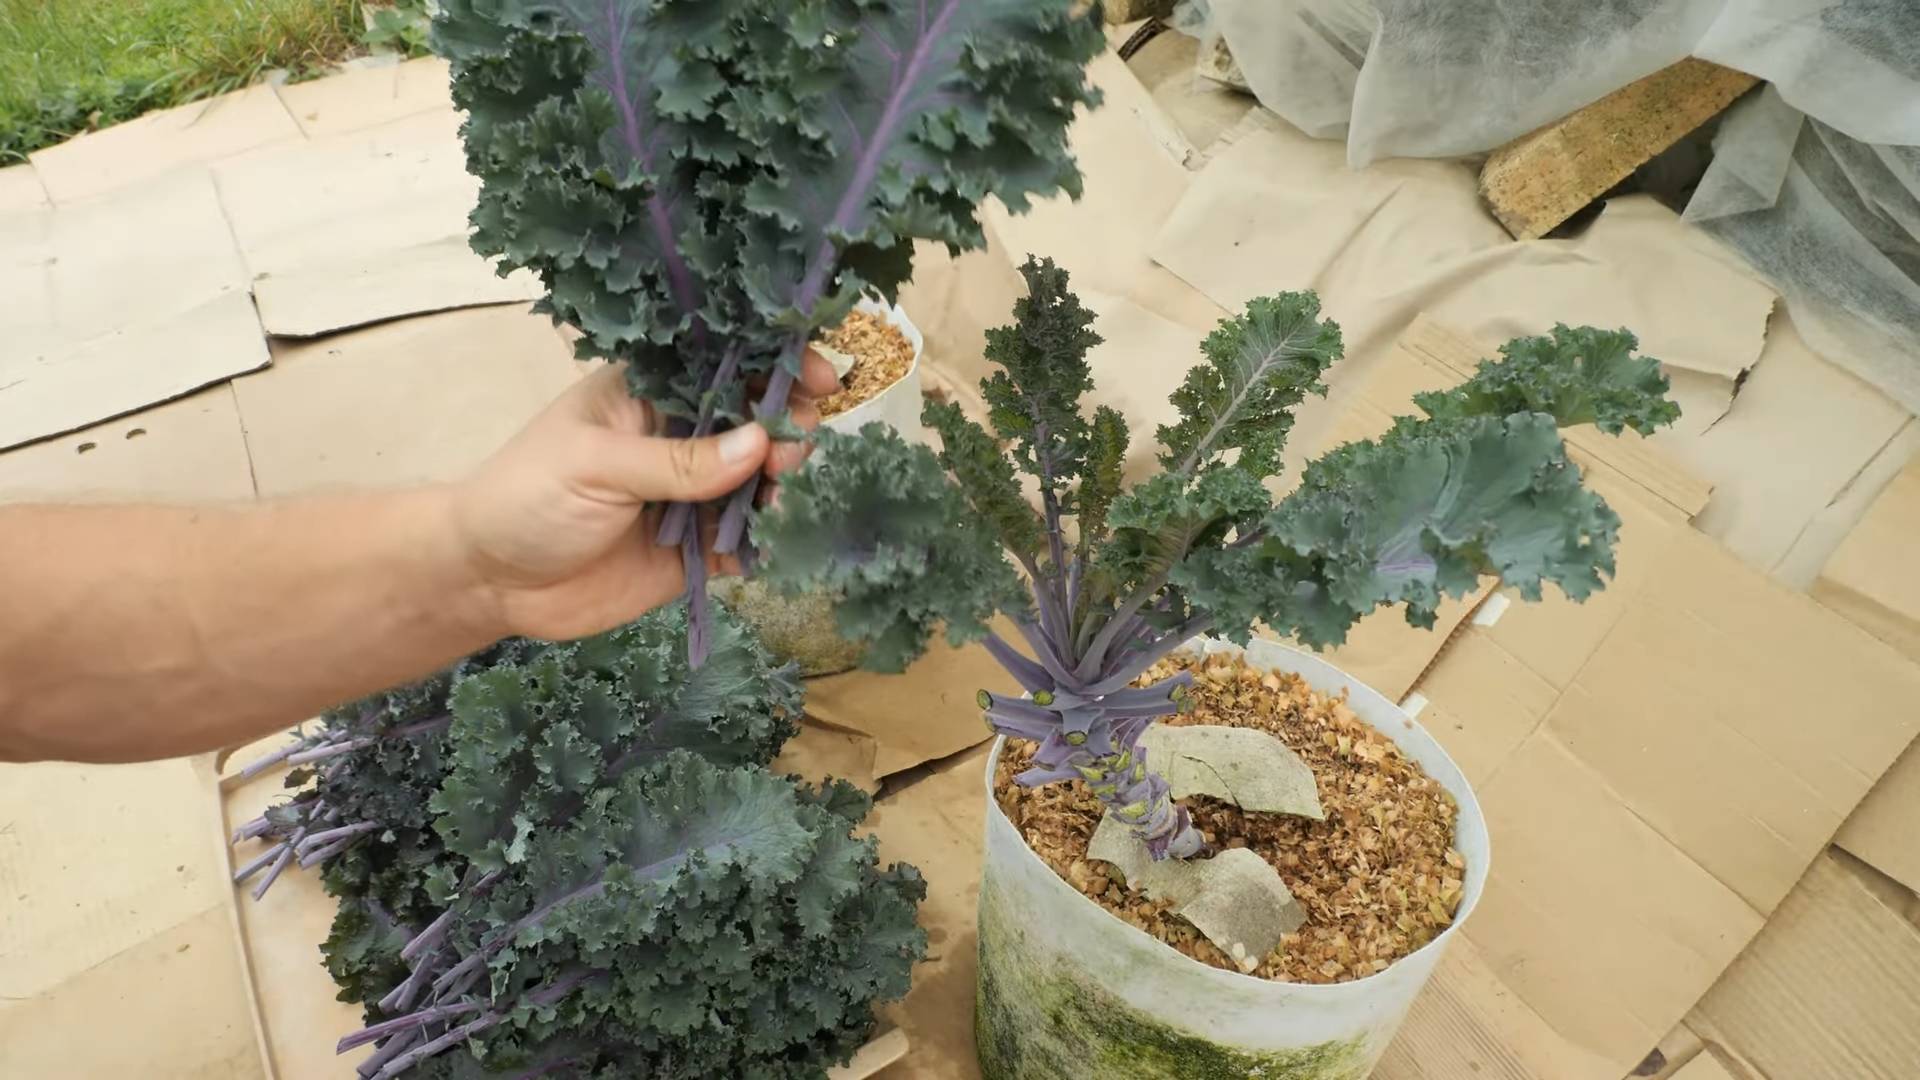
Harvesting Your Kale
You can start harvesting kale leaves once they’re about 6-8 inches long. Simply snip off the outer leaves, leaving the inner leaves to continue growing. This will encourage the plant to produce more leaves.
* **Harvesting Technique:** When harvesting, start with the oldest, lowest leaves first. This will encourage the plant to produce new growth from the center.
* **Harvesting Time:** You can harvest kale throughout the growing season, even after the first frost. In fact, some people believe that kale tastes even better after a frost!
* **Storage:** Freshly harvested kale can be stored in the refrigerator for up to a week. Wrap it in a damp paper towel and place it in a plastic bag.
Troubleshooting Common Kale Problems
Even with the best care, you may encounter some problems when growing kale. Here are a few common issues and how to address them:
* **Yellowing Leaves:** This can be caused by a variety of factors, including nutrient deficiencies, overwatering, or underwatering. Check the soil moisture and nutrient levels and adjust accordingly.
* **Holes in Leaves:** This is often a sign of pest damage, such as cabbage worms or flea beetles. Inspect your plants carefully and take action to control the pests.
* **Leggy Seedlings:** This is usually caused by insufficient light. Make sure your seedlings are getting enough light, either from grow lights or a sunny window.
* **Bolting:** Bolting is when a plant prematurely goes to seed. This can be caused by stress, such as heat or drought. To prevent bolting, keep your kale plants well-watered and shaded during hot weather.
Enjoying Your Homegrown Kale
Now for the best part: enjoying the fruits (or rather, leaves) of your labor! There are countless ways to use your homegrown kale. Here are a few of my favorite recipes:
* **Kale Salad:** Massage kale leaves with olive oil, lemon juice, and salt. Add your favorite toppings, such as avocado, nuts, seeds, and dried cranberries.
* **Kale Chips:** Toss kale leaves with olive oil, salt, and pepper. Bake at 350°F (175°C)

Conclusion
So, there you have it! Growing kale at home is not only achievable, but it’s also incredibly rewarding. From the vibrant, nutrient-packed leaves gracing your garden to the delicious and healthy meals you can create, the benefits are undeniable. We’ve walked you through the essential steps, from selecting the right kale variety to protecting your precious plants from pests and diseases.
Why is this DIY trick a must-try? Because it puts you in control of your food source. You know exactly what goes into your kale – no mystery pesticides or long-distance transportation. Plus, the taste of freshly harvested kale, just moments from garden to plate, is simply unmatched by anything you can buy in a store. It’s a flavor explosion of earthy goodness that will elevate your salads, smoothies, and stir-fries.
But the beauty of growing kale at home lies in its adaptability. Feel free to experiment with different varieties. Try Lacinato kale (also known as dinosaur kale) for its unique texture and slightly sweeter flavor, or Red Russian kale for its beautiful purple stems and mild taste. You can even grow baby kale for tender, delicate leaves perfect for salads.
Consider companion planting to further enhance your kale’s growth and deter pests naturally. Marigolds, for example, are known to repel many common garden pests, while herbs like rosemary and sage can improve the overall health of your kale plants.
Don’t be afraid to get creative with your harvest! Kale chips are a healthy and addictive snack, while massaged kale salads are a delicious way to enjoy the raw leaves. You can also add kale to soups, stews, and even smoothies for a nutritional boost. The possibilities are endless!
We strongly encourage you to give growing kale at home a try. It’s a relatively low-maintenance project that yields a bountiful harvest of healthy and delicious greens. Even if you only have a small balcony or patio, you can still grow kale in containers.
And most importantly, we want to hear about your experience! Share your tips, tricks, and triumphs in the comments below. Let us know which varieties you’re growing, what challenges you’ve faced, and what delicious recipes you’ve created. Together, we can build a community of home gardeners who are passionate about growing their own food and enjoying the many benefits of fresh, homegrown kale. So, grab your seeds, get your hands dirty, and start growing your own delicious and nutritious kale today! You won’t regret it.
Frequently Asked Questions (FAQ)
What is the best time of year to plant kale?
Kale is a cool-season crop, meaning it thrives in cooler temperatures. The best time to plant kale depends on your climate. In areas with mild winters, you can plant kale in the fall for a winter or early spring harvest. In colder climates, plant kale in the early spring, a few weeks before the last expected frost, or start seeds indoors 6-8 weeks before the last frost. You can also plant kale in late summer for a fall harvest. Avoid planting kale during the hottest months of the summer, as high temperatures can cause the plants to bolt (go to seed) and become bitter.
How much sunlight does kale need?
Kale needs at least 6 hours of sunlight per day to thrive. If you’re growing kale indoors, provide supplemental lighting with grow lights. Insufficient sunlight can result in leggy, weak plants with poor leaf production. Choose a sunny spot in your garden or on your balcony for optimal growth.
What kind of soil is best for growing kale?
Kale prefers well-drained soil that is rich in organic matter. Amend your soil with compost or aged manure before planting to improve its fertility and drainage. Kale also prefers a slightly acidic to neutral soil pH, between 6.0 and 7.0. You can test your soil pH with a soil testing kit and amend it accordingly.
How often should I water kale?
Water kale regularly, especially during dry periods. Aim to keep the soil consistently moist, but not waterlogged. Overwatering can lead to root rot. Water deeply at the base of the plants, avoiding wetting the leaves, which can encourage fungal diseases. Mulching around the plants can help retain moisture in the soil and suppress weeds.
How do I fertilize kale?
Kale is a heavy feeder, meaning it requires a good amount of nutrients to grow well. Fertilize kale with a balanced fertilizer, such as a 10-10-10 or 5-5-5, according to the package directions. You can also use organic fertilizers, such as compost tea or fish emulsion. Fertilize kale every few weeks during the growing season to ensure optimal growth.
What are some common pests and diseases that affect kale?
Common pests that affect kale include aphids, cabbage worms, flea beetles, and slugs. You can control these pests with organic methods, such as handpicking, insecticidal soap, or Bacillus thuringiensis (Bt). Common diseases that affect kale include downy mildew, powdery mildew, and black rot. Prevent these diseases by providing good air circulation, avoiding overhead watering, and planting disease-resistant varieties.
How do I harvest kale?
You can begin harvesting kale leaves when they are about 4-6 inches long. Harvest the outer leaves first, leaving the inner leaves to continue growing. You can harvest kale leaves continuously throughout the growing season. Avoid harvesting more than one-third of the plant at a time, as this can stress the plant.
Can I grow kale in containers?
Yes, you can grow kale in containers. Choose a container that is at least 12 inches deep and wide. Use a well-draining potting mix and fertilize regularly. Container-grown kale may require more frequent watering than kale grown in the ground.
How do I store kale after harvesting?
Store kale in the refrigerator in a plastic bag or container. Kale will keep for about a week in the refrigerator. You can also freeze kale for longer storage. To freeze kale, blanch it in boiling water for 2-3 minutes, then plunge it into ice water. Drain the kale and squeeze out any excess water. Place the kale in freezer bags or containers and freeze.
My kale is bolting (going to seed). What should I do?
Bolting is a natural process that occurs when kale plants are exposed to high temperatures or long days. Once kale bolts, the leaves become bitter and less palatable. You can try to delay bolting by providing shade during the hottest part of the day and watering regularly. If your kale has already bolted, you can still harvest the leaves, but they may not taste as good. You can also save the seeds from bolted kale for planting next year.

Leave a Comment