
Microwave hacks and tips – who knew these two simple words could unlock a world of kitchen wizardry? Let’s be honest, the microwave often gets a bad rap. It’s seen as the quick-fix, the reheater of leftovers, but I’m here to tell you it’s so much more! For decades, this appliance has been a staple in homes worldwide, evolving from a bulky, experimental device to the sleek, efficient machine we know and love. Its convenience has revolutionized how we prepare food, saving us precious time and energy.
But are you truly maximizing your microwave’s potential? Are you tired of dried-out leftovers, exploding sauces, and unevenly cooked meals? I know I was! That’s why I’ve compiled this ultimate guide to microwave hacks and tips. These aren’t just your grandma’s reheating tricks; we’re diving deep into the science and art of microwave cooking. From perfectly steamed vegetables to surprisingly delicious desserts, I’ll show you how to transform your microwave from a simple appliance into a culinary powerhouse.
In today’s fast-paced world, time is of the essence. These hacks will not only save you time but also reduce food waste and even help you discover new and exciting ways to cook. So, ditch the microwave misconceptions and get ready to unlock a whole new level of kitchen confidence. Let’s get started!
DIY Microwave Hacks and Tips: Level Up Your Kitchen Game!
Hey everyone! I’m so excited to share some of my favorite microwave hacks and tips with you. Microwaves are seriously underrated kitchen powerhouses, and with a few clever tricks, you can do so much more than just reheat leftovers. Let’s dive in and unlock the full potential of your microwave!
Reheating Like a Pro
Reheating food in the microwave can often lead to uneven heating and dry spots. But fear not! These tips will help you achieve perfectly reheated meals every time.
* The Water Trick: Place a small glass of water in the microwave alongside your food. The water absorbs some of the microwave energy, preventing your food from drying out.
* Cover Up: Always cover your food with a microwave-safe lid or plastic wrap (make sure it’s vented!). This traps steam and helps to heat the food more evenly.
* Stir and Rotate: Halfway through the reheating process, stir your food and rotate the dish. This ensures that all parts of the food are exposed to the microwave energy.
* Power Down: Reheating at a lower power level (like 50% or 70%) for a longer time can prevent splattering and uneven heating.
Steaming Vegetables in Minutes
Forget boiling or steaming on the stovetop! Your microwave can steam vegetables quickly and easily.
* Choose Your Veggies: This works best with vegetables like broccoli, cauliflower, carrots, green beans, and asparagus.
* Prep the Veggies: Wash and chop your vegetables into bite-sized pieces.
* Microwave-Safe Container: Place the vegetables in a microwave-safe bowl or container.
* Add Water: Add a tablespoon or two of water to the bottom of the container.
* Cover and Cook: Cover the container with a microwave-safe lid or plastic wrap (vented). Microwave on high for 2-5 minutes, depending on the type and amount of vegetables. Check for doneness and continue cooking in 30-second intervals until tender-crisp.
Making Mug Cakes: Dessert in a Flash!
Craving something sweet but don’t want to bake a whole cake? Mug cakes are the answer!
* The Basic Recipe: This is my go-to base recipe, feel free to experiment with different flavors!
* 4 tablespoons all-purpose flour
* 4 tablespoons sugar
* 2 tablespoons unsweetened cocoa powder (optional, for chocolate cake)
* 1/4 teaspoon baking powder
* 3 tablespoons milk
* 1 tablespoon vegetable oil
* 1/2 teaspoon vanilla extract
* Pinch of salt
* Customize It: Add chocolate chips, sprinkles, nuts, or anything else your heart desires!
* Microwave Time: Microwave on high for 60-90 seconds, or until the cake is cooked through. The top should be set, but still slightly moist.
Reviving Stale Bread
Don’t throw away that stale bread! You can easily revive it in the microwave.
* Dampen a Paper Towel: Lightly dampen a paper towel with water.
* Wrap the Bread: Wrap the stale bread in the damp paper towel.
* Microwave Briefly: Microwave on high for 10-20 seconds, depending on the size and dryness of the bread.
* Check and Repeat: Check the bread. If it’s still stale, microwave for another 5-10 seconds. Be careful not to over-microwave, or it will become tough.
Easy Egg Poaching
Poaching eggs can be intimidating, but the microwave makes it a breeze!
* Microwave-Safe Mug: Fill a microwave-safe mug with about 1/2 cup of water.
* Add Vinegar: Add a teaspoon of white vinegar to the water. This helps the egg whites coagulate.
* Crack the Egg: Gently crack an egg into the water.
* Pierce the Yolk (Optional): Some people recommend piercing the yolk with a toothpick to prevent it from exploding. I usually skip this step, but it’s up to you!
* Microwave Carefully: Microwave on high for 45-60 seconds, depending on your microwave’s power.
* Check for Doneness: Check the egg. The white should be set, but the yolk should still be runny. If it’s not cooked enough, microwave for another 10-15 seconds.
* Remove and Enjoy: Carefully remove the egg with a slotted spoon and enjoy!
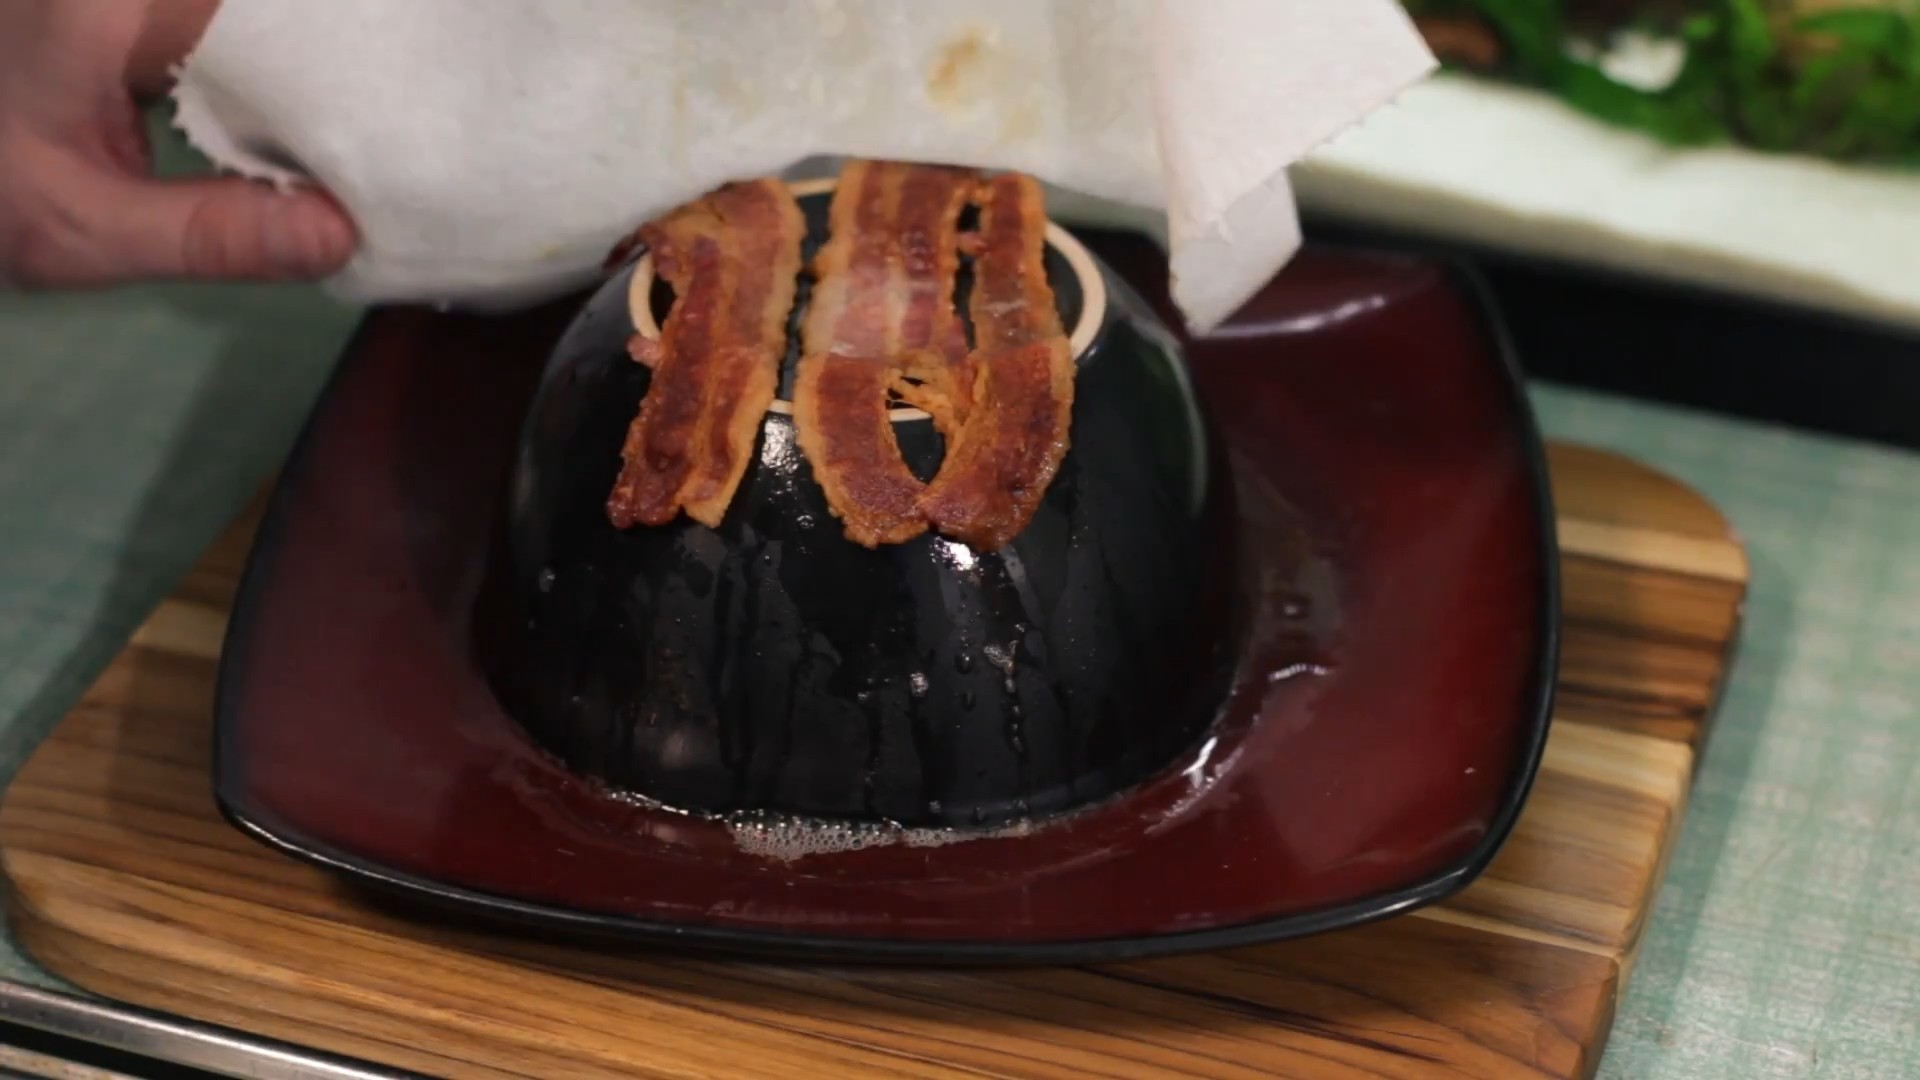
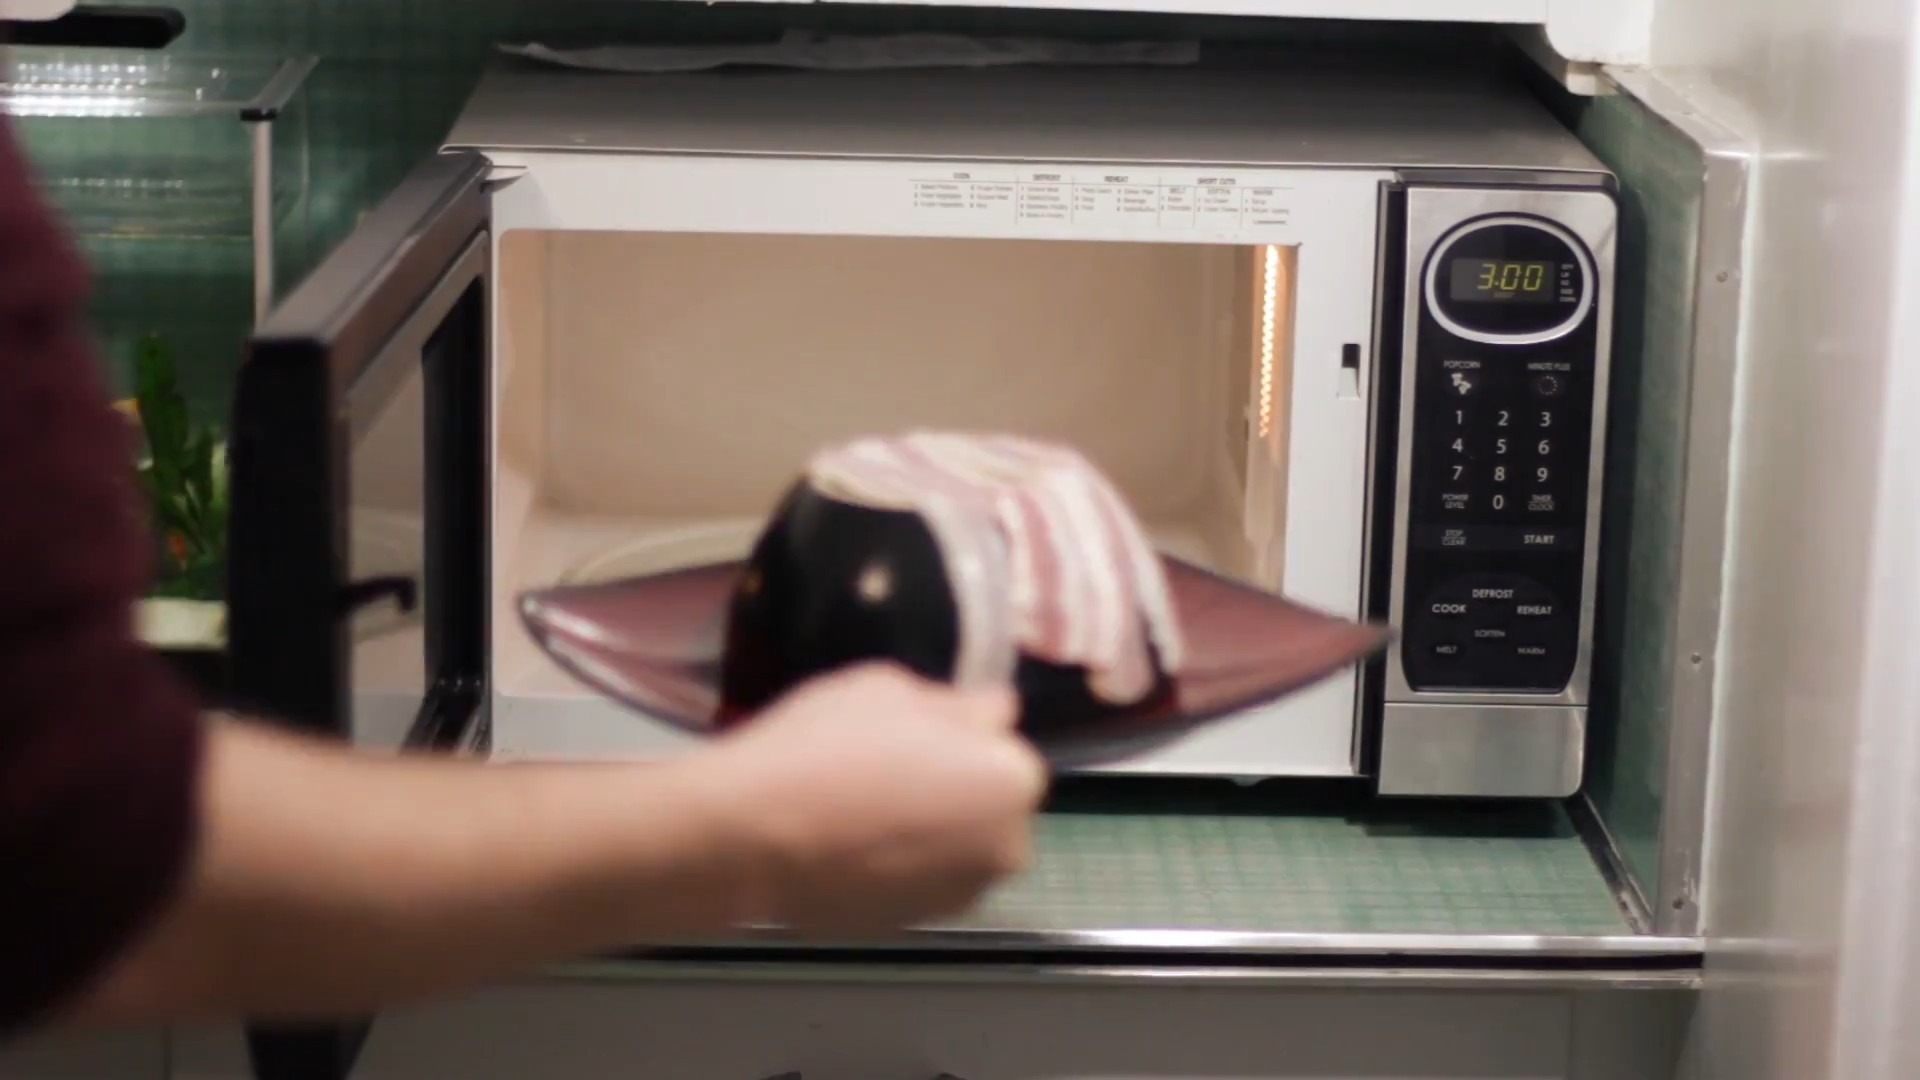
Making Crispy Bacon
Who knew you could make crispy bacon in the microwave? It’s quick, easy, and less messy than frying!
* Line a Plate: Line a microwave-safe plate with paper towels.
* Arrange the Bacon: Lay the bacon strips on the paper towels, making sure they don’t overlap.
* Cover with Paper Towels: Cover the bacon with another layer of paper towels. This helps to absorb the grease.
Hey everyone! I’m so excited to share some of my favorite microwave hacks and tips with you. Microwaves are seriously underrated kitchen powerhouses, and with a few clever tricks, you can do so much more than just reheat leftovers. Let’s dive in and unlock the full potential of your microwave!
Reheating Like a Pro
Reheating food in the microwave can often lead to uneven heating and dry spots. But fear not! These tips will help you achieve perfectly reheated meals every time.
* The Water Trick: Place a small glass of water in the microwave alongside your food. The water absorbs some of the microwave energy, preventing your food from drying out.
* Cover Up: Always cover your food with a microwave-safe lid or plastic wrap (make sure it’s vented!). This traps steam and helps to heat the food more evenly.
* Stir and Rotate: Halfway through the reheating process, stir your food and rotate the dish. This ensures that all parts of the food are exposed to the microwave energy.
* Power Down: Reheating at a lower power level (like 50% or 70%) for a longer time can prevent splattering and uneven heating.
Steaming Vegetables in Minutes
Forget boiling or steaming on the stovetop! Your microwave can steam vegetables quickly and easily.
* Choose Your Veggies: This works best with vegetables like broccoli, cauliflower, carrots, green beans, and asparagus.
* Prep the Veggies: Wash and chop your vegetables into bite-sized pieces.
* Microwave-Safe Container: Place the vegetables in a microwave-safe bowl or container.
* Add Water: Add a tablespoon or two of water to the bottom of the container.
* Cover and Cook: Cover the container with a microwave-safe lid or plastic wrap (vented). Microwave on high for 2-5 minutes, depending on the type and amount of vegetables. Check for doneness and continue cooking in 30-second intervals until tender-crisp.
Making Mug Cakes: Dessert in a Flash!
Craving something sweet but don’t want to bake a whole cake? Mug cakes are the answer!
* The Basic Recipe: This is my go-to base recipe, feel free to experiment with different flavors!
* 4 tablespoons all-purpose flour
* 4 tablespoons sugar
* 2 tablespoons unsweetened cocoa powder (optional, for chocolate cake)
* 1/4 teaspoon baking powder
* 3 tablespoons milk
* 1 tablespoon vegetable oil
* 1/2 teaspoon vanilla extract
* Pinch of salt
* Customize It: Add chocolate chips, sprinkles, nuts, or anything else your heart desires!
* Microwave Time: Microwave on high for 60-90 seconds, or until the cake is cooked through. The top should be set, but still slightly moist.
Reviving Stale Bread
Don’t throw away that stale bread! You can easily revive it in the microwave.
* Dampen a Paper Towel: Lightly dampen a paper towel with water.
* Wrap the Bread: Wrap the stale bread in the damp paper towel.
* Microwave Briefly: Microwave on high for 10-20 seconds, depending on the size and dryness of the bread.
* Check and Repeat: Check the bread. If it’s still stale, microwave for another 5-10 seconds. Be careful not to over-microwave, or it will become tough.
Easy Egg Poaching
Poaching eggs can be intimidating, but the microwave makes it a breeze!
* Microwave-Safe Mug: Fill a microwave-safe mug with about 1/2 cup of water.
* Add Vinegar: Add a teaspoon of white vinegar to the water. This helps the egg whites coagulate.
* Crack the Egg: Gently crack an egg into the water.
* Pierce the Yolk (Optional): Some people recommend piercing the yolk with a toothpick to prevent it from exploding. I usually skip this step, but it’s up to you!
* Microwave Carefully: Microwave on high for 45-60 seconds, depending on your microwave’s power.
* Check for Doneness: Check the egg. The white should be set, but the yolk should still be runny. If it’s not cooked enough, microwave for another 10-15 seconds.
* Remove and Enjoy: Carefully remove the egg with a slotted spoon and enjoy!
Making Crispy Bacon
Who knew you could make crispy bacon in the microwave? It’s quick, easy, and less messy than frying!
* Line a Plate: Line a microwave-safe plate with paper towels.
* Arrange the Bacon: Lay the bacon strips on the paper towels, making sure they don’t overlap.
* Cover with Paper Towels: Cover the bacon with another layer of paper towels. This helps to absorb the grease.
* Microwave Time: Microwave on high for 1-2 minutes per slice, depending on your microwave’s power and how crispy you like your bacon.
* Check for Crispness: Check the bacon. If it’s not crispy enough, microwave for another 30 seconds.
* Drain and Enjoy: Remove the bacon from the microwave and drain on fresh paper towels.
Disinfecting Sponges and Cleaning Cloths
Your microwave can help you keep your kitchen clean by disinfecting sponges and cleaning cloths.
* Wet the Sponge/Cloth: Thoroughly wet the sponge or cleaning cloth.
* Add Lemon Juice or Vinegar (Optional): Add a tablespoon of lemon juice or vinegar to the sponge/cloth. This helps to kill bacteria and remove odors.
* Microwave Briefly: Microwave on high for 1-2 minutes.
* Cool Down: Let the sponge/cloth cool down before handling it. It will be very hot!
Softening Brown Sugar
Hard, rock-solid brown sugar? No problem! The microwave can soften it in seconds.
* Dampen a Paper Towel: Dampen a paper towel with water.
* Place in Container: Place the hardened brown sugar in a microwave-safe container.
* Cover with Towel: Place the damp paper towel on top of the brown sugar.
* Microwave Briefly: Microwave on high for 15-30 seconds.
* Check and Repeat: Check the brown sugar. If it’s still hard, microwave for another 10-15 seconds.
Roasting Garlic
Roasting garlic in the oven takes a long time, but you can speed up the process in the microwave.
* Prepare the Garlic: Cut off the top of the garlic bulb to expose the cloves.
* Drizzle with Oil: Drizzle the garlic with olive oil.
* Wrap in Plastic Wrap: Wrap the garlic bulb in microwave-safe plastic wrap (vented).
* Microwave Carefully: Microwave on high for 2-3 minutes, or until the garlic is soft and fragrant.
* Cool and Squeeze: Let the garlic cool slightly, then squeeze the roasted garlic out of the bulb.
Making Oatmeal
A quick and easy breakfast option!
* Combine Ingredients: In a microwave-safe bowl, combine 1/2 cup of rolled oats, 1 cup of water or milk, and a pinch of salt.
* Microwave: Microwave on high for 1-2 minutes, or until the oatmeal is cooked through. Watch carefully, as it can bubble over.
* Stir and Add Toppings: Stir the oatmeal and add your favorite toppings, such as fruit, nuts, seeds, or honey.
Melting Chocolate
Melting chocolate in the microwave can be tricky, but these tips will help you avoid burning it.
* Chop the Chocolate: Chop the chocolate into small, even pieces.
* Microwave-Safe Bowl: Place the chocolate in a microwave-safe bowl.
* Microwave in Intervals: Microwave on medium power (50%) for 30 seconds.
* Stir and Repeat: Stir the chocolate and microwave for another 15-30 seconds. Repeat this process until the chocolate is almost completely melted.
* Stir Until Smooth: Stir the chocolate until it is completely smooth. The residual heat will melt any remaining pieces.
Making Popcorn
While pre-packaged microwave popcorn is convenient, you can make it even healthier (and cheaper!) yourself.
* Choose Your Kernels: Use 1/4 to 1/2 cup of popcorn kernels.
* Microwave-Safe Bowl: Place the kernels in a microwave-safe bowl with a lid
Conclusion
So, there you have it! Mastering these microwave hacks and tips isn’t just about convenience; it’s about unlocking a new level of efficiency and creativity in your kitchen. From perfectly steaming vegetables to reviving stale bread, the humble microwave is capable of so much more than just reheating leftovers. We’ve shown you how to prevent splatters, achieve even cooking, and even create delicious single-serving desserts in minutes.
But why is this a must-try? Because time is precious. In today’s fast-paced world, who has hours to spend slaving over a hot stove? These microwave hacks and tips empower you to create quick, healthy, and satisfying meals without sacrificing flavor or nutrition. Imagine coming home after a long day and whipping up a perfectly cooked salmon fillet in under five minutes, or enjoying a warm, gooey chocolate mug cake without the hassle of baking. That’s the power of these simple techniques.
Don’t be afraid to experiment! Try adding different herbs and spices to your steamed vegetables, or use different types of chocolate in your mug cakes. You can even use these techniques to pre-cook ingredients for more complex recipes, saving you even more time in the long run. For example, pre-cooking potatoes in the microwave before roasting them in the oven can significantly reduce the overall cooking time. Or, try softening butter quickly for baking by microwaving it in short bursts.
We encourage you to dive in and try these microwave hacks and tips for yourself. Start with the simplest ones, like the splatter guard trick or the even cooking tip, and gradually work your way up to the more advanced techniques. The more you experiment, the more comfortable you’ll become with using your microwave in new and innovative ways.
And most importantly, we want to hear about your experiences! Share your successes (and even your failures!) in the comments below. What are your favorite microwave hacks and tips? What variations have you tried? What challenges did you encounter? Your feedback will not only help us improve this guide, but it will also inspire other readers to explore the endless possibilities of microwave cooking. Let’s create a community of microwave masters!
Remember, the key to success with these microwave hacks and tips is to start small, be patient, and don’t be afraid to experiment. With a little practice, you’ll be amazed at what you can accomplish with this often-underestimated kitchen appliance. So, go ahead, give it a try, and discover the magic of microwave cooking!
Frequently Asked Questions (FAQ)
What if my microwave doesn’t have a turntable?
Not all microwaves come equipped with a turntable, and that’s perfectly fine! The key to even cooking in a microwave without a turntable is to manually rotate the dish halfway through the cooking time. This ensures that all sides of the food are exposed to the microwave energy, preventing hot spots and uneven cooking. You might also consider using a microwave-safe dish that is smaller than the microwave itself, allowing for better air circulation and more even heating. For larger items, rotating more frequently (every minute or so) might be necessary.
How do I know if a container is microwave-safe?
This is a crucial question to ensure your safety and prevent damage to your microwave. Look for the microwave-safe symbol, which is usually located on the bottom of the container. This symbol typically depicts a microwave oven with wavy lines inside. If you’re unsure, it’s always best to err on the side of caution. Avoid using metal containers, aluminum foil (unless specifically instructed in a recipe), and some types of plastic that are not designed for microwave use. Glass, ceramic, and microwave-safe plastics are generally good choices. If you’re still unsure, perform a simple test: place the container in the microwave with a cup of water and microwave on high for one minute. If the container remains cool and the water is hot, it’s likely microwave-safe. If the container gets hot, it’s not safe to use.
Can I microwave eggs?
Yes, you can microwave eggs, but it requires special attention to prevent explosions. Microwaving eggs in their shells is generally not recommended due to the buildup of steam inside the shell, which can cause them to explode. However, you can scramble eggs in a microwave-safe bowl or cook poached eggs in a microwave-safe cup filled with water. For scrambled eggs, whisk the eggs with a little milk or cream and microwave in short intervals (30 seconds at a time), stirring in between, until cooked through. For poached eggs, crack an egg into a cup of water with a splash of vinegar and microwave for about 1-2 minutes, depending on your microwave’s power. Always pierce the yolk with a toothpick before microwaving to prevent it from exploding.
How do I prevent food from drying out in the microwave?
Microwaves can sometimes dry out food, especially when reheating. To prevent this, add a little moisture to the food before microwaving. For example, you can sprinkle a few drops of water over leftovers or cover the dish with a damp paper towel. This helps to create steam inside the microwave, keeping the food moist and preventing it from drying out. You can also use a microwave-safe lid or plastic wrap (with a small vent) to trap moisture. Another tip is to microwave in short intervals and check the food frequently, adding more moisture if needed.
What’s the best way to reheat pizza in the microwave?
Reheating pizza in the microwave can often result in a soggy crust. To avoid this, try placing a cup of water in the microwave alongside the pizza slice. The water will absorb some of the microwave energy, preventing the crust from becoming overly dry and tough. You can also place the pizza slice on a paper towel to absorb excess moisture. Microwave in short intervals (20-30 seconds at a time) until heated through. For an even crispier crust, consider using a microwave crisper pan, which is designed to promote air circulation and prevent sogginess.
How can I soften butter quickly in the microwave?
Softening butter quickly in the microwave requires careful attention to prevent it from melting. The best method is to microwave the butter in short bursts (5-10 seconds at a time) on low power, checking it frequently. Rotate the butter after each burst to ensure even softening. Alternatively, you can microwave a glass of water until it boils, then carefully remove the water and place the butter inside the warm microwave. The residual heat will gently soften the butter without melting it.
Is it safe to microwave plastic containers?
Not all plastic containers are microwave-safe. Some plastics can leach chemicals into food when heated, which can be harmful to your health. Always look for the microwave-safe symbol on the container before using it in the microwave. Avoid using containers made from plastics labeled with recycling codes 3, 6, or 7, as these are more likely to leach chemicals. Opt for containers made from microwave-safe plastics, glass, or ceramic. Even with microwave-safe plastics, it’s best to avoid microwaving fatty foods, as fat can increase the likelihood of chemical leaching.
How do I clean my microwave effectively?
Cleaning your microwave regularly is essential for maintaining hygiene and preventing unpleasant odors. A simple and effective method is to microwave a cup of water with a few slices of lemon or a tablespoon of vinegar for 3-5 minutes. The steam will loosen any food splatters and make them easier to wipe away. After microwaving, carefully remove the cup and wipe down the interior of the microwave with a clean cloth or sponge. For stubborn stains, you can use a paste of baking soda and water.

Leave a Comment