
Growing Potatoes in Bags: Imagine harvesting a bounty of fresh, homegrown potatoes right from your patio or balcony! No sprawling garden needed. I’m so excited to share this simple, space-saving DIY trick that will transform the way you think about potato farming. For centuries, potatoes have been a staple food source, fueling civilizations and providing essential nutrients. From the Inca highlands where they originated to the Irish potato famine that shaped history, this humble tuber has a rich and complex past.
But let’s face it, not everyone has access to acres of farmland. That’s where this ingenious hack comes in. Growing Potatoes in Bags is the perfect solution for urban dwellers, apartment residents, or anyone with limited garden space. It’s a fun, rewarding project that yields delicious results. Plus, it’s incredibly satisfying to dig into a bag and unearth your own homegrown treasure.
This DIY guide will walk you through every step, from choosing the right potato variety to ensuring proper drainage and sunlight. Say goodbye to store-bought potatoes and hello to fresh, flavorful spuds grown with your own two hands! Get ready to experience the joy of homegrown goodness, one bag at a time.
Growing Potatoes in Bags: A Bountiful Harvest on Your Patio!
Hey there, fellow gardening enthusiasts! I’m super excited to share one of my favorite DIY gardening hacks with you: growing potatoes in bags! It’s a fantastic way to get a surprisingly large potato harvest, even if you don’t have a traditional garden plot. Plus, it’s incredibly satisfying to watch those little spuds grow and multiply right before your eyes. Let’s dive in!
Why Grow Potatoes in Bags?
Before we get started, you might be wondering why you should even bother with bags. Well, here’s the scoop:
* Space-Saving: Perfect for balconies, patios, or small yards. You don’t need a huge garden to enjoy fresh, homegrown potatoes.
* Easy Harvesting: Forget digging around in the dirt! Harvesting is as simple as tipping the bag over.
* Control Over Soil: You can create the perfect growing environment with the right soil mix.
* Mobility: You can easily move the bags to follow the sun or protect them from frost.
* Fun and Educational: It’s a great project for kids (and adults!) to learn about where their food comes from.
What You’ll Need
Okay, let’s gather our supplies. Here’s what you’ll need to get started on your potato-growing adventure:
* Large Bags: I recommend using heavy-duty gardening bags, burlap sacks, or even large trash bags (make sure they’re thick and durable). Aim for bags that are at least 24 inches in diameter and 24 inches tall. The bigger, the better!
* Seed Potatoes: These aren’t just any potatoes! Seed potatoes are specifically grown for planting and are certified disease-free. You can find them at your local garden center or online. Choose a variety you love to eat!
* Potting Mix: A well-draining potting mix is crucial. I like to use a mix of compost, peat moss (or coco coir), and perlite. This ensures good drainage and provides plenty of nutrients.
* Water: Essential for keeping your potatoes happy and hydrated.
* Fertilizer (Optional): A balanced, slow-release fertilizer can give your potatoes an extra boost.
* Scissors or Knife: For cutting drainage holes in the bags (if needed).
* Trowel or Shovel: For scooping soil.
Step-by-Step Instructions: Planting Your Potatoes
Alright, let’s get our hands dirty! Here’s how to plant your seed potatoes in bags:
1. Prepare Your Seed Potatoes: A week or two before planting, “chit” your seed potatoes. This means encouraging them to sprout. Place them in a cool, bright location (but not direct sunlight) until they develop small, green sprouts, also known as “eyes.” You can also cut larger seed potatoes into smaller pieces, making sure each piece has at least one or two eyes. Let the cut pieces dry for a day or two to prevent rotting.
2. Prepare Your Bags: If your bags don’t already have them, cut several drainage holes in the bottom. This is super important to prevent waterlogging, which can rot your potatoes.
3. Add Initial Soil Layer: Pour about 4-6 inches of your potting mix into the bottom of each bag.
4. Plant Your Seed Potatoes: Place 2-3 seed potato pieces (or whole small seed potatoes) on top of the soil, with the sprouts facing upwards. Space them evenly apart.
5. Cover with Soil: Cover the seed potatoes with another 4-6 inches of potting mix.
6. Water Thoroughly: Water the soil well until it’s evenly moist but not soggy.
7. Place in a Sunny Location: Potatoes need at least 6-8 hours of sunlight per day, so choose a sunny spot for your bags.
The “Hilling” Process: Encouraging More Potatoes
This is where the magic happens! “Hilling” is the key to getting a big potato harvest. As the potato plants grow, you’ll gradually add more soil to the bag, encouraging the plant to produce more potatoes along the buried stem.
1. Wait for Growth: Once the potato plants have grown about 6-8 inches tall, it’s time to start hilling.
2. Add More Soil: Add another 4-6 inches of potting mix to the bag, burying the lower part of the stems, leaving only the top few inches of the plant exposed.
3. Water Again: Water the soil well after adding more soil.
4. Repeat the Process: Continue this process every 1-2 weeks as the plants grow taller, until you’ve filled the bag almost to the top. Remember to always leave a few inches of the plant exposed.
Caring for Your Potato Plants
Now that your potatoes are planted and hilling is underway, here’s how to keep them happy and healthy:
1. Watering: Potatoes need consistent moisture, especially during flowering and tuber formation. Water deeply whenever the top inch of soil feels dry to the touch. Avoid overwatering, as this can lead to rot.
2. Fertilizing (Optional): If you’re using fertilizer, follow the instructions on the package. I like to use a balanced, slow-release fertilizer at planting time and then again when the plants start to flower.
3. Pest Control: Keep an eye out for pests like aphids, potato beetles, and flea beetles. You can handpick them off the plants or use an organic insecticide if necessary.
4. Sunlight: Ensure your potato plants are getting at least 6-8 hours of sunlight per day. If they’re not getting enough sun, the stems will become leggy and the potato yield will be lower.
5. Monitor for Diseases: Watch out for signs of diseases like early blight or late blight. Remove any affected leaves immediately and consider using a fungicide if the problem is severe.
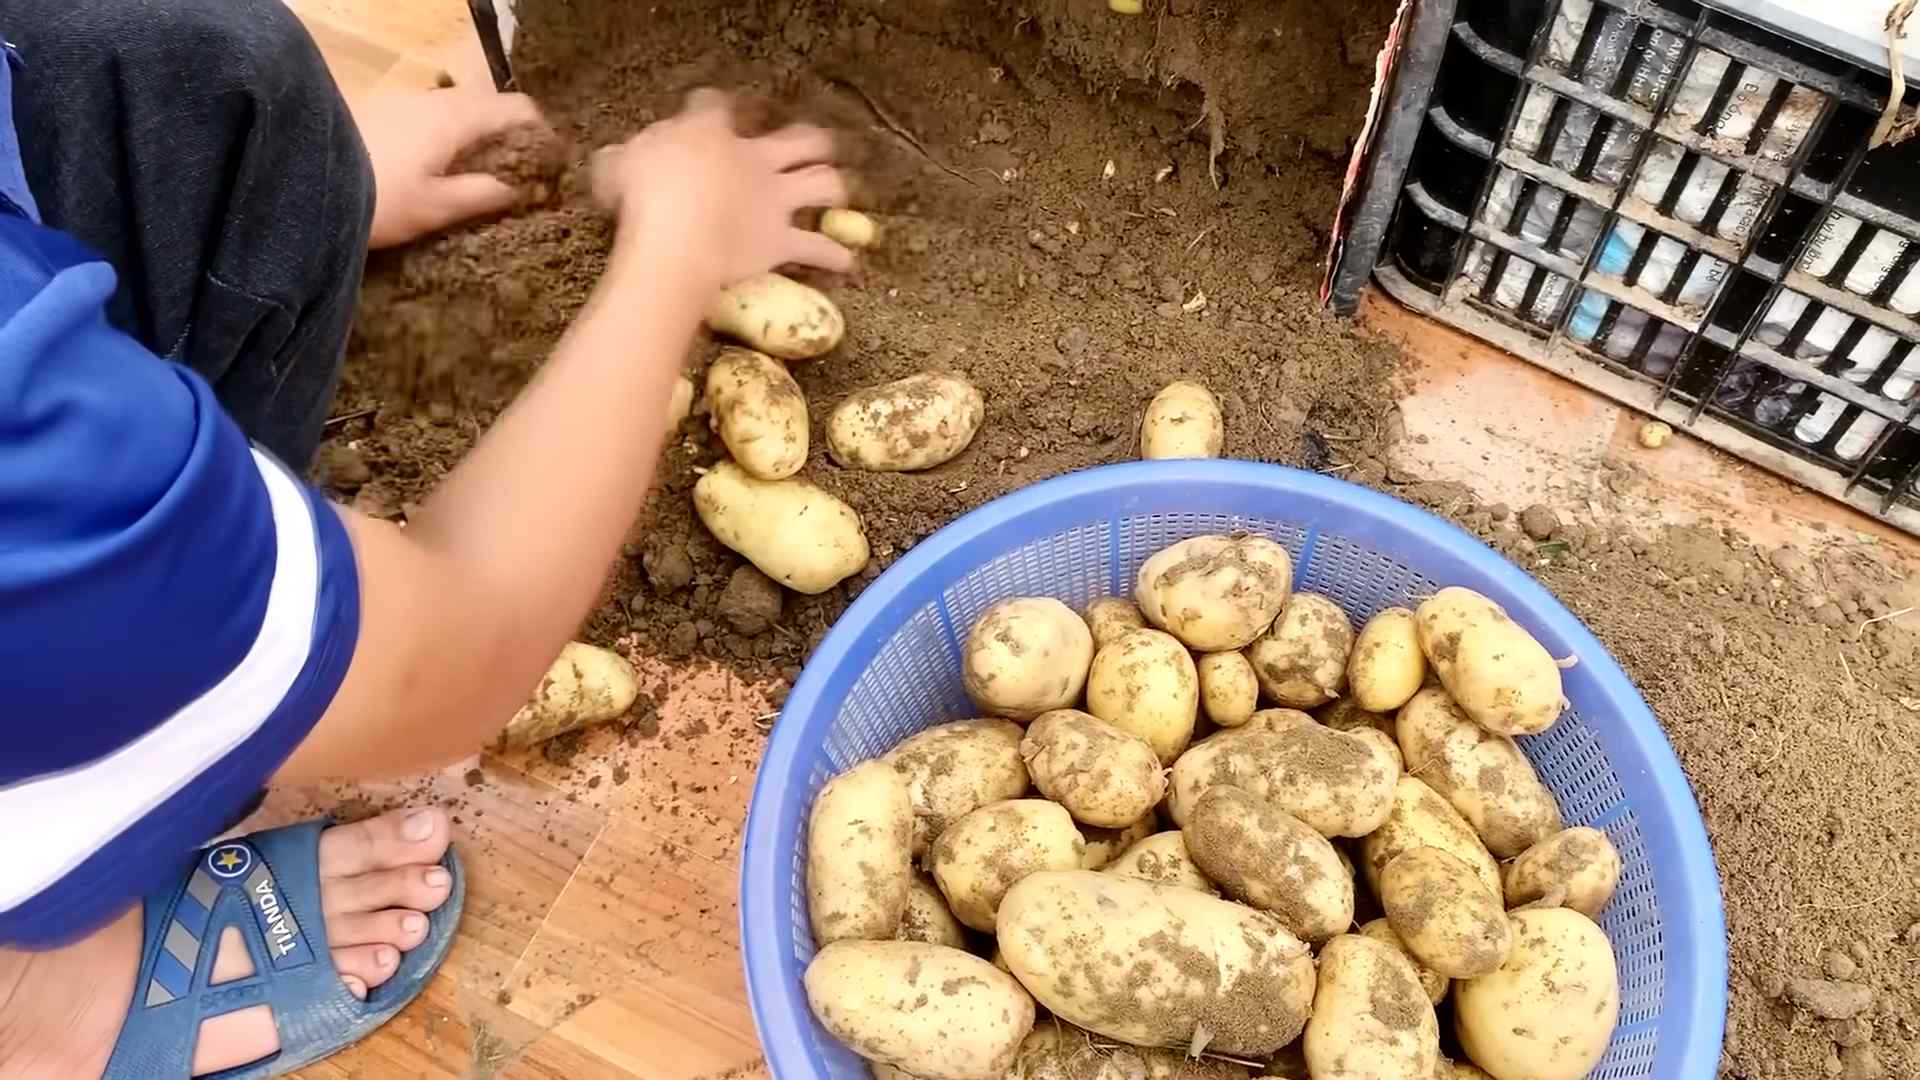
Harvesting Your Potatoes: The Grand Finale!
The best part! Harvesting your potatoes is super easy when they’re grown in bags.
1. When to Harvest: You can start harvesting “new potatoes” (small, tender potatoes) about 2-3 weeks after the plants finish flowering. For larger, mature potatoes, wait until the foliage starts to die back and turn yellow or brown. This usually takes about 80-100 days from planting.
2. Harvesting New Potatoes: Gently reach into the bag and feel around for small potatoes near the surface. You can harvest these without disturbing the rest of the plant.
3. Harvesting Mature Potatoes: Once the foliage has died back, it’s time to harvest the entire crop. Simply tip the bag over onto a tarp or other surface and sort through the soil to find your potatoes!
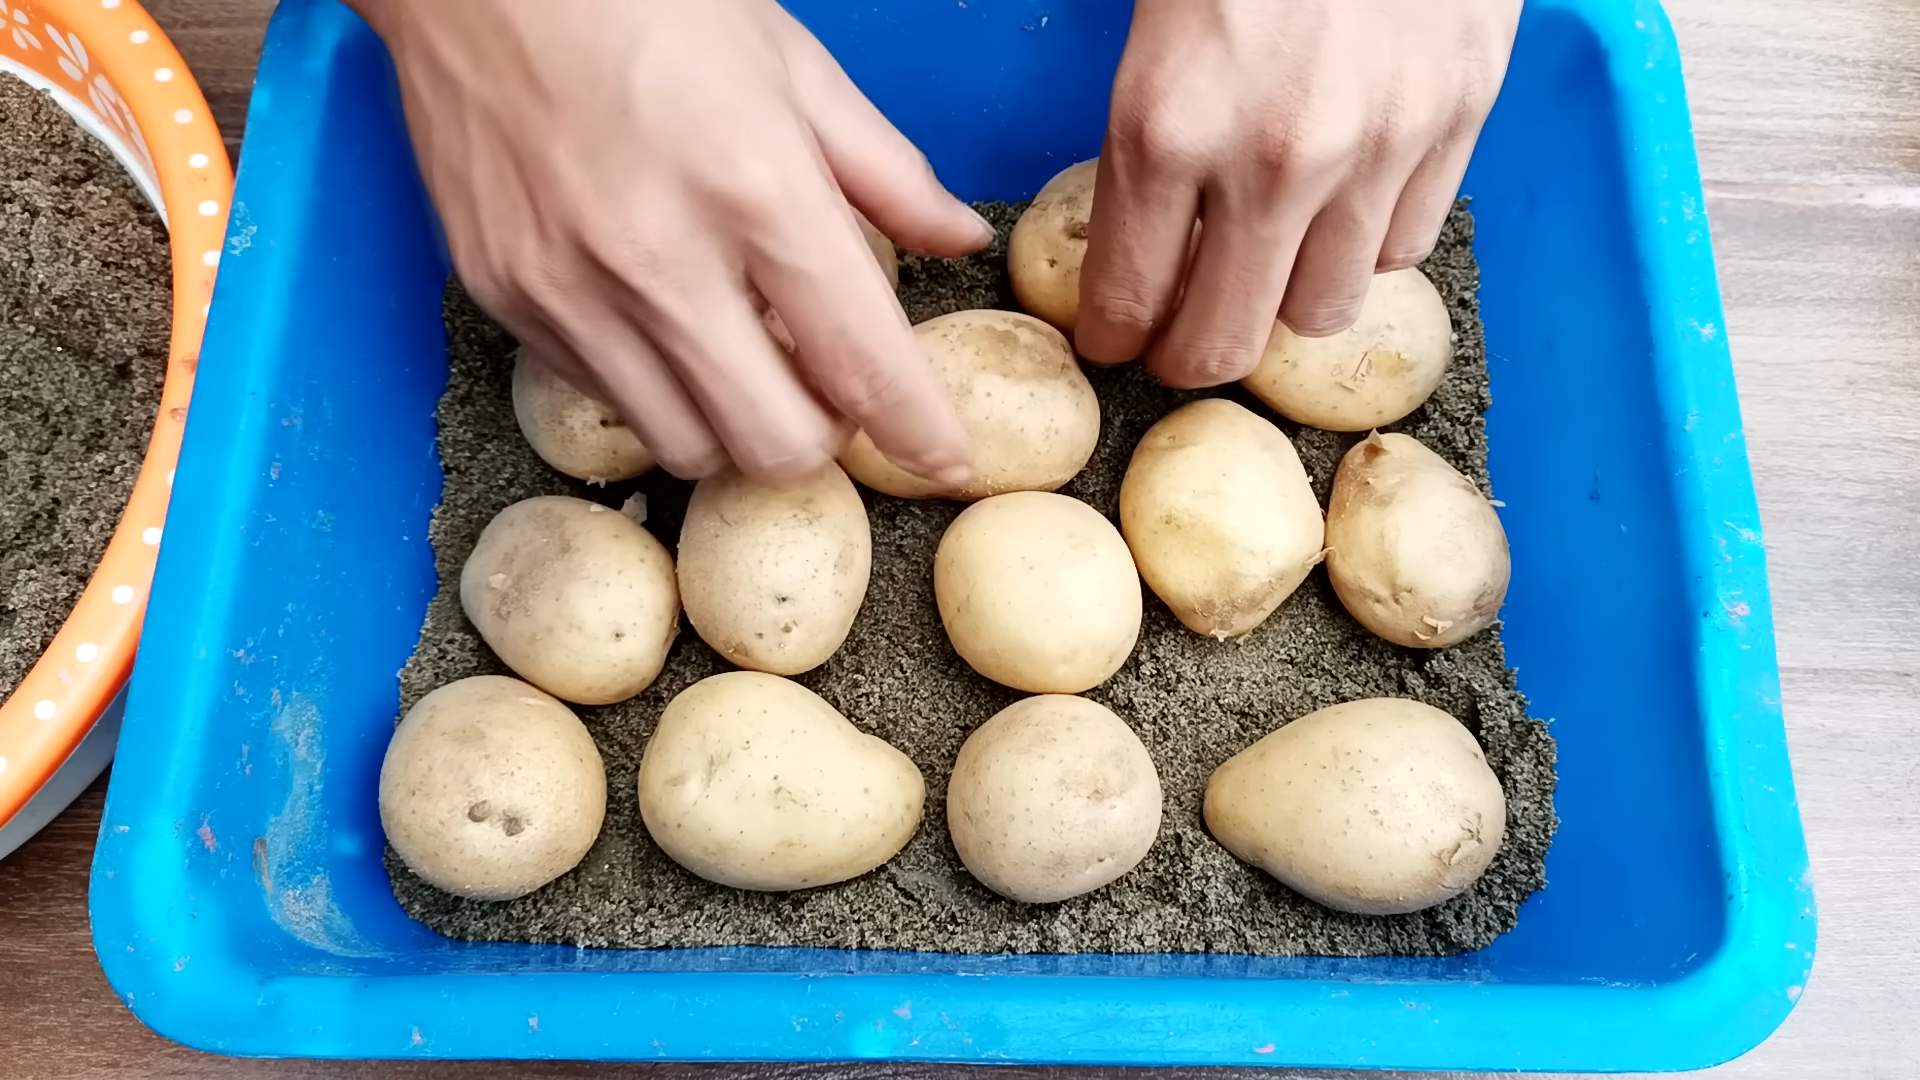
4. Curing (Optional): If you plan to store your potatoes for a longer period, you can cure them for a week or two. Spread them out in a cool, dark, and well-ventilated place to allow the skins to harden.
Troubleshooting: Common Issues and Solutions
Even with the best care, you might encounter a few challenges along the way. Here are some common issues and how to address them:
* Yellowing Leaves: This could be a sign of overwatering, underwatering, nutrient deficiency, or disease. Check the soil moisture, fertilize if necessary, and inspect the plants for signs of disease.
* Leggy Stems: This usually indicates insufficient sunlight. Move the bags to a sunnier location.
* Small Potatoes: This could be due to insufficient watering, nutrient deficiency, or overcrowding. Make sure you’re watering regularly, fertilizing as needed, and not planting too many seed potatoes in each bag.
* Rotting Potatoes: This is usually caused by overwatering or poor drainage. Ensure your bags have adequate drainage holes and avoid overwatering.
* Pests: Regularly inspect your plants for pests and take action promptly to prevent infestations.
Choosing the Right Potato Variety
The type of potato you choose to grow will impact the taste, texture, and storage life of your harvest. Here are a few popular varieties to consider:
* Yukon Gold: A classic all-purpose potato with a buttery flavor and smooth texture. Great for baking, mashing, and roasting.
* Red Norland: A red-skinned potato with a waxy texture. Excellent for boiling and potato salads.
* Russet Burbank: The quintessential baking potato with a fluffy texture. Also good for frying.
* Fingerling Potatoes: These small, elongated potatoes have a unique flavor and texture. Great for roasting and salads.
* Purple Potatoes: Add a pop of color to your plate with these vibrant potatoes. They have a slightly nutty flavor and are good for roasting and mashing.
Tips for a Bumper Crop
Want to maximize your potato harvest
Conclusion
So, there you have it! Growing potatoes in bags is not just a gardening trend; it’s a game-changer for anyone, regardless of space or experience. We’ve explored the simplicity, the efficiency, and the sheer joy of harvesting your own homegrown spuds right from your patio, balcony, or even a sunny corner indoors. Forget back-breaking digging and endless weeding; this method brings the potato patch to you, making fresh, delicious potatoes accessible to everyone.
Why is this DIY trick a must-try? Because it’s incredibly rewarding. Imagine the satisfaction of nurturing a few seed potatoes into a bounty of fresh, earthy goodness. Think about the flavor – potatoes grown in your own backyard (or balcony!) simply taste better. They’re fresher, more flavorful, and you know exactly what went into growing them. Plus, it’s a fantastic learning experience for kids and adults alike, connecting you to the food you eat in a tangible and meaningful way.
But the benefits don’t stop there. Growing potatoes in bags is also incredibly versatile. Feel free to experiment with different potato varieties. Try Yukon Golds for their creamy texture, Russets for their perfect baking qualities, or fingerling potatoes for a gourmet touch. You can also adjust the soil mix to suit your specific climate and growing conditions. Consider adding compost or other organic matter to boost nutrient levels and improve drainage.
Looking for variations? Instead of traditional burlap or grow bags, you can repurpose large plastic storage bins or even old tires (with proper drainage, of course!). Just be sure whatever container you choose has adequate drainage holes to prevent waterlogging. You can also try companion planting in your potato bags. Marigolds can help deter pests, while basil can improve the overall health of your potato plants.
Don’t be intimidated! This is a forgiving and adaptable method. Even if you’ve never grown anything before, you can successfully grow potatoes in bags. The key is to start small, follow the basic guidelines, and be patient. Observe your plants, adjust your watering schedule as needed, and don’t be afraid to experiment.
We wholeheartedly encourage you to give this DIY trick a try. It’s a fun, educational, and ultimately delicious way to connect with nature and enjoy the fruits (or rather, vegetables!) of your labor. And most importantly, we want to hear about your experience! Share your photos, tips, and stories with us in the comments below. Let’s create a community of bag-grown potato enthusiasts and inspire others to discover the joy of homegrown goodness. What are you waiting for? Grab some seed potatoes, a bag, and get growing! You’ll be amazed at what you can achieve. This method of growing potatoes in bags is a simple and effective way to get a great harvest.
Frequently Asked Questions (FAQ)
What kind of bag should I use for growing potatoes?
The best bags for growing potatoes are typically made of breathable fabric, such as burlap or specialized grow bags. These materials allow for good air circulation and drainage, which are crucial for healthy potato growth. Grow bags often come with handles for easy moving and a flap or window for harvesting potatoes without disturbing the entire plant. Avoid using non-breathable plastic bags, as they can lead to waterlogging and root rot. If you must use a plastic container, ensure it has plenty of drainage holes. The size of the bag is also important; a bag that is at least 15-20 gallons in size is recommended to provide enough space for the potato plants to develop a good root system and produce a decent yield.
How often should I water my potato plants in bags?
Watering frequency depends on several factors, including the weather, the type of soil you’re using, and the size of the bag. Generally, you should water your potato plants when the top inch of soil feels dry to the touch. During hot, dry weather, you may need to water daily, while during cooler or rainy periods, you can reduce the frequency. Avoid overwatering, as this can lead to root rot. Ensure the bag has good drainage to prevent water from pooling at the bottom. A good rule of thumb is to water deeply until you see water draining from the bottom of the bag.
What kind of soil should I use for growing potatoes in bags?
Potatoes thrive in well-draining, slightly acidic soil. A good soil mix for growing potatoes in bags consists of equal parts of the following: garden soil, compost, and peat moss or coco coir. The garden soil provides structure and nutrients, the compost adds organic matter and improves drainage, and the peat moss or coco coir helps retain moisture. Avoid using heavy clay soil, as it can become compacted and restrict root growth. You can also add a slow-release fertilizer to the soil mix to provide a steady supply of nutrients throughout the growing season.
How do I know when my potatoes are ready to harvest?
The timing of potato harvest depends on the variety of potato you’re growing and your desired size. For “new potatoes,” which are small and tender, you can start harvesting when the plants begin to flower. Simply reach into the bag and carefully remove a few potatoes, leaving the rest to continue growing. For mature potatoes, wait until the foliage starts to turn yellow and die back. This indicates that the potatoes have stopped growing and are ready to be harvested. To harvest, simply tip the bag over and carefully remove the potatoes from the soil.
Can I reuse the soil from my potato bags?
Yes, you can reuse the soil from your potato bags, but it’s important to amend it before planting again. After harvesting your potatoes, remove any remaining plant debris and roots from the soil. Then, add fresh compost and other organic matter to replenish the nutrients that were used by the potato plants. You may also want to test the soil pH and adjust it if necessary. If you suspect that the soil may be contaminated with diseases or pests, it’s best to sterilize it before reusing it. You can do this by baking the soil in the oven at 200 degrees Fahrenheit for 30 minutes or by solarizing it in a black plastic bag for several weeks during the summer.
What are some common pests and diseases that affect potato plants in bags?
Common pests that can affect potato plants include aphids, potato beetles, and flea beetles. Aphids can be controlled with insecticidal soap or neem oil. Potato beetles can be hand-picked or controlled with Bacillus thuringiensis (Bt). Flea beetles can be deterred with row covers or controlled with pyrethrin. Common diseases that can affect potato plants include early blight, late blight, and potato scab. Early blight and late blight can be prevented by providing good air circulation and avoiding overhead watering. Potato scab can be prevented by maintaining a slightly acidic soil pH. If you notice any signs of pests or diseases, it’s important to take action quickly to prevent them from spreading.
Can I grow potatoes in bags indoors?
Yes, you can grow potatoes in bags indoors, but you’ll need to provide them with adequate light. Potatoes need at least 6-8 hours of direct sunlight per day to grow properly. If you don’t have a sunny window, you can use grow lights to supplement the natural light. You’ll also need to ensure that the plants have good air circulation and are watered properly. Growing potatoes indoors can be a great way to extend the growing season and enjoy fresh potatoes year-round.
How many seed potatoes should I plant in one bag?
Generally, you should plant 2-3 seed potatoes in a 15-20 gallon bag. This allows enough space for each plant to develop without overcrowding. If you’re using a smaller bag, you may want to plant only one seed potato. Be sure to space the seed potatoes evenly throughout the bag to ensure that the plants have enough room to grow.
What do I do if my potato plants start to flower?
When your potato plants start to flower, it’s a sign that they are starting to produce tubers. You can either leave the flowers on the plants or remove them. Removing the flowers may encourage the plants to put more energy into tuber production, but it’s not essential. If you’re growing “new potatoes,” you can start harvesting them when the plants begin to flower.
How do I store my harvested potatoes?
Store your harvested potatoes in a cool, dark, and dry place. A root cellar is ideal, but a basement or garage can also work. Avoid storing potatoes in the refrigerator, as this can cause them to develop a sweet taste. Before storing, brush off any excess soil from the potatoes, but don’t wash them. Spread the potatoes out in a single layer on a tray or in a basket, and make sure they have good air circulation. Properly stored potatoes can last for several months.

Leave a Comment