
Indoor Radish Growing: Unlock the secrets to fresh, peppery radishes right in your own home! Forget those bland, store-bought radishes – imagine the satisfaction of harvesting crisp, vibrant roots you’ve nurtured yourself, even without a sprawling garden. Have you ever thought about growing your own food indoors? It’s easier than you think, and radishes are the perfect place to start!
Radishes have a surprisingly rich history, dating back to ancient times. They were cultivated in Egypt before the pyramids were even built! Throughout history, they’ve been valued not only for their taste but also for their medicinal properties. Now, we’re bringing this ancient crop into the modern home.
Why should you learn this DIY trick? Because fresh, homegrown radishes are simply better! They have a more intense flavor and a satisfying crunch that you just can’t find in the supermarket. Plus, indoor radish growing is a fantastic way to add a touch of green to your living space, boost your mood, and enjoy a healthy, sustainable snack. I’m excited to share my favorite tips and tricks to help you cultivate a thriving indoor radish patch, no matter how small your space is. Let’s get started!
Grow Your Own Radishes Indoors: A Beginner’s Guide
Hey there, fellow gardening enthusiasts! Ever crave that peppery crunch of a fresh radish in the middle of winter? Well, guess what? You don’t need a sprawling outdoor garden to enjoy these little root veggies. I’m going to walk you through the surprisingly simple process of growing radishes indoors. Get ready to have a constant supply of these zesty treats right at your fingertips!
What You’ll Need
Before we dive in, let’s gather our supplies. This is a pretty low-cost project, which is always a win in my book!
* **Radish Seeds:** Choose a variety that’s known for quick growth, like Cherry Belle, French Breakfast, or Easter Egg. These are generally ready to harvest in about a month.
* **Containers:** You’ll need containers that are at least 6 inches deep. Radishes need room to grow downwards. I like using plastic pots, but you can also use repurposed containers like yogurt tubs or even old buckets, as long as they have drainage holes.
* **Potting Mix:** Use a good quality, well-draining potting mix. Avoid using garden soil, as it can be too heavy and compact for container gardening.
* **Watering Can or Spray Bottle:** For gentle watering.
* **Grow Lights (Optional but Recommended):** While radishes can grow indoors with enough natural light, grow lights will ensure they get the consistent light they need for optimal growth, especially during the darker months.
* **Fertilizer (Optional):** A balanced liquid fertilizer can give your radishes a boost, but it’s not strictly necessary.
* **Small Trowel or Spoon:** For planting the seeds.
Choosing the Right Radish Variety
Not all radishes are created equal, especially when it comes to indoor growing. Here’s a quick rundown of some of my favorite varieties for container gardening:
* **Cherry Belle:** This is a classic, reliable variety that’s known for its quick growth and mild flavor. It’s a great choice for beginners.
* **French Breakfast:** These radishes are elongated with a mild, slightly sweet flavor. They’re also relatively quick to mature.
* **Easter Egg:** This variety produces a mix of red, pink, purple, and white radishes, adding a splash of color to your harvest.
* **Sparkler:** Another fast-growing variety with a mild, crisp flavor.
Step-by-Step Planting Guide
Alright, let’s get our hands dirty! Here’s how to plant your radish seeds:
1. **Prepare Your Containers:** Make sure your containers are clean and have adequate drainage holes. If you’re using repurposed containers, drill a few holes in the bottom.
2. **Fill with Potting Mix:** Fill your containers with potting mix, leaving about an inch of space at the top. Gently pat down the soil to remove any air pockets.
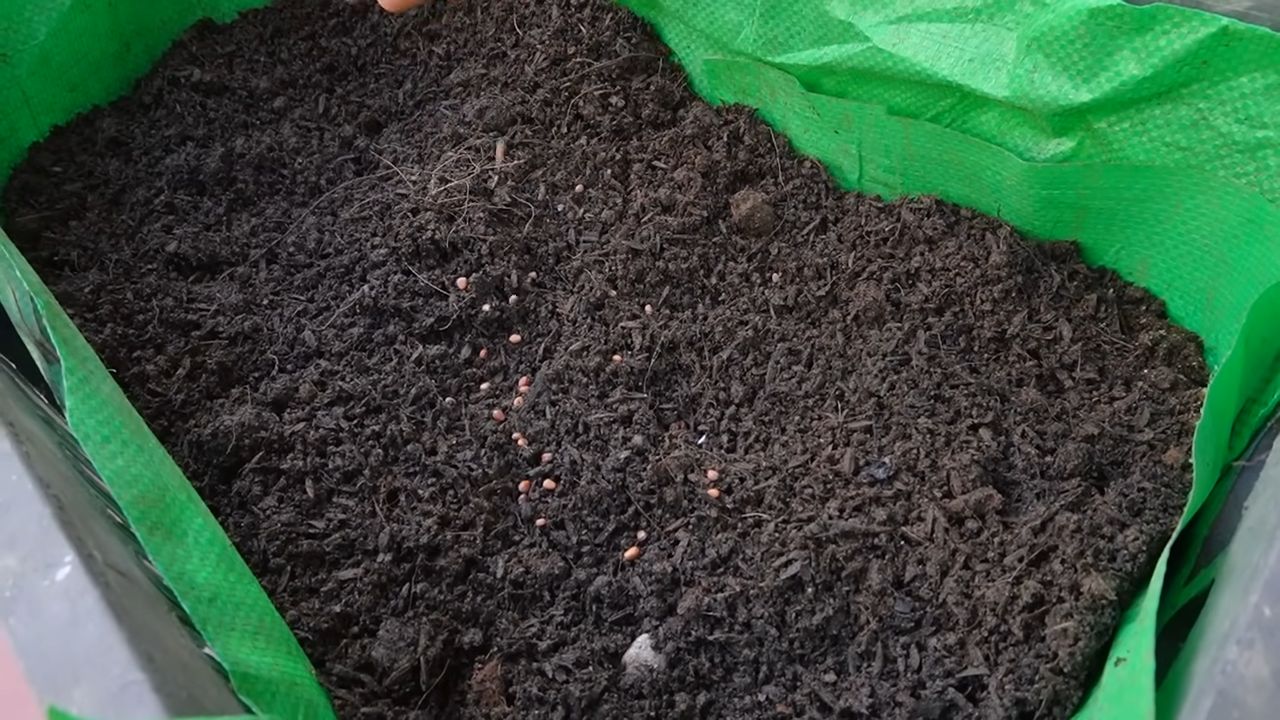
3. **Sow the Seeds:** Radishes need space to develop, so don’t overcrowd them. Sow the seeds about ½ inch deep and 1 inch apart. You can use your finger or a small trowel to make the holes.
4. **Cover the Seeds:** Gently cover the seeds with potting mix.
5. **Water Thoroughly:** Water the soil gently but thoroughly until it’s evenly moist. Avoid overwatering, which can lead to rot.
6. **Provide Light:** Place your containers in a sunny location that receives at least 6 hours of direct sunlight per day. If you don’t have enough natural light, use grow lights. Position the lights a few inches above the seedlings.
Caring for Your Indoor Radishes
Now that your radishes are planted, it’s time to nurture them and watch them grow!
1. **Watering:** Keep the soil consistently moist, but not soggy. Water when the top inch of soil feels dry to the touch. Overwatering can lead to root rot, so be careful. I usually check the soil moisture every day or two.
2. **Thinning:** Once your seedlings emerge (usually within a few days), you’ll need to thin them out. This means removing some of the seedlings to give the remaining ones enough space to grow. Thin the seedlings so that they are about 1 inch apart. Don’t just pull them out; gently snip them off at the soil line to avoid disturbing the roots of the remaining plants.
3. **Fertilizing (Optional):** If you want to give your radishes a boost, you can fertilize them with a balanced liquid fertilizer every two weeks. Follow the instructions on the fertilizer label. I usually dilute the fertilizer to half strength to avoid burning the plants.
4. **Light:** If you’re using grow lights, make sure they’re positioned correctly and that the plants are getting enough light. Radishes need at least 6 hours of light per day.
5. **Temperature:** Radishes prefer cool temperatures, ideally between 60°F and 70°F (15°C and 21°C). Avoid placing them near heat sources, such as radiators or vents.
Harvesting Your Radishes
The best part of growing radishes is, of course, harvesting them! Most radish varieties are ready to harvest in about 3-4 weeks.
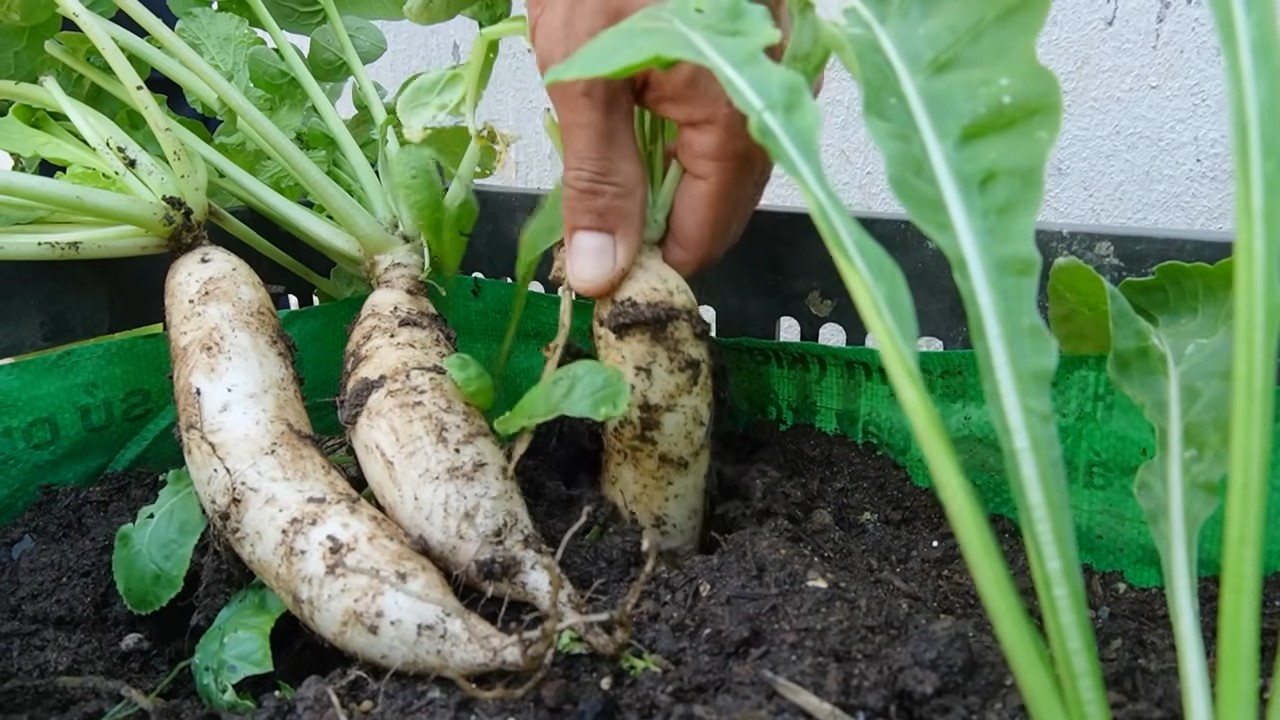
1. **Check for Maturity:** Radishes are ready to harvest when the roots are about 1 inch in diameter. You can gently brush away some of the soil to check the size of the roots.
2. **Harvest Carefully:** To harvest, gently pull the radishes out of the soil. If the soil is dry, you may need to loosen it first with a trowel.
3. **Enjoy Your Harvest:** Wash the radishes thoroughly and enjoy them fresh in salads, sandwiches, or as a crunchy snack. You can also roast them or pickle them.
Troubleshooting Common Problems
Even with the best care, you might encounter a few problems along the way. Here are some common issues and how to address them:
* **Leggy Seedlings:** This means your seedlings are stretching towards the light and becoming weak and spindly. This is usually caused by insufficient light. Make sure your plants are getting enough sunlight or grow light.
* **Root Rot:** This is caused by overwatering and poor drainage. Make sure your containers have drainage holes and that you’re not overwatering.
* **Pests:** Radishes are generally pest-resistant, but you might occasionally encounter aphids or flea beetles. You can control these pests with insecticidal soap or neem oil.
* **Bitter Taste:** This can be caused by hot weather or inconsistent watering. Keep the soil consistently moist and provide shade during the hottest part of the day.
Extending Your Harvest
Want to keep the radish party going? Here’s how to extend your harvest:
* **Succession Planting:** Plant a new batch of seeds every week or two to ensure a continuous supply of radishes.
* **Choose Different Varieties:** Experiment with different radish varieties to find the ones that grow best in your indoor environment.
* **Proper Storage:** Store your harvested radishes in the refrigerator in a plastic bag or container. They should last for about a week.
Why Grow Radishes Indoors?
Okay, so why bother growing radishes indoors when you could just buy them at the store? Here are a few reasons why I think it’s worth it:
* **Freshness:** Nothing beats the taste of a freshly harvested radish. The flavor is so much more vibrant and peppery than store-bought radishes.
* **Convenience:** Having a constant supply of radishes right at your fingertips is incredibly convenient. You can add them to salads, sandwiches, or snacks whenever you want.
* **Control:** When you grow your own radishes, you have complete control over the growing process. You can choose organic seeds and avoid using harmful pesticides or herbicides.
* **Fun:** Gardening is a fun and rewarding hobby. It’s a great way to connect with nature and learn about the food you eat.
* **Year-Round Harvest:** You can enjoy fresh radishes year-round, regardless of the weather outside.
So, there you have it! Everything you need to know to grow your own radishes indoors. It’s a simple, rewarding, and delicious project that anyone can do. Happy gardening!
Conclusion
So, there you have it! Mastering the art of indoor radish growing is not only achievable but also incredibly rewarding. Forget those bland, store-bought radishes that lack the vibrant flavor and satisfying crunch of freshly harvested ones. By embracing this simple DIY trick, you’re unlocking a world of culinary possibilities right in your own home, regardless of the season or your outdoor space limitations.
Why is this a must-try? Because it puts you in control. You dictate the growing conditions, ensuring your radishes are free from harmful pesticides and bursting with the peppery goodness you crave. Imagine adding a handful of these homegrown gems to your salads, tacos, or even enjoying them as a quick and healthy snack. The possibilities are endless!
But don’t stop there! Feel free to experiment with different radish varieties. From the classic Cherry Belle to the spicy French Breakfast or the vibrant Watermelon radish, each offers a unique flavor profile to explore. You can also adjust the growing medium to see how it affects the taste and texture. Try adding a bit of compost for extra nutrients or using a soilless mix for a cleaner growing experience.
Consider the lighting too. While a sunny windowsill works wonders, supplementing with a grow light can significantly boost your radish production, especially during the darker winter months. Play around with the duration and intensity of the light to find the sweet spot for your chosen variety.
And remember, success in indoor radish growing is all about consistency. Keep the soil consistently moist, but not waterlogged, and provide adequate ventilation to prevent fungal diseases. A little attention goes a long way in ensuring a bountiful harvest.
We’re confident that once you try this DIY trick, you’ll be hooked. The satisfaction of harvesting your own fresh, flavorful radishes is simply unmatched. So, grab your seeds, prepare your containers, and get ready to embark on a delightful journey of indoor gardening.
We encourage you to share your experiences with us! Let us know which radish varieties you’ve tried, what growing techniques you’ve found most effective, and any delicious recipes you’ve created using your homegrown bounty. Your insights will not only inspire others but also help us refine and improve this guide for future radish enthusiasts. Happy growing!
Frequently Asked Questions (FAQ)
What are the best radish varieties to grow indoors?
While many radish varieties can be grown indoors, some tend to perform better than others. Shorter, round varieties like Cherry Belle, French Breakfast, and Easter Egg radishes are generally recommended due to their quick maturity and compact size. These varieties don’t require as much space or light as larger, longer varieties, making them ideal for indoor containers. However, don’t be afraid to experiment with other varieties to see what works best for you! Consider the available space and lighting when making your selection. Remember that the key to successful indoor radish growing is choosing varieties that are well-suited to container gardening.
How much light do radishes need when grown indoors?
Radishes need at least 6 hours of direct sunlight per day to thrive. A south-facing windowsill is often the best location for indoor radish growing. However, if you don’t have access to sufficient natural light, you can supplement with a grow light. Fluorescent or LED grow lights are excellent options. Position the light a few inches above the plants and keep it on for 12-14 hours per day. Monitor your radishes closely and adjust the light as needed. Signs of insufficient light include leggy growth (long, thin stems) and pale leaves.
What type of soil is best for growing radishes indoors?
Radishes prefer well-draining soil that is rich in organic matter. A good potting mix specifically formulated for vegetables is an excellent choice. You can also create your own mix by combining equal parts of potting soil, compost, and perlite or vermiculite. The compost will provide essential nutrients, while the perlite or vermiculite will improve drainage and aeration. Avoid using garden soil, as it can be too heavy and may contain pests or diseases. Proper soil drainage is crucial for preventing root rot, a common problem in indoor radish growing.
How often should I water my indoor radishes?
Radishes need consistent moisture to grow quickly and develop crisp, flavorful roots. Water your radishes regularly, keeping the soil consistently moist but not waterlogged. Check the soil moisture by sticking your finger about an inch into the soil. If it feels dry, it’s time to water. Water deeply, allowing the excess water to drain out of the bottom of the container. Avoid overwatering, as this can lead to root rot. The frequency of watering will depend on factors such as the temperature, humidity, and the type of container you’re using.
How long does it take for radishes to mature when grown indoors?
One of the great things about radishes is their quick maturity. Most varieties will be ready to harvest in just 3-4 weeks from planting. However, the exact time will depend on the variety, growing conditions, and temperature. Keep an eye on your radishes and harvest them when they reach the desired size. Overripe radishes can become woody and bitter. To ensure a continuous harvest, sow a new batch of seeds every week or two. This staggered planting approach will provide you with a steady supply of fresh radishes throughout the growing season.
How do I prevent pests and diseases when growing radishes indoors?
While indoor radish growing is generally less susceptible to pests and diseases than outdoor gardening, it’s still important to take precautions. Start with clean containers and fresh potting mix to minimize the risk of introducing pests or diseases. Inspect your plants regularly for any signs of problems. Common pests that may affect indoor radishes include aphids and spider mites. These can be controlled with insecticidal soap or neem oil. To prevent fungal diseases, ensure good air circulation and avoid overwatering. If you notice any signs of disease, remove the affected plants immediately to prevent the spread.
Can I grow radishes in a hydroponic system indoors?
Yes, radishes can be successfully grown in a hydroponic system indoors. Hydroponics offers several advantages, including faster growth rates and reduced risk of soilborne diseases. There are various hydroponic systems you can use, such as deep water culture (DWC), nutrient film technique (NFT), and ebb and flow systems. When growing radishes hydroponically, it’s important to use a nutrient solution specifically formulated for leafy greens or root vegetables. Monitor the pH and nutrient levels regularly to ensure optimal growth. Hydroponic indoor radish growing can be a rewarding and efficient way to produce fresh, flavorful radishes.

Leave a Comment